Close
0%
0%

Animatronic Hand

Play it in rock, paper, scissors, or have it give you a helping hand!

Similar projects worth following
The hand is controlled by littleBits' new Arduino module and programmed to randomly move into rock, paper, or scissor position when prompted by you.

See it in action here: https://www.youtube.com/watch?v=yTlooSon14I

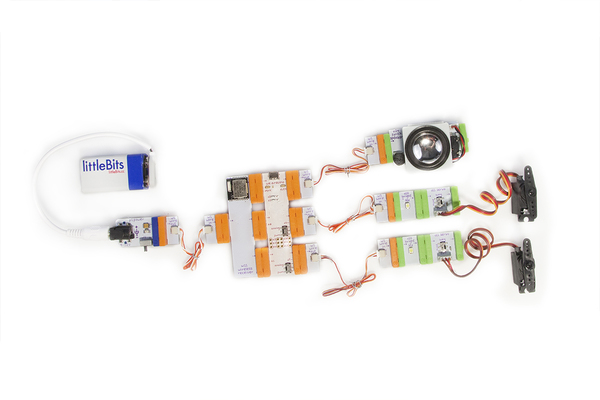
This wireless interaction begins with a press of a button on your own glove. 1,2,3 shoot. Choose your hand position, and the animatronic hand will do the same. The Arduino module will be able to tell who wins and will play either a tune of victory or defeat.

  • 1 × arduinoBit
  • 2 × bend sensorBit
  • 2 × bright ledBit
  • 2 × powerBit
  • 2 × servoBit

View all 21 components

  • 1
    Step 1
    1. Upload the “Rock Paper Scissors” sketch onto your Arduino. The sketch file can downloaded from this page in the "other files" section.
    2. 2.  Create the circuit.
    3. 3.  Build the robotic hand. Laser cut the attached file “robotic hand” out of a ¼” clear acrylic sheet. Then assemble the cutting pieces together.
    4. 4.  Secure two servos onto the acrylic palm with four M3 screws.
    5. 5.  Place the rubber fingers (from the robotic hand you hacked) onto the acrylic hand. Use fishing wire to connect the tops of the rubber fingers with the two servos. Because we are building “rock, paper and scissors”, tie the thumb to both servos. Tie the index finger and the middle finger together to one servo and tie the ring finger and the little finger together to the other servo. This will allow the robotic hand to make all three signs - rock, paper and scissors.
    6. 6.  Use three M3 screws and three M3 low profile nuts to attach a 90 degree Meccano piece onto the acrylic robotic hand. Secure two ¼” screw threads with four ¼” nuts and two ¼” lock spacers onto the Meccano part to build the robotic arm.
    7. 7.  Build the base box. Laser cut the attached file “box” out of a ¼” acrylic sheet. We built our box with black and clear acrylic, but you can use whatever you like. Glue the acrylic pieces with acrylic glue to build the base box. Note: make sure not to glue the top lid to the other parts of the box. We will screw the top lid down onto the box later.
    8. 8.  Place the circuit inside the box. Place the acrylic switch extension on the little black switch on the power module. Then place it at the side of the box, so that the switch extension sticks out through the small hole in the side. Then plug in some juice. You can use a battery, but we suggest plugging a power adapter into the wall. Also, make sure you leave enough space in the center of the box because we will secure the robotic hand there in the next step.
    9. 9.  Lock the robotic hand to the box by inserting the two screw threads through the two holes on both the top and the bottom lids of the acrylic box. Secure them with two lock nuts from the bottom.
    10. 10.  Make the interactive glove. Organize the circuit nicely and use velcro shoes to stick the modules onto the glove.
    11. 11.  Now you are done! Plug in the power, turn on your robotic hand, put on the glove and turn it on. Press the button, and choose your sign at the end of the 3 tones. See if you can beat this robotic Watson hand!

View all instructions

Enjoy this project?

Share

Discussions

Similar Projects

Does this project spark your interest?

Become a member to follow this project and never miss any updates