 Anthony
Data
The first step was to get the solar data from my Growatt 3000MTL inverter online into pvoutput.org, which is a great tool for uploading and comparing PV data. The method for getting the data into pvoutput is beyond the scope of this project (but was accomplished using these excellent instructions by Sander Plug http://energiecommunity.eigenhuis.nl/profiles/blogs/growatt-wifi-module-via-raspberry-pi-automatische-upload-naar and a raspberry pi).
The data stored in pvoutput is the live power (in Watts), and is loaded at 5 minute intervals.
Hardware
I have used a NodeMCU board which takes care of powering and connecting USB to the ESP8266 module and breaks out the pins to allow easy breadboard prototyping. The display is a 24 Neopixel Ring using addressable LEDS (WS2812). The neopixels are being powered through the NodeMCU board's VIN pin (so there are limits on overall LED current draw, but plenty of power for this application). The NodeMCU board is programmed using the Arduino IDE plugin for ESP8266, which works seamlessly.
For now, the parts are loaded into an enclosure made from a mineral water bottle lid, some plastic from a milk bottle and a rubber band...really just to hold it together until I can make a nice 3D printed or laser cut enclosure.
The device is powered by USB.
Software
The code is programmed with the Arduino IDE using the ESP8266 plugin, which was surprisingly straightforward to use. The Wifi connections are handled with the ESP8266Wifi.h library (thanks ESP8266 community!) and the LEDs are driven with the Adafruit_Neopixel.h library (Thanks Adafruit!).
You can get the code here.
Display
The display shows one green pixel per full 200 Watts of output. As my system usually sees up to a maximum of 3kW (3000W) this will use up to 15 pixels. The data is truncated to show only full multiples of 200 Watts. So if I have 2000 Watts I see 10 green pixels. If I have 1999 Watts I see 9 green pixels. If the power is zero, there is a single blue LED to show that the system is powered on. When power is less than 200 Watts, the display shows a single yellow pixel to show there is some power generation, but not enough to light a full pixel. I hope to add some pixels for error reporting later.

 pammyleong
 Victor
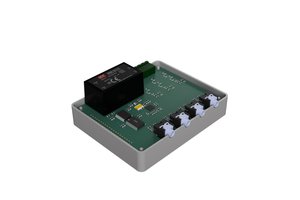
 André
André
 Matthijs