 Max.K
Max.KFor the Zerobot robot there are different instructions and files spread over Hackaday, Github and Thingiverse which may lead to some confusion. This project log is meant as a short guide on how to get started with building the robot.
Where do I start?
- Grab the STL-files from here: https://www.thingiverse.com/thing:2800717 and print them out following the instructions on Thingiverse
- Get the remaining parts:
- Raspberry Pi Zero W
- 2x ICR18650 lithium cell 2600mAh
- Raspberry camera module
- Zero camera adapter cable
- Mini DC dual motor controller
- DC gear motors
- ADS1115 ADC board
- TP4056 USB charger
- MT3608 boost converter
- Raspberry CPU heatsink
- Micro SD card (8GB or more)
- 2x LED
- BC337 transistor (or any other NPN)
- 11.5 x 6mm switch
- 4x M3x10 screws and nuts
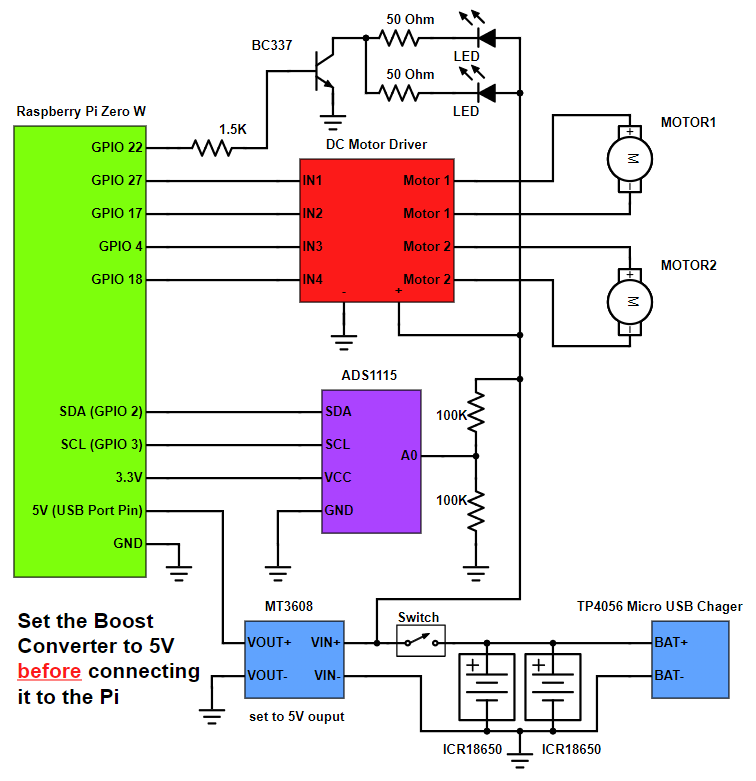
- Wire up the electronics according to this schematic:
![]() In case you are not familiar with this: The schematic is optimized for readability. You don't have to use this exact wiring (e.g. connection LEDs to ADS1115) as long as the electrical connections stay the same. For the wire gauges, use around 22 AWG wire for the signal connections and slightly thicker wire for the batteries and motors.
In case you are not familiar with this: The schematic is optimized for readability. You don't have to use this exact wiring (e.g. connection LEDs to ADS1115) as long as the electrical connections stay the same. For the wire gauges, use around 22 AWG wire for the signal connections and slightly thicker wire for the batteries and motors. - The software comes preinstalled on an SD card image. Download it from here: https://drive.google.com/file/d/163jyooQXnsuQmMcEBInR_YCLP5lNt7ZE/view?usp=sharing, extract the files using 7-Zip and flash it to your 8GB micro SD card. Do not boot the Pi before entering your WiFi router name and password in the wpa_supplicant.conf file on the SD.
- After the SD card is inserted you can assemble the robot as seem on the pictures on the Hackaday project page. Make sure that all wires are properly isolated. Lithium batteries are very dangerous. If there is a short circuit between the batteries, they can catch fire.
- Turn the robot on and wait for the Pi to connect to your WiFi. After that you can connect to it by accessing its IP followed by the port :3000 like this: 192.168.2.11:3000. If you don't know your Raspberry Pi's IP use a WiFi scanner like "Fing" on your smartphone to scan for devices.
- After that you are done! Have fun with your Zerobot! Below are some common questions/problems.
 In case you are not familiar with this: The schematic is optimized for readability. You don't have to use this exact wiring (e.g. connection LEDs to ADS1115) as long as the electrical connections stay the same. For the wire gauges, use around 22 AWG wire for the signal connections and slightly thicker wire for the batteries and motors.
The robot spins/ doesn't drive right
The motors might be reversed. You can simply swap the two wires to fix this.
I can't connect to the Zerobot in my browser
The Raspberry Pi itself with the SD card image running on it is able to display the user interface in your browser. There is no additional hardware needed, so this can't be a hardware problem. Check if you are using the right IP and port and if you inserted the correct WiFi settings in the wpa_supplicant.conf file.
I see the user interface but no camera stream
Check if your camera is connected properly. Does it work on a regular Raspbian install?
Zerobot and Zerobot Pro - What's the difference?
The "pro" version is the second revision of the robot I built in 2017, which includes various hardware and software changes. Regardless of the hardware the "pro" software and SD-images are downwards compatible. I'd recommend building the latest version. New features like the voltage sensor and LEDs are of course optional.
Can I install the software myself?
If you don't want to use the provided SD image you can of course follow this guide to install the required software: https://hackaday.io/project/25092/instructions You should only do this if you are experienced with the Raspberry Pi. The most recent code is available on Github: https://github.com/CoretechR/ZeroBot
Discussions
Become a Hackaday.io Member
Create an account to leave a comment. Already have an account? Log In.
Hi, thanks for making this project! Could you please make a more detailed wire schematic? The schematic above only shows one MT3608, but the project uses two of them.
Are you sure? yes | no
Do you have any pointers on printing the bottom shell. I am print it open side down and with supports. When I go to remove the supports I keep braking some of the battery pillars.
Thx
Are you sure? yes | no
hi, works very well! Just one problem, every now and then contact is lost, and the robot continues moving in the last sent way. What to do to solve this?
Are you sure? yes | no
Hey, any more details on that motor controller?
Source link?
Chipset?
Are you sure? yes | no
OK, you're right that this project is spread out over a lot of other pages and sites.
I did manage to find on one of them that it's basically a standard L298N Dual H-Bridge module and they can be found in the usual places like Amazon, e-bay, etc.
Are you sure? yes | no