 Daren Schwenke
Origin
I wanted to make a simple, low cost 3D printer using the available parts I had leftover from other projects, so the C1 was born. Designed it in my head, and then modeled the parts in OpenSCAD.
All I didn't have on-hand was the rods (driveway markers and a garden stake) which cost me a total of $12.
I started independently on this path, but then a forum post pointed me to the Flying Skydelta. Awww... It's a lot like that, with cheaper hardware.
System overview
An octahedral equal length frame made from low cost fiberglass driveway markers support 3D printed corners. The vertical components of the frame are held firmly in place by the line tension of the system, allowing them to be removed. This facilitates flat packing of the printer for transport.
Each of the top corners house three pulleys sharing a shaft, through which cables are routed from the base mounted spool rod and steppers. The relatively large distance from the pulleys to the spooling shaft results in a single layer of tightly wound cable. This minimizes the error from the cable spooling up to less than 0.012mm allowing it to be ignored.
The outer two cables are wrapped in the same direction and serve to position the print head using tripod kinematics, while the center cable is wound in the opposite direction and is routed to apply tension to a central push-rod. So as the outer cables wind up, the central cable unwinds to maintain tension. The top of the push-rod is free to move, so as the end effector is moved right, the top of the push-rod will pivot and move left maintaining constant down-force throughout the build area. The opposing forces on the spooling shaft also cancel each other out, resulting in the stepper motors only needing to support the weight of the end effector and not provide any actual tension on the lines.
The required cable length is not a constant however. As the end effector is moved up, the required cable length of this system becomes shorter. A compression spring mounted on the push-rod serves to make up this difference and maintain tension in all the lines.
Virtual pulleys
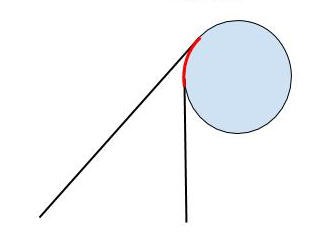
Tripod kinematics without any compensation assumes the end connections are points in space. They are not. Pulleys can introduce significant error into the calculations: An 11mm diameter pulley can introduce up to 5mm of error into the resulting positioning. This happens because as the angle to the pulley increases, the cable will wrap onto the pulley which will change the effective cable length and generate a horizontal and vertical offset.
However...
If you use two pulleys with the cables wrapping in the same direction, this error effectively cancels out. As you wrap up onto one pulley, you unwrap from the other pulley.
Rather than adding the cost and complexity of adding actual pulleys to the end effector, I have instead modeled the curve required to duplicate the effect of having pulleys into the top surface of the end effector, aka virtual pulleys.
There was one more issue with the kinematics as designed in that the upper pulleys do not rotate to face the end effector. This has the effect of foreshortening the cable length when the end effector moves off axis. This can be also be compensated for physically by altering the shape of the virtual pulley.
As the cable moving off axis from the upper pulley is causing a shortening of the effective cable length, an equal and opposite effect can be modeled into the shape of the virtual pulleys. Essentially this compensation will result in some variation on elongating or warping the virtual pulley parallel to the axis of the actual pulley.
I lack the expertise to properly model this system to determine the ideal virtual pulley shape, so I guessed. It's a good guess though and gets me started.

So that means the existing tripod kinematics math can now be used as is with no pulley compensation, as the system is back to behaving as if all connections were points in space.
OpenSCAD source?
OpenSCAD is a 3D modeling system based on describing parametric objects via code.
So parts modeled properly using OpenSCAD allow for easy modification of many parameters of a design in a seamless way. For example, to change the width of the end effector and everything else in the other parts which depends on that, you simply change one number in the OpenSCAD source, save, and render the parts again. Not that I'm an OpenSCAD master here, but I was relatively careful and modifying most parameters in this source should work. If you add something useful to the design, feel free to submit a push request to the github page and it may be included here. Versioned source code for 3D objects is way cool.
Once the design stabilizes I will render out regular STL files and include them in the distribution for ease of use, but for bleeding edge adopters, you can just render it yourself now.
Please ensure you have a relatively recent version of OpenSCAD to render these parts. There are some truly ancient versions sometimes included in many distributions. Version 2015.03 is new enough to have all the functions I used.
License

Hardware design (OpenSCAD source and STL exports) files are licensed under the Creative Commons Attribution-ShareAlike 3.0 Unported License and follow the terms of the OSHW (Open-source hardware) Statement of Principles 1.0.