 David J. Bianco
I've recently started working with the Raspberry Pi, and have been looking for a fun first project. I bought a Sense Hat for it, which is an add-on board that provides a magnetometer, gyroscope, accelerometer, tiny joystick and an 8x8 RGB LED matrix (along with some other sensors I'm not currently using). Since we'd recently experienced The Great North American Solar Eclipse of 2017 and interest in the sky was... um, "high", I came up with the idea of making a little gizmo to help point people where to look for some common objects, mostly planets.
The Sense Hat provides almost everything I needed, namely a magnetometer for determining compass bearing, a gyroscope for reading the device orientation and the hardware for a very basic UI. I added a GPS module to allow it determine both the precise location of the observer and the current time. I did some simple coding in Python, using the pyephem module for the astronomical calculations.
Using the Planet Finder is pretty simple. Upon power on, it first attempts to get a GPS lock. Usually this is pretty fast (a few seconds). Next, you use the joystick to scroll through a simple menu of possible targets. I've preloaded all the planets, the moon & sun (useful for testing) and Pluto. Once you click the joystick button to select your planet, the real fun begins.
Using simple right, left and straight ahead arrows on the display, the planet finder guides you to the correct compass bearing to view your target (astronomers call this the azimuth). Once you're pointing the right way, you'll see a green checkmark on the display, and it will then use similar arrows to guide you to the right elevation (referred to as altitude). If you hold the device level in your hand with your arm outstretched, you should now be pointing right to your target. Easy!
Once it's done guiding you, the display will go dark, but you can wake it up again and start the entire process over for your next target just by clicking the joystick button.
When you're done with your viewing session in the field, don't just yank the power cable out! Give the planet finder a good shake, and that'll trigger a graceful system shutdown. Simply disconnect and reconnect the power to boot up again if you change your mind and decide to do some more planet gazing.

 Philip Weiss
 WJCarpenter
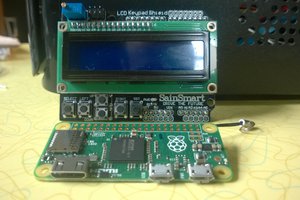
 RodolpheH