-
Casing update and: What license to choose?
12/10/2014 at 22:28 • 0 commentsI have updated the casing to it's final state (until now). Since I haven't found any suitable hinges (easily available), the lid will be attached with fabric tape.
The PCB will get a buzzer, for audible notification, that the exposure is finished and maybe a led row in green/red in the bend-wood part of the casing, to see the state of the machine from a distance.
One problem I have encountered, while publishing the .dxf files, is an appropriate license. I want everyone to use the designs and replicate them for private or educational use, but I'd like to have control over, wether someone earns money with it. All licenses I have found so far are quite restrictive. It's mostly all or nothing. Is there a license, that gives me the possibilites I want?
-
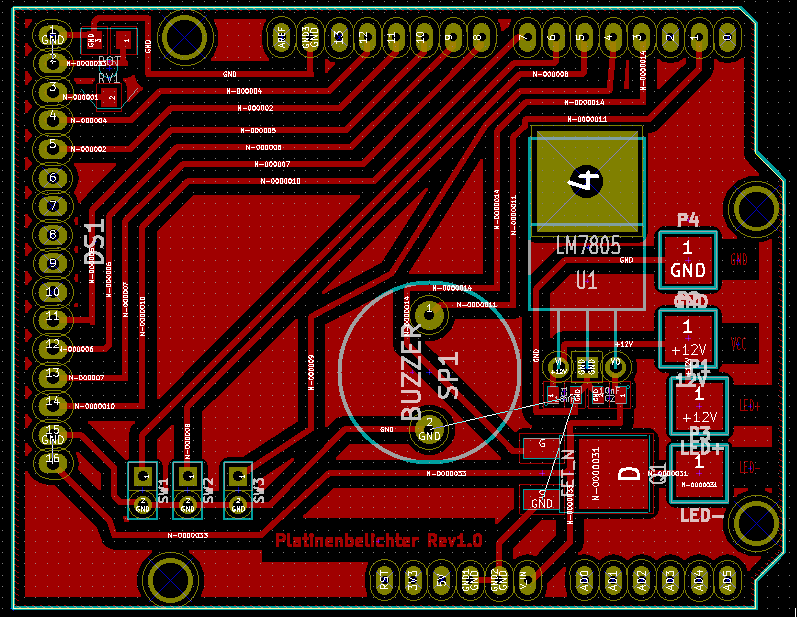
Custom PCB finished
11/27/2014 at 23:37 • 4 comments![]()
This is the Arduino Shield for the UV Exposure Unit. It should be the first PCB you create on the UV Exposure Unit and from there on you can use it to create even more PCBs; )
-
Git, Casing update, custom PCB
11/26/2014 at 17:13 • 0 commentsWhile my initial goal was to create a UV Exposure Unit to produce a custom PCB for a beamer, which I have achieved, it's now time to make the entire unit available for everyone.
I have set up a Git repository for the project. I will upload the .dxf files for the casing and the code, that I've already uploaded here.
Furthermore I'm planning to create a custom PCB for the UV Exposure Unit. While a Arduino is quite nice, a custom PCB saves space inside the box and makes it more compact.
EDIT: DXF-Files uploaded. I'm still searching for a proper license for the project...
-
First exposure:
11/23/2014 at 14:26 • 0 comments![]() The right most exposure time was 13 minutes. It still seems to be underexposed. The letters on the left have sharp edges, so the distance of the leds to the board seems to be sufficient. I'm currently using H2O2 + HCl for etching.
The right most exposure time was 13 minutes. It still seems to be underexposed. The letters on the left have sharp edges, so the distance of the leds to the board seems to be sufficient. I'm currently using H2O2 + HCl for etching. -
The Box is working - time to finish it!
11/21/2014 at 14:45 • 0 comments![]()
The Exposure Unit is working as intended! New Case and a clean PCB for the electronics and it's finished. Once everything is finished, I will release all files.
-
Programming finished!
11/20/2014 at 23:13 • 0 comments/* Platinenbelichter V0.1 (UV Exposure Unit) Acts as a timer for PCB exposure. The leds are controlled by a FET. Furthermore a 16x2 Character LCD and three push buttons are connected. The circuit: * LCD RS pin to digital pin 12 * LCD Enable pin to digital pin 11 * LCD DO4 pin to digital pin 5 * LCD DO5 pin to digital pin 4 * LCD DO6 pin to digital pin 3 * LCD DO7 pin to digital pin 2 * LCD R/W pin to ground *Push button to digital pin8 / 9 / 10 Copyright: Alexander Kroth 2014 */ //include LCD library #include <LiquidCrystal.h> //include Debounce library #include <Bounce2.h> //LCD initilization LiquidCrystal lcd(12, 11, 5, 4, 3, 2); //Button pin definition const int MinButtonP = 8; const int SecButtonP = 9; const int StartButtonP = 10; //FET pin definition const int FetP = 13; //Timer variable unsigned long current_time; unsigned long termination_time; int Min_Set = 0; int Sec_Set = 0; int Min_Cur = 0; int Sec_Cur = 0; boolean running; //Initialize button objects Bounce MinButton = Bounce(); Bounce SecButton = Bounce(); Bounce StartButton = Bounce(); void setup() { //Pin Setup pinMode(MinButtonP, INPUT); digitalWrite(MinButtonP, HIGH); pinMode(SecButtonP, INPUT); digitalWrite(SecButtonP, HIGH); pinMode(StartButtonP, INPUT); digitalWrite(StartButtonP, HIGH); pinMode(FetP, OUTPUT); //Button debouncing using Bounce 2 from thomasfredericks MinButton.attach(MinButtonP); MinButton.interval(100); SecButton.attach(SecButtonP); SecButton.interval(100); StartButton.attach(StartButtonP); StartButton.interval(100); //Row and columns setup of LCD lcd.begin(16,2); //Startup Screen lcd.print("Platinen-"); lcd.setCursor(0,1); lcd.print("Belichter"); lcd.setCursor(0,0); delay(2000); //Prepare Display lcd.print("Dauer "); lcd.setCursor(0,1); lcd.print("Min. 00 Sec. 00 "); } void loop() { //Button Updates MinButton.update(); SecButton.update(); StartButton.update(); running = false; //Info Screen if(MinButton.read() == false && SecButton.read() == false && StartButton.read() == false) { lcd.setCursor(0,0); lcd.print("Hackaday.io "); lcd.setCursor(0,1); lcd.print("Alexander Kroth "); delay(2000); lcd.setCursor(0,0); lcd.print("Dauer "); lcd.setCursor(0,1); lcd.print("Min. 00 Sec. 00 "); Min_Set--; Sec_Set--; running = true; if(Min_Set < 10) { lcd.setCursor(6,1); lcd.print(Min_Set); } else { lcd.setCursor(5,1); lcd.print(Min_Set); } if(Sec_Set < 10) { lcd.setCursor(14,1); lcd.print(Sec_Set); } else { lcd.setCursor(13,1); lcd.print(Sec_Set); } } //Reset time if(MinButton.read() == false && SecButton.read() == false) { Min_Set = -1; Sec_Set = -1; lcd.setCursor(0,1); lcd.print("Min. 00 Sec. 00 "); } //Increment minutes //Check wether exposure is running and rising edge was detected if(MinButton.rose() == true) { //Increase minutes to expose Min_Set++; //Maximum of 99 minutes, seriously, no one needs more? if(Min_Set > 99) { Min_Set = 99; } //Move cursor to position the numbers if(Min_Set < 10) { lcd.setCursor(6,1); lcd.print(Min_Set); } else { lcd.setCursor(5,1); lcd.print(Min_Set); } } //Increment seconds //Check wether exposure is running and rising edge was detected if(SecButton.rose() == true) { Sec_Set++; //Seconds overflow and Cursor correction if(Sec_Set > 59) { Sec_Set = 0; lcd.setCursor(13,1); lcd.print("00"); } //Move cursor to position the numbers if(Sec_Set < 10) { lcd.setCursor(14,1); lcd.print(Sec_Set); } else { lcd.setCursor(13,1); lcd.print(Sec_Set); } } //Start exposure if(running == false && StartButton.rose() == true) { //Calculate end time of exposure termination_time = millis()/1000 + Min_Set * 60 + Sec_Set; //Inform user of exposure lcd.setCursor(0,0); lcd.print("Belichtung "); lcd.setCursor(0,1); lcd.print("00:00 / 00:00 "); if(Min_Set < 10) { lcd.setCursor(9,1); lcd.print(Min_Set); } else { lcd.setCursor(8,1); lcd.print(Min_Set); } if(Sec_Set < 10) { lcd.setCursor(12,1); lcd.print(Sec_Set); } else { lcd.setCursor(11,1); lcd.print(Sec_Set); } //Switch the leds on digitalWrite(FetP, HIGH); //Wait for PCB to be exposed while( millis()/1000 < termination_time) { //Still read the StartButton to get free StartButton.update(); //Abort exposure if(StartButton.rose() == true) { break; } //Calculate time to display Min_Cur = int(long(termination_time-(millis()/1000))/60); Sec_Cur = long(termination_time-millis()/1000) - (int(long(termination_time-(millis()/1000))/60)*60); //Update display if(Min_Cur < 10) { lcd.setCursor(0,1); lcd.print(0); lcd.setCursor(1,1); lcd.print(Min_Cur); } else { lcd.setCursor(0,1); lcd.print(Min_Cur); } if(Sec_Cur < 10) { lcd.setCursor(3,1); lcd.print(0); lcd.setCursor(4,1); lcd.print(Sec_Cur); } else { lcd.setCursor(3,1); lcd.print(Sec_Cur); } } digitalWrite(FetP, LOW); //Restore former display lcd.setCursor(0,0); lcd.print("Dauer "); lcd.setCursor(0,1); lcd.print("Min. 00 Sec. 00 "); if(Min_Set < 10) { lcd.setCursor(6,1); lcd.print(Min_Set); } else { lcd.setCursor(5,1); lcd.print(Min_Set); } if(Sec_Set < 10) { lcd.setCursor(14,1); lcd.print(Sec_Set); } else { lcd.setCursor(13,1); lcd.print(Sec_Set); } } }Lacking a Github Account I have to post the entire code here.
The 16x2 LCD is controlled by the standard LCD library, that comes with the Arduino IDE. The button debouncing is taken care by Bounce2 by Thomas Fredericks.
There's one button to increase the minutes and one to increase the seconds. If both are pushed at the same time, the time is reset to zero. The third button is there to start and stop the exposure. Once the button is pushed, the Led-Stripe is switched on and the display starts to count down.
If all three buttons are pushed at the same time, my name and Hackaday.io is displayed.
The electronics are working as intended, but the casing needs a redesign....
Any suggestions regarding the code?
UV Exposure Unit
UV Exposure Unit reproducable in every Hackerspace with a Laser-Cutter.
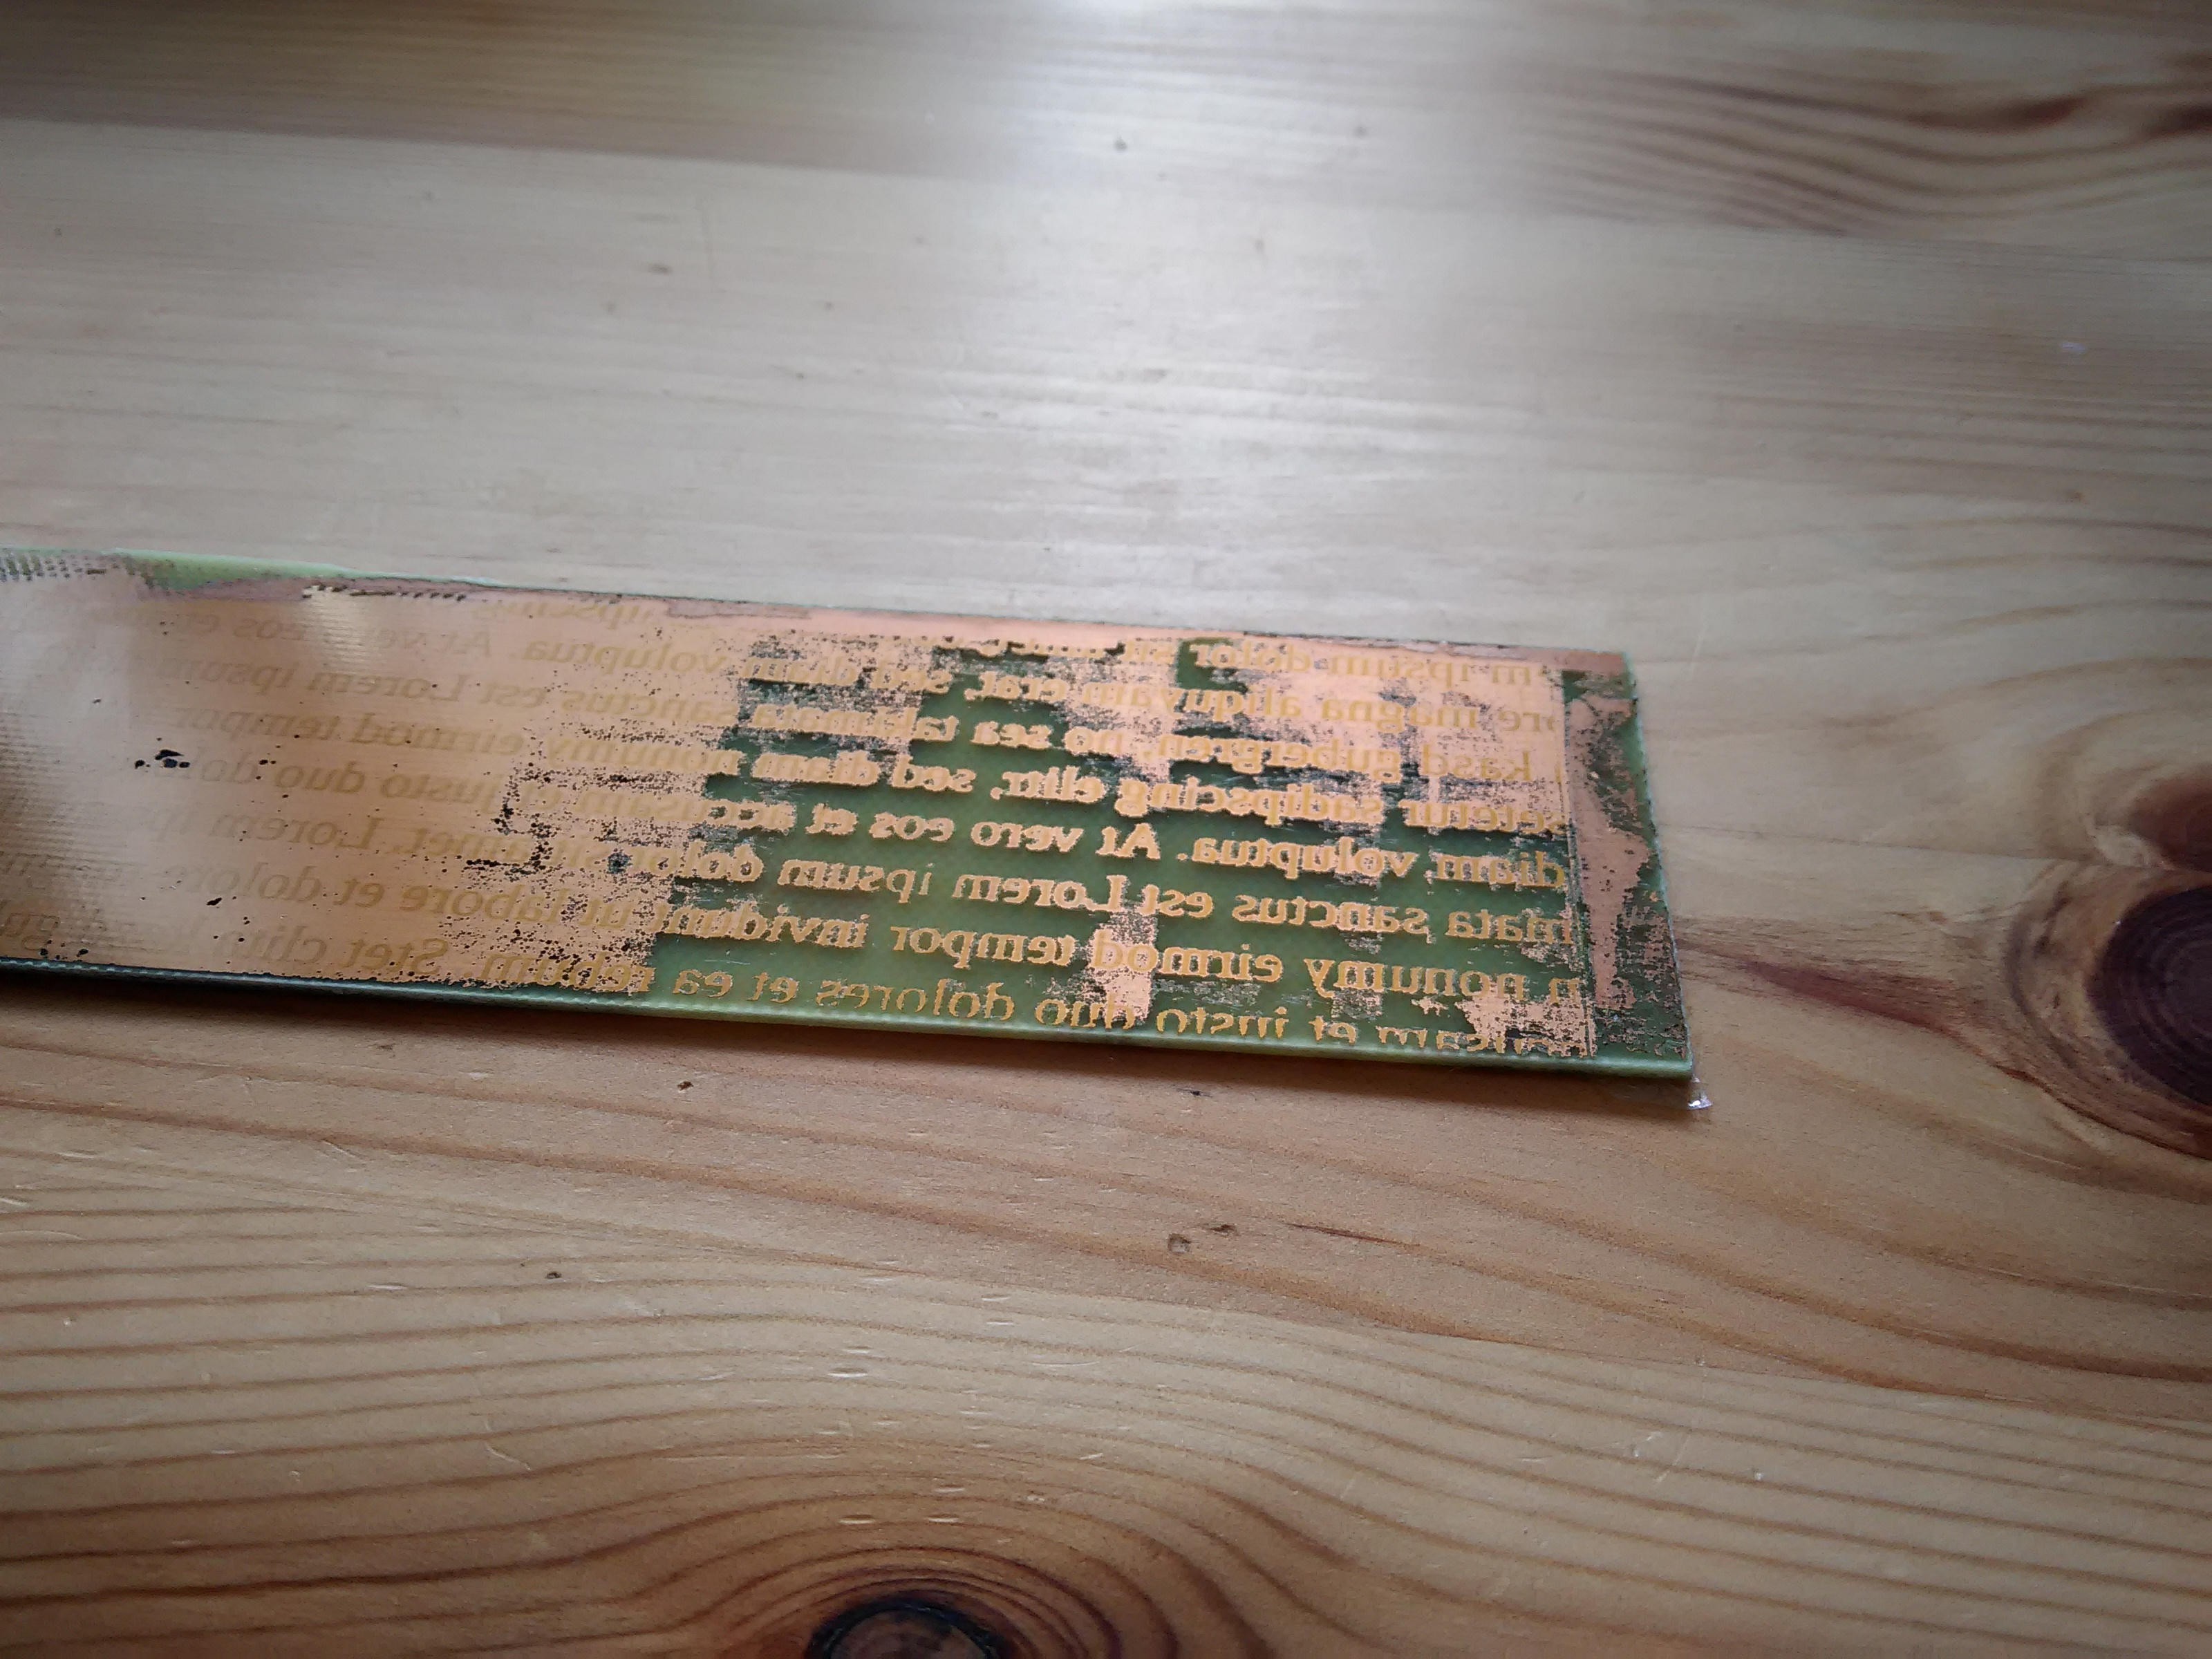 The right most exposure time was 13 minutes. It still seems to be underexposed. The letters on the left have sharp edges, so the distance of the leds to the board seems to be sufficient. I'm currently using H2O2 + HCl for etching.