Close
0%
0%

T962A Controller Drop-In (using *PIC32MZ*)

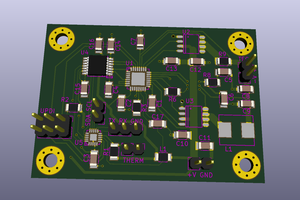
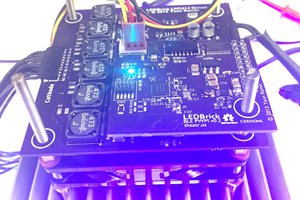
This is a drop-in replacement controller board for the T962A reflow oven, using the PIC32MZEFH as the CPU.

Similar projects worth following
PIC32MZEF CPU @200Mhz

8KB eeprom (256x32), from (256x8)

4 Max31855 on-board TC Sensors (K-type), upgradable to 8 with expansion board

on-board DS18B20 1-wire Digital Thermometer, for CPU fan control

PWM control of CPU fan (6Khz PWm)

120VAC Phase-cut control of COOLING FAN for true speed control
(via 8-bit DAC and FL5160 AC Phase controller)

PWM control of heater/SSR (10Hz PWM)

USB & RS232 on-board interfaces (RS232 3.3v/5v selectable)

5v & 3.3v switching power supplies

Unused PIC32 I/O pins brought out to header

Expansion Headers for future use

** board is fully grounded and can be screwed/grounded directly to oven case **

** AC is fused on board for short protection, etc **

** USB & RS232 Not yet coded up in software **

*** software port from Werner Johansson's exceptional work on the original T962A improvement software.  I cannot overstate how much credit goes to WJ for his oustanding work on making this software.  I would not have even attempted this project without his work, and all of the contributors, RE work, etc everyone has done in making this oven usable.

***

This port contains simplications of the Temperature sensor code, unused things have been removed, etc, etc, and also due to the more straightforward hardware of the PIC32, many of the hardware interface functions have been changed (ie SPI-2-I2C bridge code, etc all removed).

But overall, the functionality is the same, with all of oddities of the original chinese board removed, like the TC 'gain' and 'offset' params, which are no longer needed.  The MAX31855s contain their own internal Cold-Junction compensation, therefore, no CJ calculations need to be done to the TC readings from the 31855s.

There are spots for '4' MAX31855 sensors on the PCB, a minimum of 1 can actually be used, but the oven has 2 installed, so makes sense to at least install 2.   The other 2 on-board sensors are labelled as 'PCB#1' & 'PCB#2' sensors, works well to use these as 2 add-on K-type TC's for measuring temp real close or on the surface of the target PCB itself.

Also, the on-board DS18B20 sensor is now ONLY being used to drive if/when the small 'CPU FAN' comes on, and the speed (PWM), etc.

The COOLING FAN setup uses an 8-bit DAC feeding the FL5160 phase-cut controller, providing true AC voltage/speed control using mosfet switching.  This allows the speed of the AC fan to be controlled just like a real AC dimmer, controlling how much AC voltage is 'turned on' for each AC wave cycle.  The only issue with the AC fan in this setup is that they don't even spin when the AC voltage goes too low, so running the coolfan at speeds under around 40 or so on the speed setting will produce almost no fan rotation, or none.  

** This COOL FAN setup works very well for running the oven in a 'convection-like' setup, where you keep    the COOL FAN running continuously during baking
**

** NOTE:  The stock metal fan this oven comes with is quite heavy and slow to react, I replaced this clunky    fan with a very cheap 120VAC 80mm fan from amazon.com, which works so much better and runs better at       lower voltages.
**

The old setup using the TRIAC was using 'proportional AC voltage' control, which is very ineffective at controlling speed of an AC fan.

******** <><><><> RECOMMENDED OVEN CHANGES <><><><><> ******************

1) Fix the earth grounding issues with chassis paint covering where the earth ground is screwed to the    chassis.  

2) Replace the bulky/metal 80mm cooling fan with a lighter/plastic fan (that has better response over AC    voltage range)...

   example:  https://www.amazon.com/gp/product/B004YTSB7C/ref=oh_aui_search_detailpage?ie=UTF8&psc=1

************************************************************************

***** FYI:  *****

You do NOT need to install the felt 'insulating washers' that the OEM board was using, this board was designed to be properly GROUNDED to the oven chassis.  

 It is also HIGHLY recommended to properly fix the grounding issues that others have shown in various cleanup/etc videos/online posts, where the GND wire on this oven is connected to a screw/washer that doesn't touch bare metal, but instead painted metal.

**************

*** FYI ***

This board is only $20 or so to make from JLCPCB, I highly suggest ordering from there or somewhere similar.. 

(I only have the link to oshpark because you can share projects from there, but I do NOT recommend using them, as this board is $100 from them)

T962A_Controller.production.hex

latest production build (flash right to board)

hex - 161.03 kB - 08/02/2019 at 19:07

Download

T962A_Controller_PCB.png

Portable Network Graphics (PNG) - 434.40 kB - 04/05/2018 at 20:21

Preview

T962A_Controller_schematic.png

Portable Network Graphics (PNG) - 999.94 kB - 02/07/2018 at 23:37

Preview

T962A_Controller_BOM.xlsx

sheet - 111.66 kB - 02/07/2018 at 23:37

Download

  • 08/02/2019

    PhillyFlyers08/02/2019 at 19:09 0 comments

    Thanks to Keith's comment, never realized you were stuck only being able to edit 'custom profile #1' as there was only ONE custom profile on the original UE firmware update, since the stock board had limited eeprom space.


    Fixed the simple bug, now you can edit all 10 custom profiles, and they save, etc.

View project log

Enjoy this project?

Share

Discussions

dffish wrote 11/21/2019 at 22:49 point

I now have a fully functional reflow oven. Excellent work guys! Thanks!

  Are you sure? yes | no

dffish wrote 11/21/2019 at 19:42 point

Figured it out. 

Turns out I misread the silk screen. A 10uF cap really isn't a good replacement for a 10uH inductor....It programmed just fine. 

Thanks!

  Are you sure? yes | no

dffish wrote 11/21/2019 at 19:16 point

This is weird. I'm putting in 3.3V from my bench supply. And on the Caps I see 3.3 on one side and 1.25v on the other...It looks like it's being pulled down by the pic, but it's only pulling a couple mA. 

  Are you sure? yes | no

dffish wrote 11/19/2019 at 19:20 point

Thanks for the reply. My voltage at the processor was 1.25v...it appears I've soldered in my oscillator backwards....I've ordered a couple more. 

  Are you sure? yes | no

dffish wrote 11/18/2019 at 21:15 point

Yet another question!

Did you get your boards from OSH?

  Are you sure? yes | no

PhillyFlyers wrote 11/19/2019 at 12:04 point

Yep, for this project I was ordering my boards from OSH, as I wasn't aware of JLCPCB at that time.  For the newer version of this project (color TFT with STM32), I now get my boards from jlc as they are so much cheaper...

and the quality is great, no issues switching from osh to jlc..

  Are you sure? yes | no

dffish wrote 11/18/2019 at 20:08 point

I've been looking at the signals on the scope...they don't quite look up to voltage...did you put any pullups on yours? Or did it just work?

  Are you sure? yes | no

PhillyFlyers wrote 11/19/2019 at 12:06 point

no, did not need any modifications, something just doesn't seem right here.  The pic32 should be able to program with nothing but 3.3v supply and the pickit connections, it doesn't even need an external clock working.

Maybe take your board out of the oven and power it instead from any DC or AC wall adapter, something in the 6-20v range... the chips on the power supply can handle that wide range of input voltage..


just wire up a temp connection on that header, and power it that way... see if you can then program it..

  Are you sure? yes | no

dffish wrote 11/18/2019 at 18:27 point

Still failing to get device ID. I've used a pickit 3 and a pickit 4. Same thing. I ohmed out the connections and everything is connected. Solder is good. Did you make any changes to the MCLR pullup?

  Are you sure? yes | no

dffish wrote 11/18/2019 at 17:54 point

Thanks Keith! I already built the board, but it's having trouble detecting the device. I assume I only need the 3.3v supply?

  Are you sure? yes | no

KeithF-git wrote 11/18/2019 at 14:44 point

dffish: Yes I used a PicKit3 to program the 32F device in ICSP mode. To program you need to connect up CLK - DAT MCLR Vss etc. You may need to use an external source to power the PCB (and CPU) as the Pkit3 source is insufficient to power the device on it's own.

You need to use MPLAB X and version 3.55 worked just fine. You will have to tell your PicKit to Revert to MPLAB Mode which should be at the bottom of the Tools Tab thus giving MPLAB X control of your PicKit programmer. 

Let me know if you you are struggling or stumped and I'll try my best to help you out. A reply here is better than PM's  as it gives others the opportunity to chip in and make this project more awesome than it already is.   - Good Luck.

p.s. have you acquired a PCB ? I have some leftovers going at cost.

  Are you sure? yes | no

dffish wrote 11/15/2019 at 23:20 point

Yeah, me again. I've been digging thru the data sheets and found this:

The following steps are required to enter 2-wireEnhanced ICSP mode:1.The MCLR pin is briefly driven high, then low.2.A 32-bit key sequence is clocked into PGEDx.3.The MCLR pin is then driven high within aspecified period of time and held

Is this necessary to program? Anything I should know about the pickit setup?

HELP!

  Are you sure? yes | no

PhillyFlyers wrote 11/16/2019 at 14:52 point

Hi, I actually haven't used the pickit, I have the ICD3 debugger, I only bought that because I needed fully debugging capability when doing this project from the start.


You may want to ping the other member on this project, 'keith-git', he just build this board as well recently, I think he was just using a pickit.

You shouldn't have to worry at all about any sequences . etc. as far as how the pickit works, that should all be internal to whatever software you are using to program the chip?

It's a straight connection between the PIC32 on the board and that ICSP header, MCLR is pulled up weakly to 3.3v via that 10k resistor as the datasheet calls for.


Are you using MPLAB-X to program the device?

Did you double check your soldering on the PIC32 pins, they are quite small profile pins, easy to have solder bridges or unsolderd connections that may appear to be soldered..

you may just want to buzz out all those pins on the ICSP header and make sure they are good.. only 3 go to the chip, the others are 3.3v and GND..

  Are you sure? yes | no

PhillyFlyers wrote 11/16/2019 at 14:54 point

I remember having something like this happen when I had some legs on the chip that didn't solder correctly... did you hand solder the chip, or use an oven with solder paste?  or have it done at a factory?

  Are you sure? yes | no

dffish wrote 11/15/2019 at 22:55 point

Correction...it's there. 

  Are you sure? yes | no

dffish wrote 11/15/2019 at 22:42 point

However, I've traced the 3.3V and it's not getting from the LED to the rest of the board...

  Are you sure? yes | no

dffish wrote 11/15/2019 at 21:48 point

Also, my 3.3v and 5v leds are coming on, but not the Power LED. The pickit says it sees the voltage. Should that lED be on, or only after programming?

  Are you sure? yes | no

dffish wrote 11/15/2019 at 21:37 point

Crud. I'm getting failure to read device ID. Voltage on the board is right and I'm using a pickit 4. Any ideas?

  Are you sure? yes | no

dffish wrote 11/04/2019 at 22:57 point

Building my board...ran into a capacitor in the buzzer circuit...it's labeled ??uF. 

Did you settle on a value?

  Are you sure? yes | no

PhillyFlyers wrote 11/05/2019 at 12:25 point

Hi, you don't need it... so don't populate

( was leftover from the original circuit that I never removed... just left it in there...)

  Are you sure? yes | no

dffish wrote 10/29/2019 at 23:23 point

Boards are in Fab, parts on the way. I'll be back with questions I'm sure! Thanks for the design, looks really good.

  Are you sure? yes | no

KeithF-git wrote 08/08/2019 at 15:42 point

Well Mike, everything is dialled in and set up and working great. I really like the way the two PCB level thermo-couples sum up with two built in ones giving an absolute and accurate oven  temperature. Really clever stuff - Well done.

I settled for a min fan speed setting of 3 which seemed to quell the fan growl on low speed.    

once again Thank you and our Swedish friend for such a splendid upgrade, I'm delighted with the outcome. And here was me thinking the Swede's were only good for stinky tinned fish, ABBA and Volvo Cars ( joke ) - how wrong am I. 

  Are you sure? yes | no

KeithF-git wrote 08/04/2019 at 16:28 point

Just finished and tested your new OS - Works an absolute treat ... Don'know if I'll ever fill all 10 Custom Profiles, but I'll sure as Hell use 3 just for Pb Paste re-flows and possibly another 2 for non-Pb alloys/

Need to put it all back together again and have a fiddle about with this min fan level setting to see how low I can get the fan  to run without growling.

Thank you so much for your help and efforts, it really is appreciated. Just need to wait patiently for another firmware upgrade to activate the USB Port and allow me to log the time/temperature data on a chart. 

I purchased one of these EST upgrade kits a while back but i didn't like the idea of hacking the TRIAC board in half. Never liked the idea of having TRIAC's control a couple of heaters and a fan and a non graphic display. It does have a USB Output and a log file. though.

  Are you sure? yes | no

KeithF-git wrote 08/03/2019 at 21:15 point

Hello again Mike, to be honest I played around with the minimum fan speed setting in the beginning but couldn't draw anything conclusive besides at the time it kept munching its way through FETS for breakfast, lunch and Dinner. ( i had loosed off the Earth Bond to the upper case without realising what the consequences would be)  Now that I have a little more information on the fan speed I'll do a little more digging and see what effect there is.

I'm not too sure as to where you say, 'Run the Fan at 60, 70, or 80 I'm making an assumption that this is a decimal graduated value as I'm almost sure my Minimum Speed setting is graduated at 0 to 10, and in the beginning not being too sure of what was happening, I set it at 5 and haven't gone back to that as yet.

I'll have a poke around with it after I have ported your new code onto the micro and get back to you.

  Are you sure? yes | no

KeithF-git wrote 08/03/2019 at 08:16 point

You write: what's your min speed where it actually spins and doesn't grind?

 It is difficult to accurately say, I'll see if I can put the Tacho on it when the next Fan arrives from CN. This really is a cheap one (6 USD) so with a bit of luck it will be a lightweight plastic one which will run at low speeds. 

  Are you sure? yes | no

PhillyFlyers wrote 08/03/2019 at 13:48 point

Hi Keith,

You don't need to do anything that complicated, the 'min fan speed' in the settings is all you need to play with.... I think I set the default in the code to '80'.

So this code is setup to always run the fan in a 'convection' like setup, *IF* you set that 'min fan speed' to anything above '0'.

So when you are running a profile, the 'min fan speed' is always checked against the 'called for' fan speed, ie the fan speed that the software determined it needs to run.  If the 'min fan speed' is higher than the 'called for' fan speed, the fan is then set to min fan speed, ie 'convection'.  ie always keep the fan running at the 'min fan speed'.

And of course you can disable the 'convection' by just setting min fan speed to 0, then it only runs the fan when the PID (software feedback stuff) determines it needs to run.

So to test your fan 'grinding'/making noise but not moving, just set your min fan speed to start at like '80', and then just start to run a profile... during the initial ramp up phase when it just needs to heat, there is normally no fan, but with a min fan speed, the convection will be enabled and it will run your fan at whatever your min fan speed is..

So play with that number and see what the lowest is you can go where it actually spins?

For my cheap amazon fan I linked, it's around 60-70, any lower and it's not enough AC voltage to spin.

- Mike

  Are you sure? yes | no

Similar Projects

Does this project spark your interest?

Become a member to follow this project and never miss any updates