 Andy from Workshopshed
The cottage has been extended at the back to house the electronics and below to hide the mechanism. The front window has a new frame to show off the LED temperature indicator.
The mechanism is a double ended Watt's linkage which gives an approximately linear movement for the figures. This is connected by a sprung stainless steel wire to the micro servo. Diametrically polarised magnets ensure that the characters are always pointing in the right direction.
The power control circuit turns on and off the power to the Servo, RGB Shield and DHT22 sensor. The knock knock sensor is left powered so that it can listen for wake up interrupts. The top panel is simple buttons attached to input pins and fibre optics to extend the Arduino's LEDs to the top of the cottage.
When the board wakes up it checks to see if the sleep counter has reached zero or if knock has been detected and if so It starts up. Otherwise it goes back to sleep for another 4seconds.
In start up it firstly powers on the peripherals and WiFi module. It then sets the LED colour to be that of the last known temperature. Following this it sets the LED to fast flash to indicate it's going to get the weather. It then gets the local temperature and humidity. Once the WiFi module has booted it will request the weather.
On the Linino side the system sends a handshake signal to indicate that it is ready and starts up the Python script to listen to the serial port. The Python script makes an API call to the Yahoo weather service, if that errors or times out it will make a "guess" at the weather based on the local conditions provided by the sensor. The data is parsed and send back to the ATmega as a simple string.
Once the weather has been received the system shuts down the WiFi module. It can then update the position and new LED colour which is then solid and starts a timer for 1 minute. Once that timer has expired it will shut down the peripherals and go back to sleep.
Note that the choice of parts was influence by the big box of free bits that Element14 gave me to build with.


 t3chflicks
 jean.perardel
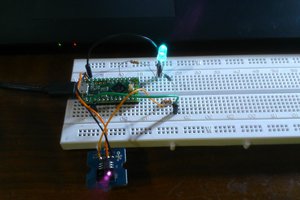
 Clovis Fritzen
 Martin Hub
hey - this is awesome! A great update to a traditional weather instrument!