-
How to Connect Cricut to MacBook: A Complete Guide
04/20/2024 at 10:47 • 0 commentsDo you want to connect your Cricut machine to your MacBook? If yes, then this blog will help you understand the connection between Cricut and Macbook. It’s not only about you; almost everyone who is starting with a Cricut machine finds the setup procedure difficult. Therefore, be with me and learn how to connect Cricut to MacBook here.
Before that, you need to understand that Cricut Design Space is an intuitive Cricut software that you need to set up on your device to connect your Cricut product. To get this software, you need to download and install it on your device. Then, you will be ready to set up your Cricut machine for a MacBook.
What Do You Need to Get Started?
To get started with the Cricut connection to MacBook, you need to keep a few things in mind. Look at the steps below to learn the necessary requirements.
- Your macOS version should be the latest, macOS 11 or later.
- Your device should have USB or Bluetooth connectivity.
- Ensure that your PC has a RAM of 4GB and 2GB free disk space.
- Also, ensure that your screen display is at least 1024 x 768.
- You should have an internet connection.
Now, you are ready to start the Cricut setup on your MacBook. Let’s check the steps.
How to Connect Cricut to MacBook?
As you know, Cricut machines are compatible with Windows and Mac computers; you can set it up easily on any of your devices. Here, you’ll learn how to connect it to a Mac device. Look at the steps below.
Step 1: Connect Cricut to a MacBook via Bluetooth
Your first step should be to connect your Cricut to a MacBook using a suitable method. I’m choosing the Bluetooth connection method, which is the best wireless connection.
- Initially, turn on your Cricut machine and connect it to the power outlet.
- Then, hit the power button to make it ready for pairing.
- After that, ensure that your Cricut and MacBook are 10-15 feet apart from each other.
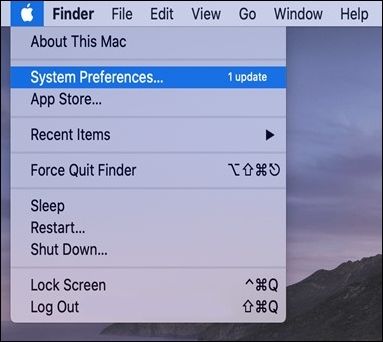
- Now, head to the Apple menu and select the System Preferences option.
![System Preferences]()
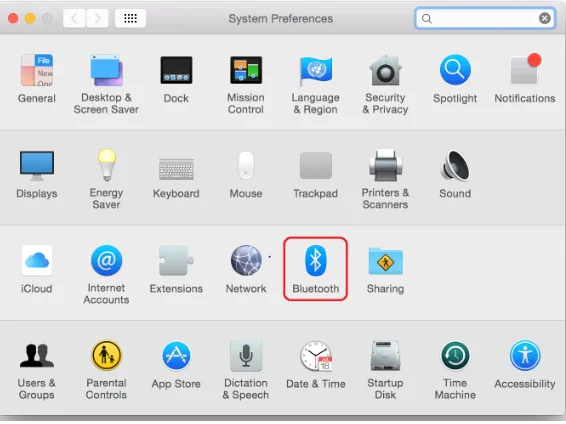
- In the following step, search for the Bluetooth option on that page.
![How to setup my Cricut Maker]()
- When you see the Bluetooth option, turn it on.
- Next, pick your Cricut model from the list of available options.
- Enter “0000” if the screen asks you to enter a PIN.
- In the last step, select the Pair option to start the pairing process.
Finally, your pairing process will be finished. You have learned one step towards how to connect Cricut to MacBook.
Step 2: Download Cricut Design Space
In the second step of connecting Cricut to a MacBook, you need to download and install the Cricut Design app on your device. Look at the steps given below to install the Cricut software.
- To start, navigate to Cricut’s official website on an internet browser.
- Then, search for the Cricut Design Space and hit the Download button when you see it.
![Downloading Cricut Design Space App]()
- Also, agree to the terms and conditions and the privacy policy before going ahead.
- After that, let the download process start, and you may notice slight changes on the screen.
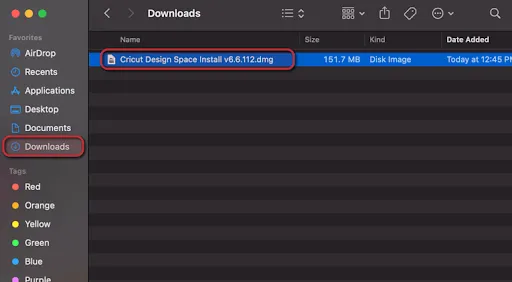
- Let the software download, and once the download is over, search the folder in the Downloads folder.
![Download & Install Cricut Design Space App on Windows & Mac]()
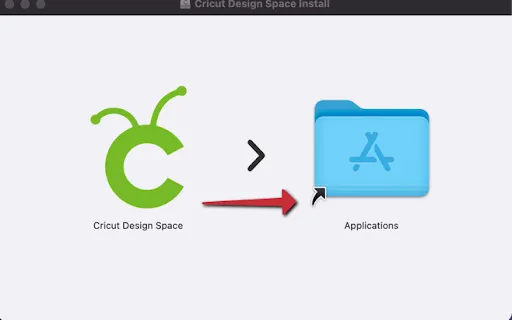
- To start the installation, drag your .dmg file to your Applications folder.
![Download & Install Cricut Design Spaxe]()
- By doing this, you will add your Cricut Design app under the Applications folder with an icon.
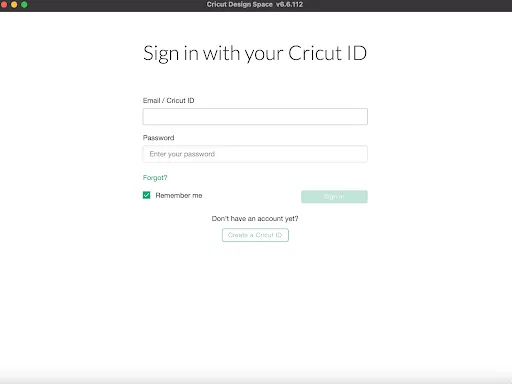
- Now, open your app and sign in to your Cricut account.
![Sign in to Cricut App]()
- Next, if you are a first-time user, create a new Cricut ID.
Finally, you have learned how to install Cricut Design Space and how to connect Cricut to MacBook. Now, you can start project-making with your amazing Cricut machine.
FAQs
How Do I Setup Cricut Machine on My Phone?
To set up a Cricut product on a phone, follow these steps.
- Initially, head to the Play Store/App Store on your...
-
How to Connect Cricut to MacBook: A Step-by-Step Guide
04/06/2024 at 11:05 • 0 commentsGetting started with a brand-new Cricut machine can be overwhelming, especially for beginners. So, I’m here to help you with its connection. Take a deep breath, and let me teach you how to connect Cricut to MacBook. It’s going to be interesting, and after reading this blog, you won’t need anyone’s help to set up a connection between your devices.
As a MacBook user, you may often find yourself in trouble due to different connection and setup methods, but not anymore! In this guide, I will explain the steps, particularly for MacBook users, to help them out with a Cricut connection. Here we go!
What Is a Cricut Design Space?
It’s the key to a Cricut machine’s setup. If you’re an existing user, you might know about it. But, if you don’t, I’ll tell you here. Basically, it is a design software by Cricut. This software has many features that allow you to design anything. For instance, you can use different fonts, designs, templates, etc, to design your project.
To get started with the Cricut Design app, you’ll need to download and install it. I’ll share with you the procedure to get this versatile software on your Mac system. Well, you can get this software on any device, but as this guide emphasizes the Mac system, you can only learn about Mac. After installing this design software, you can connect Cricut to MacBook.
How to Download Cricut Design Space on MacBook?
You know how important it is to download and install the Cricut software on your MacBook system. Check the steps below to learn how to install it on your Mac.
- Navigate to design.cricut.com on an internet browser.
- Now, accept the Cricut Terms and Conditions and Privacy Policy to proceed.
- Then, hit the Download option to get the app.
- After that, select a location to save your Cricut software file.
- Next, let the download process start and end.
- Once the download is complete, head to the Downloads location.
- In the next step, you’ll get an icon for Cricut Design Space.
- Then, drag that icon to the Applications folder to start the installation.
- Next, your Cricut Design Space will be added under the Applications folder.
- Thereafter, move to that folder and launch your application.
- To open the app, you may need to select an option, select the Open option.
- Now, sign in or log in to your Cricut ID and password.
- Finally, you can enjoy your Cricut software and create projects.
That’s it for installing the Cricut account on your MacBook. If you’re a new user, create a new Cricut account and then sign in to your Cricut account.
Connect Cricut to MacBook: 2 Different Methods
Here, all your questions will be answered. I’ll tell you all the steps involved in connecting a Cricut machine to a MacBook.
Method 1: With a USB Cable
If you want a wired connection, you can choose a USB connection. As this connection method is conventional, you can use it to connect your devices when your device doesn’t support a Bluetooth connection. Let’s see the steps below to learn how to connect Cricut to computer with USB.
- In the first step, connect your USB cable to your Mac’s USB port.
- Now, connect another end to the Cricut machine.
- After that, power on both devices by connecting them with a power supply.
- Next, when your devices are ON, you’ll see the lights blinking.
- Finally, you’ll see that your devices are connected to a USB.
That’s it to connect Cricut to MacBook via USB connection. If you don’t want to use a USB connection, go for a wireless connection like Bluetooth.
Method 2: Via a Bluetooth Connection
If you want to go for a wireless connection, you can select the Bluetooth option. Let’s see the steps here to learn how to connect Cricut to MacBook via Bluetooth.
- To start, power on your Cricut machine and then turn on your Mac system.
- Once your Mac is ON...
-
Cricut Explore Air 2 Wireless Setup on a Computer and Mobile
03/21/2024 at 11:13 • 0 commentsHey, are you looking for a guide to setting up your Cricut machine? However, Cricut already has plenty of models in its lineup. So, which Cricut machine am I talking about?Well, this is going to be all about the Cricut Explore Air 2 wireless setup. The setup will be done wirelessly using Bluetooth. Since a Bluetooth connection might be a little tricky for beginners, I will show you how to connect your Cricut Explore Air 2 to Windows or Mac wirelessly via Bluetooth.
I have done it for many Cricut machines, such as Cricut Maker, Explore, and Joy. But today, I am setting up my friend’s machine. She wanted to enter the world of crafting, so she had to do it herself, but for some reason, she could not do so. I took this chance to explain to you all the steps of setting up the machine. Let’s start!
How to Connect Cricut Explore Air 2 via Bluetooth to Computer?
Let’s establish the connection here! Connection is very important for our Cricut Explore Air 2 wireless setup. The wireless connection will be a breeze with the following steps:
Windows
- You should first place the Cricut machine within 10 to 15 feet of your computer.
- Then, you will need to move to the Start menu > Settings (Gear icon).
- After that, you need to go to the Devices option.
- Now, turn on Bluetooth and hit Add Bluetooth or other device.
- Next, select Bluetooth and wait until it shows your Cricut model.
- Also, select the machine from the available list.
- Here, your machine will be paired.
- You can also start setting up your machine.
Mac
- The first step is the same as for the Windows computer.
- Navigate to your Apple menu and select System Preferences.
- Now, you have to find the Bluetooth option.
- Verify whether the Bluetooth is turned on.
- Then, let your Mac find your Cricut machine.
- Select the machine model found by your Mac and begin pairing.
- Finally, you have paired your machine successfully.
iOS
- Again, the first step is the same as that for Mac or Windows.
- Now, go to the Settings and turn on the Bluetooth.
- Now, choose your Cricut model from the list.
- Now, you have paired your Cricut Explore machine with your iOS device (iPhone or iPad).
Android
- Once you have placed your machine at a recommended distance, you need to go to Settings.
- Now, you have to turn your Bluetooth on.
- Then, select your machine model from the available list.
- Here, it is paired now.
Cricut Explore Air 2 Wireless Setup on a Computer
Below, I will share the methods for wirelessly setting up your Cricut machine. The following steps will be helpful for both Mac and Windows users.
- To setup your machine, you have to visit cricut.com/setup on any browser that you use.
- Then, proceed to the next page and click on the check box to download the Cricut Design app.
- However, everything will be shown on the screen; you just have to follow the prompts to set it up.
- Next, you will be required to register your machine using sign-in with your Cricut ID.
- Afterward, choose the machine on the upcoming screen.
- Now, you have to plug your machine into your computer using your power cord.
- You can skip to the next step since you have already connected via Bluetooth.
- Also, your Design Space will be updated; wait and let it update.
- Once it is updated, you have to register your machine by entering the details. You should also try the free Cricut Access Membership trial.
- Finally, you have to follow the prompts to perform a test cut or complete your first project.
Cricut Explore Air 2 Wireless Setup on a Mobile
Many users want to use their mobile phones to operate or setup the Cricut machine. Don’t worry; I’ve got you covered below! Below, I have explained how to setup Cricut Explore Air 2 for mobile devices, suitable for both iOS and Android...
Read more »


 Lutetium