-
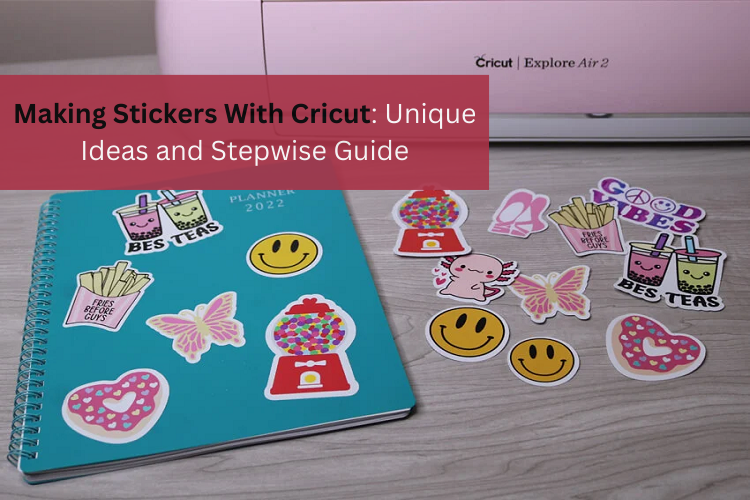
Making Stickers With Cricut: Unique Ideas and Stepwise Guide
02/07/2024 at 10:37 • 0 comments![]()
As the new year arrived, I started planning my resolutions. This led me to buy a planner in which I wanted to plan my days. While planning, I got an idea and decided to give it a creative touch. Since then, I have been looking for customized stickers to add to my planner (which really sounds like a really cool idea). Making stickers with Cricut is easy, as I’ve been crafting for several years. go to official website cricut.com/setup to register.
In this blog, I am going to show you how to make vinyl stickers with Cricut using a Print Then Cut feature. With this tutorial, I will basically cover the steps to guide you through the process. In addition, I will also explain the essential items required to make stickers.
So, visit this blog to learn the steps to create your own stickers using a printer and Cricut cutting machine.
What Will You Need for Making Stickers With Cricut?
The supplies I am going to discuss here are really important if you want to make professional-looking stickers like me. So, gather the following items first, then proceed to learn the steps to create Cricut stickers.
Here’s the list that includes essential items:
- Cricut Machine and Blades
- Cricut Variety Cutting Mats
- A4 Printable Vinyl Sheets
- Printable Clear Sticker Paper
- Printer
- Design Space app
- Printable Sticker Paper
So, you must have these items before learning the steps to create stickers.
How to Make Vinyl Stickers With Cricut Cutting Machine?
Here, I am going to create character-based stickers. Each and every sticker indicates a particular task. Such stickers make it easier for me to figure out which task I am going to perform next.
So, I will take you through the process of making stickers with Cricut that you can use for journals, diaries, and others.
Step 1: Create a Sticker Image
As I have already mentioned in the list of supplies, you will need a software called Cricut Design Space Download. Using this software, I will create sticker images. However, it’s your choice whether you want to create stickers from scratch or upload print and cut images.
Since I hurriedly needed the stickers, I uploaded images that could be easily printed and cut on my printer and Cricut, respectively. Ensure that print and cut require a print margin of 6.75 x 9.25 inches. Hence, I will suggest you create a template so that it becomes easy to work on.
Here’s how to create a template to get the most out of my material:
- First, go to Canvas on your Design Space and navigate to Shapes from the left toolbar.
- After that, choose the Square shape.
- Next, you need to resize it to 6.75 x 9.25 inches.
- Then, you should arrange the stickers onto the template.
- Once everything comes to its place, you will need to remove the square from the canvas.
- Now, you will need to select the images on the sheet and attach all of them together.
Now, we have arranged all the sticker images together to be in one place while being printed and cut.
Step 2: Manage Settings
My design is ready, and I can print and cut it now. Before that, I have to click on the green-colored Make It button. As you hit the Make It button, you will notice your designs inside the black-lined box. This black-lined box indicates that your printer will not print anything beyond this black border, so ensure your design fits perfectly inside the box.
For the rest, you must do the same steps as usual, such as clicking on the Print option. After that, you will be moved to the print screen.
As you can see in the picture above, I have enabled the Add Bleed option. This Add Bleed option creates a margin around the stickers. To access the printer’s settings, you should also enable the “Use System Dialogue.”
Step 3: Load Your Printer
Now, it is time to load my printer. I will add my printable material here.
Note: Before loading the material into the printer, you should know whether your printer requires a face-up or face-down paper feed.
Once done, you...
Read more -
How to Make a Personalized Cricut Water Bottle: Top 3 Ideas
01/25/2024 at 10:23 • 0 comments![]()
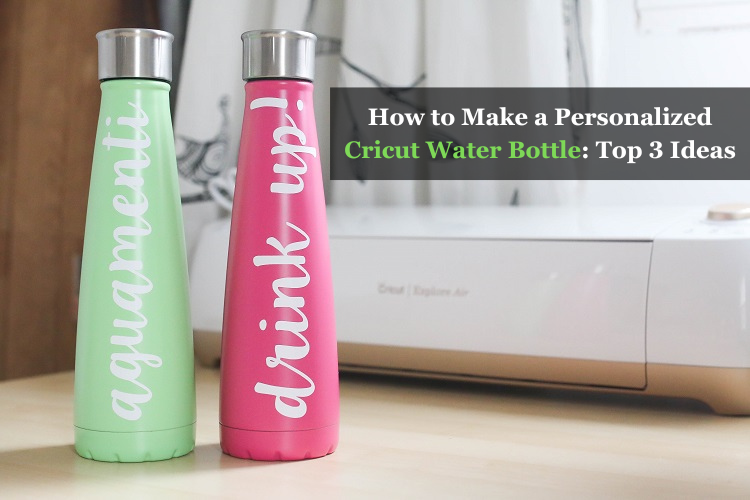
The Cricut water bottle is more than just an accessory for hydration, as it's a great way to show off your creativity and personal style. If you are interested in learning how to make a water bottle with the Cricut machine, I have prepared this blog post just for you. In this blog, I will first share with you 3 unique water bottle projects that are very popular and expensive in the market, which I made myself with some supplies and a Cricut machine.
Next, I will show you step-by-step how you can make such bottles in only a short time. Once you learn it, you will be able to make many things like bottles, glasses, and cups. Now, I can't wait to start this guide.
3 Most Popular Cricut Water Bottle Ideas
The following are the trending water bottle ideas that you should try to show your creative side. Bottles are very easy to style and don't take much time. If you are a person who loves exploring new ideas, you are going to love these three ideas.
1. Berg Water Bottle
Whether you're a working professional or in college, you can make this project with your Cricut. This is a water bottle from a very popular brand, Berg, which you can prepare yourself at your home. I made this because I had to give it to my clients at the crafting office. To make this, buy a plain water bottle, cut out several permanent vinyl berg designs with a Cricut, and attach.
2. Cricut Water Bottle With Vinyl
My daughter wants to serve the country as a professional nurse, and I keep giving her small gifts to keep her motivated. She loves to personalize things, so I gifted her a personalized water bottle. To make this, I need a Cricut machine and vinyl. You can also make this by simply cutting your design on vinyl.
3. Sports Water Bottle
If you are also a sports lover, like to go to the gym and also do workouts. It is your responsibility to keep yourself hydrated, and for this, you need a water bottle that will excite you. This Cricut allows you to personalize a plain water bottle according to you.
To make this first, go to the Design Space, create a stencil design, choose the correct material setting, and cut it out.
How to Make a Water Bottle With Your Cricut Machine?
After sharing my top Cricut bottle ideas with you, I'll now walk you through the complete step-by-step process of how to make a custom Cricut water bottle.
Step 1: Collect All the Tools and Supplies
The first thing you have to do is gather all the essential materials you will require for your project.
- A Step by step instruction
- Cricut cutting machine
- Permanent adhesive vinyl
- Transfer tape
- Cutting mat
- Scraper tool
- Blank water bottles
- A computer with Design Space installed
- Downloaded SVG file
Step 2: Upload Your SVG File on the Design Space
First, we connected our Cricut machine to our computer and opened the Design Space.
- Now, click on the New Project on this software.
- After this, press the Upload icon on the left-hand corner of your screen.
- Then, browse and find the SVG file from your computer system.
- Next, import the file, write a name and tag for it, and select Upload.
- Here, I am making more than 3 Cricut water bottle designs, so I have selected multiple designs.
- Now, measure your bottle and resize your design accordingly using the edit tool.
Step 3: Choose the Appropriate Material Settings
The design we will make on the bottle must be curved; for this, click on the design and use the curve tool. Once everything is prepared according to plan, click on the Make It option.
Now, you will be on a new page, mirror the design here, and click on Continue.
Subsequently, set the material as permanent vinyl and maintain the default pressure setting.
Step 4: Cut the Design
Now leave your computer as it is, take your permanent vinyl, and lay it on the Cricut mat with the shiny side down. And after that use the roller to fit it correctly.
Moreover, press the Load button on the machine and load the mat. Then go back...
Read more -
Comparing Cricut Machines to Choose the Best Tool in 2024
01/17/2024 at 09:58 • 0 comments![]()
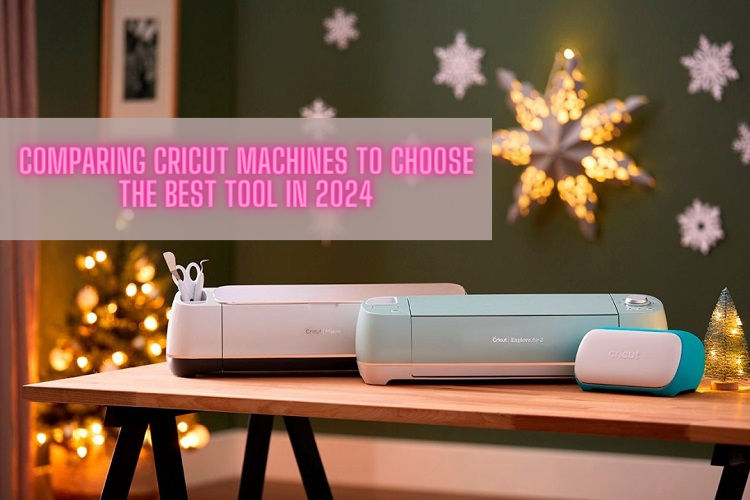
Good luck guys; gear up yourself to be a part of a thrilling ride comparing Cricut machines. The main goal of writing this blog is to help my sister by guiding her to invest money in the right Cricut machine setup. For the past few years, the company has developed different models of Cricut machines. Before taking a step into the world of crafting, my sister needs to compare all Cricut machines without skipping any pointers.
After differentiating among all the models, it will be easier for her to make a final decision about the compatible Cricut machine. Whether you have a small or big project, there is always a craft plotter that turns imaginable projects into reality. So, study this blog now and choose which Cricut cutting model is going to be suitable for homemade projects.
Cricut Maker Versions
Beginning with the Cricut Maker is one of the most powerful and costly cutting models ever developed by the company. This model is highly preferred by the experts for producing highly professional-level crafts. Also, the Maker cutting machine is the most versatile model available in the market. With the help of its bundle and tools, this craft model cut more than 300 materials with precise and clean cuts on the corners. Besides, Maker can do more than write and cut that is beyond your imagination.
Cricut Maker 3 isthe new version of the Maker model that was launched in 2021. If you compare Cricut machine models to its predecessor, it is a much more powerful, faster, and smart cutting machine for every kind of craft. This Cricut cutting machine swiftly and accurately cuts more than 300+ materials and is compatible with Smart Materials. On the other hand, it performs like a champ, even on the complicated cuts. Plus, this Cricut Maker 3 can not only cut or write but also score, foil, and engrave on the materials.
Cricut Explore Versions
Next up, while talking about comparing Cricut machines, comes Cricut Explore 3. It is a DIY dream machine of all the crafters. This craft plotter impresses them with its incredible speed and precision. Also, it works with 100+ materials and provides eye-catching crafts that make every DIYer grabbing attention. Also, Explore 3 supports Smart Materials during the cutting process and is easily connected to the home inkjet printer. Apart from that, this Cricut product can write, draw, foil, and score depending upon the command given by the crafter.
Equally important to compare different Cricut machines, you can also refer to the Cricut Explore Air 2. This all-rounder craft machine is capable of cutting 100+ materials making all the DIY dreams come true. Explore Air 2 is the best choice for all the newbies and a fabulous full-size machine in the craft market. Undoubtedly, it has a Print Then Cut feature but isn't compatible with Smart Materials. Finally, it works with six tools to cut, write, score, and foil during the process.
Cricut Joy Versions
Focusing on comparing Cricut machines, Cricut Joy turns your innovative ideas into action within a few minutes. This small, mighty, cute, and portable smart cutter cut 50+ materials precisely and accurately. Besides, the Joy cutting machine is lightweight, portable, and fits in tight places. Plus, it is compatible with Smart Materials that come in a variety of colors and styles. Other than that, Cricut Joy's built-in Bluetooth feature connected devices with its Joy app.
In this list, you can also add the Cricut Joy Xtra cutting machine model. The Cricut Joy model came into the market in 2023. Just like its previous version, this cut-die machine is portable but a little heavier and more prominent in size. In addition, Cricut Joy Xtra also cuts 50+ materials with precision without making any mistakes. Also, it has a Print Then Cut feature and easily connects with the home inkjet printer. This Cricut Joy latest model not only cuts but also writes, draws, and foils as per the directions given by the crafter.
Cricut Venture
Finally comes Cricut Venture...
Read more -
A Complete Guide on Cricut Pens for Beginners 2024
01/11/2024 at 07:21 • 0 comments![]()
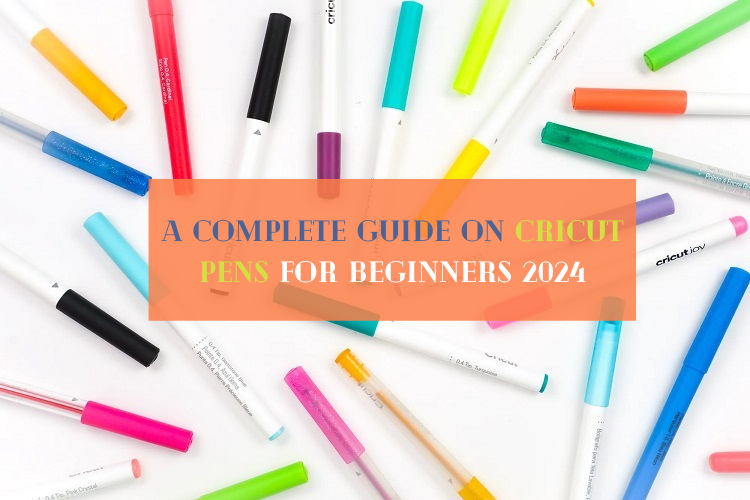
Are you looking for an accessory that can make your DIY craft come to life? If yes! Then Cricut pens are the ultimate answer. When I first bought my Cricut machine setup, I needed to learn more about its writing function. But as time passes by, I always find an excuse to use them to design new things. Yesterday, my parents celebrated their 25th wedding anniversary, and being a craft lover, I was responsible for creating all the decorations from the entrance to the main hall.
Ever since the party came to an end, everyone has been asking about how I made such fabulous projects on my own. Undoubtedly, all credit goes to my Cricut machine and pen. They helped me create projects such as banners, cards, doodles, and many more. In this blog, I explain everything about these Cricut supplies and projects.
What Are the Different Types of Cricut Pens?
Ever since its formation, the company has developed a variety of Cricut supplies that are beneficial for them while drawing or writing on the material. With an aim to expand the lifeline of this item, store this product with a cap in a downward position. One of the good news that I am going to share with you is that Cricut Maker, Explore, and Joy are compatible with all kinds of Cricut pens. These craft machine items are available in various models, allowing you to be more creative:
1. Opaque Gel Pens 1.0 mm
Beginning with opaque gel pens, they pop clearly on the darkest and light materials. With the help of this cutting machine product, it will be easy to include an embellishment on any card, paper craft, or decor. Also, these Cricut supplies are water-proof, non-toxic, acid-free, and permanent after getting dried up. Inside the pack, you will find five different colors, i.e. Pink, White, Orange, Blue & Yellow. Plus, these craft machine supplies are compatible with Cricut Maker & Explore machines.
2. Glitter Gel Pens 0.8 mm
Further referring to this specific Cricut supply, don’t leave the chance to add a special touch to your project with these glitter gel pens. Its eye-catching sparkle and silky gel will surely enhance each part of your project, making it look more attractive and praiseworthy. Also, these craft plotter items are water-based, acid-free, and non-toxic. The pack contains Blue, Red, Orange, Yellow, Green, Purple, Light Blue, Brown, and Black.
3. Pen Set, Metallic (5 ct.)
Equally important, this Cricut supply also includes a Metallic pen set with the Cricut pens in five different colors. These craft machine items are acid-free, non-toxic, and get permanent after getting dried up. Also, they are used for making invitations, banners, cards, gift tags and many more. Other than that, the set includes Gold, Silver, Copper, Blue, and Violet. Plus, this set is compatible with Cricut Maker, Explore & Venture cutting machines.
4. Infusible Ink Pens 0.4, Ultimate (30ct)
Last but not least, watch your design getting into vibrant, permanent, and pro-quality transfers on any Infusible Ink blank. Get a chance to draw and write on the material while making any project. This craft machine pen set is available in a variety of colors that give bright, beautiful, and seamless smooth transfers without any wrinkles. Finally, these items are acid-free, water-based, and aren’t safe for the skin.
Since you’ve learned about the types of cutting machine supplies, let’s begin by making you come across the process by which you can utilize this smart cutting machine accessory.
How to Use Cricut Pens for Making a Custom Project?
If you are a proud owner of a Cricut machine along with other tools and supplies, then this part is going to be beneficial for you. Here, you will get a chance to learn how to create a customized project with these supplies.
Step 1: Draw a Design on the Cricut App
Start the process by going to Cricut Design Space canvas and tick the Upload option. Next, tick the Upload Image and upload an image from your system...
Read more -
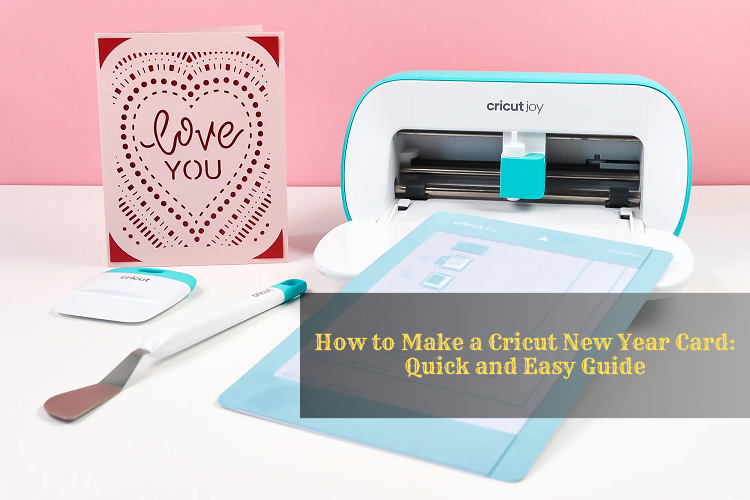
How to Make a Cricut New Year Card: Quick and Easy Guide
12/28/2023 at 06:35 • 0 comments![]()
During the New Year, everyone likes to send greeting cards to their loved ones, and I do too. But making it is a difficult task. If you are a Cricut user, then you can easily create your own Cricut New Year card in just a few minutes. Also, I have made a custom card on Cricut Joy. Yes, you heard that right! This mini Cricut Joy is capable of cutting more than 50 materials.
Moreover, I recently finished creating a greeting card; I will now teach you how to make your own card. The process is simple and easy, and a beginner can make it on their own. Be it essential supplies or step-by-step tutorials, I have tried to explain everything in the easiest way possible. So why wait? Let’s dive deeper into it!
What Cricut Supplies Will You Need for Making a Card?
When I started making cards, I collected all the essential accessories, tools, and other items that I needed. Below, I have mentioned the supplies required for making a Cricut New Year card. Have a look at it:
- Cricut Joy (or Maker & Explore series)
- Cricut Design Space software installed on the computer
- Cardstock or Thick paper
- Cricut Joy Mat
- Vinyl
- Cricut Tool Set
- Cricut Bright Pad (optional)
- Insert Card
How to Make a Cricut New Year’s Card?
So, ready to start your project on Cricut Joy? Below, I have provided detailed instructions to create a beautiful card, so look no further than the tutorial given below:
Step 1: Upload SVG File or Create Your Own Design
The first step includes uploading a ready-made Cricut design. You can get this SVG from the internet, or you can use Cricut’s free resources to make your own. Other than that, you have the option to create your own design on Design Space.
If you want to upload an SVG file, then you need to follow the steps mentioned below:
- Open the Design Space and go to the Canvas; there, you will find the “Upload” panel.
- After that, you have to click the Browse button.
- Then, you will be redirected to the folder where you have downloaded your SVG file.
- After that, the design will be added to Design Space.
- Here, you can edit your design as per your requirements, such as resizing the size of the cards and adding elements.
Step 2: Prepare the Card Mat
In order to make a beautiful Cricut New Year card, you have to load the pre-cut card onto your card mat.
You will find the top layer is sticky and looks like a LightGrip Mat, so you have to fold the top of the card onto itself and you need to press it down.
Tip: Ensure you need to take the time to align the folded card with the pre-printed lines on the card mat. This way, you can make your design perfect!
Step 3: Cut and Weed Out the Design
Once you are ready with your design, you have to press the Go button on the software. After that, your Joy machine will start cutting the design on your loaded cardstock material. After cutting, all you need is to weed the cut design gently and remove the extra materials that are not required. Make sure you are using the right tool to weed your material, such as weeders and tweezers.
Step 4: Assemble Cards
Now we have done our cutting, it’s time to assemble them so that it looks visually appealing. For this, I have chosen this insert card that easily fits into the four cutout corners.
The contrasting paper gives it a much better look than other papers.
Last but not least, if you are thinking why I have added congrats on my greeting card, then it is because I want to congratulate someone. This is no one but my son who scored good marks on his math test. Therefore, I tried something for this New Year.
Besides, you will find a lot of space inside the card where you can wish and express what you want. So, transform the Cricut New Year card into an extraordinary card with a Cricut Joy and spread the Joy of the festive season.
FAQs
Can I make a New Year card with Cricut?
Absolutely! Whether it is a New Year project like a banner, cake topper, or cards, everything is possible...
Read more -
How to Use Cricut EasyPress 3: Mastering Iron-on Projects
12/14/2023 at 10:33 • 0 comments
Cricut EasyPress 3 12x10 If you are here to learn how to use Cricut EasyPress 3, you are at the right place! My husband is a huge wine fan and has a dedicated space called a bar section. In this section, he loves to collect different types of beverages or wines. Since my husband likes to have a collection of liquor or beverages, one day, he came to me and asked if I could make something unique that would get more attention.
On his request I decided to make wine bags. I showed him an idea about a design I had created in Design Space. After several trials, he finally agreed to a design that I will show you later in this tutorial. Also, there are some essential supplies required to make this project, which I have included in this blog. Despite that, you will also learn how to activate your press machine using the Cricut Heat app. Let’s take a look at this blog to know the proper usage of EasyPress 3.
How to Setup Cricut EasyPress 3 on Your Device?
Here, I am going to show you how to set up the EasyPress using the Cricut Heat app. This step is essential if you want to know how to use Cricut EasyPress 3. Besides, this press uses Bluetooth Lite technology to pair the Android or iOS device. Plus, the app is used to communicate with the heat press. So, follow the instructions below to set up the press.
Here are the steps to follow for EasyPress setup:
- First of all, you will need to download a Cricut Heat app. This app is essential to set up your EasyPress.
- Then, plug your machine into the power source and press the power button to turn it on.
- After that, you will see the APP flashing on the screen, meaning it is ready to connect with the Cricut Heat app. This step is a must for activating and registering the machine.
- Pair the device via Bluetooth, and ensure a minimum of 7 feet of distance between the machine and the mobile device.
- Go to the app, and hit the option Set Up to begin the activation.
- Afterward, you have to choose the unit from available presses and hit the Connect button.
- Now, you will see “Connecting to EasyPress 3-0163” as shown in the picture below.
- Then, select the check box to accept the Terms of Use and Privacy Policy and finally tap the Activate.
- Lastly, you will see a “Success!” message on the screen, confirming the setup is done. During this time, your Cricut EasyPress 3 will start to heat up and be ready to use.
Here, I have explained the easy steps to set up your EasyPress 3 machine. However, you will need to ensure some essential supplies are needed for making a wine bag. So, let’s proceed further to know.
What Materials Do I Need to Make a Custom Wine Bag?
So, are you ready to collect the supplies needed to make a beautiful wine bag? For this project, I will use Infusible Ink materials. Here’s the list of supplies required for the wine bag:
- Cricut cutting machines such as Maker, Explore, and Joy.
- Cricut EasyPress 3
- EasyPress mat
- Cricut Infusible Ink wine bag
- Brayer
- Green StandardGrip mat
- Cricut Infusible Ink Transfer Sheets, along with a butcher paper
- Heat resistant tape
- White cardstock
How to Use Cricut EasyPress 3 for Creating a DIY Project?
Finally, I am excited to share the complete tutorial on the usage of this machine. But the heat press alone can’t do everything. Hence, you will also need some other supplies that I have already mentioned above.
Step 1: Create Your Design
I have made a very simple design for a wine bag. If you want, you can also try different font styles and sizes to enhance the designs. Add extra elements to make it as beautiful as possible.
Step 2: Choose the Load Type
When you go for cutting your design, you will get a pop up screen. This pop-up screen will be visible to those who are using anyone from Cricut Maker 3, Explore 3, and Joy. Since I am working with Infusible Ink, I opted for the On Mat option.
Note: Older Cricut machine users will not get the pop-up screen to select the load type....
Read more -
Top 8 Cricut Christmas Ideas to Try in 2023
11/16/2023 at 10:47 • 0 comments![]()
Are you planning to go creative this Christmas? If you have a Cricut machine, you can find a wide range of opportunities to make awesome DIY projects this year. It acts as an excellent way to add personalization to several DIY projects. Thus, utilize it to make several gifts, starting from handmade stockings to personalized gifts, Christmas ornaments, and more. So, put in your creative brains and get started with these holiday cheers.
In this post, we will talk about the top eight Cricut Christmas ideas that you can make for your friends and family and just for the Christmas celebration. Therefore, it will help you make thoughtful gifts and customize items.
1. Personalized Christmas Stockings
You can make personalized stockings for your family members this Christmas. Cricut beginners can find this project an ideal one. Do you want to know how to get started? You need to get to grips with iron-on vinyl. And then, you get all set to transform a simple stocking into your customized design. It needs just the push of a button. However, you can use yarns, oversized tassels, crochet stars, and more to personalize them. Thus, you can plan to go with this wonderful project idea this Christmas.
2. DIY Christmas Hamper
No matter what you want to gift your friend, family, or neighbor, a personalized Christmas hamper plays a vital role. DIY Christmas hamper is something they will fall in love with. So, bring out your Cricut machine and create custom details for the unique handmade hamper. Christmas is a festival of gifts, and thus, it is one of the best DIY Cricut Christmas ideas that you can try with your Cricut cutting machine.
3. Handmade Christmas Pillows
Christmas pillows make an elegant holiday decor. DIY enthusiasts can use iron-on designs to create Christmas-themed pillows of their choice. Additionally, use the design and color you want to include in your project. For this wonderful project, you will first be required to head to the Cricut Design Space and then cut it via your cutting machine. You can make lots of them during your Christmas holiday. The best thing is you can send them as DIY gifts to your loved ones.
4. Christmas Baking Set
If you want to explore challenging projects, a Christmas baking set is the best DIY option. Christmas is coming, and thus, you can put your creative skills into this project. Since it is related to the kitchen, it can make an exciting gift for baking lovers. The options for this project include a baking spoon, an oven mitt, and a hand towel. Even though it will take your time to finish, it is all worth it.
5. Wood Block Christmas Tree
Are you bored of the usual Christmas tree? This time, why don’t you go with a wood block Christmas tree project? The creative twists to the use of wood will make this project interesting. Furthermore, you will need to use your Cricut and vinyl letters to go along with this project. Additionally, you can add any color to the wood. While adding, make sure that it matches your home decorations. Make use of sparkly vinyl and include letters to give this wooden tree a stylish appearance. The wooden tree is one of the best Cricut Christmas ideas to add merry vibes.
6. Hot Cocoa Christmas Mugs
A hot cup of tea is welcome in the Christmas season. It feels incredible to cuddle in the blanket while having a hot cup of cocoa. You can start this project by bringing out your Cricut machine. Now, use adhesive vinyl and add a personalized touch to your Christmas mug. Therefore, if you have no time for Christmas shopping, utilize your spare time right away. Indeed, everyone will surely appreciate your efforts towards this excellent project idea.
7. Leather Snowflake Earrings
Leather snowflake earrings are easy Christmas jewelry projects that you can craft with your Cricut machine. You can use faux leather, paper...
Read more -
How to Set up Cricut Machine with Steps
11/02/2023 at 07:12 • 0 comments![]()
Setting up your Cricut machine is a straightforward process that opens the door to endless crafting possibilities. Begin by unpacking your Cricut and placing it on a flat surface. Connect the power, turn it on, and link it to your computer or mobile device. Download and install Cricut Design Space, the hub for your creative projects. Create or sign in with your Cricut ID to access a world of designs.
If required, calibrate your machine for precise cuts. Load your chosen material onto the cutting mat and let the Cricut work its magic by following the simple on-screen instructions. Within minutes, you'll witness your designs come to life. The setup is intuitive, allowing you to focus on what you do best – crafting with precision and creativity. Welcome to the world of Cricut, where your imagination knows no bounds!
Setting up your Cricut machine is a breeze, and soon you'll be crafting to your heart's content. Follow these simple steps to get started:
- Unboxing: Begin by carefully unpacking your Cricut machine set up and accessories. Take a moment to marvel at the sleek design and the possibilities it holds.
- Place Your Machine: Find a clean, flat surface to set up your Cricut machine. Ensure there's ample space for the materials and projects you'll be working on.
- Connect Power: Plug in the power cord and turn on your machine. The power button is usually located on the side. Watch as it comes to life, ready to bring your creative visions to reality.
- Connect to Computer or Mobile Device: Depending on your Cricut model, connect it to your computer or mobile device using a USB cable or Bluetooth. Make sure your device's software is up-to-date for seamless communication.
- Install Design Space: Download and install Cricut Design Space from official website Cricut.com setup on your computer or mobile device. This is the platform where you'll create and customize your projects.
- Create a Cricut ID: If you don't already have one, create a Cricut ID. This will be your gateway to a world of designs and inspiration.
- Calibrate Your Machine (if required): Follow the on-screen instructions to calibrate your Cricut machine. This step ensures precision in your cuts.
- Load Materials: Place your chosen material (vinyl, paper, fabric, etc.) on the cutting mat and load it into the machine. Adjust the settings in Design Space accordingly.
- Design and Cut: Open Design Space, create or choose a design, and click "Make It." Follow the prompts to load the cutting mat into the Cricut machine, and let the Cricut work its magic.
- Admire Your Creation: Once the cutting is complete, carefully remove your project from the mat. Admire the clean cuts and intricate details, knowing that the world of limitless crafting possibilities is now at your fingertips.
With these simple steps, you've successfully set up your Cricut machine and are ready to embark on a creative journey like never before. Happy crafting!
Source: How to Set up Cricut Machine
-
Cricut Firmware Update Guide for Heat Press Machines
09/12/2023 at 09:18 • 0 comments![]()
It becomes frustrating when the smart cutting machine starts running slowly during the cutting process. However, the only reason why this happens is because of the craft plotter's frequent usage. Directly coming to the point, with the Cricut firmware update, the software living inside the machine gets updated. After the cutting machine update comes to an end, the craft plotter becomes eligible to give commands to the machine and improve its performance.
Other than that, it also adds new features making cut-die machines run swiftly with the addition of new features on a timely basis. You can also learn about the different heat presses model firmware here. Although, you are supposed to select any one of the press mentioned below to know about the step-by-step instructions
Firmware Update for Cricut Mug Press
Before starting the Cricut firmware update process, ensure Mug Press comes with the latest and top-class features and improvements. Although, you need to read the guidelines penned down below:
- First, put the Mug Press into Connect mode:
- Take the power cord and plug it inside the press USB port.
- Following this, press and hold on to the Power button until Connect mode starts (> 5 seconds). The power button will start flashing orange after the Mug Press is in Connect mode.
- Open the Design Space app on your respective PCs and sign in with your Cricut ID & Password.
- Under the Design Space menu panel, choose the Cricut New Machine Setup box.
- Tick the Heat Press and then the Cricut Mug Press inside the Dropbox.
- Go through the on-screen instructions to this Cricut press, and the detection will occur.
- The Mug Press firmware update progress bar will be displayed on the new screen.
- The power button will again flash down orange after the update ends.
- After that, disconnect the USB cable, power it off, and restart it again.
Cricut Firmware Update for Hat Press & EasyPress 3
Cricut Hat Press & Easy Press 3's firmware update is completed through the app installed on iOS & Android devices. The total number of steps for completing the firmware process is as follows:
- First, plug the unit into the compatible wall socket.
- After that, switch on the Cricut machine Power button.
- Now, ensure the press & cutting machine is paired with the mobile devices.
- You've to open the Cricut Heat app & sign in by entering the asked ID & Password.
- However, choose your unit from the My Presses category if it is set up early.
- After all these steps, any firmware update will immediately get started.
Firmware Update for Cricut EasyPress 2
Go through the steps shared below to learn about the total number of steps revolving around the EasyPress 2 firmware:
- Let's begin by visiting the Cricut Design Space setup page on your Desktop.
- At the setup page, choose EasyPress 2 and sign in with your Cricut ID & Password. However, if you don't have an account, create one to proceed toward the next step.
- Following this, follow the instructions in front of the screen and get your EasyPress 2 connected.
- After the software completes the machine detection process. It will provide the instructions to put EasyPress 2 into firmware update mode.
- To proceed toward the next steps, press the Continue button and select the Update option.
- Soon the Update will get started displaying the progress bar. With the help of the bar, you can pay attention to how much of an update has been done.
- Here you go! The update process of your EasyPress 2 has successfully come to an end. Now, you need to tick the Done button to open the Heat Guide or select the X symbol visible on the top right of the screen.
Frequently Asked Questions
How to Resolve Technical Issues of Cricut Machine Firmware Update?
Due to any reason; if you are facing trouble during your Cricut firmware update process, then follow the mentioned below steps:
- Start by disconnecting your smart cutting machine from the PC and turning off its power.
- It would help if you...
- First, put the Mug Press into Connect mode:
-
Cricut Infusible Ink: What Is It and How to Use It?
09/06/2023 at 11:58 • 0 comments![]()
Have you ever used the Cricut Infusible Ink? If not, then this guide is for you! This post is mainly dedicated to beginner crafters who know little about infusible ink (or transfer sheets). In other words, the Infusible Ink comes in two varieties: markers/pens and transfer sheets. However, you can’t use infusible ink markers/pens directly onto the materials (paper or fabrics), but you will need a heat press to infuse the ink into the materials.
This detailed guide will teach you about Infusible Ink, Infusible Ink transfer sheets, and how to use them to make beautiful craft projects.
What is Cricut Infusible Ink?
Infusible ink is also a Cricut product, allowing us to get professional-quality heat transfer projects. In simple terms, the ink infuses any of your projects instead of sticking in the form of a layer. When it dries, it becomes a permanent part of your projects. As a result, the ink doesn’t peel, crack, or wrinkle like vinyl.
On the other hand, Cricut Infusible Ink transfer sheets are a collection of pre-printed materials. The transfer sheets contain Infusible Ink that is made to work with a cutting machine. You just need to load these sheets into your Cricut machine just like other materials (loading them onto a cutting mat). Further, you can cut your design with a Cricut digital cutter. Finally, you will press these sheets with a heat press to infuse the design onto your projects.
What Supplies Do You Need to Use Cricut Infusible Ink?
Given below is the list of supplies and tools you will need for using Infusible Ink.
- Infusible Ink transfer sheets
- Butcher paper
- Cardstock
- Cricut Explore or Maker cutting machine
- A heat press machine such as AutoPress or EasyPress
- A Poly-coated base Material like Cricut’s blank
- Heat Resistant Tape
- Other supplies, like tweezers or a link roller
How to Use the Cricut Infusible Ink Transfers?
Here is the step-by-step guide to cutting and applying infusible ink transfers on a project. Hope you are excited to learn this. Let’s get started!
Step 1: Select Infusible Ink Materials and a Compatible Blank
As per your inconvenience, you can either cut designs from Infusible Ink sheets or sketch your own designs with Cricut Infusible Ink (pens or markers).
Step 2: Start Making Your Design in the Cricut App
- Launch the Cricut Design Space and start working on a new project.
- For this, you can choose the design from Cricut Access Library.
- You need to upload an SVG cut file. Otherwise, you can make your own design on this app.
- When you finish your design, click Make it to send it to the mat.
- Further on the prepare screen, you need to click the button to mirror your design.
- Then, choose Cricut Infusible Ink from the given list of materials settings. Also, load the fine-point blade into your machine.
Step 3: Cut Your Transfer Sheet
- Now, you can load the transfer sheets on top of the cutting mat (StandardGrip). Place your sheet onto this mat. Ensure the shiny side is down, and the colorful inked surface should be facing upward. Plus, the transfer sheet must be adhered to the mat.
- After that, hit Load to insert the mat into the Cricut machine. Next, press GO and start.
- Unload the mat after cutting. Keep the mat on a clean surface by flipping it.
- Then, separate the cutting mat and Cricut Infusible Ink sheet by peeling the mat.
- Next, you need to weed the design.
- After the weeding, you will have your design.
Note: Weeding Infusible Ink is not as easy as weeding vinyl. As per Cricut’s recommendation, you should weed your transfer sheets by using your fingers. Don’t use sharp objects to weed, as it may result in unwanted ink transfer.
Step 4: Get Ready With Your Materials
This time, you need to set up your working area before you apply for the transfer sheet.
- First of all, place your blank project onto the mat. Keep a piece of white cardstock inside it (blank project). The cardstock will shield your mat and project from ink seepage from...
-
How to Set Up Cricut Mug Press? [A Complete Guide]
08/31/2023 at 12:03 • 0 comments![]()
With a vision to make pro mugs at home, all the DIYers are introduced to how to set up Cricut Mug Press. Through this masterpiece, one can make custom-designed sublimation mugs with compatible Ceramic Mugs & Infusible Ink. Moreover, one needs to design, attach & insert the mug blank, and the press will do the rest of the work. The crafter can simply draw their design from the Design Space app/software.
Other than that, the Infusible Ink system gives smooth, pro-quality transfers, becoming one with a mug and making it long-lasting. This Cricut press allows the user to discover their creative side by creating various mugs for different occasions. Besides, the crafter needs to buy a Mug Press along with the bundle and other supplies to create the custom mug.
Let us help you out by showing in-depth Cricut setup Mug Press primary details in the coming section.
How to Set Up Cricut Mug Press on a Device?
Before getting the personal mug, all the users need to set up/activate their Mug Press. To complete the machine activation process, read the steps given below:
- First, go to the Cricut setup official page and download Design Space on your system.
- Following this, create your Cricut ID or sign in with your Cricut ID and Password.
- After getting connected to the Cricut Setup page, choose Heat Press > Mug Press.
- Next, plug into the Mug Press and Power on the wall outlet switch.
- Following this, take the provided USB code and put it inside your device and the machine port.
- After doing these steps, tick the Activate option and start reading the Terms & Conditions.
- Lastly, choose Get Started and start creating your first project on Mug Press.
After finishing up the Cricut setup Mug Press process, take a step forward by knowing how to use it for crafting purposes.
How to Use Cricut Mug Press?
After setting up the Cricut Mug Press, the user can easily create custom mugs in minutes with simple and one-touch settings. Get to know about the steps given below:
- Start the process by creating your design on the Cricut app by using a mug template or any pre-made mug design.
- Next, spread the Infusible Ink sheet on the purchased cutting mat with color side up & shiny side down.
- Following this, cover up the mug with the design using the transfer sheet to avoid any bubbles.
- Now, preheat the machine by turning it on and pressing the Power button.
- After the heating process is complete, it will start beeping, and the Power button will turn green.
- Next, place the mug inside into the press and close the lid available on the right-hand side.
- Now, you are suggested to wait till the heating process is going down.
- After the mug cools down, remove the sheet without damaging the design.
- Here you go; making a custom mug with this press is so much fun.
How to Change Cricut Mug Press Temperature Settings?
For top-quality custom mug results, all the users should be aware of the process by which they can modify the machine temperature settings. Get to know about the steps below:
- First, enter the Temperature Setting mode, whether the press is switched on or off.
- Next, select and hold the power button for 10 seconds.
- After that, you will hear two chimes, and all the LEDs will start flashing at once.
- Now, you will get to see that the power button will be flashing orange during the Temperature Setting mode.
- Afterward, the LED row will start displaying the present setting. You have to push the Power button to cycle through the 3 settings options:
- Following this, hold on the Power button for 3 seconds to select the settings after getting the desired LED setting on the display.
- After that, a chime will be heard with an LED display, and a Power button will be flashed.
- Next, your Mug Press will turn off, exiting the Temperature Setting mode.
- Lastly, the new settings will come into action when the press is switched on.
Summing up the above-said section of the blog, we hope that you have understood how to set...
Read more -
How to Upload Fonts to Cricut? [Easy Ways]
08/10/2023 at 11:24 • 0 commentsThe use of the right font is essential in creating crafts projects. Each font you select gives your project a different feeling and emotional effect. Fonts are an important element in the process for a crafter using Cricut. The good news is they can learn how to upload fonts to Cricut and use them for their project.
Here is a useful tutorial that you can read and learn how. It will teach you quick ways of uploading fonts to the Cricut Design Space software and using them on Windows and Mac. After that, you can use them to give a personalized touch to your project. But to upload a font, you first need to download it. Before starting the uploading process, let's first know where you can find fonts to download.
Where to Find Eye-catching Fonts to Download?
There are several places where crafters can discover both free and paid fonts to download for their projects. They can select from beautiful and high-quality font collections and include them in the Design Space to begin with their project. Most often, their free font downloads option includes a personal use license. It makes them use those fonts for free in their projects. Thus, if you want to sell items with certain fonts, include only the one for commercial use.
Easy Steps to Access Fonts in Cricut Design Space
You can access Fonts in the Cricut Design Space with some basic steps. Here are some of the steps you need to execute for the purpose.
- First, download the font you want.
- After that, unzip your font file folder.
- Double-click on the individual font file.
- Follow the prompts to install the font file on your computer.
- Now, open Cricut Design Space.
- Start to create a New Project.
- In the next step, add a new text box to your canvas.
- Click on the font drop-down menu to change the font.
How to Upload Fonts to Cricut Design Space on Windows/Mac?
You can access the font on several devices. You only need to download and install the font onto each device you want to use. Here are some easy steps that can help you add fonts to this Cricut's software on Windows and Mac computers.
For Windows
Follow these instructions if you use Windows to access the Cricut Design Space. Once you learn how to upload fonts to Cricut on Windows, you can include those fonts in your project.
- First of all, download the font file you want to have in your project.
- Next, navigate to your Downloads folder.
- Find the downloaded font file and right-click on it.
- Choose the Extract option to extract those files.
- In the following step, right-click on the font file and choose Install.
Once you perform these steps, the fonts will get installed on your windows. You can find them in the Design Space to access.
For Mac
Do you want to add fonts on your Mac device? Here are a few of the directions that you need to follow.
- First, download the font you prefer.
- Double-click on the downloaded zip folder.
- Once unzipped, select the fonts and use ctrl+click to launch the menu.
- Now, select Open with > Font Book option.
- Now, you will see a pop-up to install fonts.
- Tap on the Install tab to begin the installation process.
It will make your fonts appear in the FontBook. From there, you can use it in the Design Space.
Conclusion
The text gives an emotional touch to the project. Thus, every craft lover should know how to upload fonts to Cricut. The process is also quick and straightforward. Moreover, Design Space makes it effortless and time-saving too. First, download the font from a specific site and then add it on a device - windows or Mac to use it in your project. Keep experimenting with crafts and fonts for attractive projects.
Frequently Asked Questions
How Can I Add Fonts to Design Space on My iPhone?
For this purpose, you first need to install Fonts, a free font manager app. Below are some instructions to make your fonts available in the Design Space app.
- Begin to download and install the Fonts app.
- Unzip the file after downloading.
- Now, open the iFont...

Cricut.com/setup's pages
To begin using any Cricut machine, download and install the Design Space app from cricut.com/setup.