Close
0%
0%

Aerotron

Portable device to measure most commmon air pollutants:
CO, CO2, O3, H2S, C6H6 and PM

Similar projects worth following
Cycling or walking to work?
We do, and it stinks!
So we decided to determine what exactly stinks.
Got ourselves a handful of various sensors, and hooked them to internet, via Arduino, all juiced up by a big fat battery, and held together by a 3D-printed box.

It's not that we don't trust goverment's air quality monitoring agencies, they just don't have any monitoring stations around where we live and work.
We will trust them enough to calibrate our own sensors.

Motivation

The initiative came from our friends at Cyclist Syndicate, a non-profit organization of about 3000 cyclists, who cycle at daily basis through most polluted streets. They were attempting to find actual air pollution data, but to no avail. Closest official air quality monitoring stations are kilometers away from their usual routes. And worse yet, they collect and display average values over large chunks of time (we're talking 8-24h). When it takes one 20min to traverse an area, such values are not particularly useful. One could easily be exposed either to much lower or much higher values depending on the time of day and year, wind direction and all sorts of factors. There's simply no way of knowing the exact exposure to pollution!

Goals

We aim to build a device which is essentially a poor man's version of one of those really expensive, completely not portable, super accurate measuring stations. Many a feature will fall sacrifice to that end, such as high accuracy, diversity of measurements and their continuity. In return, our device will be highly portable, able to produce rough measurements within a couple of minutes and cheap.

At the end, we intend to donate one of these to the Cyclist Syndicate for testing, and if it proves useful, we win.

Furthermore, developing a stationary version of these is as easy as making them run off the power grid, which means Aerotron is only a couple hours of coding away from being an affordable node in a potentially city-wide network for real-time pollution tracking.

Features

  • portable
  • fast measurements of several pollutants (CO, PM being the most notable)
  • cheap to produce
  • IoT enabled

Technology

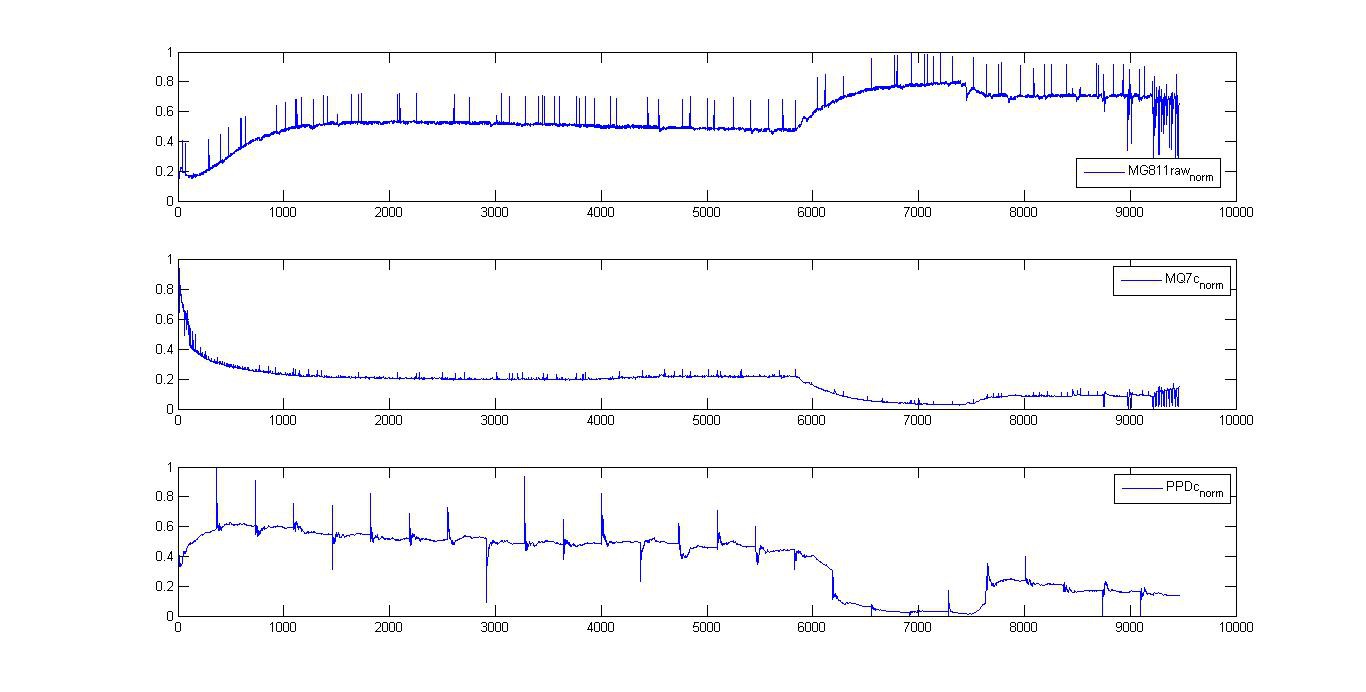
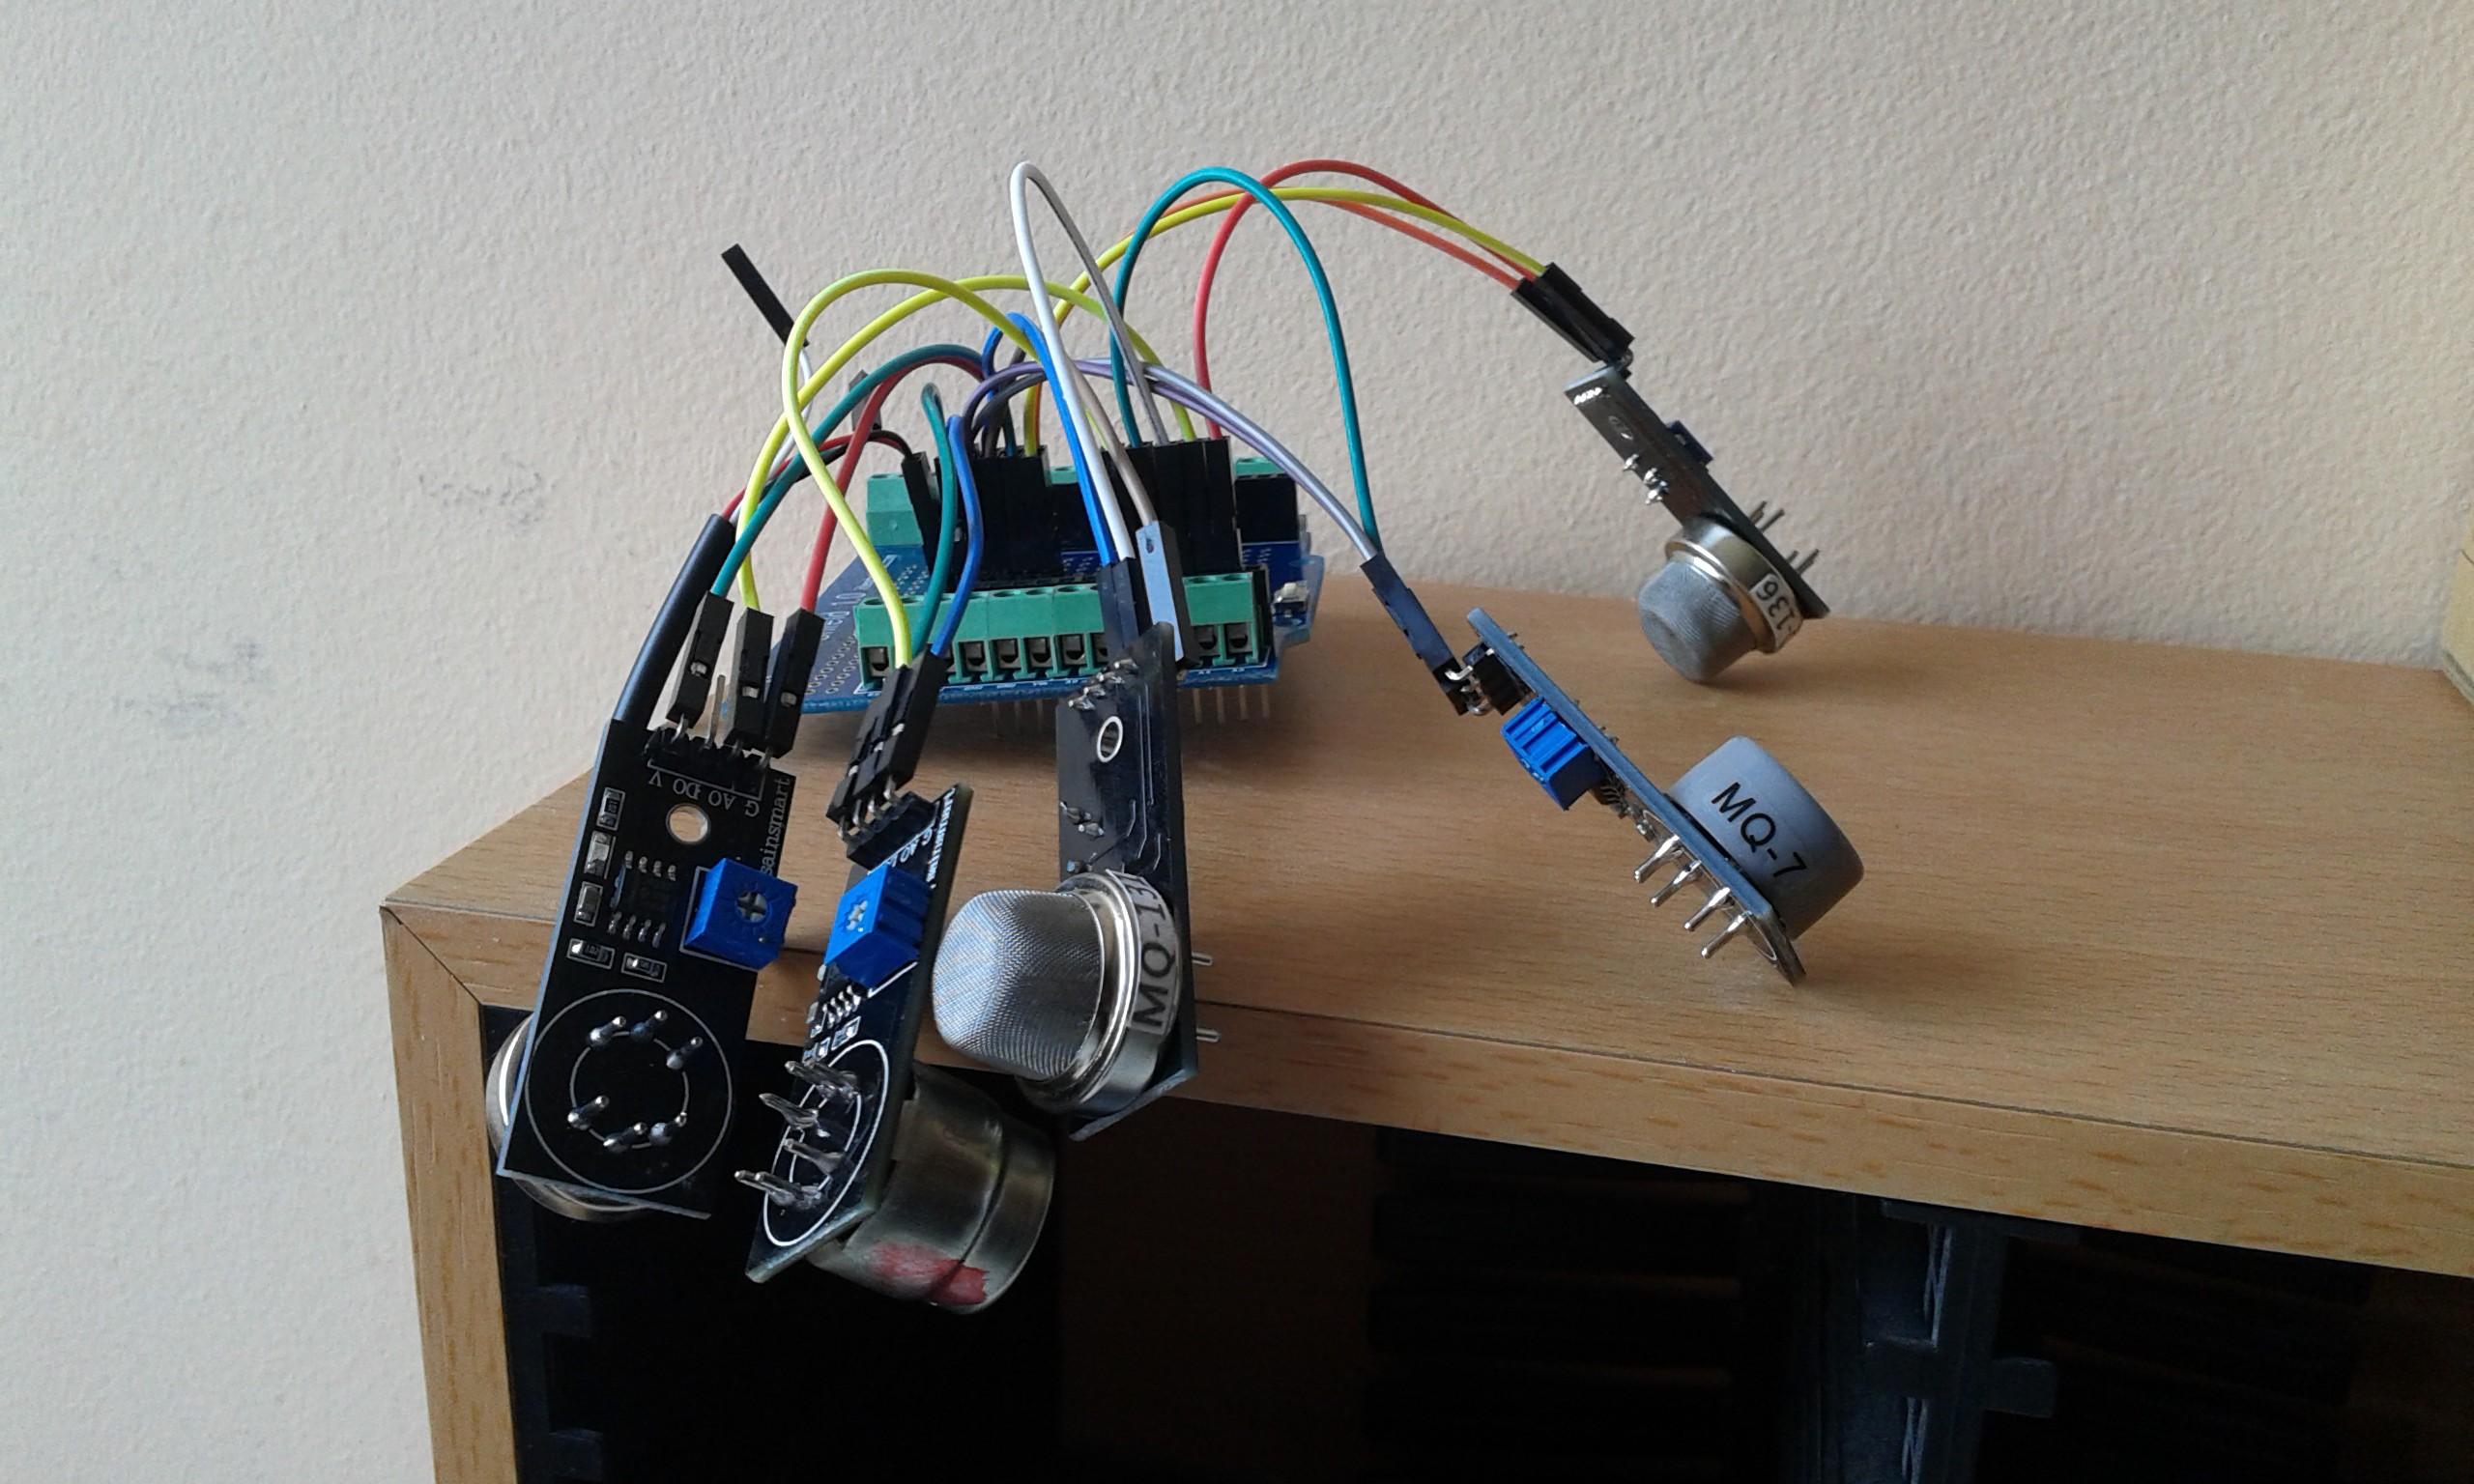
For the prototype will be using an Arduino and widely available (read: cheap) sensors. All these sensors need a lot of juice though, for each of them includes it's own heater resistor, eating away 125 mA or so. There is no way an Arduino can provide that much current, so power supply is a major challenge in building the device. Second challenge is calibration of sensors. Professional calibration costs a lot, and we don't intend to do it, but making our own references is tricky and for some gasses dangerous. We will get out and compare our measurement to official ones, by monitoring stations around the city. If we get good average measurements at different times, we'll call it a day.

If possible, we will stick to Arduino UNO - the easiest development platform that still contains what we need. In case we run into memory issues, we will probably switch to Iteaduino Mega 2560, as it provides more memory and 5V logic level.

Source

As usually, we will publish the source under GPL v3 to our github page: https://github.com/mikrotron-zg, and all documentation under CC SA v4 license.

Aerotron.pdf

MANUAL! :)

force-download - 191.95 kB - 07/11/2016 at 10:19

Preview
Download

Aerotron.odt

MANUAL! :)

text - 152.21 kB - 07/11/2016 at 10:17

Download

  • 1 × MQ7 module measures concentration of carbon monoxide (CO)
  • 1 × MQ131 module measures concentration of ozone (O3)
  • 1 × MQ135 module measures concentration of benzene (C6H6)
  • 1 × MQ136 module measures concentration of hydrogen sulfide (H2S)
  • 1 × MG811 module measures concentration of carbon dioxide (CO2)

View all 12 components

  • Test data on the cloud

    Tomislav Mamić08/03/2016 at 10:06 0 comments

    After fiddling with Adafruit IO, Aerotron can now publish to feeds via http (though ultimately we plan to make it use MQTT). You can see example results at my temporary dashboard here. In case nothing pops up, just click the feed title and it will redirect you to a plot of whatever data is stored. There is also a download button in case you find some of it useful. Another way to get it is to change the url to jadefox/feeds/<feed you need>. The feeds are as follows:

    • aerotron-co for carbon monoxide [mg/m^3]
    • aerotron-pm for particulate matter over 2.5um [ug/m^3]
    • aerotron-t for temperature [deg. C]
    • aerotron-h for relative humidity [%]
    • aerotron-V for sensor voltage control [V]

    The data you can find will consist mostly of our test runs which follow a set pattern of heat-up transient -> normal measuring conditions -> battery death. Unfortunately at present we have no means of adding annotations to the cloud, but worry not, in case we measure something interesting, we will bring it up here.

  • Power supply considerations

    mikrotron07/16/2016 at 16:00 0 comments

    There's no way for LiIon battery to provide enough juice with our current setup.

    Although our step-up converter declares up to 3A, and device consumes below 2A, we get unstable voltage when all sensors are plugged in. Working assumption is, battery's protection kicks in - device's inner resistance is just a few ohms.

    And, so far device isn't exactly portable.

    Anyway, we'll try with some good old dumb batteries. Although twice cheaper, they are much heavier, so we're not happy about it. Then again, step-up might not be required then.

    But, we'll take a vacation first, and be silent for next two weeks or so;)

  • Going Live!

    mikrotron07/13/2016 at 11:32 0 comments

    We managed to send real-time data to Adafruit IO!

    So far, we're sending only carbon monoxide readings from our office, via HTTP.

    Check it out here:

    https://io.adafruit.com/jalmasi/feeds/co

  • Source published

    mikrotron07/11/2016 at 11:01 0 comments

    Behold mighty aerotron source!

    https://github.com/mikrotron-zg/aerotron

  • Going to github...

    mikrotron07/09/2016 at 14:57 0 comments

    Just created the repo:
    https://github.com/mikrotron-zg/aerotron

    It's still empty, for the code is still a mess... but stay tuned, coming soon;)

    We still need to decide which MQTT lib we'll use. Adafruit's lib seems to have one mad pointer, or maybe we're just running out of memory. So we'll investigate PubSubClient too.

    After checking a couple of ESP8266 libs, seems we'll have to make our own. That's a mess too - various firmware versions on various modules, supporting various AT commands. So we have to make sure that ESP firmware matches the Arduino lib. Bottom line - we'll have to include instructions to upload one specific ESP firmware to the module.

  • Cloudy data

    mikrotron07/04/2016 at 14:46 0 comments

    So where will pollution data go?
    We decided to send them to Adafruit IO.

    Here's why:

    - our favourite fruit is Adafruit ;)

    - all IoT things should talk IoT protocols; Adafruit IO talks MQTT

    - available open source libs and learning resources

    - cool web widgets to display the data

    That said, please note that Adafruit IO is still in beta.

    So, here are the feeds:

    https://io.adafruit.com/jalmasi/feeds/co
    https://io.adafruit.com/jalmasi/feeds/co2
    https://io.adafruit.com/jalmasi/feeds/h2s
    https://io.adafruit.com/jalmasi/feeds/o3
    https://io.adafruit.com/jalmasi/feeds/c6h6
    https://io.adafruit.com/jalmasi/feeds/pm
    https://io.adafruit.com/jalmasi/feeds/temp

    They are all public, or are supposed to be.

    Our initial attempt to send the data failed, due to chicken-egg problem:
    we use SoftwareSerial to drive ESP8266. ESP8266 works on 115200 bps by default, and highest accurate boud rate available with SoftwareSerial is about 38400.
    Our attempt to change baud rate to 19200 resulted in two fatalities, now we have to upload firmware to two ESP8266 modules.

    So, no data yet :(
    Probably tomorrow;)

    But FTR, here's the code for MQTT over SoftwareSerial ESP8266.

    // https://github.com/Diaoul/arduino-ESP8266
    #include <ESP8266Client.h>
    
    #include <SoftwareSerial.h>
    
    #include "Adafruit_MQTT.h"
    #include "Adafruit_MQTT_Client.h"
    
    // wifi setup
    #define WIFI_SSID        "krbljovrtislav"
    #define WIFI_PASSWORD    "Kobasica"
    
    //SoftwareSerial softSerial(3, 2); /* RX:D3, TX:D2 */
    SoftwareSerial softSerial(2, 3); /* RX:D3, TX:D2 */
    ESP8266 wifi(softSerial);
    
    /************************* Adafruit.io Setup *********************************/
    
    #define AIO_SERVER      "io.adafruit.com"
    #define AIO_SERVERPORT  1883                   // use 8883 for SSL
    #define AIO_USERNAME    "supersecret"
    #define AIO_KEY         "SuperSecretAndLongKeyImpossibleToGuess"
    
    // Create an ESP8266 WiFiClient class to connect to the MQTT server.
    //WiFiClient client;
    // or... use WiFiFlientSecure for SSL
    //WiFiClientSecure client;
    
    // Store the MQTT server, username, and password in flash memory.
    // This is required for using the Adafruit MQTT library.
    const char MQTT_SERVER[] PROGMEM    = AIO_SERVER;
    const char MQTT_USERNAME[] PROGMEM  = AIO_USERNAME;
    const char MQTT_PASSWORD[] PROGMEM  = AIO_KEY;
    
    ESP8266Client client(wifi);
    
    // Setup the MQTT client class by passing in the WiFi client and MQTT server and login details.
    Adafruit_MQTT_Client mqtt(&client, MQTT_SERVER, AIO_SERVERPORT, MQTT_USERNAME, MQTT_PASSWORD);
    
    /****************************** Feeds ***************************************/
    
    // Notice MQTT paths for AIO follow the form: <username>/feeds/<feedname>
    const char CO_FEED[] PROGMEM = AIO_USERNAME "/feeds/co";
    Adafruit_MQTT_Publish co_feed = Adafruit_MQTT_Publish(&mqtt, CO_FEED);
    
    const char CO2_FEED[] PROGMEM = AIO_USERNAME "/feeds/co2";
    Adafruit_MQTT_Publish co2_feed = Adafruit_MQTT_Publish(&mqtt, CO2_FEED);
    
    const char H2S_FEED[] PROGMEM = AIO_USERNAME "/feeds/h2s";
    Adafruit_MQTT_Publish h2s_feed = Adafruit_MQTT_Publish(&mqtt, H2S_FEED);
    
    const char O3_FEED[] PROGMEM = AIO_USERNAME "/feeds/o3";
    Adafruit_MQTT_Publish o3_feed = Adafruit_MQTT_Publish(&mqtt, O3_FEED);
    
    const char C6H6_FEED[] PROGMEM = AIO_USERNAME "/feeds/c6h6";
    Adafruit_MQTT_Publish c6h6_feed = Adafruit_MQTT_Publish(&mqtt, C6H6_FEED);
    
    const char PM_FEED[] PROGMEM = AIO_USERNAME "/feeds/pm";
    Adafruit_MQTT_Publish pm_feed = Adafruit_MQTT_Publish(&mqtt, PM_FEED);
    
    const char TEMP_FEED[] PROGMEM = AIO_USERNAME "/feeds/temp";
    Adafruit_MQTT_Publish temp_feed = Adafruit_MQTT_Publish(&mqtt, TEMP_FEED);
    
    void setup() {
      Serial.begin(9600);
      
      softSerial.begin(115200);
      wifi.begin();
    
      // setWifiMode
      Serial.print("setWifiMode: ");
      Serial.println(getStatus(wifi.setMode(ESP8266_WIFI_STATION)));
    
      Serial.print("joinAP: ");
      Serial.println(getStatus(wifi.joinAP(WIFI_SSID, WIFI_PASSWORD)));
    
      // getMAC
      byte mac[6];
      Serial.print("getMAC STA: ");
      Serial.print(getStatus(wifi.getMAC(ESP8266_WIFI_STATION, mac)));
      Serial.print(" : ");
      for (uint8_t i = 0; i < 6; i++) {
        Serial.print(mac[i], HEX);
        if (i...
    Read more »

  • First measurement results

    mikrotron06/30/2016 at 09:16 0 comments

    CO2, CO and PM measured every 2 seconds, indoors. These are raw sensor data, and we need to remove the noise, and calculate concentration.
    Readings need about 2000 seconds to stabilize... so our device will be portable, but will not be exactly mobile:(
    After nearly 6000 readings, window was opened. Breeze of fresh air is clearly visible - readings display less monoxide, dioxide and dust:)
    Battery dies after about 19000 seconds, and readings are inaccurate soon before.

  • Sensor barbecue

    mikrotron06/24/2016 at 13:26 0 comments

    Gas sensor require preheat (burn-in) of 12-24 h. Usually, just connect one to your Arduino or any other 5V power supply and leave it be till tomorrow.

    But we actually made a custom device to preheat all sensors at once.
    Behold the mighty sensor barbecue!

  • Notes on choice of sensors

    mikrotron06/24/2016 at 13:15 0 comments

    At this point we are working on project for about three months., and will be posting past reports. And first one starts like this:

    Do not buy MG811 module from Sainsmart! We recommend one from DFRobot.
    The catch is, MG811 needs 6V. No it's not a typo, it's six (6) volts. Sainsmart didn't get it, DFRobot did, and included a step-up on their module.

    Also, we gave up DSM501A dust sensor by ITead. We don't know whats wrong, but didn't get any meaningful readings. (pointers appreciated). Instead we bought Grove dust sensor from Seeed, seems fine.

    We acquired other gas sensors from Sainsmart, and they seem fine.

View all 9 project logs

Enjoy this project?

Share

Discussions

Similar Projects

Does this project spark your interest?

Become a member to follow this project and never miss any updates