Close
0%
0%

Multisite Home/Office/Hackerspace Automation

Toolchain to start making your environments connected in a single cloud

Similar projects worth following
This HaD prize entry is about the root of this contest: automation. We all know of the horrors of using someone else's private cloud. In the end, they own it, you don't. We need only look at the companies who tighten their screws on what was previously Open IoT infrastructure.

Just like the corporate offerings, I wanted my system to work with as many services and devices as possible. I also wanted to be able to interoperate from multiple sites. My 3d printers are located at a shop at a puppetter's shack. I have a computer co-lo'ed at our local hackerspace. I also have sensors at my desk at work. I want all of them to work together... but How?

Fast, good, cheap.... I pick all 3. ?! A blend of open source hardware and software allows me that leverage. So. Let's dig in.

This is an IoT project. The key here what I have dug up and uncovered, is how to extend Your IoT infrastructure to wherever your computers are.

Previously, we had to rely on some VPS machine to glue everything together, or worse yet buy into an infrastructure that would eventually turn hostile against you.

My solution uses Tor as the network glue, some scripts that enable .onion resolution across a whole Linux system, Node-Red for the glue logic, and MySensors/Arduino for the local sensors and actuators.

When this is all set up, you, the IoT developer can think of this whole infrastructure as hanging on multiple [hash].onion addresses. One address will be your MQTT server. Another will be a NoSQL database you're running BigData on. Another .onion will be the sensors and camera for your 3d printer at your friend's house. And all of these connections will be as if you're on one huge ethernet switch.
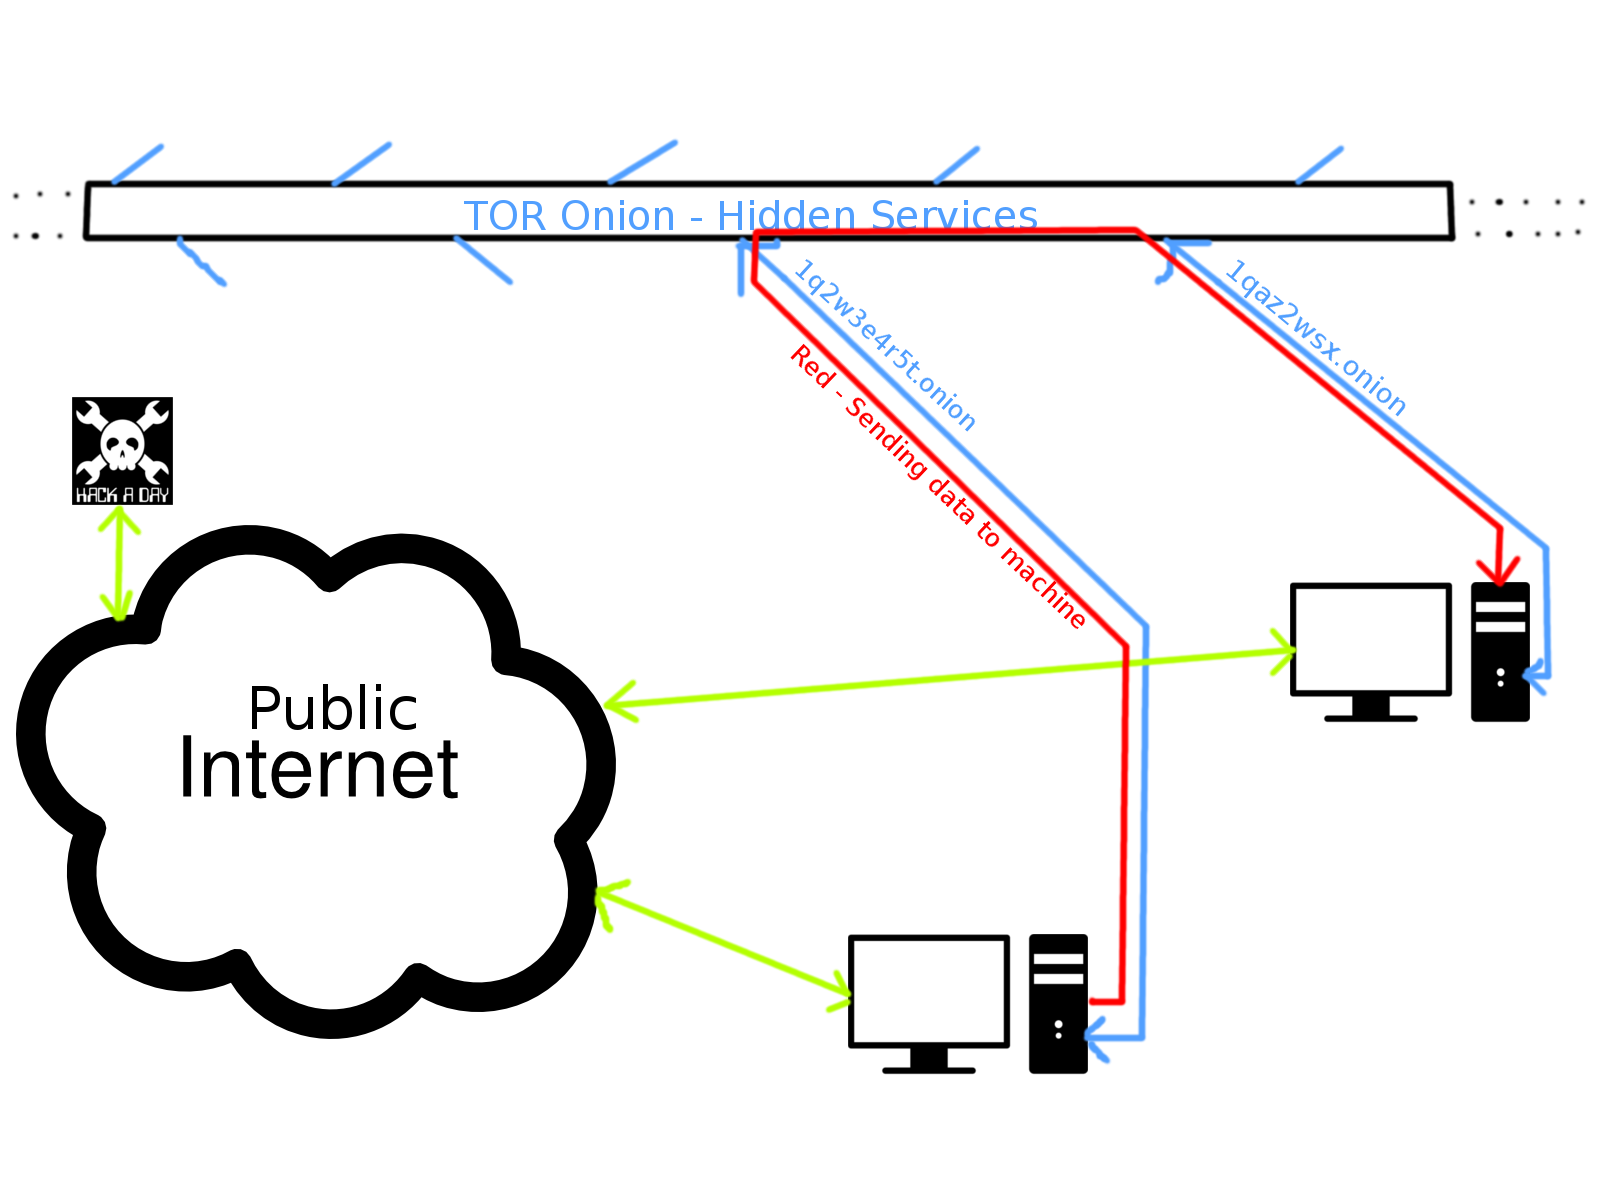


We completely bypass corporately owned IoT data and access. You control your data, your network, and your freedom. No other IoT system can give such hard statements.

BinarySwitchSleepSensor.zip

The Arduino code for the Door and button sketch

Zip Archive - 3.64 kB - 08/22/2016 at 23:54

Download

MySensors door and button_bb.png

Picture of schematic in fritzing

Portable Network Graphics (PNG) - 105.74 kB - 08/22/2016 at 23:54

Preview
Download

fzz - 6.87 kB - 08/22/2016 at 23:53

Download

x-xcf - 293.55 kB - 08/22/2016 at 19:34

Download

Portable Network Graphics (PNG) - 169.32 kB - 08/22/2016 at 19:33

Preview
Download

View all 17 files

  • 1 × Arduino Nano Clone Get them from Aliexpress for $1.90/each
  • 1 × nRF24L01+ -OR- Si24R1 Chinese clones are Si24R1. They don't play nice due to preamble errors
  • 1 × Sensors Really, whatever sensors you need for your project
  • 1 × Actuators Buy, scrounge, and dig up whatever motors, solenoids, steppers, or what you need

  • Add Seamless Android Access

    Joshua Conway08/23/2016 at 00:31 0 comments

    I just came across a few tools that may, with sufficient modification, allow full control via your Android/iDevice. This is still very much a work in progress, but this would allow full control from an "app" from your phone. These instructions are going to be for Android, because I'm a poor hacker.

    1. Install Orbot. (Tor client for android). Also install NR Inject.

    2. In Orbot, do Settings> Select Apps> and find NR Inject. Then close.

    3. Install in Node-Red the module "node-red-contrib-nr-injector"

    4. You'll see the new node in Node-Red in blue called "NR Injector". This is now an input that can toggle things on, off, and such... I'm playing around with it as well to figure out how to shim it in correctly. But for test, hook it up to a debug.

    5. In NR Injector app on Android, type in your Tor address...... which doesnt seem to work. Submitting patch to remove

  • IoT Door sensor

    Joshua Conway08/22/2016 at 23:58 0 comments

    For this, is a way to add a button actuator (for doorbell) along with a reed switch. Substitute one of the buttons for the reed switch - those magnetic thingies that act as a switch.


    The code to put on the Arduino is here:https://cdn.hackaday.io/files/12985555550240/BinarySwitchSleepSensor.zip

  • Refridgerator/Freezer Node

    Joshua Conway08/22/2016 at 16:03 0 comments

    the code We have a Samsung fridge/freezer. We've called multiple times about the fridge not cooling. They sent a technician out once, and chipped away and used hot air to get rid of the ice. Lo and behold, 1 month later, ice accumulates and causes the fridge to get in the 50f and above range.

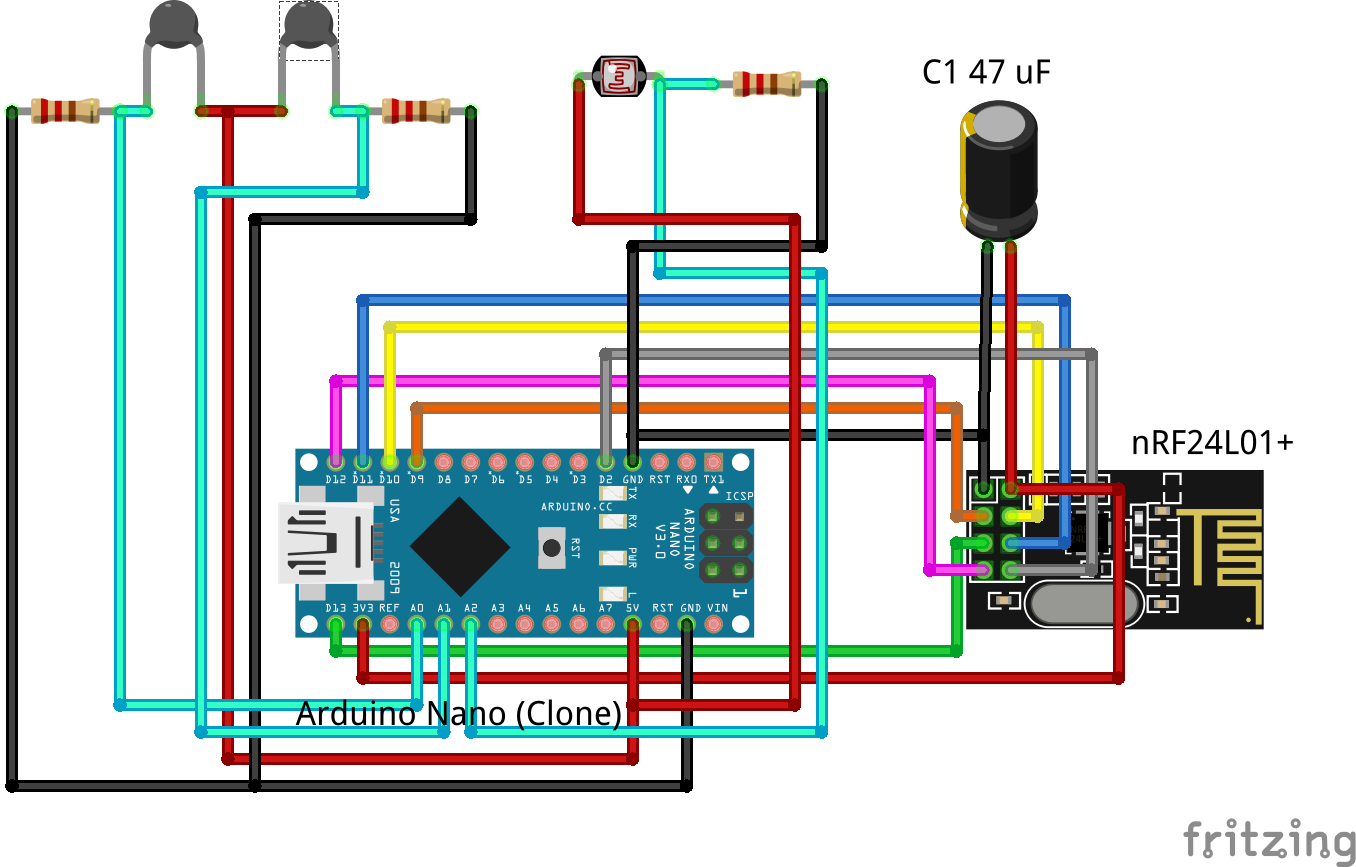
    So... IoT to the resuce! Wire up the Arduino Nano to the nRF24L01+ as per every board we use here. Next, you need 2 thermistors and ideally a photoresistor. This is the circuit (Fritzing file in files):

    And here's the code for the Arduino to get you up and running:https://cdn.hackaday.io/files/12985555550240/fridge_sensor.zip

  • WS2812 (Neopixel) Node

    Joshua Conway08/22/2016 at 15:30 0 comments

    Ws2812 node created (Neopixels). The code is the zip file called FastLED_node.zip . Instead of the Adafruit Neopixel library, this uses the FastLED library.

    FastLED library is a such nicer lib to use, with plenty of extra abilities built in. And it's smaller to boot as well.

    Files: https://cdn.hackaday.io/files/12985555550240/FastLED_Node.zip


    When you use this node, make sure to use the correct data pin for the strip, and change the number of pixels you have for your strand. We can't autodetect them.

View all 4 project logs

View all 7 instructions

Enjoy this project?

Share

Discussions

Similar Projects

Does this project spark your interest?

Become a member to follow this project and never miss any updates