 paweljarosz
Open sesame
Another problem we wanted to solve was dealing with keys, searching them in your backpack, while you simply want to open the door. If you want to make your doors smarter just follow us making a simple DIY opening and locking device.
Hardware
- Husarion CORE2 with ESP8266 adapter (available here)
- Servo Tower Pro MG-995
- LED RGB
- Li-Po Battery
Assembly
We prepared 3D printable elements, so feel free to download them, print and attach on your door lock. We don't want you to destroy your doors, so we made it easy to attach with some screws or tape.
 Mechanism assembly
First of all, solder some wires to the RGB LED. It will be the indicator, so we use only red and green color. Then insert LED to the larger gear.
 RGB LED with wires soldered and inserted in the larger gear
We attach the PMMA plate with tape under a door lock for CORE2. There are 4 screws and 4 distance nuts.
Then insert the larger gear on a knob, and tighten it with screws.

Tighten CORE2 with 4xM3 screws.

Next, assembly a servo with the smaller gear and the base. We tightened servo with 4xM3 screws. Then attach it above a door locker, so it will be able to move correctly. We used tape to attach the base with the servo to a door above the lock. Bear in mind, that the program will be starting at the open position, so unlock the door and make sure, that the servo is in a correct position before assembling gears togheter. The best is, to do it after programming, so the servo will be in the desired position.


Connections
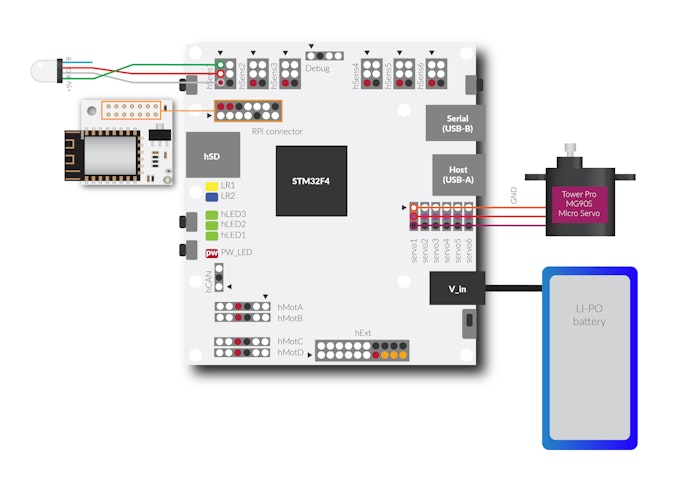
Attach ESP8266 adapter delivered with CORE2 in the box for free in the RPi connector. Connect RGB LED to the hSens1 port as described on the schematics. Connect the servo to the hServo1 port. In the end connect Li-Po as a power supply.
Code
We used Husarion Cloud to program CORE2 with ESP8266. Everything could be find on the site here.
When you connect your CORE2 to the Cloud just program it with our source code available from github here. We also pasted main.cpp here:
#include <cstddef>
#include <cstdint>
#include "hFramework.h"
#include "hCloudClient.h"
#define opened 2500
#define closed 800
bool status;
void cfgHandler()                               //UI
{
	platform.ui.loadHtml({Resource::WEBIDE, "/ui.html"});
}
void onButtonEvent(hId id, ButtonEventType type)
{
	if (id == "bo") {
		if (type == ButtonEventType::Pressed) {
			hServoModule.enablePower();
			hServoModule.servo1.setWidth(opened);
			hSens1.pin1.write(0);
			sys.delay(1000);
			hSens1.pin3.write(1);
			hServoModule.disablePower();
		}
	}
	if (id == "bc") {
		if (type == ButtonEventType::Pressed) {
			hServoModule.enablePower();
			hServoModule.servo1.setWidth(closed);
			hSens1.pin3.write(0);
			sys.delay(1000);
			hSens1.pin1.write(1);
			hServoModule.disablePower();
		}
	}
}
void hMain()
{
	status = false;
	platform.begin(&RPi);
	platform.ui.setProjectId("@@@PROJECT_ID@@@");
	platform.ui.configHandler = cfgHandler;
	platform.ui.onButtonEvent = onButtonEvent;
	hServoModule.setVoltage6V();
	hServoModule.enablePower();
	hServoModule.servo1.calibrate(-90, 800, 90, 2400);
	hSens1.pin1.setOut();
	hSens1.pin3.setOut();
	hSens1.pin1.write(0);
	hSens1.pin3.write(1);
}
Use your device via web browser and our ui.html.
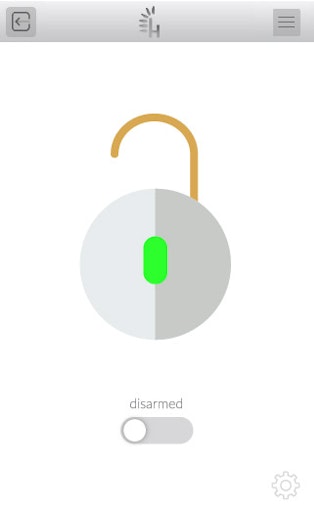
You can see it working here:
 MaBe42
 likeablob
 Jarich
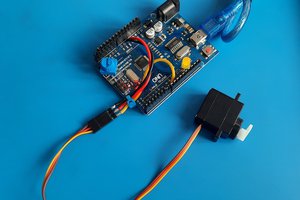
 Marius Taciuc