Sarah Petkus
-
CHALLENGE : BUNS
07/26/2018 at 21:42 • 1 comment![]()
I had every intention of finding some proper suction cups for research and development on the augment for my "buns". My plan was that this coming weekend would be all about my butt- but no such suction cups did I find... no… so plans had to change.
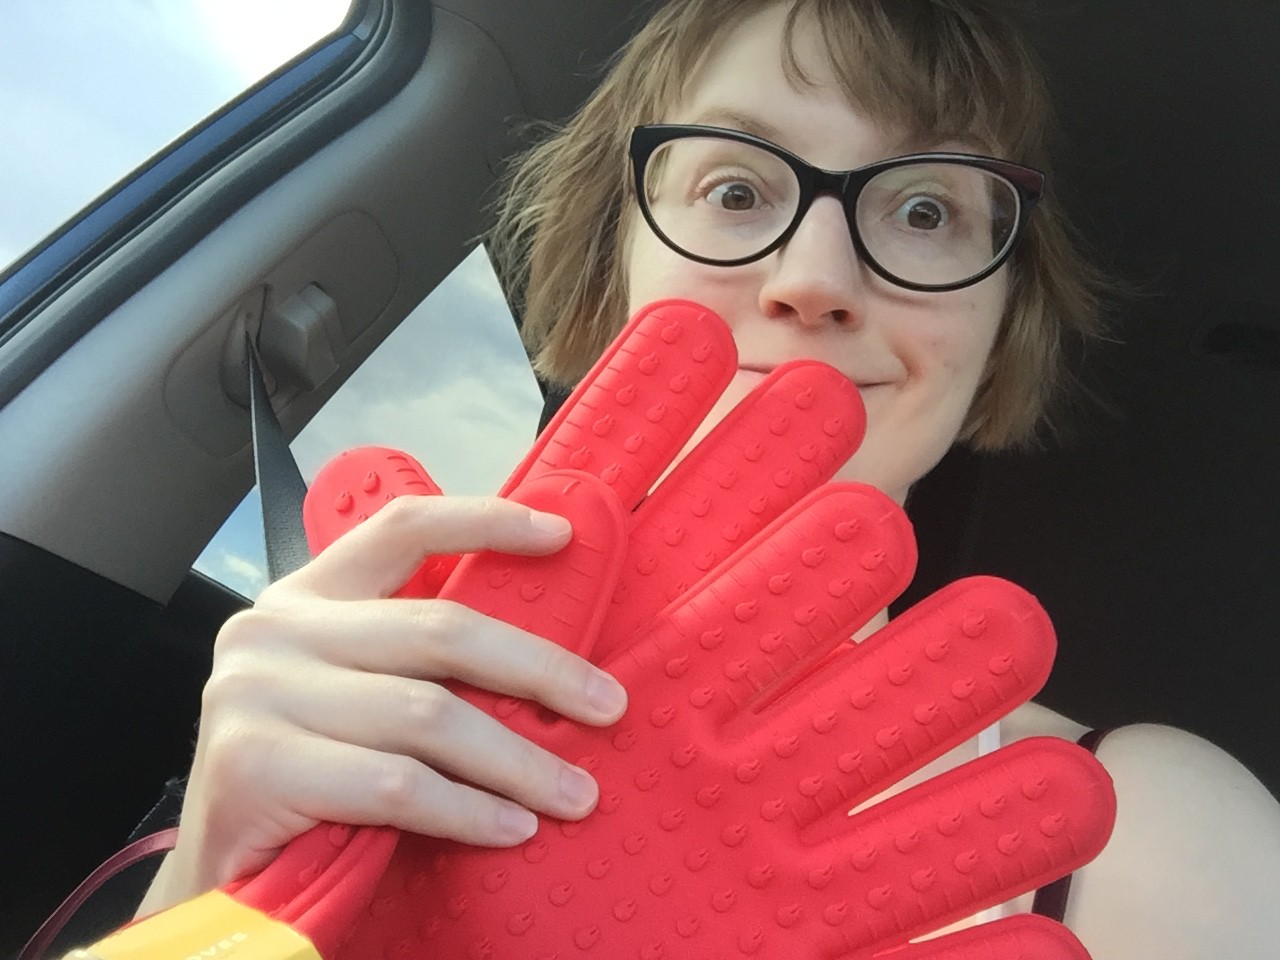
In leu of what I sought, I did stumble upon some meaty-beefy silicone grilling mitts on clearance in Target's summer section (that they were shedding to replace with back to school crap).
![]()
These gloves are thicc and have a satisfying weight to them (just the way I like). There were two pairs of these bad boys left. Since they titillated something within me, I snatched them both up. I wasn't yet sure where my subconscious was running off to- but I figured I'd catch up with it eventually.
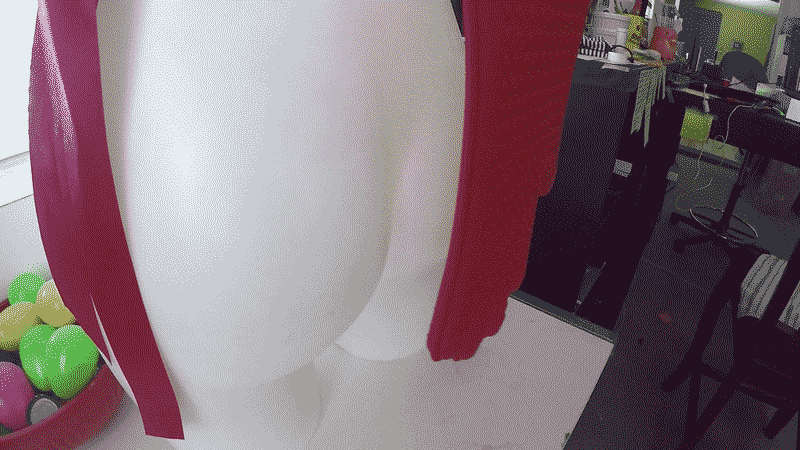
---------- more ----------On the way home, it occurred to me that the big red gloves were sorta like mud flaps on a semi-truck.
![]()
This realization helped me catch up with my subconscious dirty mind. The gloves also reminded me of the sort of big red handprint one gets on their skin after receiving a good swift slap.
Mud flaps... slapping... this can be a thing... no... this MUST be a thing!!
I already have something specific planned for the "buns", so I decided that this new impromptu augment could occupy the same area of my body, however jack into the left or right "thigh" connector on the Pulse board.
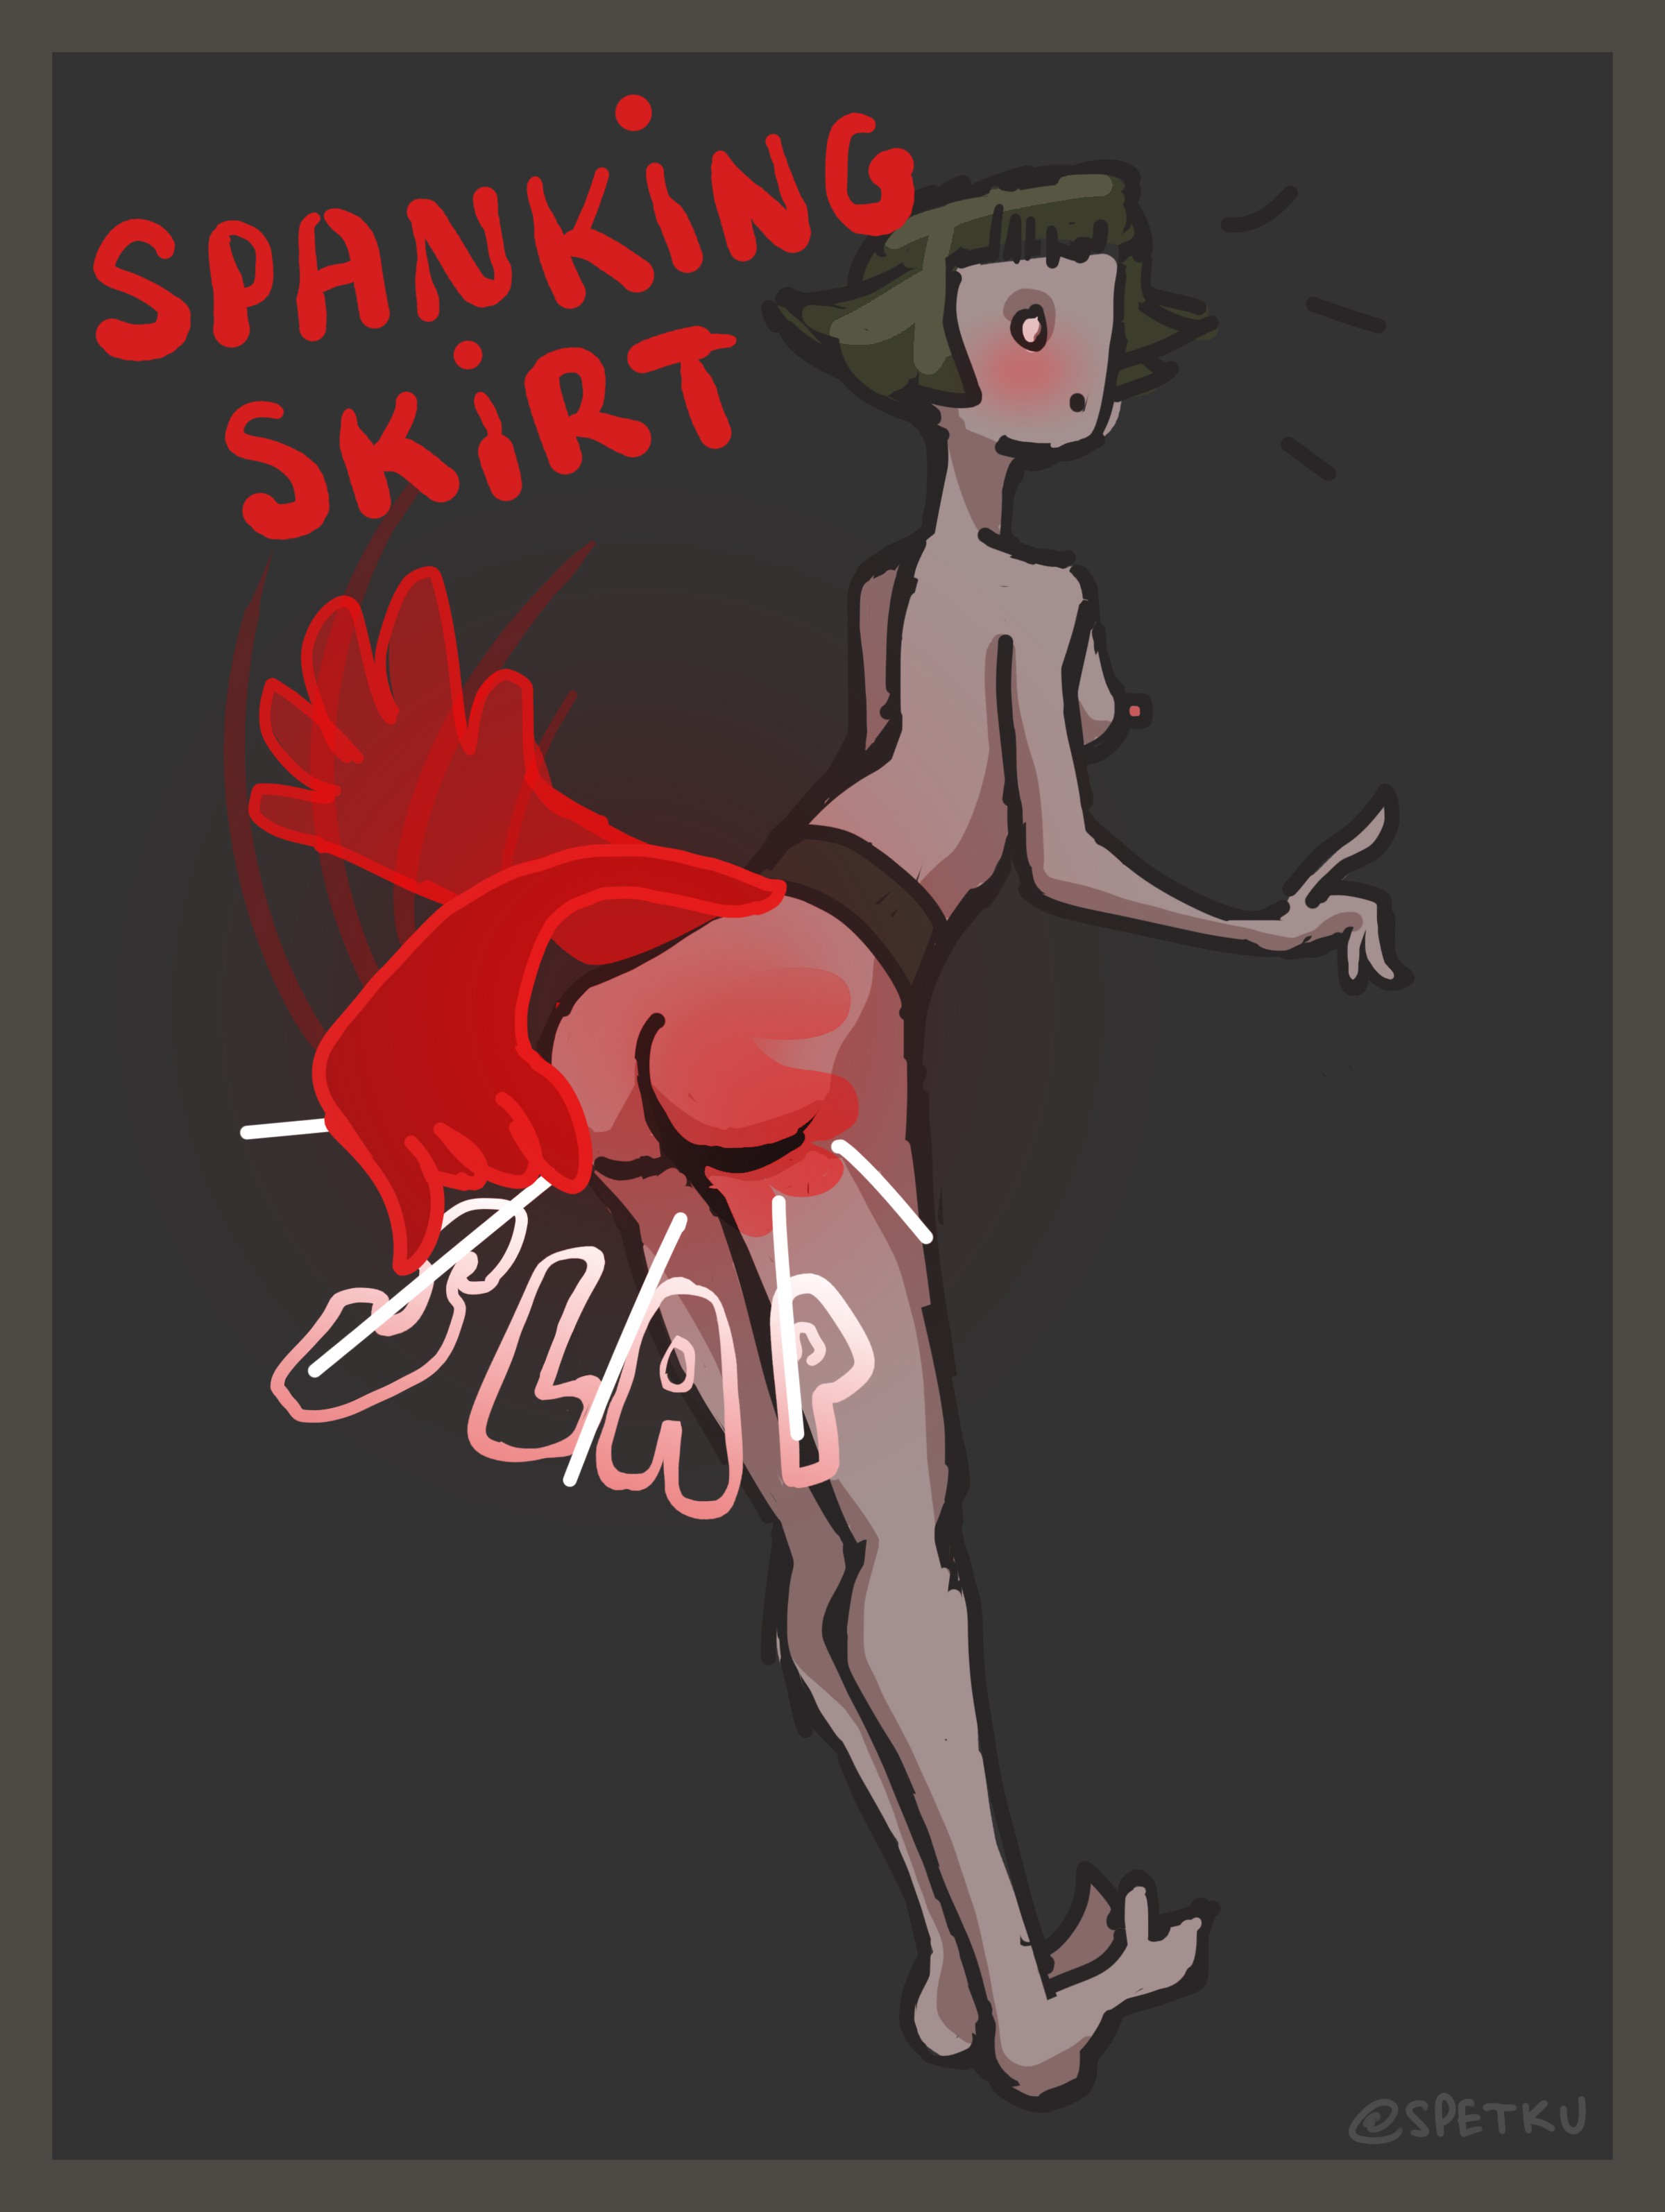
For my next trick, I would like to construct a Slapping Skirt, if you will. A kilt of hands that can swing back and whip forward with enough force to spank the skin beneath.
![]()
Within the past 24 hours, I've already met with my fellow mechanical minded friends, the forces that be, and discussed possible ways of creating a waist-mounted device to provide such motion.
The words I'll throw out there for now: cam, springs, and some torqueeee motors.
Since I have two pairs of these gloves, I figure I'll use both sets. One for directly behind me, and one set for my flanks (the back and the sides).
Time to make a mechanical skirt capable of whipping my bum. Would anyone out there enjoy wearing such a thing as much as me, I wonder? ;) Wish me luck!
-
CHALLENGE : THIGHS
07/25/2018 at 22:05 • 1 comment![]()
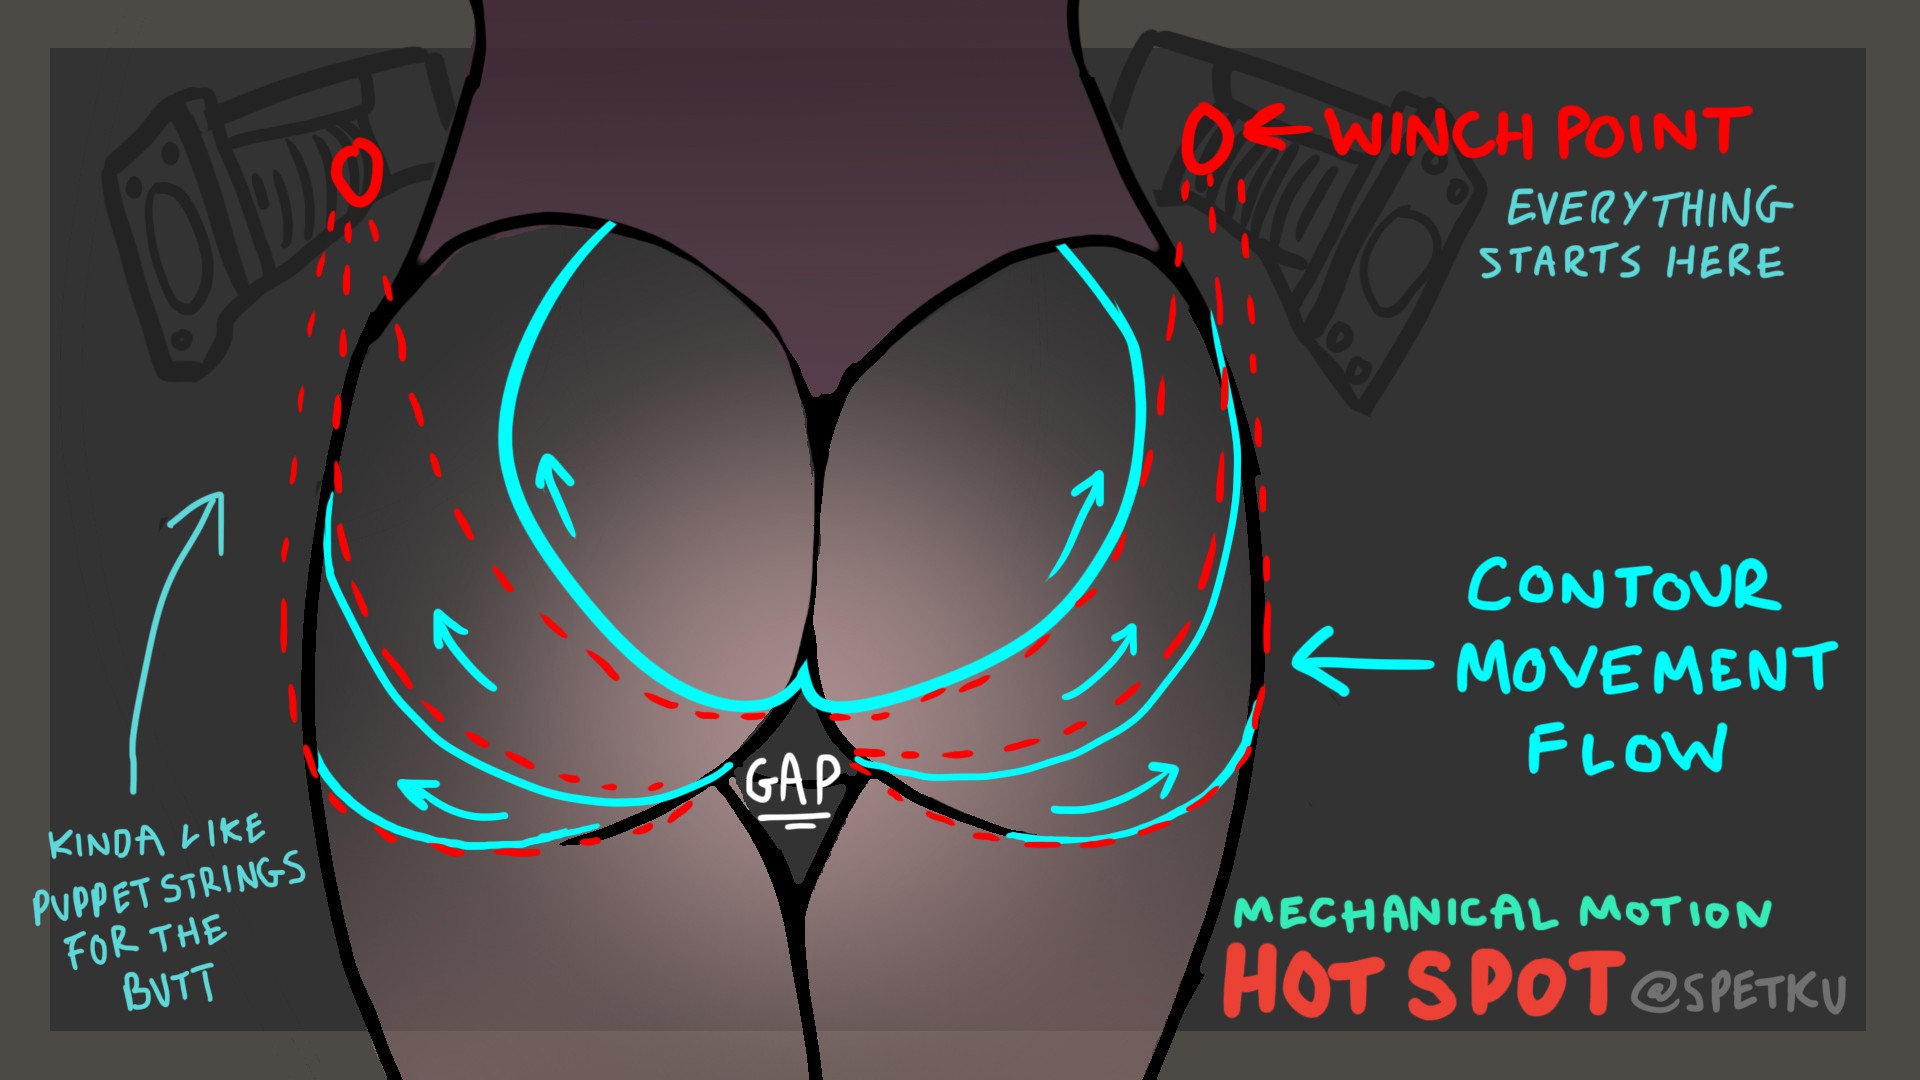
THE HOT SPOT
As the name suggests, this augment involves heat… and a spot…
If you’re familiar with the other modules part of this project, then you know the drill. This device senses something from the part of the body it is designed for, and then utilizes that part of the body to indicate that which is sensed. I get extra credit if I can create a feedback loop with a totally unintentional byproduct of pleasurable stimulation... So here we go! Challenge: THIGHS
(note: I originally labeled the 'spank skirt' as being the augment for the thighs, but decided it made more sense for the buns. so I switched it!)
SENSING
INPUT: Body temperature… specifically the atmosphere between my thighs; a place very likely to exhibit temperature fluctuations for a number of reasons.
INDICATING
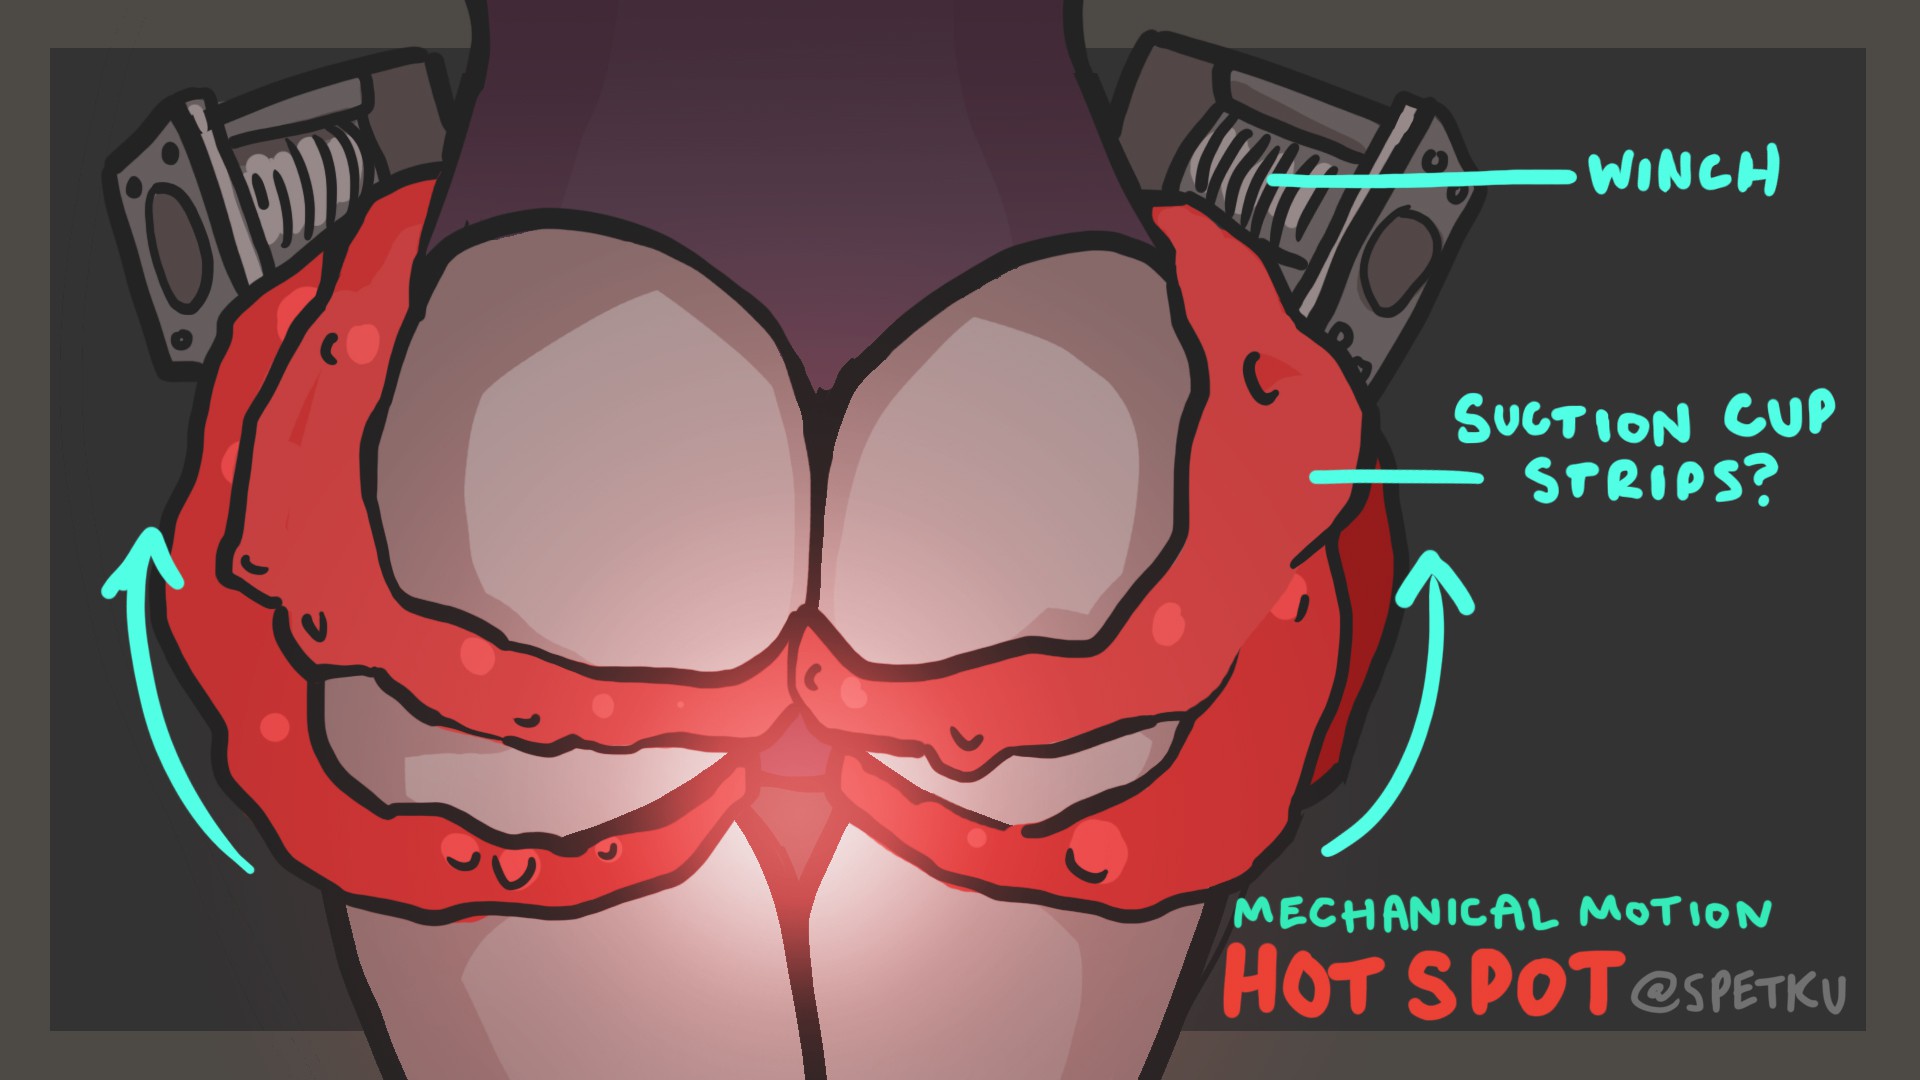
OUTPUT: an elevation in body temperature beyond a designated threshold will activate a geared motor or winch mounted on either hip. The winch will tug on a kevlar tendon stitched through the length of a suction-cup-like tentacle whose cups adhere to the surface area of either half of my… butt. When the winch winds, the tendons should be pulled taught, tugging the flesh of my checks apart from one another. At the point when separation is achieved, a light will shine through the gap that’s created, backlighting the negative space formed by this action.
![]()
Once the gap is formed, this will allow the free flow of air into the open space. This will cool the area below the triggering threshold and trigger the system to unwind the winch, releasing the cheeks.
Think of Moses… parting the Red Sea. Think of any of those action…. Sci-fi……… adventure films where the ocean separates into two solid walls with nothing but a vertical slice in between. I want that. This is my goal.
---------- more ----------EXTRA CREDIT
At some point in time, there was a discussion amongst my friends about ass grabbing. We concluded that not all ass-grabs are equal.
Just like anything else, there is a satisfying way to do it and a shitty way to do it. Throughout my life, I have predominantly been subject to the latter, but I luckily know of at least one person who is pro in the ass-grabbing department.
Stop laughing I’m totally serious about this. There is nothing more disappointing and rapey than a lackluster ass squeeze from someone who is blatantly using your body in a one-sided effort to get themselves excited.
If your goal is to stir the person whose flesh you are handling, as well it should be… then consider this method as a suggestion the next time you give someone a tushie squeeze.
![]()
It’s not about the squeeze. It’s all in a firm grip… and a slight pull. The pull is key. If you are a female receiving this particular ass-grab, the pull should peal apart the flesh in-between your legs just enough to suggest the idea of something more with the physical sensation produced.
I’ll call it the “squeeze and lift” (only because “grip and tug” lends itself more to a completely different act)
Now then. Both of those terms are descriptive enough to form ideas regarding what sort of mechanical motion might come into play. Plenty of mechanisms are capable of different types of squeezing/gripping actuation, as well as lifting/tugging. The question becomes, which will work in the butt… context.
We are talking about a wearable here, so this device can’t inhibit me from walking, and ideally……… it shouldn’t prevent me from sitting down either.
It should also look cool. Aesthetics matter in this game.
TO COME FULL CIRCLE: the reason why I'm trying to mechanically replicate this satisfying ass grab in particular, is that it happens to produce that thigh separation I'll need in order to shine the light through my gap. Savvy?
MATERIALs
I like octopuses. They're hickey aliens of the sea. I saw this video around the same time all of this was coming together in my head:
Attaching to the butt: Channeling inspiration from their natural attachment mechanisms (suction), my minds eyes saw something like a bathmat, or dish sink mat with suction cups on one side as the material that would adhere in long strips to the contours of my butt:
![]()
I have a few varieties of this sort of thing coming in the mail soon. I plan to cut them into strips, creating a line of suction cups from the attachment point of the pulling force, down along the desired path of motion.
The matter of sticking (in leu of sucking): It isn't likely that this thing (or anything I end up buying to play around with) will stick to my skin with suction alone; not while being tugged on by a winch at least.
It was suggested to me that I look into medical adhesive as a cheat. So I am.
The tendon: Noodle's shape daddy also suggested that I use Kevlar thread as my pulley tendon. It's strong and more flexible that wire rope, so it's been ordered as well.
motorized actuation: Lastly... there is the matter of the winch (or very geared torquey motor). I only need to pull the tendon a small amount, I'm guessing between 6 - 12 cm, but it's going to take a bit of force to displace the flesh.
I don't want TOO MUCH power however... as I'm not trying to rip my ass in half. I just want a nice strong but subtle motion.
GET TO WORK SARAH
I have homework to do and some fun R&D ahead of me. If any of this interests you, I will be streaming various tasks throughout the week as my materials arrive in the mail from the Amazon fairy. :)
The streaming will take place on my channel: GravityRoad
As always, I appreciate the support of my patrons on Patreon. This time of year, their honey money is pretty much my primary source of income. They are the life blood of projects like this <3
-
Lets Enhance Ourselves... Together
07/17/2018 at 22:03 • 1 commentThis week, the "Human-Computer Interface" category for the HackaDay Prize popped wide open.
I've followed this contest from the sidelines since the beginning, so I'm very excited to announce that I'll be participating this year............. by entering none-other than the SHE BON project as an open source offering!
If you aren't familiar with the project scope, "SHE BON" is a wearable platform for sensing and indicating the user's level of arousal with mechatronic body augments.
How might we use our body data to communicate what would otherwise go unnoticed? Can the technology we create help us express ourselves in new ways, adding another layer of texture to our daily lives?
---------- more ----------On the technical side...
- half of the project involves the platform which logs and displays the data received from the various sensors use by the "augments".
- half of the project involves the individual augments themselves; how they are equipped to sense biological data from the wearer, as well as the way in which they communicate what they are sensing.
Basically, think of SHE BON as an exo(tic)-skeleton that functions to track what your body is feeling, and indicate that information visually by means of electronic and mechanical devices! It's a suit of amour!
On the conceptual side...
My goal in working on this project publicly is two-fold...
- I hope that by publishing my development, this will help normalize discussion about sexuality and spark a general dialogue with others about our sexual nature.
- I wish to encourage others to make more personalized technology for their individual use... like creating another limb for the purpose of enhancing self expression.
The augments I am creating this summer are personalized for me. They are manifestations of my own flavor of self expression. I challenge you to create some of your own that communicate something about you.
I'll be working on the primary platform through Fall, and I hope to create something that will serve this cause, should anyone decide to embark on this adventure of self exploration and next-level communication along with me.
Lets Trans-human together! ::channels inner Barbarella::
-
Sensing from & Indicating to : NIPS
07/06/2018 at 00:46 • 0 commentsMost of the areas of the body listed on the PULSE board are open and waiting to receive something to control: arms, thighs, head, buns, nips, and neck!
![]()
Each comes with its own challenges and list of potential ideas. After much thought, I decided to direct my attention to the nipples for my next project...
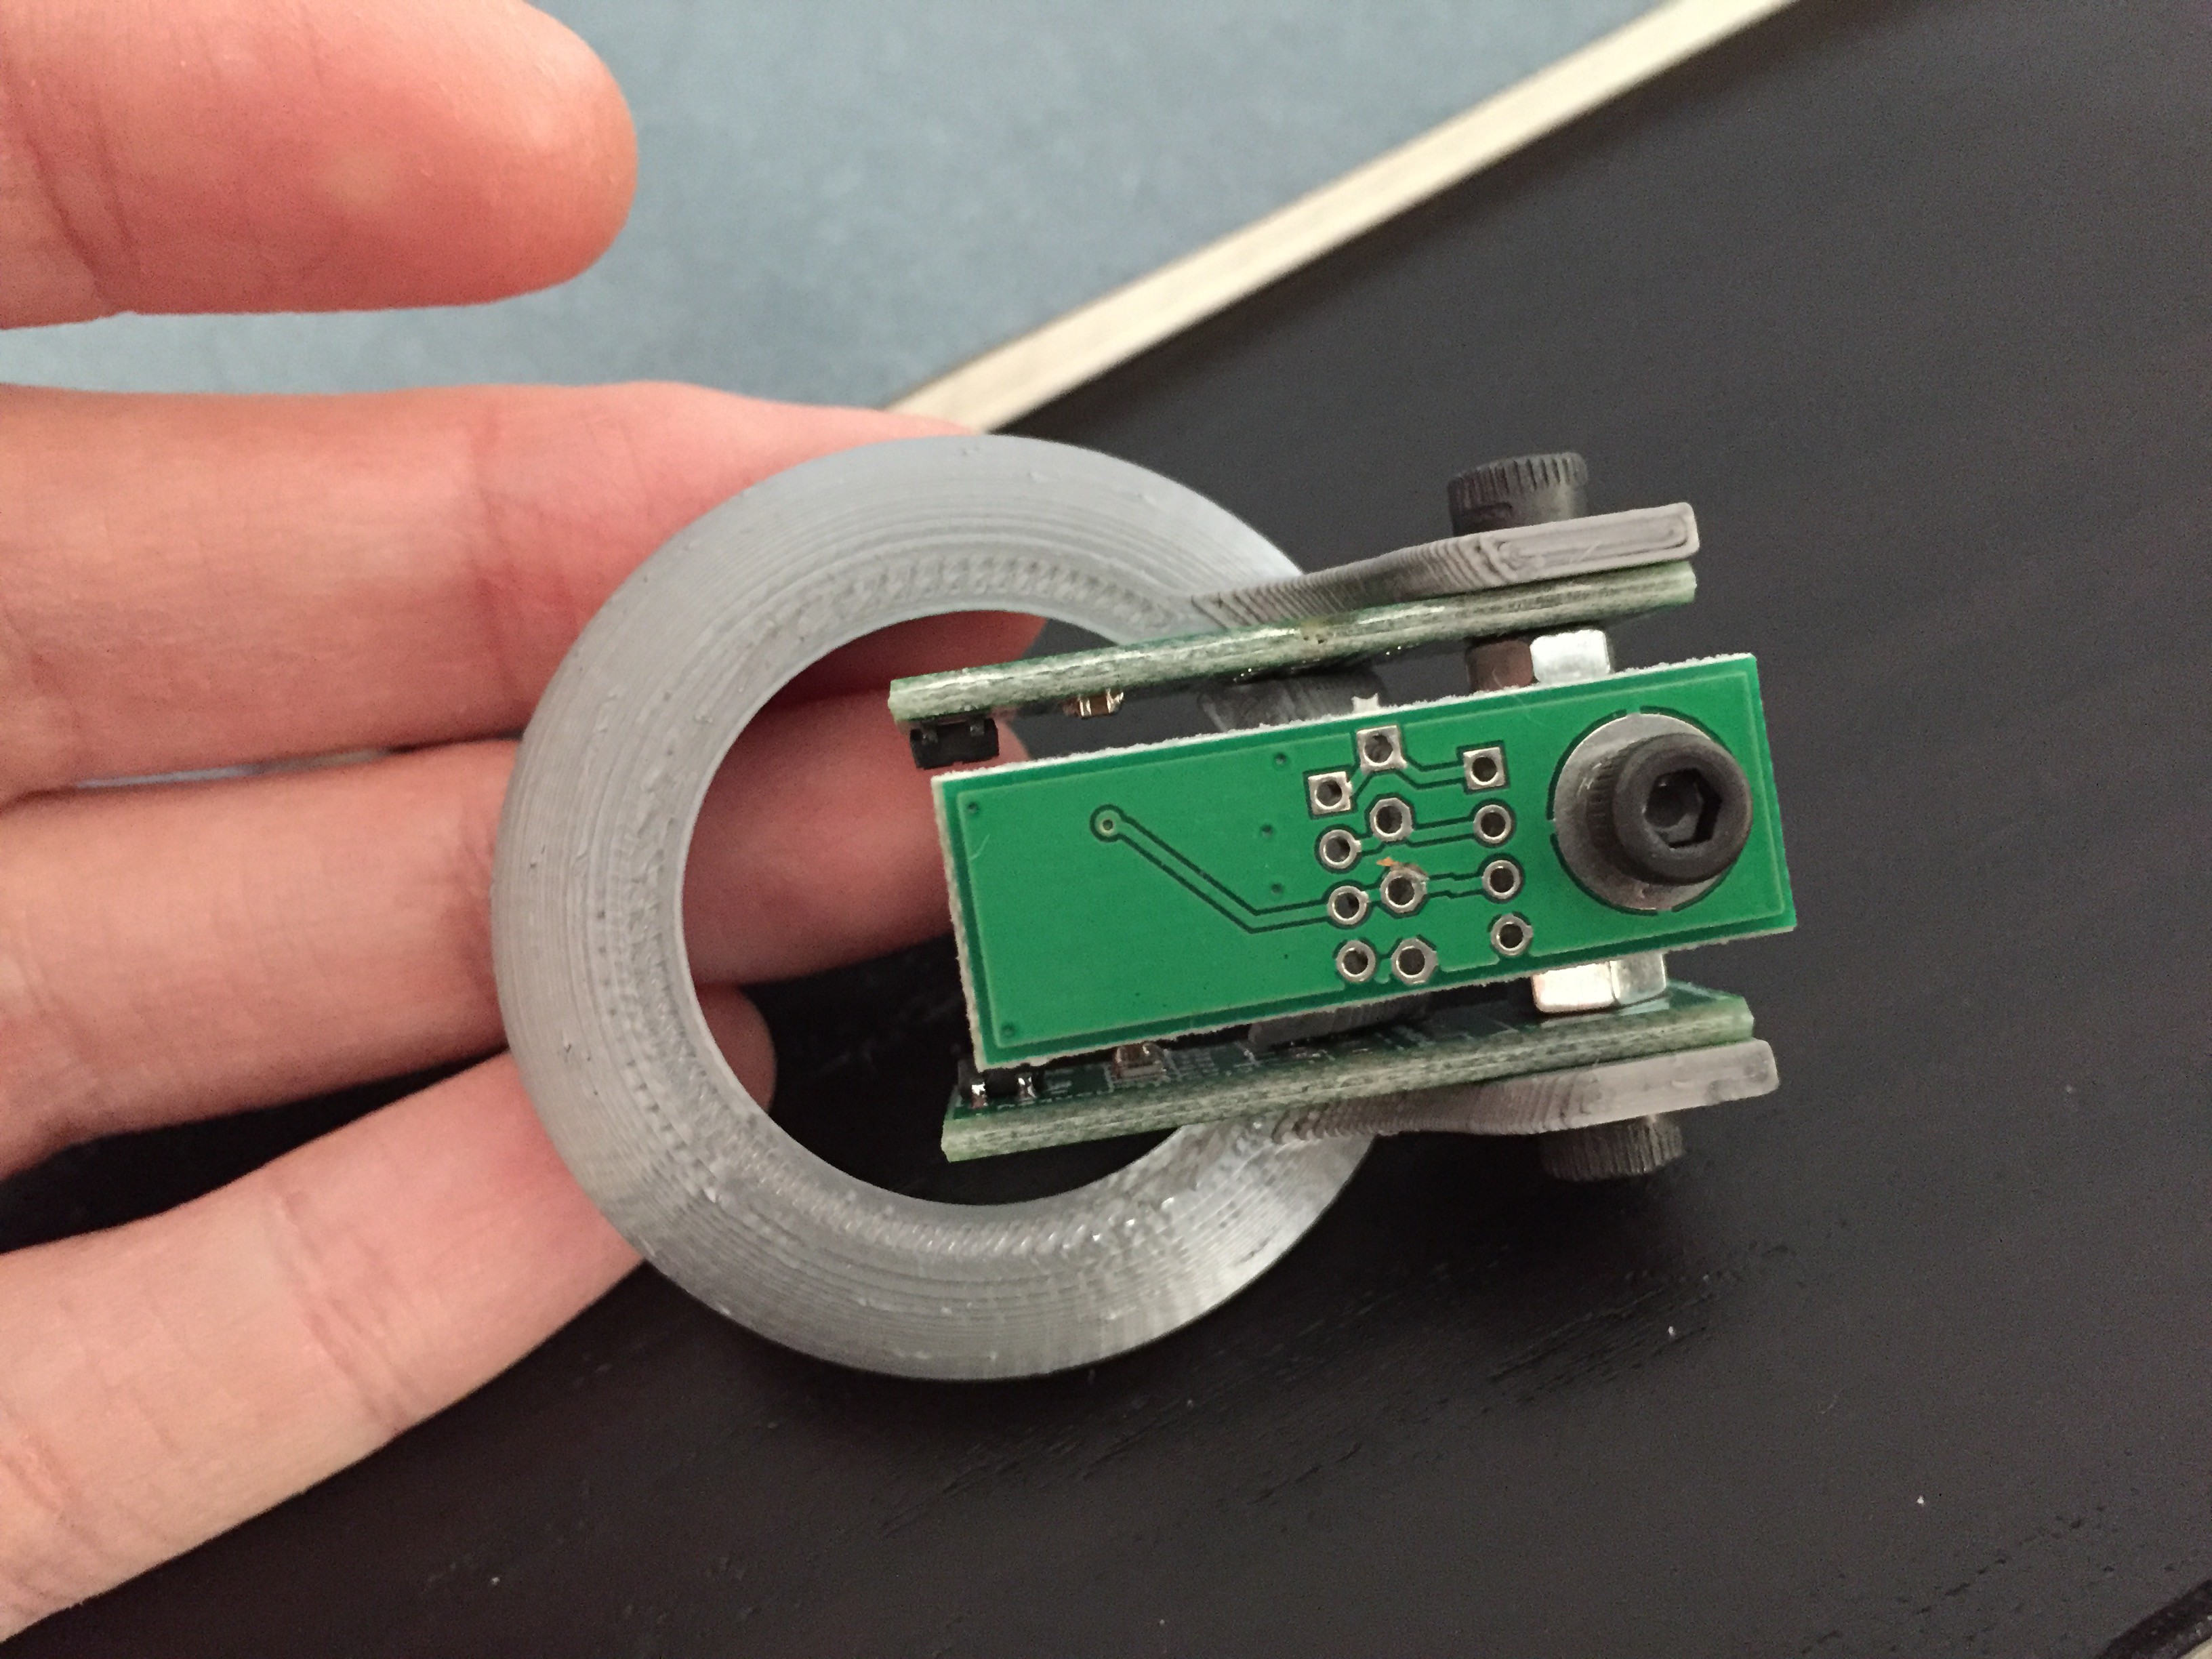
The first nipple augment is called the "Propellor Pasties"! As its name suggests, it senses fluctuations in the size of the wearer's nipple using IR distance sensors and then indicates the fluctuation by spinning a geared propellor mounted to the other breast.
---------- more ----------SENSING FROM THE NIP
Initially, the brainstorming session for this build took place in the kitty pool with an electronics engineer, a machinist, and plenty of beer to go around. As these *meditations* go, we first discuss the WHAT, and then mulled over the HOW. What am I sensing from the nipple, and how will I do it?
Likely, you're thinking to yourself that this is a matter of detecting fluctuations in size and stiffness. Which realistically, if we're talking lowest hanging fruit, those are the branches to pick from!
What sensors might a proper hardware hacker pick for the task of sensing discrete changes in stiffness or size? I personally can think of at least a half-dozen. The most accessible to me (as a broke af artist right now) was what Mark happened to have on hand in the lab: IR reflective sensors.
The little IR reflective sensor boards (Which mark designed himself long ago) turned out to be excellent at reading small changes at a close distance. When placed near a form-shifting Nipple, they might work to tell when there has been a shift in size/girth/stiffness.
![]()
To test this out, I designed a pastie stand-off in CAD, mounted one of the sensors to it, and watched the serial line plotter in Arduino while moving my pinkie finger in and out of proxy to the chip. It turned out to work stellar!
INDICATING TO THE NIP
The second half of the problem involves the matter of indication. After something is sensed from the subject (nipple)... then what?
This is typically the part that allows me to exercise more creative freedom and silliness. As mentioned earlier... the name of this meditation includes the word, "propellor". So you see where this is going.
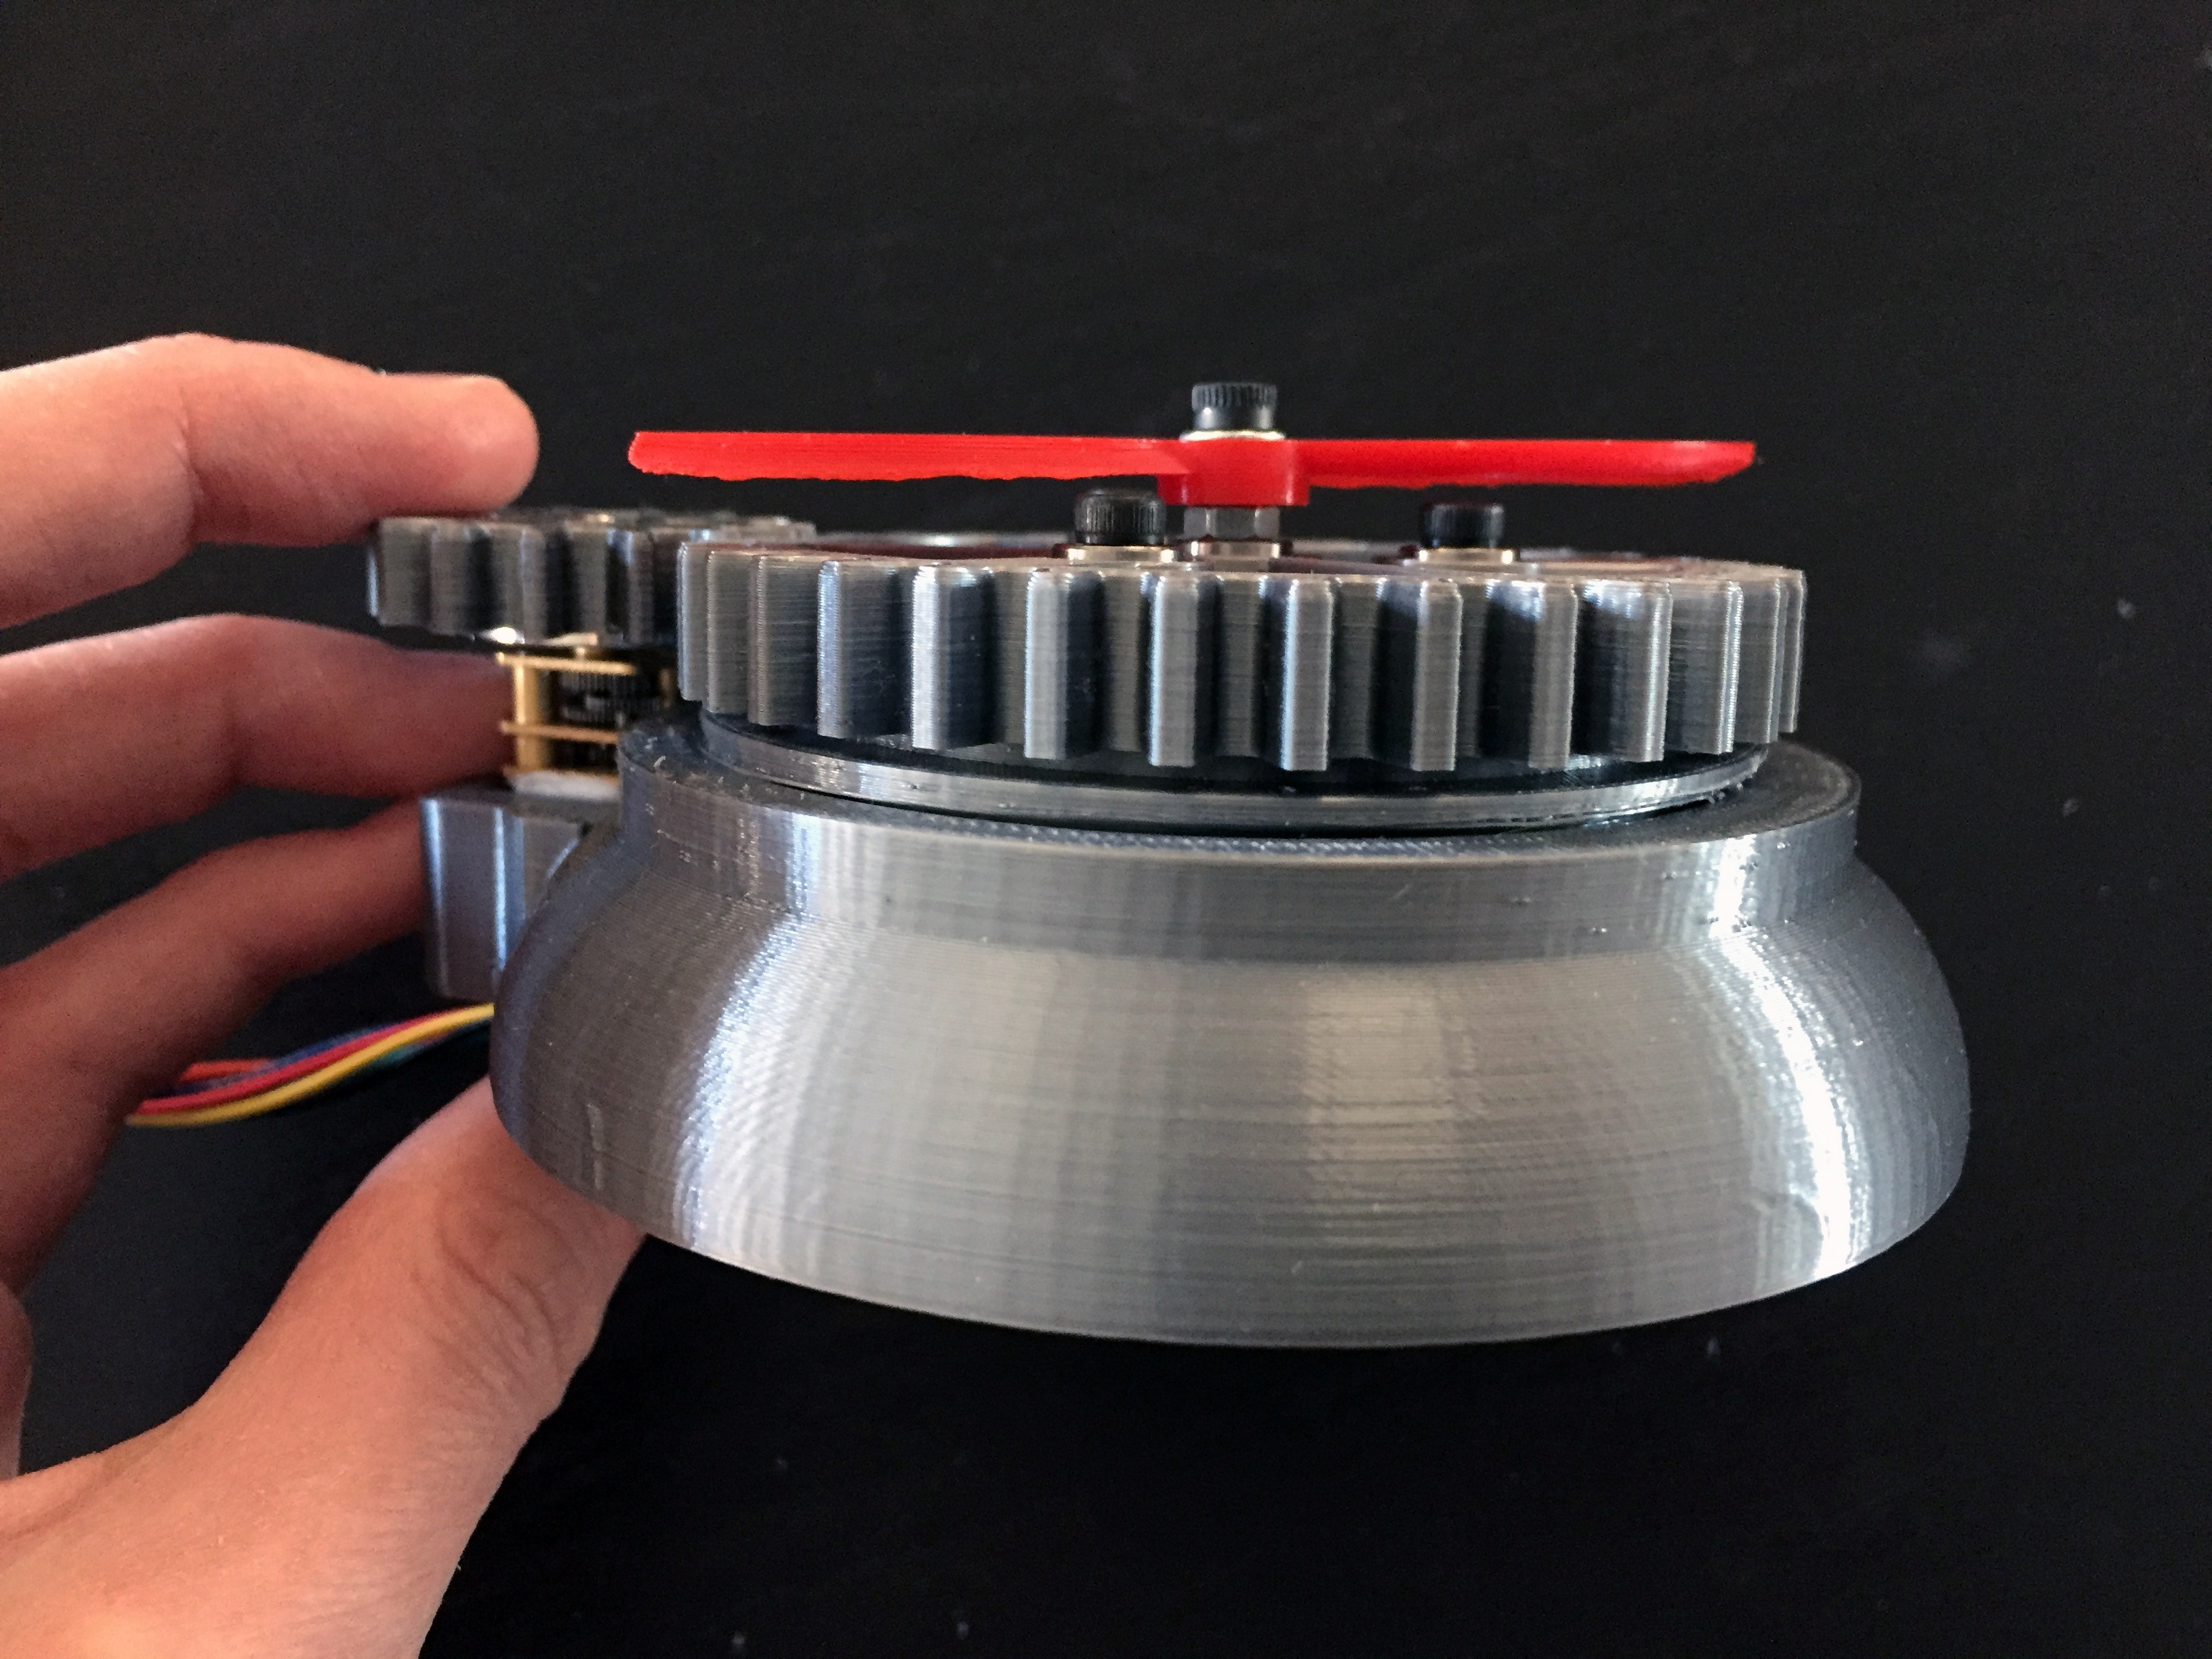
Right out of the chute, I knew there needed to be some spinning entity mounted on the end of the breast. The spinning propellor came to manifest as a geared and driven indicator whose speed directly related to the distance read by the IR sensor.
The challenge in this was:
- creating a gearbox that mounts to a breast!
- the gear box must spin a central propellor over the nipple
- the gears probably shouldn't shred the nipple
- I get bonus points if the function somehow stimulates the wearer in a pleasant way
On an unrelated note, I had recently assembled a toy rover kit that I had picked up while in Tokyo. It had a somewhat showy planetary gear system on the top of it, that stuck in my mind for some reason. Three smaller gears rotated within it... creating a nice circle-within a circle effect:
![]()
Alas, I recreated this system with my own printed gears and it worked just as imagined:
![]()
THE COMMON PASTIE ADAPTOR
Once I had the properly calibrated sensor stand off and a working planetary gear box + propellor. Now what? These two key assemblies won't do me any good unless they are mounted to an actual breast, and in the correct location at that.
The part of this build that took the longest amount of time, was creating a "common pastie adaptor" that both the IR mount and gear box could screw onto... and also seat in the correct location relative to the nipple.
This took a lot of trial and error in CAD because I could not simply create a boobie *stand-in* model to design around in Fusion360. I couldn't get a sense for how something would fit until it was assembled and tested on my body irl.
I made slight adjustments to each assembly until both systems fit universally on the same pastie adaptor, and were locked in the correct position once screwed in place.
The adaptor and assemblies are threaded so that they can couple and decouple with ease!
![]()
Here is the IR sensor standoff seated on a pastie adaptor:
![]()
You can see the sensor chip centered over the middle of the housing from below:
![]()
Here is the gear box seated on the pastie adaptor:
![]()
The "common" adaptor isn't truly common, in that the one for the gear box is modified with a mounting point for a tiny DC motor on the side (other than that though they're the same shape/proportion):
![]()
BONUS CHALLENGE: STIMULATION
I stated back when I first announced this project: the point of all these wearable augment IS NOT to arouse the wearer. The goal is to sense and indicate arousal. HOWEVER... if the indication happens to stimulate the wearer as a byproduct- then this is allowable.
This creative challenge manifested with those three seemingly useless internal gears part of my planetary gearbox. Secretly, when I looked at that little rover toy, I saw them doing something very useful indeed... like facilitating in a kneeling motion.
I added some thick rounded bumpers to the ends of my gears. The not only massage the nipple, but also help keep it a safe distance away from the working gears that would otherwise SHRED IT:
![]()
Once positioned in the proper direction, the three oval-shaped bumpers produce an undulating... kneading effect around the middle:
![]()
SUCCESS.
TESTING THE SYSTEM
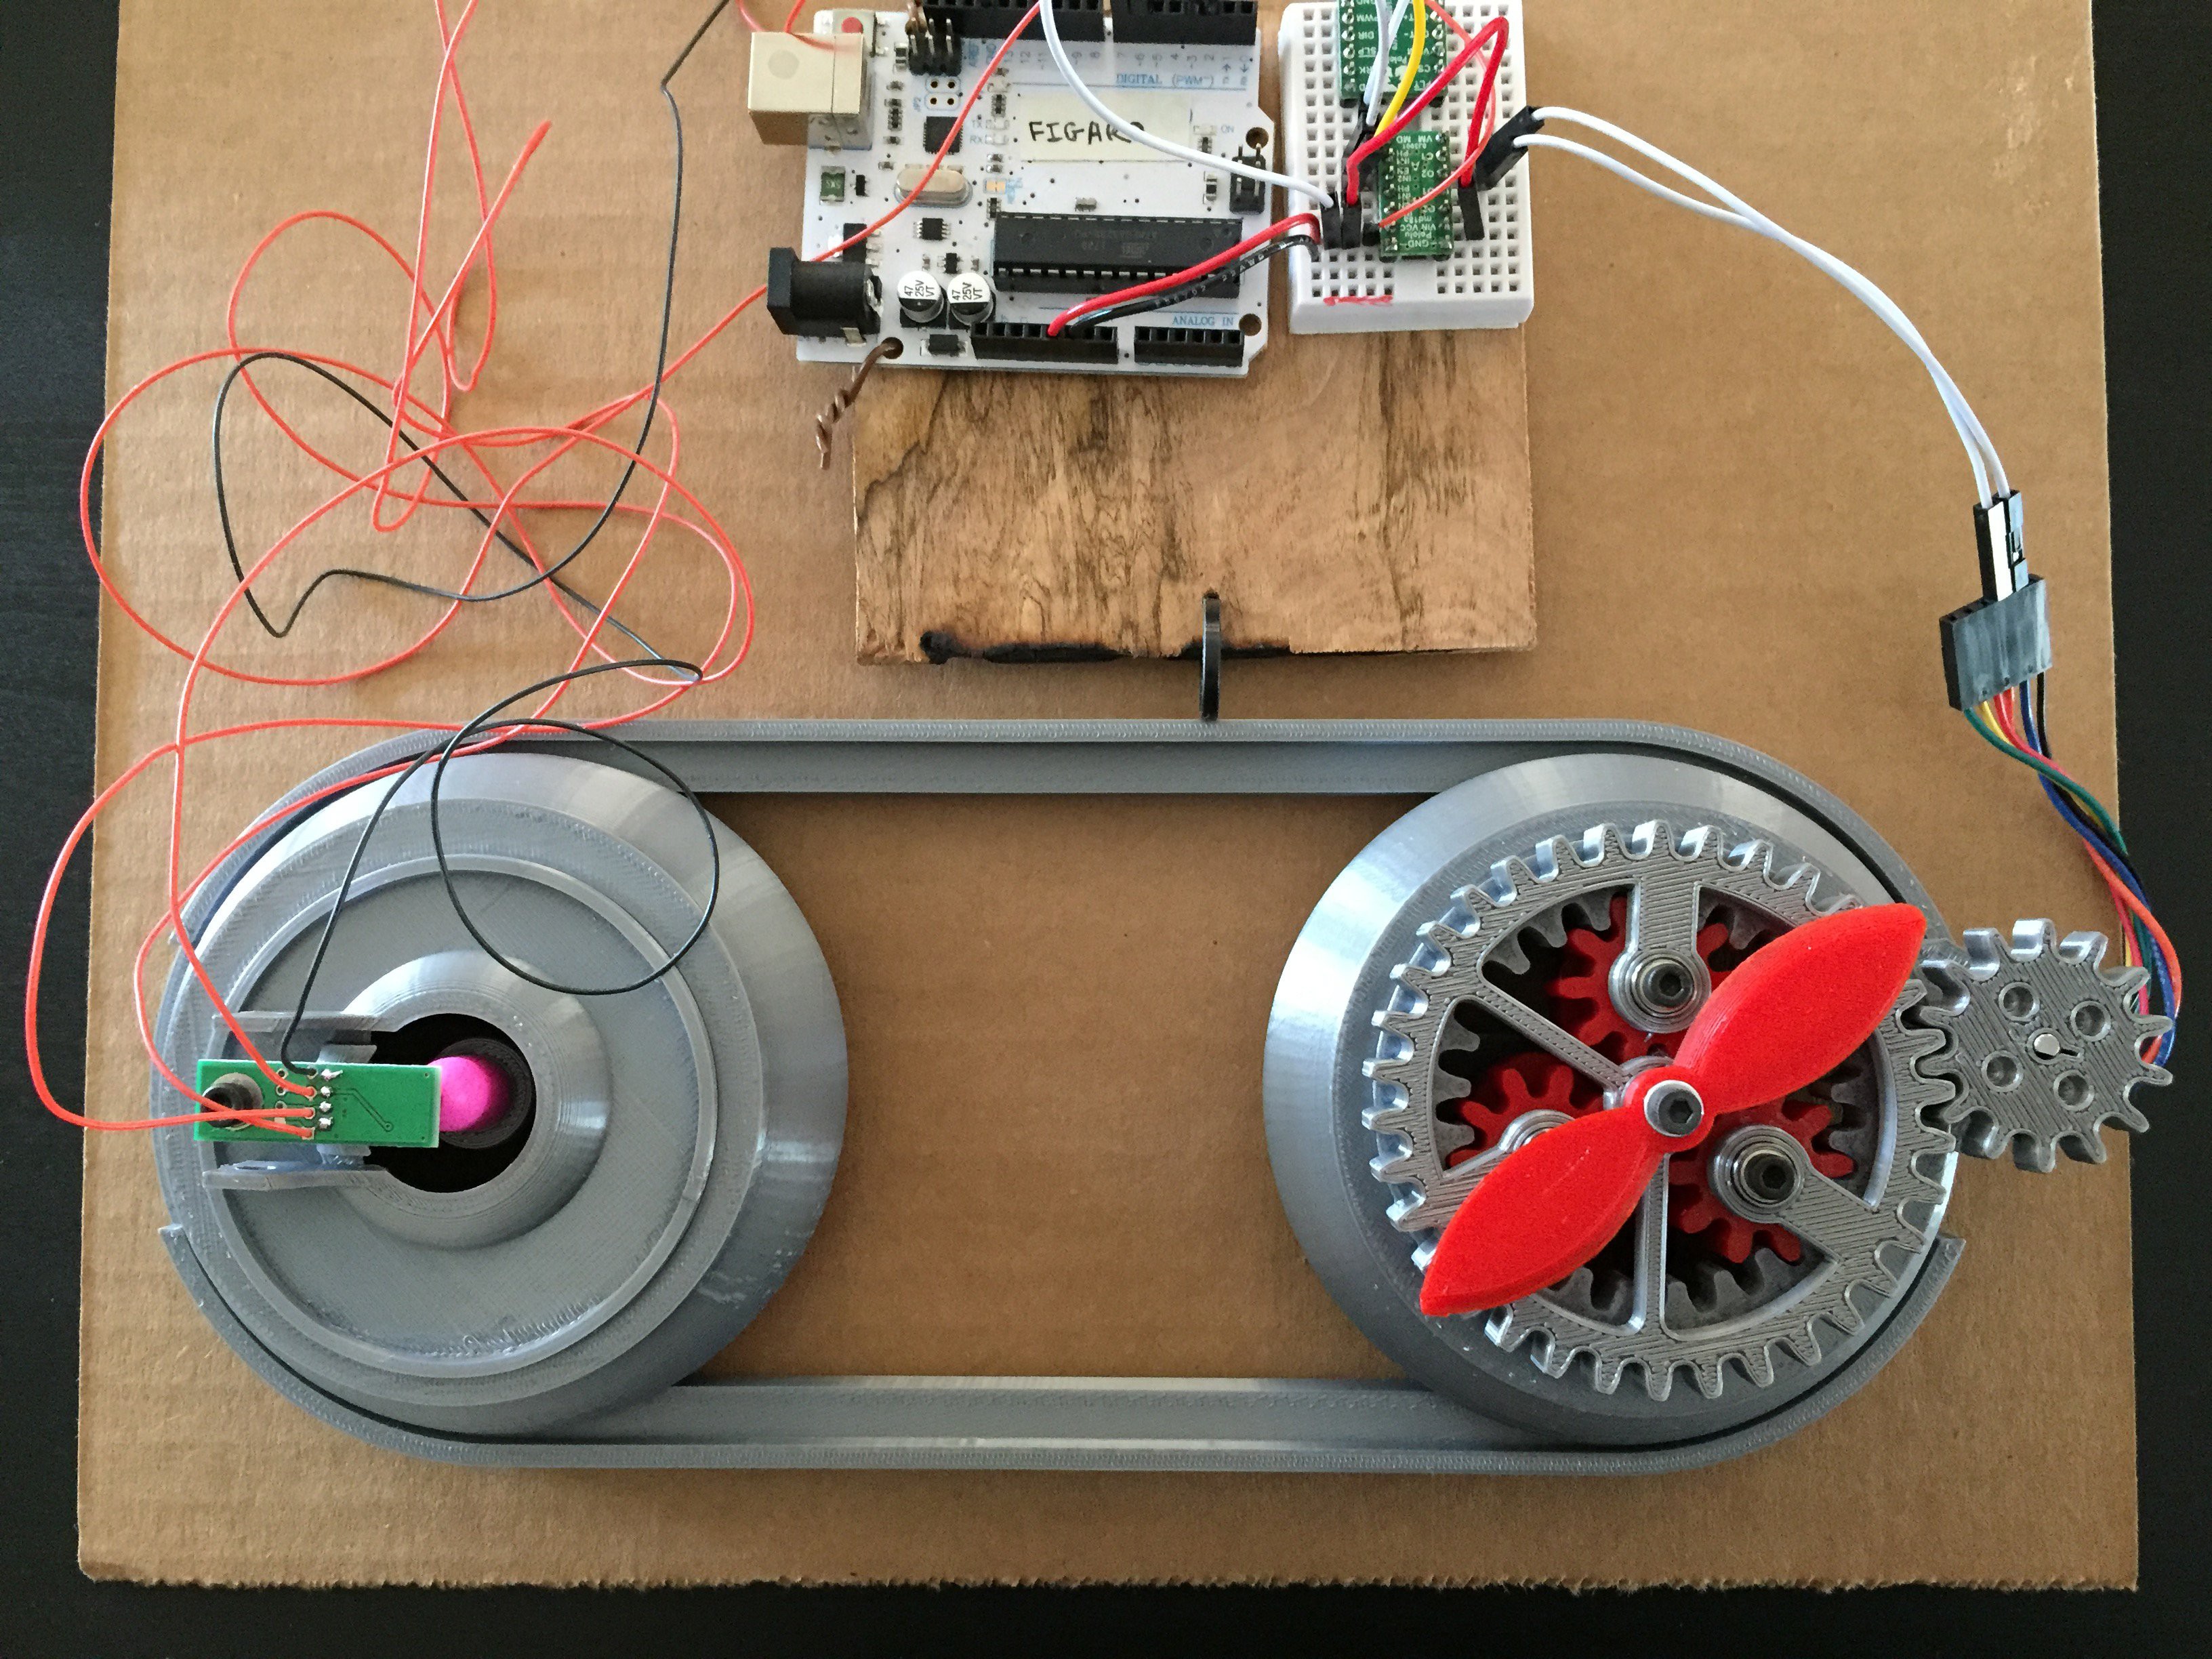
Since there are obviously potential pinch points in the design of my apparatus, it was clear I had to make some form of test fixture to use while testing and calibrating my system.
It made sense to use something soft and nipple-like that changed shape like nipples do... so I decided to use some of the earplugs that have become a necessary part of my sleeping ritual (living with someone who snores):
![]()
To help keep everything in place, I 3D printed a guide rail that ensures the ear plugs are held at the proper height relative to the augments. It also keep the augments from sliding around all whil-a-nil:
![]() The system works pretty reliably. This is the first iteration of this particular system, so there are of course improvements to be made for the next version. as a proof of concept however, I am super happy with how these turned out. ;)
The system works pretty reliably. This is the first iteration of this particular system, so there are of course improvements to be made for the next version. as a proof of concept however, I am super happy with how these turned out. ;)Here is the first iteration in action on the test fixture:
It is also important to note that some other concepts have also been mapped out for the "nip" area. They are COMPLETELY different from this meditation, so likely after the HackaDay Hardware Developer's Didactic Galactic next week in SF, I'll tackle one of those ideas as a follow up.
If you happen to find yourself in the Bay Area next week on the 12th of July, come stop in and say HI! I'll be there ready to talk NIPS and wearables!
![]()
-
Building the Whispering Crotch Box
07/01/2018 at 22:11 • 2 commentsAt some point this Spring, I recall closing my eyes after a long breath and thinking to myself, "I could really use a pussy whisperer right now."
Soon after, the words dissolved from abstract meaning into disassociated literal imagery: "pussy. whisperer." -I ran into the lab to fetch a pair of calipers. I measured my pelvic bone, opened a fresh document in CAD and started modeling an actual box that ergonomically fit between my legs. It would house a speaker aimed directly at my lady parts... and do precisely that, the pussy whispering.
It came to be known in the days to come as the BEAT BOX! -and would become the first wearable I'd develop as part of the SHEBON project! :)
![]()
The augment reads the wearer's heart rate and then outputs sound through a speaker aimed into the pelvic bone at a volume relating to their beats per minute (BPM). The byproduct of the whispering is a subtle vibration that only the user is aware of until the whispering intensifies to the point that it becomes audible to others near by.
The first version of this wearable's enclosure looked somewhat like a fillet of fish, so I embraced its coincidental visual metaphor and integrated the idea into other aspects of the design... (the pet name of the BEAT BOX became the "crotch salmon" :3 )
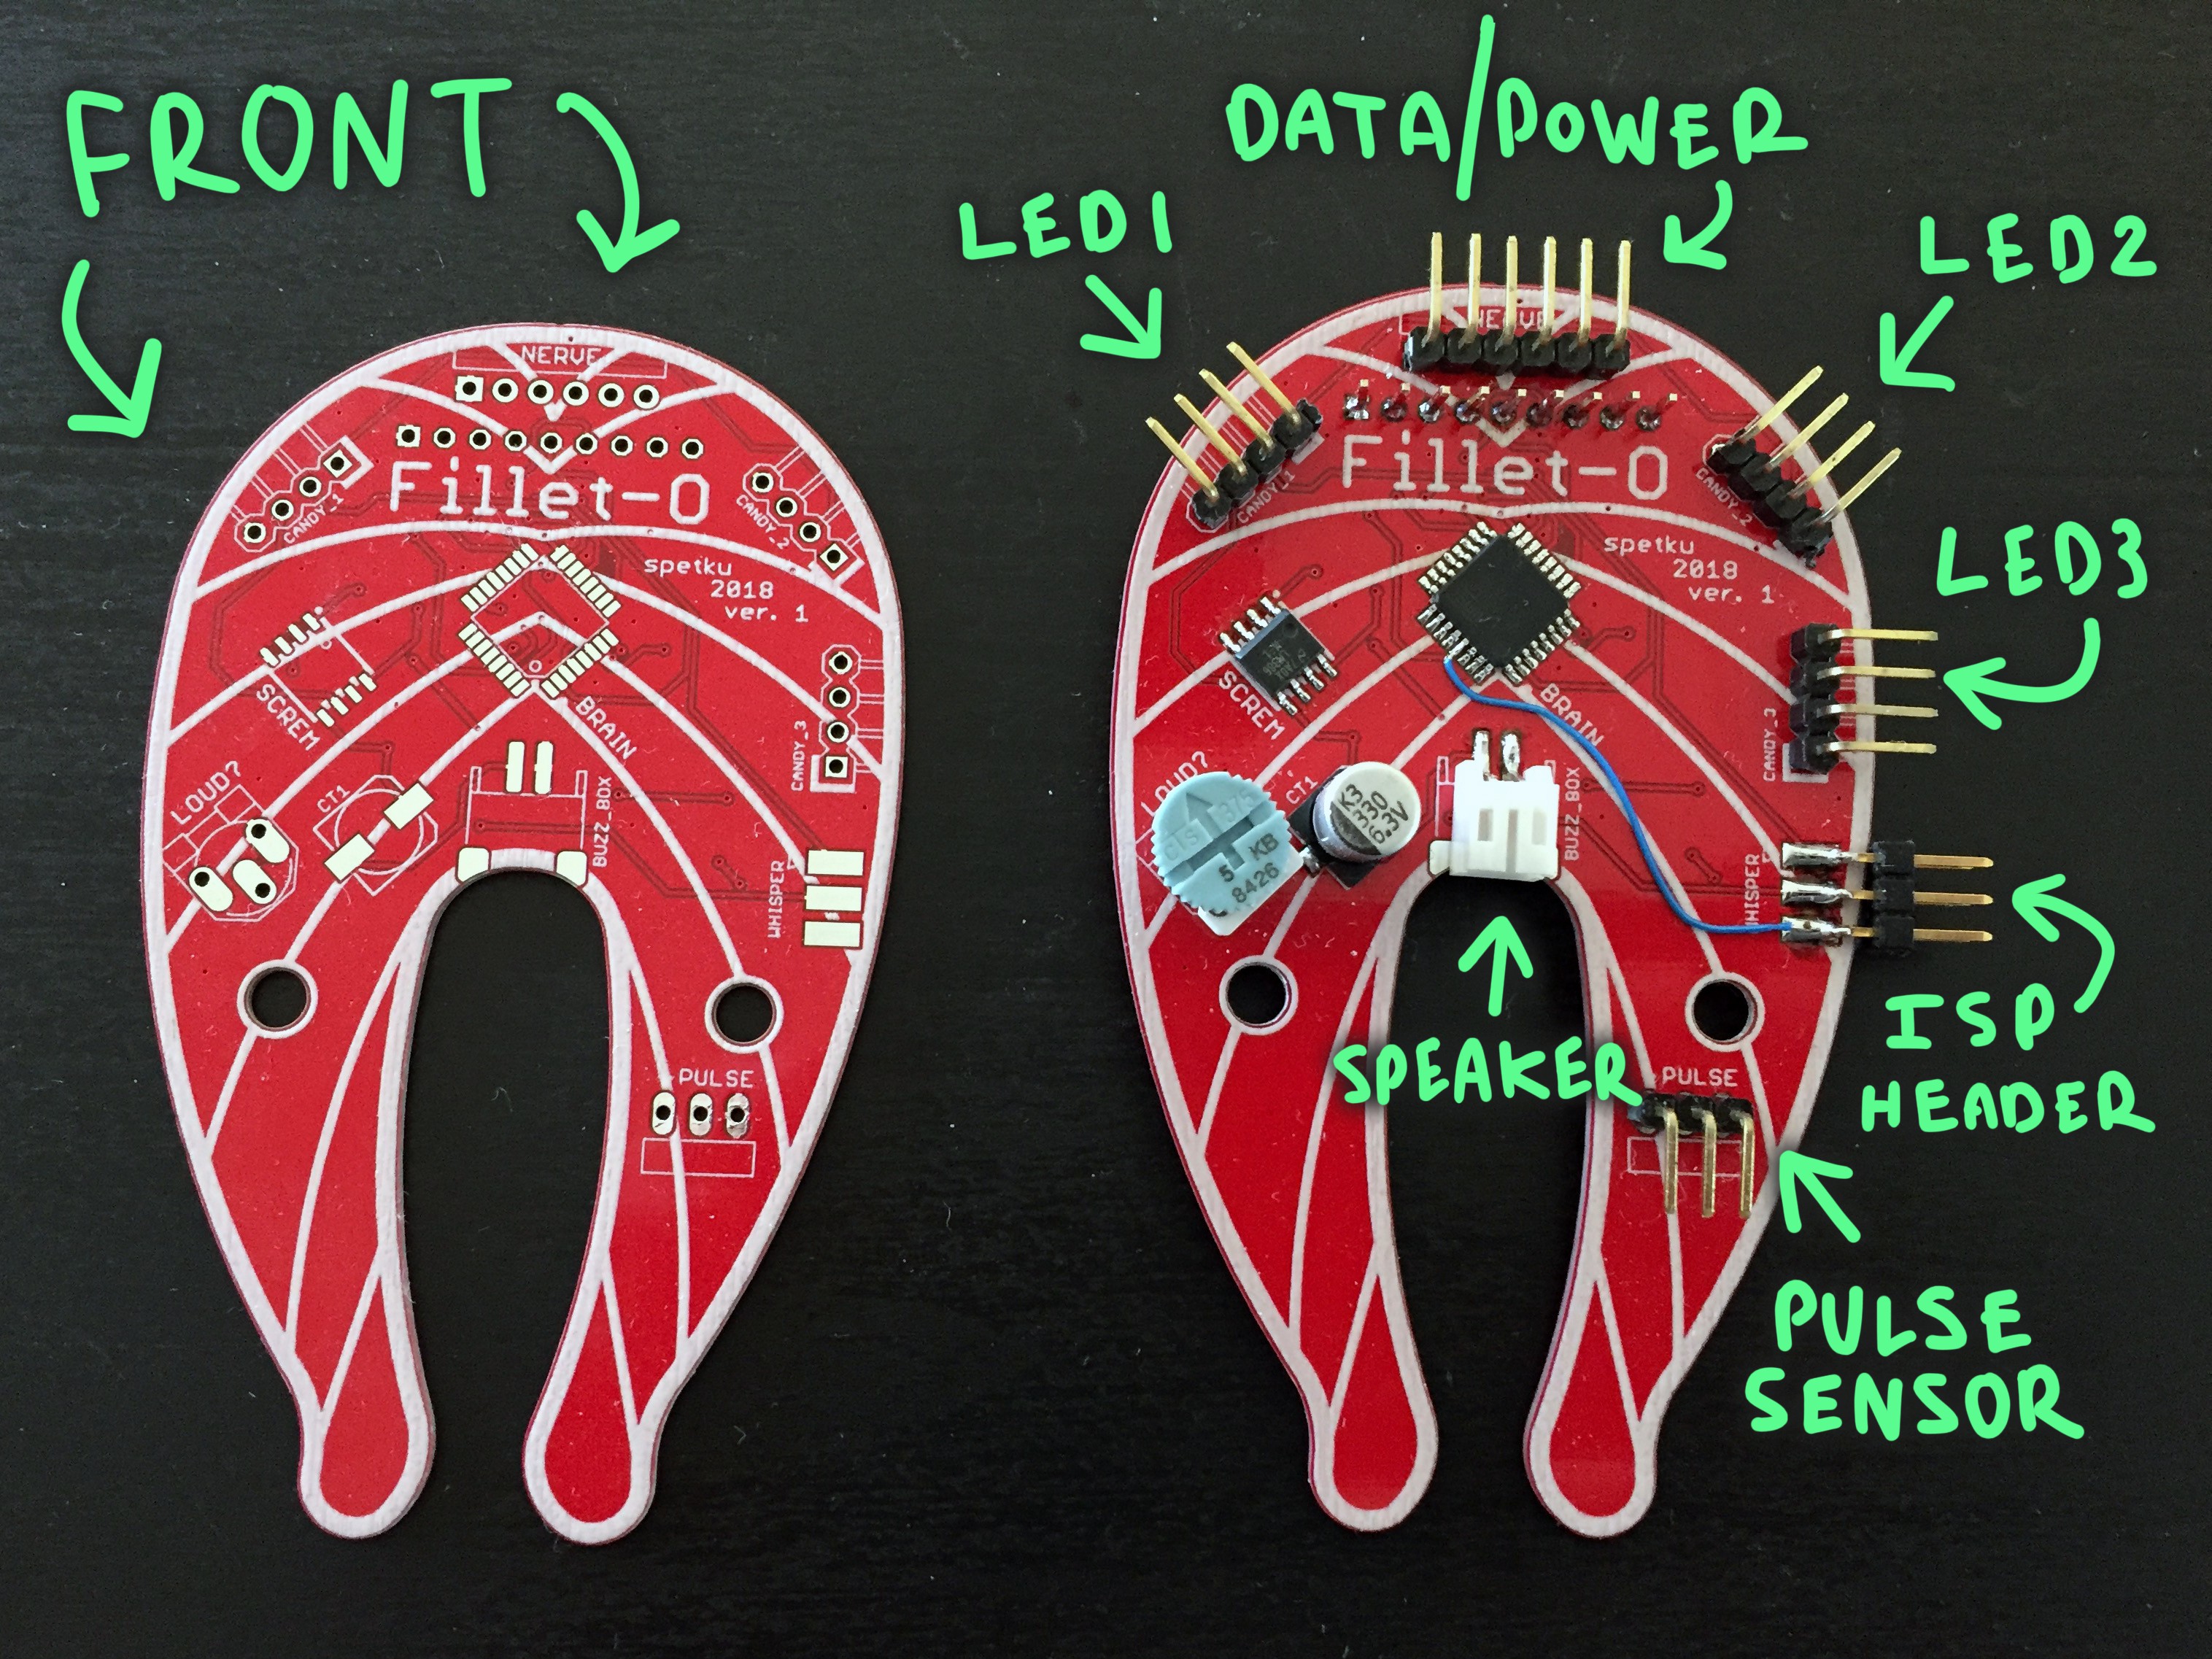
---------- more ----------ELECTRONICS : "FILLET-O" BOARD + SENSORS
Since the spirit animal of the Beat Box is the salmon, I decided that the PCB running the show aught to carry this visual theme. It was a toss-up whether I design the board to look like a strip of nigiri sushi, or a cross-section:
![]()
In the end the cross-section won for practical reasons (where the connectors would mount along the edge of the board / symmetry):
![]()
...After I decided on the design and function, I took to drunk routing the board in EAGLE CAD one evening in April while Mark offered beer-tainted guidance:
I dubbed the brain the "Fillet-o"! Here it is completed in all of its delicious glory (I hope you're craving sushi now):
![]()
The Fillet-o has pins allocated for specific functions. There are male headers for:
- a microSD card reader (on back)
- 3 separate strands of RGB LED
- a basic pulse sensor
- a mono speaker
![]()
...and the back...
![]()
THE "CROTCH SALMON" ENCLOSURE
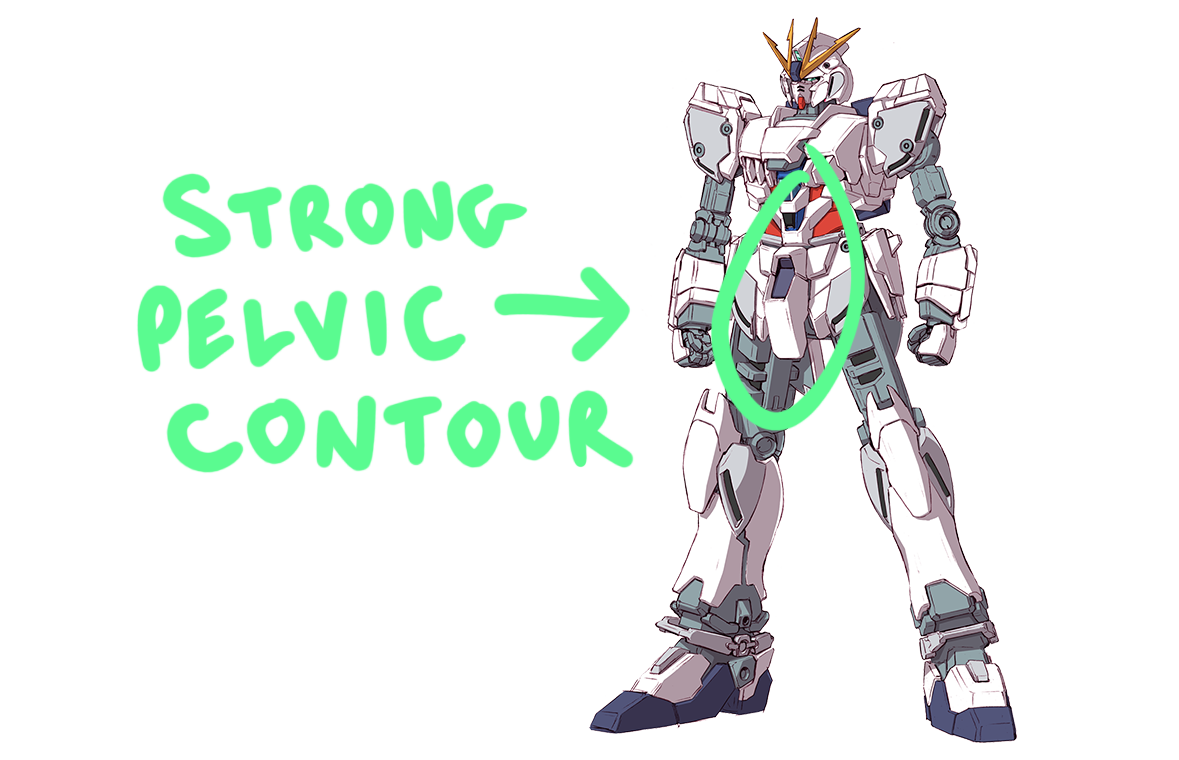
When it came to the actual design of the object itself, my mind's eye saw something that was reminiscent of the rectangular elongated pelvic structures you see on the Gundam mechs. Instead of protruding outward in a very phallic way, I wanted the enclosure to conform to the natural curve of my female body as it slopes inward between my legs. (like a robot-maxi-pad!)
![]()
In FUSION, I first traced the general contour that would sit flush with my skin. Then I created a "cavity" that followed that curve:
![]()
This shape became the cross-section outline of my frame.
![]()
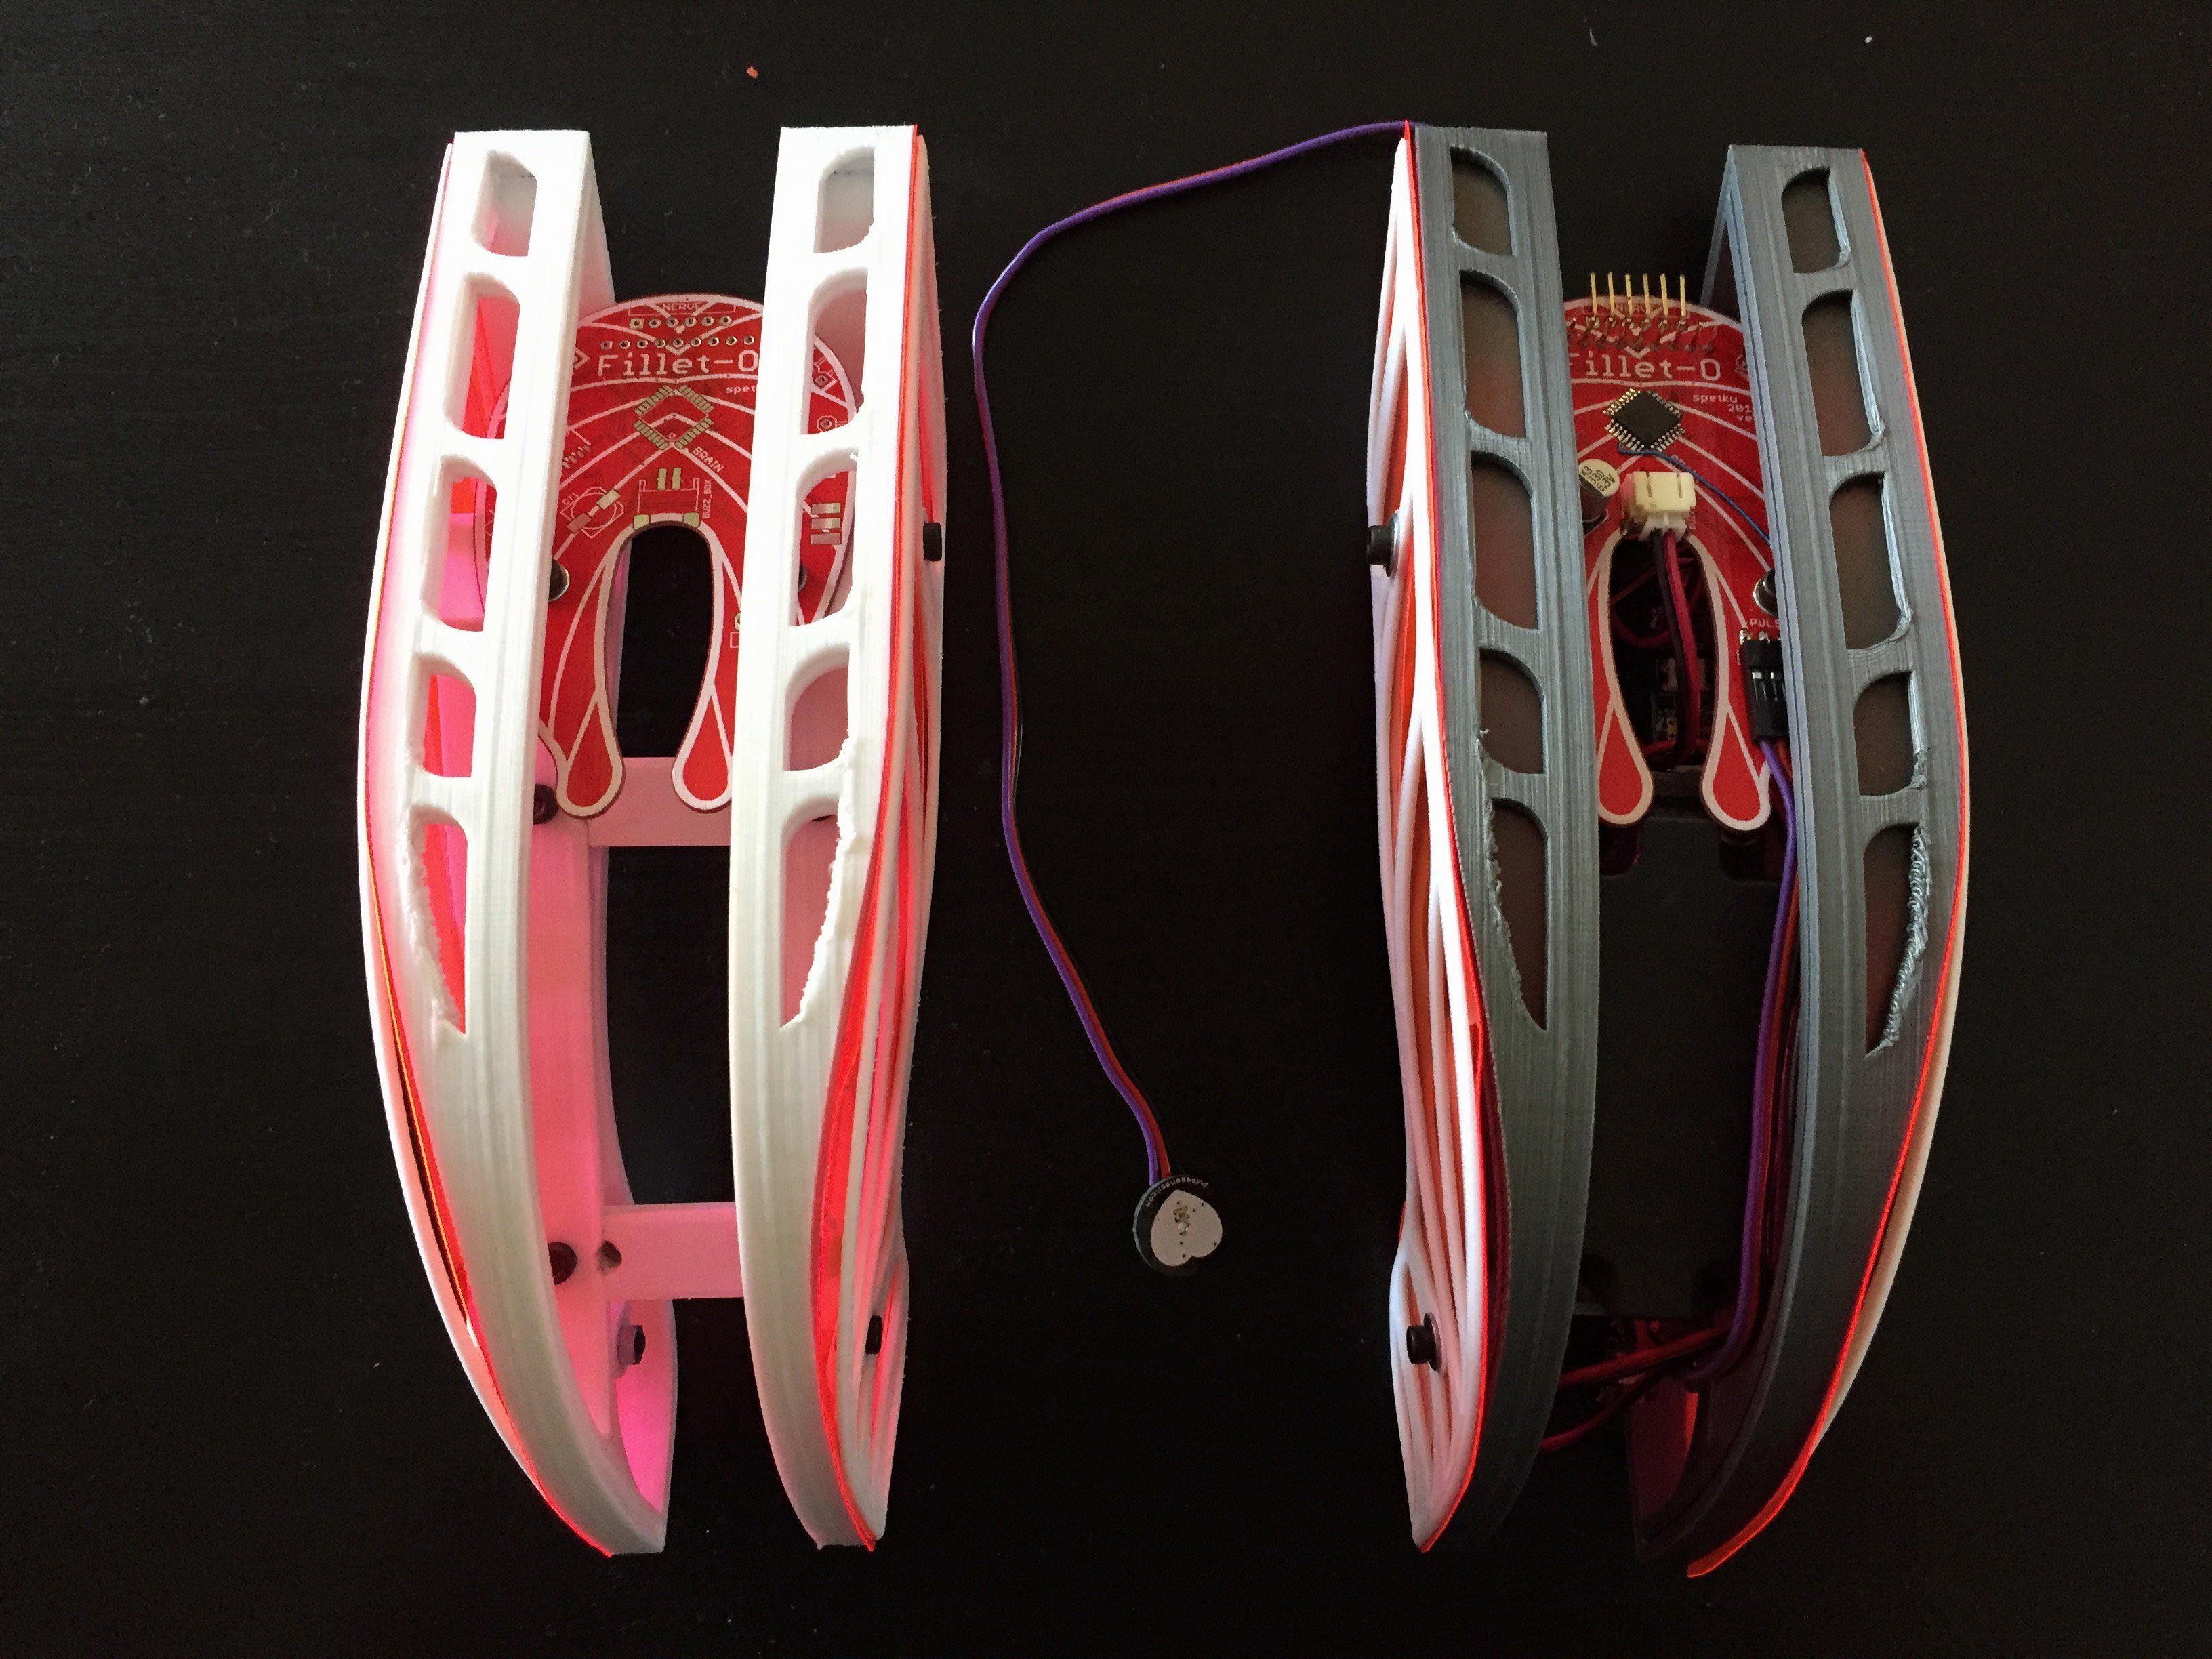
The enclosure consists of several layers of this shape sandwiched together with long pins. The thinner 3D printed cross-section pieces bracket strips of semi-transparent plastic between them. The transparent plastic material acts as a light diffuser for LEDs mounted along the inside:
![]()
The silver color looks to me like the shiny scales on fish skin =P So I chose to continue with the theme throughout this module's design:
![]()
Originally, I sketched a set of "wings" that mounted onto the blunt sides of the box. I thought this might make the enclosure look more like a pelvis, or robotic pair of panties...
![]()
The print for each of these wings ended up taking a solid night each. They had their own aesthetic once fixed to the base housing:
![]()
(note the webbing I placed behind the light defuser to create a "fiber glass effect")
![]()
View of the back side lit with LED strip:
![]()
In the end, the pantie wings didn't create the look I was going for. The bulky shapes detracted from the clean design of the main housing a bit too much (also, sorta made the enclosure resemble a fin or mermaid tail).
As a plan B, I figured, why not just go DEEP SALMON? I designed a set of simple end pieces, like grates, that resembled the fat marbling of raw salmon flesh:
![]()
I cut a piece of red transparent vinyl to lay beneath each white grate. Combined with the silver "salmon skin" front, this completed the overall aesthetic:
![]()
Sadly, I came to learn very quickly that this "box" enclosure, however pretty, wasn't an ideal shape in close proxy to the thigh meat it would be coming in contact with... MEAT CLASH!!
![]()
I also didn't account for where several of the active electronic components would mount, so it was necessary that I design a second version of the enclosure... this is a wearableafter all. It must be... wear able...
BEAT BOX ENCLOSURE V. 2
The second revision of the salmon enclosure is slightly slimmer, to fit between the thighs with a bit more ease:
![]()
white and in silver:
![]()
There is a slot for the LED strip to mount along both flanks of the inside, and a mounting point for the Fillet-o board, which places it front and center:
![]()
Fillet-o up in front!
![]()
...and of course, there is a mounting bracket to hold the small mono speaker at an angle pointing into the receiving area:
![]()
Similarly, it pins together from the left and right sides.
![]()
...the good salmon.
![]()
THE VOICE OF THE SALMON
The point of having any volume at all is that the sound waves produce a vibration. Whispering suggests that the volume be low and subtle enough that the vibration produced may be felt only by someone in the immediate vicinity of the thing producing the sound.
"whispering" also implies there will be a voice uttering actual words. BUT What voice? What words???
I imagined my friends coming over, and after a few drinks, speaking complete nonsense into a microphone for a while... like a drunken monologue/stream of consciousness sort of thing. Whatever they whispered wouldn't necessarily need to be seductive in nature, or sexual even. In my heart I was channeling weird one-sided conversation the likes of this:
Last summer, while I was filming the build updates for noodle's behavior appendages, I started stealing my closest friends away after a few beers and recording their improvised infomercials and show bumpers. The results were pretty great, so I was hoping to coax the same sort of situation again for the "pillow talk".
As of yet, this hasn't happened (though I might still try later this summer), so in the mean time I resorted to using the good old text to speech that comes with my Mac. It's a thing of nightmares.
I spent a good minute finding the correct creepy content.... Victorian erotica... then copied and pasted some of it into a word processing document to be read by the "Alex" voice. You can see the module in action at the end of this stream once I assemble the whole salmon enclosure and upload the test file to the microSD card reader:
MOUNTING TO PANTIES
In the weeks to come, I might make some crazy harness that attaches this enclosure to the desired area of the body. For now however, I plan to stitch the box directly to a basic pair of panties. Done and done. Once I revisit the design one more time and produce a version. 3- I will surely slip into my creation and model it for you. Until then, enjoy the serenade of the salmon:
-
The Function of the PULSE Circuit Board
06/26/2018 at 19:34 • 0 commentsI describe the "PULSE PACK" as being the platform that runs the SHE BONproject. It connects everything with data and power, yada, yada.... but what is its function? Tell me more about this brain, right?
When I first started daydreaming about the cortex of the whole project, it was a matter of aesthetic rather than function.I saw a mass of cables and wires branching out like veins from the upper back of a human... making the body look like a fruit waiting to be picked from a branch of some sort. I wanted to see lines spilling out from one location; the visual affirmation that everything has a definite point of origin.
---------- more ----------![]()
There were a few influences in my life that had my head in a particular place that month. One was a strange jaunt to a "fetish ball" I attended with a friend, and the other was the submission to a summit in Tokyo I wished to attended. The mixture of hypothetical kawaii against a backdrop of maybe fetish and frustration forced my neurons to produce the heart-shaped backpack. The poetry of it all.
![]()
From the moment my mind saw it, that was what it had to be. The precise level of function could be negotiated along the development process... and so I set my sight on acquiring a big shiny red heart backpack! Cake. All I had to do was buy one off amazon and get to modding it, right?
As you likely know, the internet does not have such a thing readily available as I had hoped. So I had to sit tight and make one from scratch in the best way I knew how.
...And what would be this "point of origin" that the wires stem from?Well that obviously had to be a circuit board, so it might as well be a heart too. I could have made the board look like a biological heart organ and all- but the hard pixelated edges of the symbolic heartwere easy to work with when connectors entered the equation (which they soon did).
![]()
Once these design decisions were made it became clear to me that I was actually making a wearable breakout board. The delicate wires coming off the PULSE circuit board inside of the backpack would feed out into much larger, more industrial cables that rout to the area of the body bring serviced.
The question became: Will this heart board do ALL of the computing, send ALL of the instructions, and house ALL of the sensors, and shields, and everything else each individual peripheral might need? (much as the croissant board for the tasting feet).
While this would have been a viable choice, it made more sense that the peripherals have some agency of their own. Much like organs in the body, they all function to perform their designated task independent of the brain, not requiring constant instruction. The brain's job is to oversee and decide how the data collected by the organs should be used.
So currently the plan is that each individual peripheral have its own designated circuit board that allows it to run independent of the PULSE board if necessary.
THE PULSE V. 1
![]()
The first version of the PULSE board is more or less a repackaged Arduino MEGA. It has an ATMEGA2560 as its brain, which breaks into (9) individual 6 pin molex connectors along the edge. (there are even (14) shiny RGB LEDs along the back side for extra flavor!)
![]()
The traces are all wiggly. That's a nice feature...
![]()
Since the one peripheral I've made so far has it's own dedicated board (the fillet-o), the first version of the PULSE does little more than provide power to the salmon.
![]()
As it was the path of least resistance at the time, I also converted the molex that came off the circuit board into CAT5 at the edge of the backpack using a small circuitboard as an adaptor:
![]()
It works. It isn't very pretty....... or optimal. But it gets the job done for now. (especially since those fancy wires aren't doing anything at all for the moment)
![]()
Since I have removed much of the purpose from the big pretty PULSE board, what might it's function become now that it no longer supports anything with data?
THOUGHTS FOR PULSE V. 2
I was brainstorming with my friends in the kittie pool the other night and it was suggested that the PULSE PACK might have less to do with sending data, than simply listening and logging information from all the other peripherals.
Since I've decided at this point that ALL of the augments will have their own dedicated circuit board installed within each system, everything should happen locally. What the next version of the Pulse board will do:
- provide power
- receive and log data
- send that data as its being received to some sort of display unit that the wearer can use to track their status in real time
So the backpack will soon be primarily responsible for carrying "baggage", if you will.
-
PULSE PACK ENCLOSURE BUILD!
06/24/2018 at 20:56 • 0 commentsThe PULSE PACK is a wearable computing platform that orchestrates a collection of body augments, all part of the SHE BON project. These augments are individual systems that sense and indicate when the user's body enters an "excited" state. Each system is designed for a particular region of the human body and uses various types of sensors to detect bio-data as input, and then communicate the user's status with electronic and mechanical devices as output.
You can think of the PULSE PACK as a wearable breakout board. Its primary function is to house the master circuit board, called the "Pulse". This heart-shaped Pulse board sends power and data over a network of cables, much like a heart pumping blood to distant organs through a series of veins.
Why would I have the platform which senses and triggers the indication of my arousal be a BIG. TRANSPARENT. PULSING. HEART-DRUM?......Well... it might be a metaphor. ;)
![]()
I am defining the cyber-punk reality I wish I lived in by creating my own works of technology and art. Also, there is something satisfying about a wearable that routs wires all over my fleshy bits. Bottom line, this is another meditation in the book of Sarah: body data as a means to communicate the intimate and the unseen.
![]() ---------- more ----------
---------- more ----------In this build log I will outline how I crafted a transparent *stitch free* backpack, from vinyl and a 3D printed frame which I designed in Fusion360. This log focuses primarily on the enclosure. I will publish more about the circuit board and how the system works in a separate post!
( This post will outline the build of the *yellow* heart... since I was bad and forgot to take pictures while assembling the *red* one... <3 )
![]()
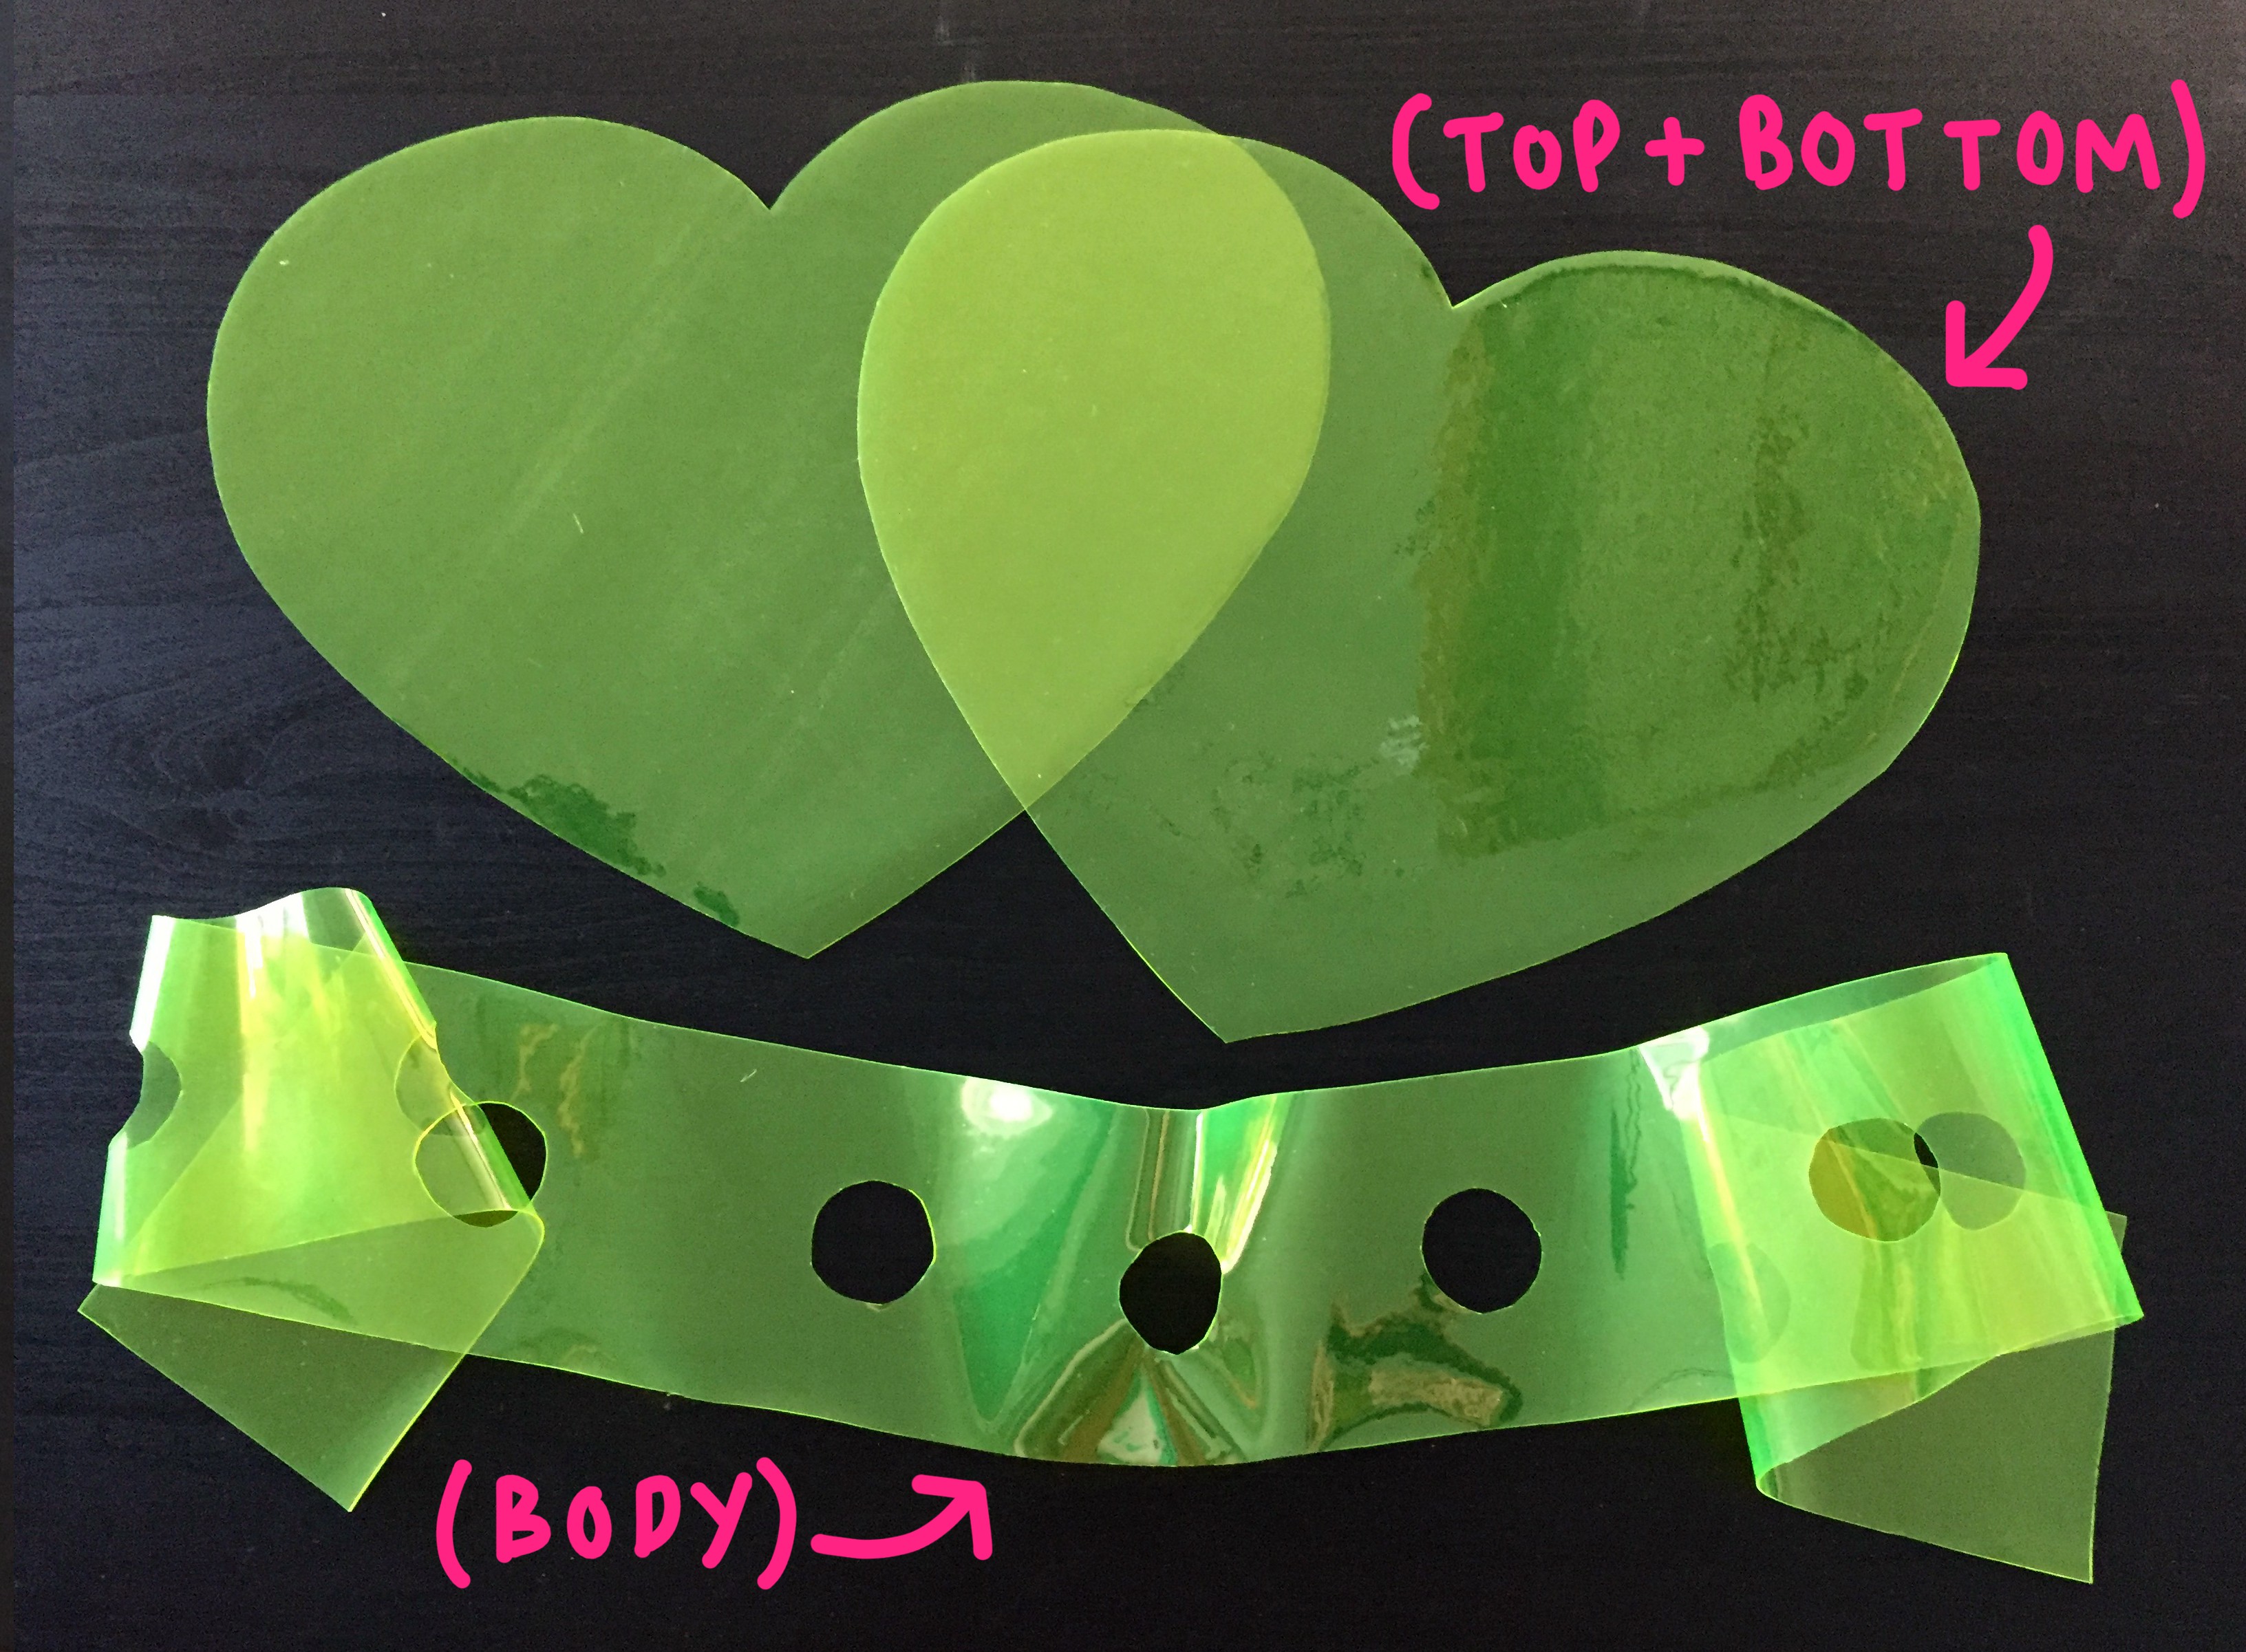
THE VINYL
So, all it takes to create a heart backpack is (3) pieces of vinyl. (2) identical heart shapes for the top and bottom vinyl, and (1) longer strip that will act as the outer wall and body vinyl:
![]()
notice: The outer wall piece has some holes in it! These are where the "bulkhead" adaptors mount along the edge of the backpack!
These vinyl pieces mount to the 3D printed frame with plastic rivets which thread through a series of small corresponding holes on the plastic and vinyl. I printed a paper template from a dxf I exported straight from fusion360 to ensure everything was precise:
![]()
I used a punch to poke the tiny 2.4mm "rivet holes" and the 4mm "hardware holes" around the edges of each piece:
![]()
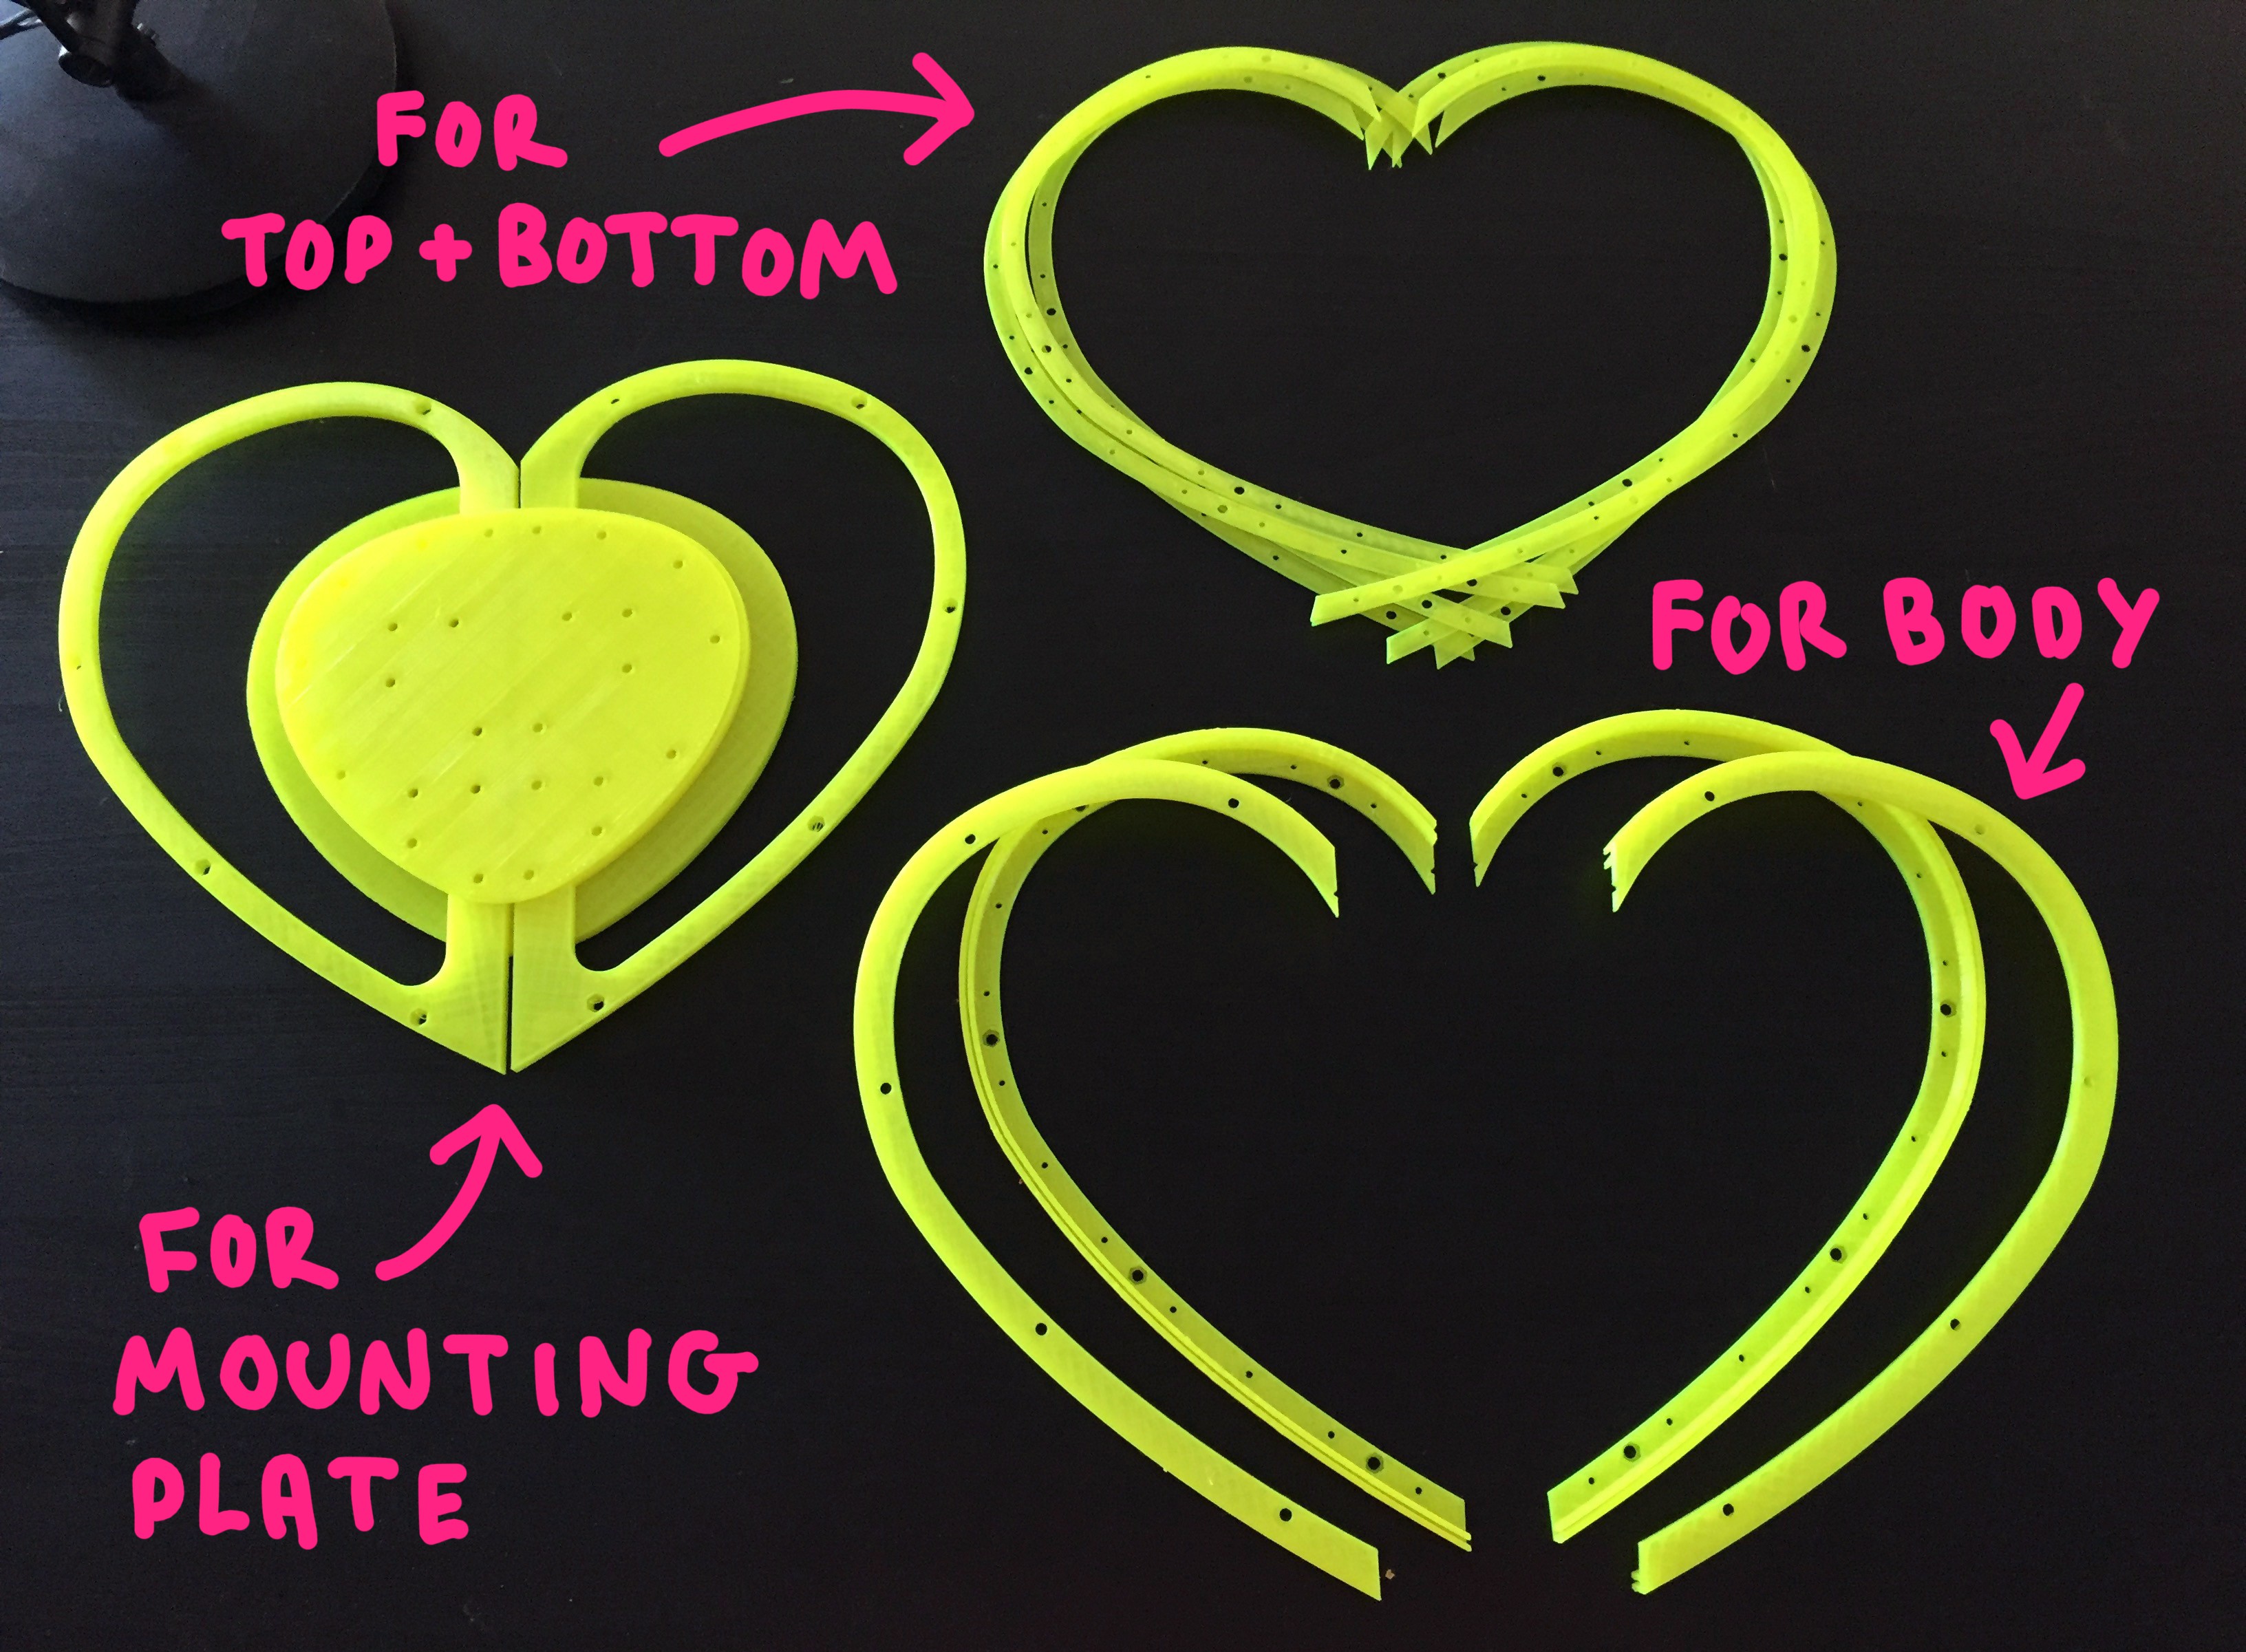
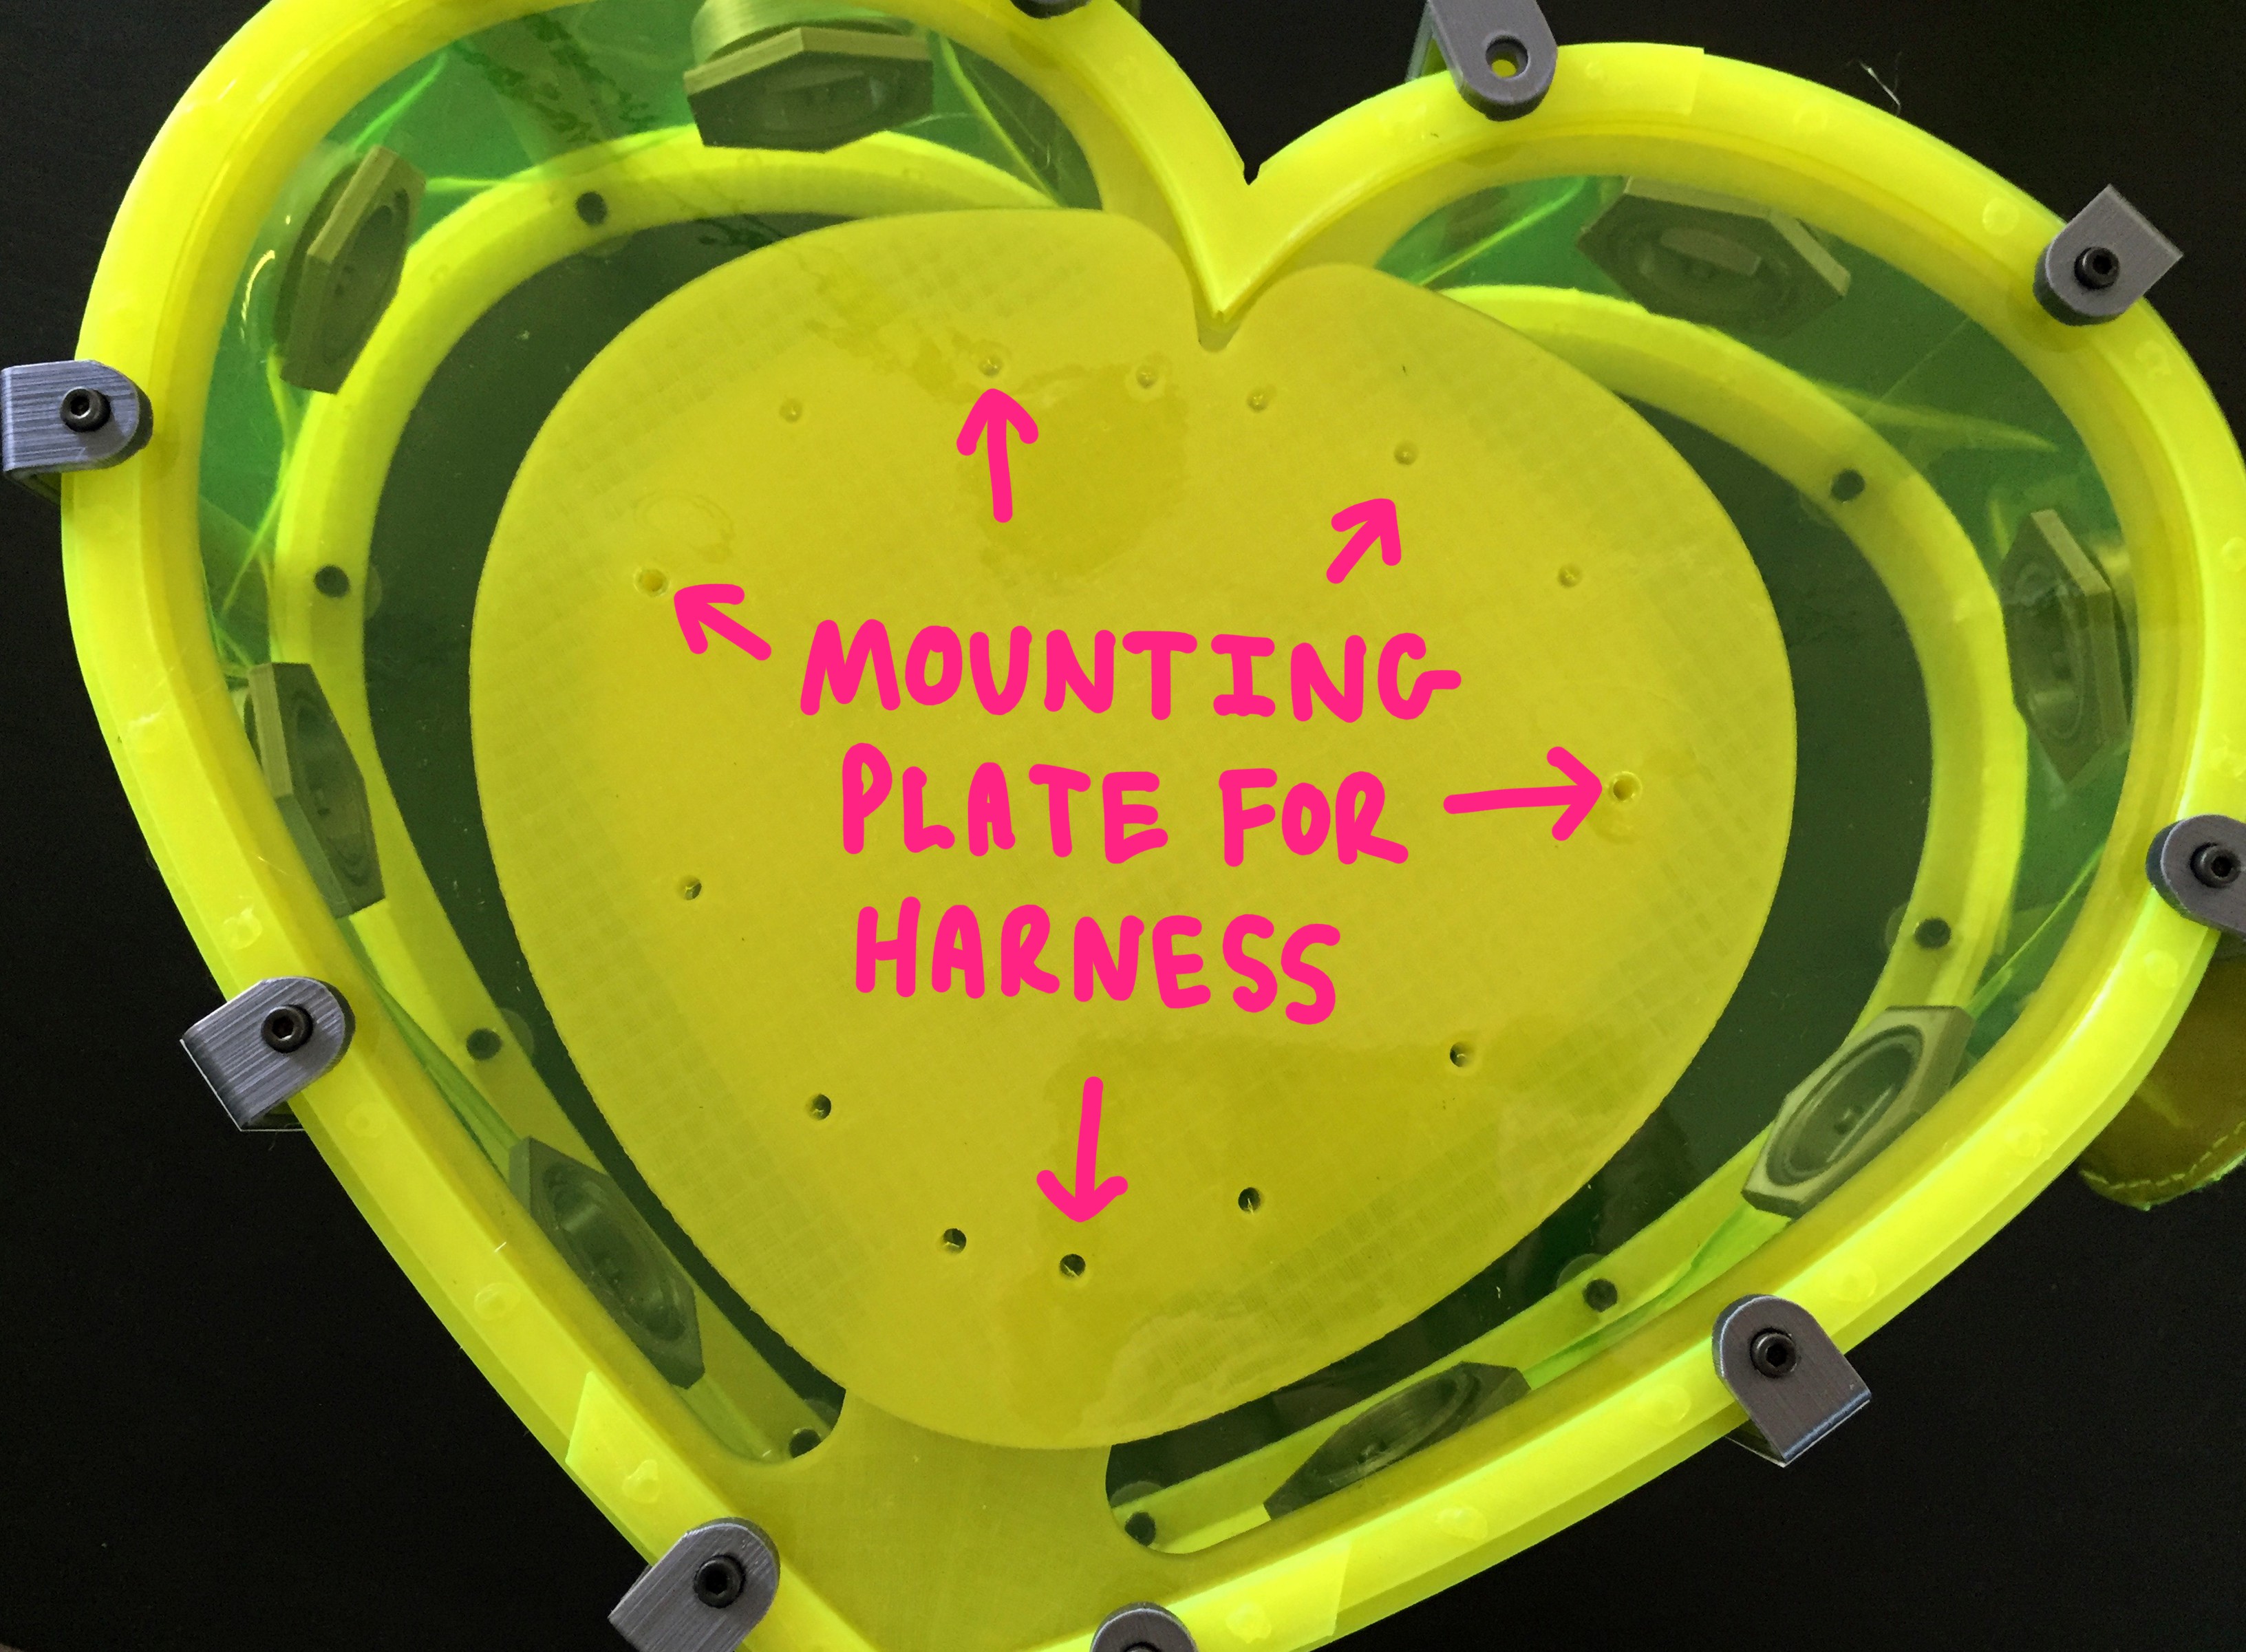
THE MOUNTING PLATE
This is technically still part of the primary backpack body, but its function has more to do with coupling to the PCB mounted in the center and the harness that's worn by the user. So basically the function of these three parts are as follows:
- back plate: couples to the harness
- adaptor plate: couples to the backpack
- front plate: couples to the PCB
![]()
...but Sarah... why does there have to be three separate pieces? Would it be easier if they were design as just one?
-Since all of these pieces bolt onto their respective assemblies with 3mm hardware, layering them this way facilitates in capturing countersunk nuts in between:
![]()
back...
![]()
The extra top and bottom piece help to capture all of this vital hardware in place and prevent it from falling out when I wish to bolt onto the mounting plate later on
![]()
This happily joined (3) piece assembly can be directly mounted onto from the back and the front!
THE PRIMARY ENCLOSURE
As mentioned, the primary enclosure is "stitch free". I designed it this way because I didn't want to attempt hand sewing vinyl fabric at 90 degree angles in less-than-straight lines. To connect the seams of my vinyl pieces, I plastic welded my vinyl to the a 3D printed frame with small rivets made from raw 3D printer filament.
Don't get me wrong, this method likely wasn't any less tedious than hand sewing with a punch and thread... BUT, it felt like I had more control during the assembly process. Once everything was in one piece, the hard frame structure helped define the backpack's overall shape.
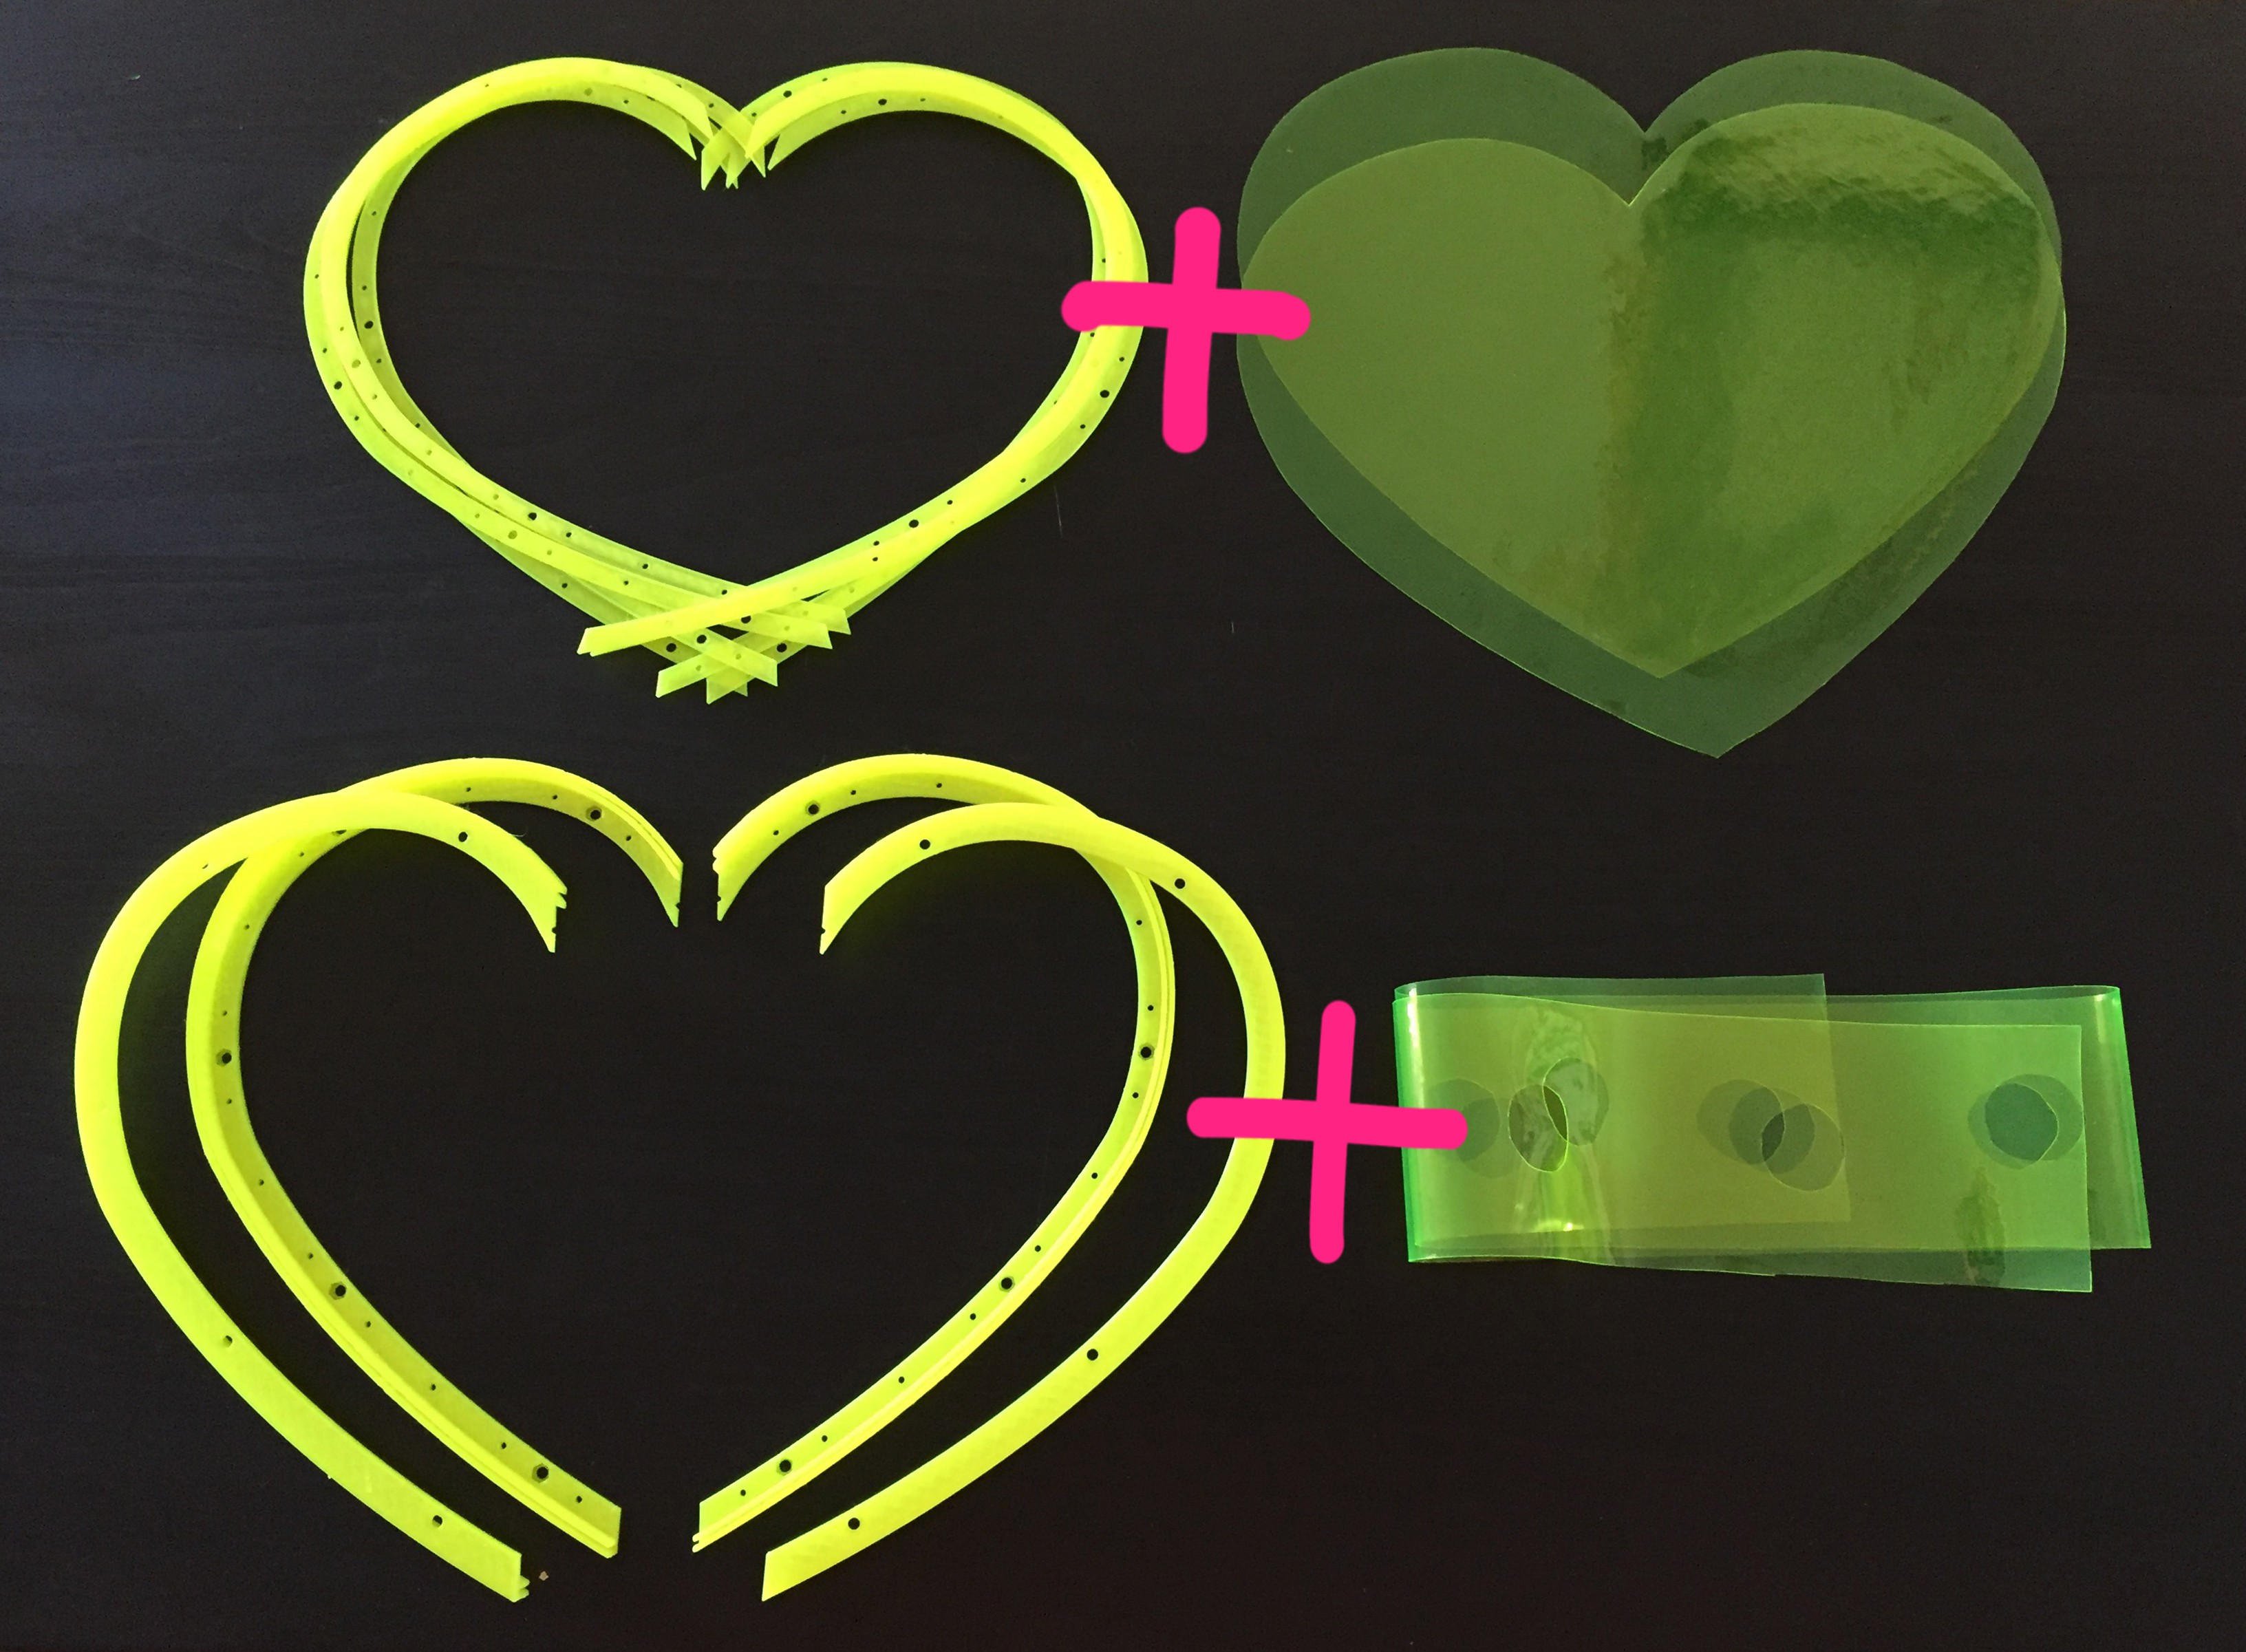
The vinyl attaches to the pieces of the frame with tiny plastic rivets to complete (3) separate parts: the top heart,the bottom heart, and the body.
![]()
Four pieces total make up the body frame:
- (1) body_front_left
- (1) body_front_right
- (1) body_back_left
- (1) body_back_right
![]()
The parts for the body are kinda fancy because they have a channel sticking up at a 90 degree angle which is meant to receive the long strip of vinyl used for the outer wall of the backpack:
![]()
There are similarly (4) smaller pieces for the top and bottom frame, making for (8) pieces total:
- (4) topBottom_left
- (4) topBottom_right
![]()
The body vinylgoes with the body framepieces, and the top and bottom vinylpieces mount to the top and bottom framepieces:
![]()
PLASTIC RIVETS + HARDWARE
The plastic riveting technique is simple. I cut many 7-10mm pieces of raw 3D printer filament, and threaded them through the corresponding holes of the vinyl and frame, melting a cap on each end to hold it in place. (this is more or less sewing but with plastic).
To prepare the rivets, I cut pieces until I was numb inside:
![]()
...I then used my soldering iron on low heat (~280 F) to melt a cap on one end:
![]()
I decided to weld the top and bottom pieces of the enclosure together first (since they're a bit easier to do). There are (6) pieces total for each the top and the bottom. They make up two halves of two frames which sandwich the vinyl in between them like two slices of bread. Two smaller joint pieces connect the halves in the middle (because I couldn't fit each frame as a whole on the printer bed!)
I used some 3mm hardware in the larger holes to temporarily hold everything in place while I placed my rivets:
![]()
The holes in the frame lined up with the holes in the vinyl! success!:
![]()
The smaller holes are begging to be skewered by those rivets!:
![]()
I pushed two or three in at a time, and then used my soldering iron to melt and flatten out the opposite end. It's important to keep the cap semi-flush with the frame as to keep everything pressed together tightly.
The steps are the same for both the top and bottom parts of the enclosure.
Lastly, I had to repeat a similar process with the body of the heart enclosure! This involves the meatier frame pieces and the remaining long strip of vinyl with the large holes along the center:
![]()
This is slightly trickier than the alignment of the top and bottom, because the long "side wall" piece of vinyl must seat in a long slot that sticks up off the frame at a 90 degree angle:
![]()
The length of the vinyl begins in the top "pinch" of the heart shape, runs along the whole diameter of the backpack and then terminates in the same location on the opposite side:
![]()
Similarly, there are a series of smaller holes along the frame that line up with the hole in the vinyl... and they want the same treatment:
![]()
It's much easier to get a soldering iron to the rivets if they are threaded from the inside of the heart and poking out as seen below:
![]()
Once all of those sharp spikes bits are capped off... I had to repeat the same song and dance with the top pieces. It's about as tricky to slot the upper lip of the vinyl into the channel of the frame, so I had to be patient!
![]()
Once plastic welded together, the middle of my enclosure was complete (mostly). I now had two frames attached to the outer wall of the enclosure, like an accordion:
![]()
Once the plastic welding of the top heart,the bottom heart, and the bodyis complete; the next step is to combine the three fully assembled parts into one. I designed some clamp-like bracketsto do the job!
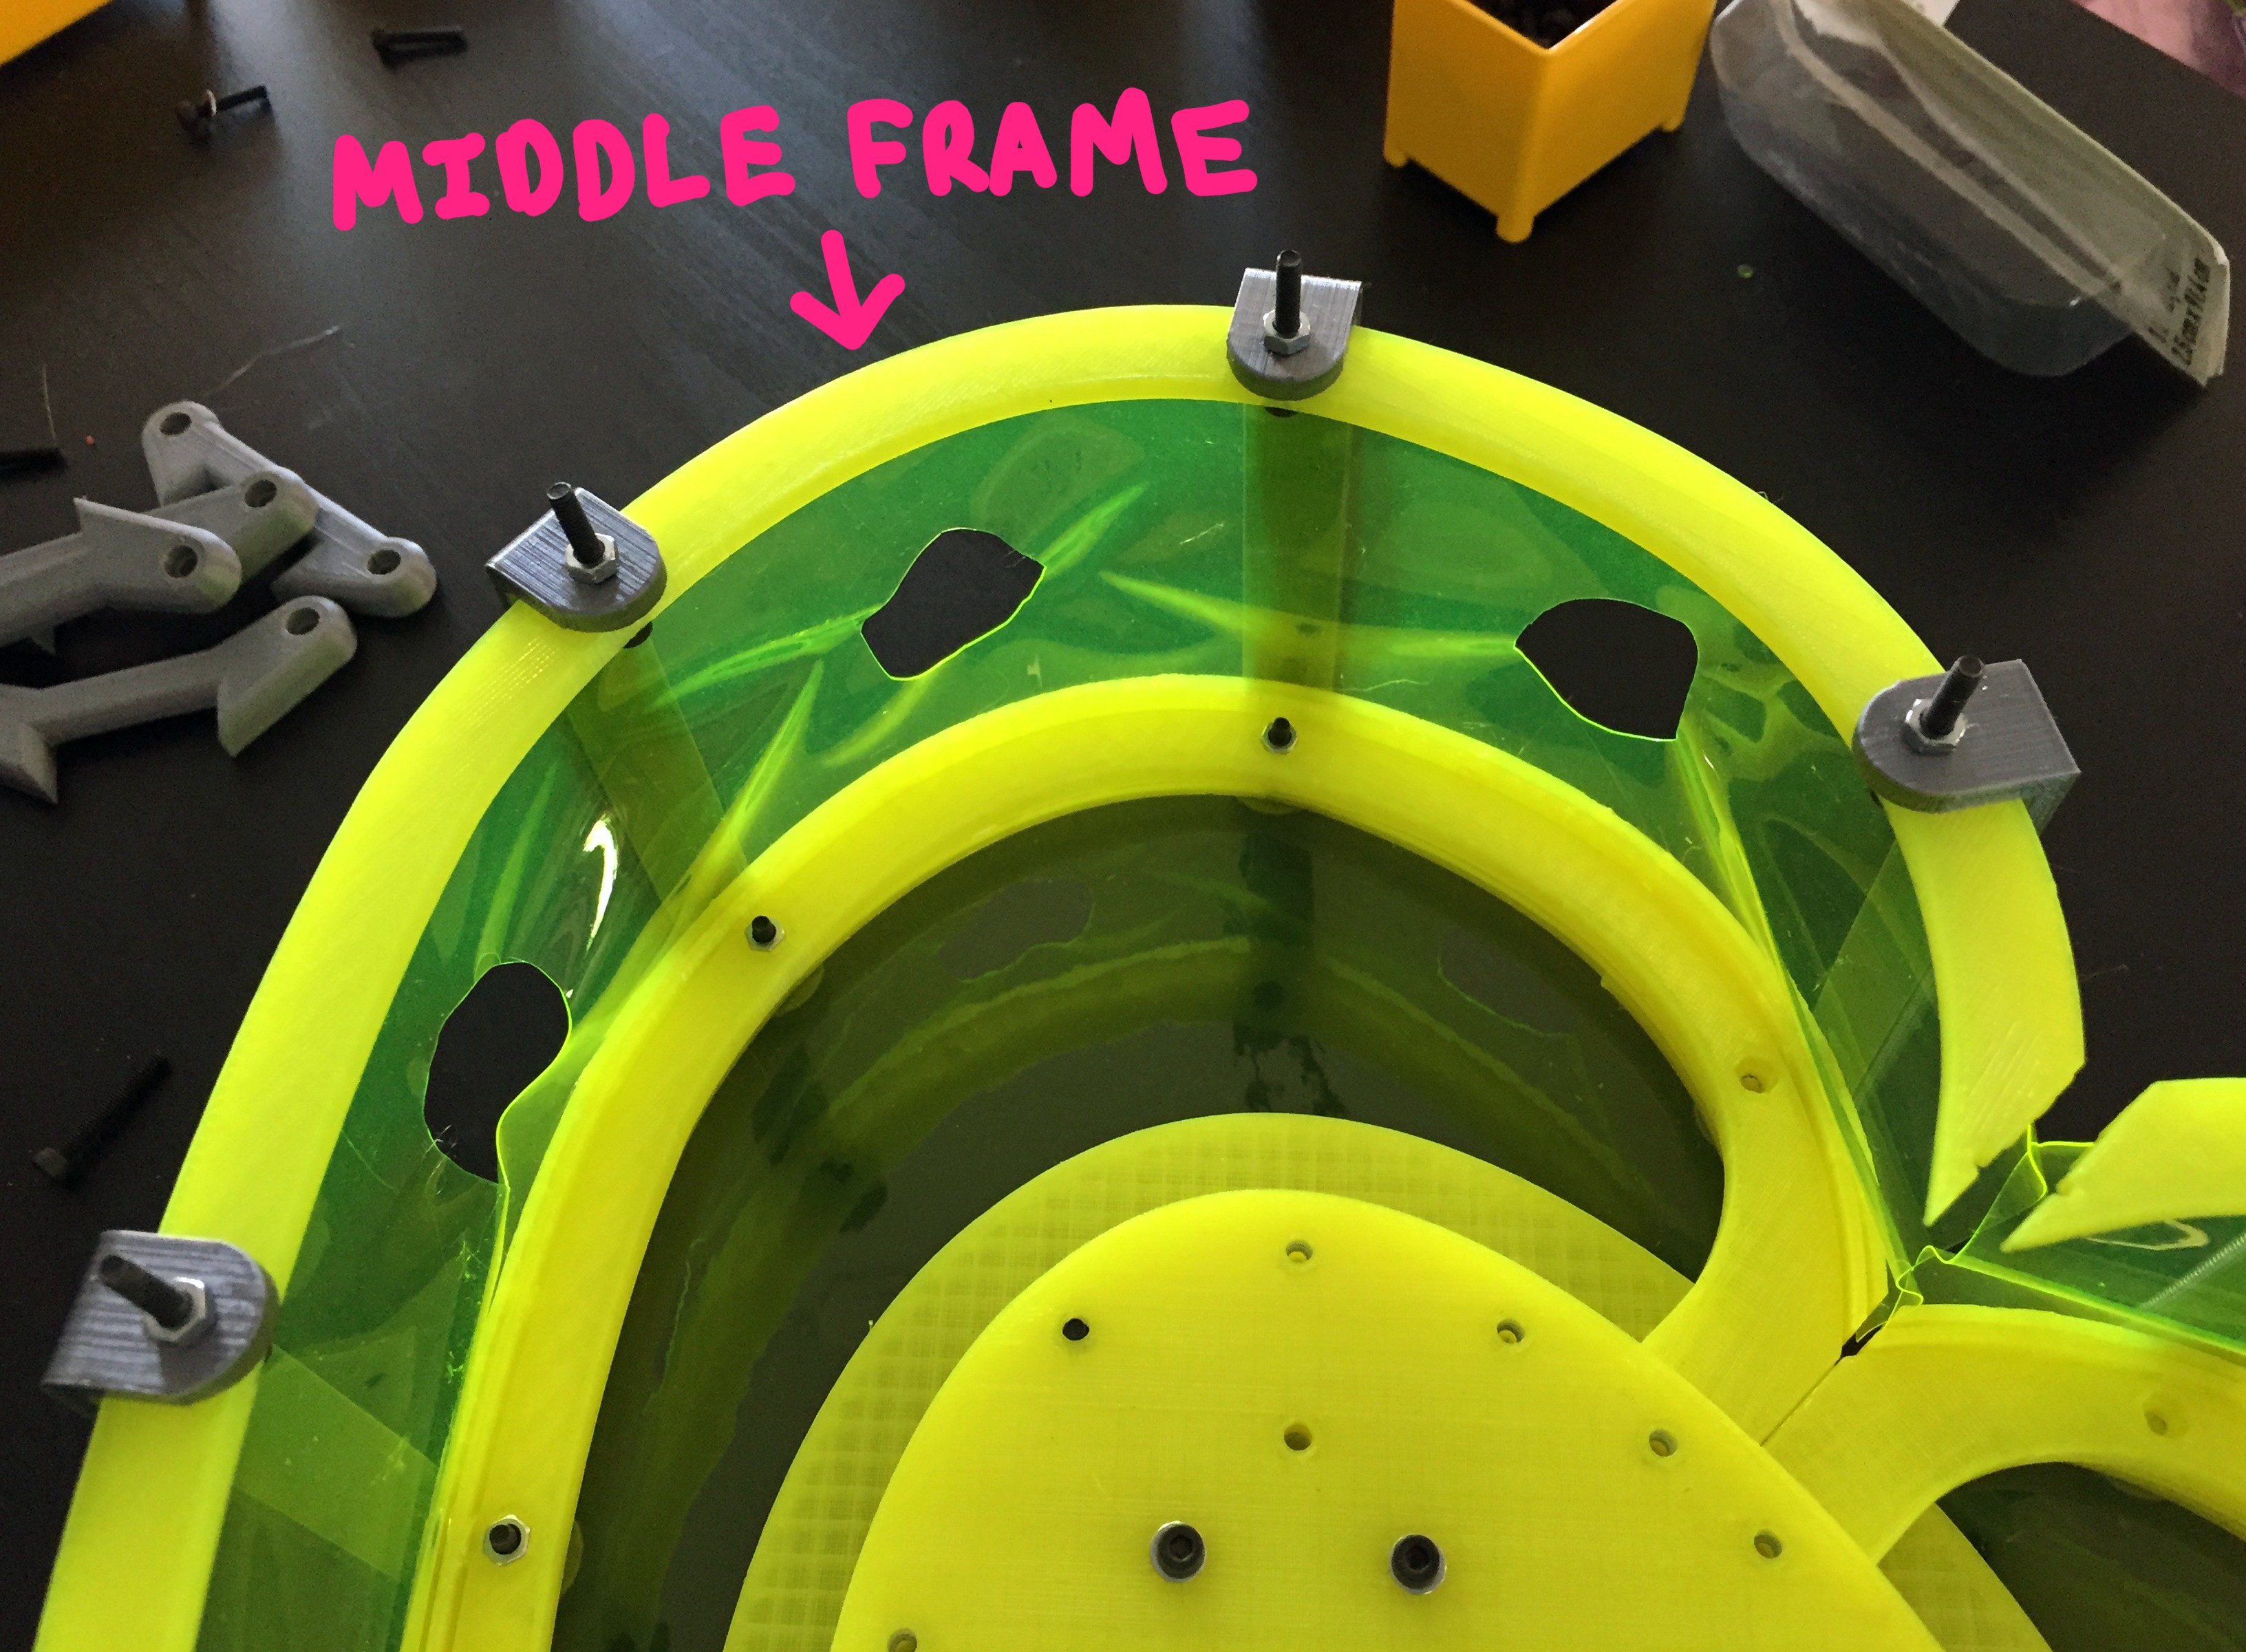
Before adding the structural brackets, I needed to insert the mounting plate! This is super important, as everything critical mounts to this one piece:
![]()
Once guided inside, the mounting plate screws into the bottom frame pieces from the back...
![]()
This is what the assembly looks like once the mounting plate is in its proper position:
![]()
The brackets hold the three pieces of the enclosure together like clamps; sandwiching the topand bottomframepieces to the middle frame piece. The 3mm hardware screws into captured nuts located in the middle frame pieces. In the image below, you can see the hardware going through the bracket, then the bottom framepiece, with a small bit of length left to screw into the middle framepiece of the enclosure:
![]()
the top portion of the middle framepiece attaches to the front half of the bracket:
![]()
...and the hardware also screws in from the back, so that the meat of the screw is sticking up. I capture the top half of the middle frame in place by adding a nut above the bracket:
![]()
The top frame piece drops onto the remaining thread of the hardware now poking up from the brackets! FIRST however, before I close this thing up, I want to install the portals along the wall of the enclosure!
![]()
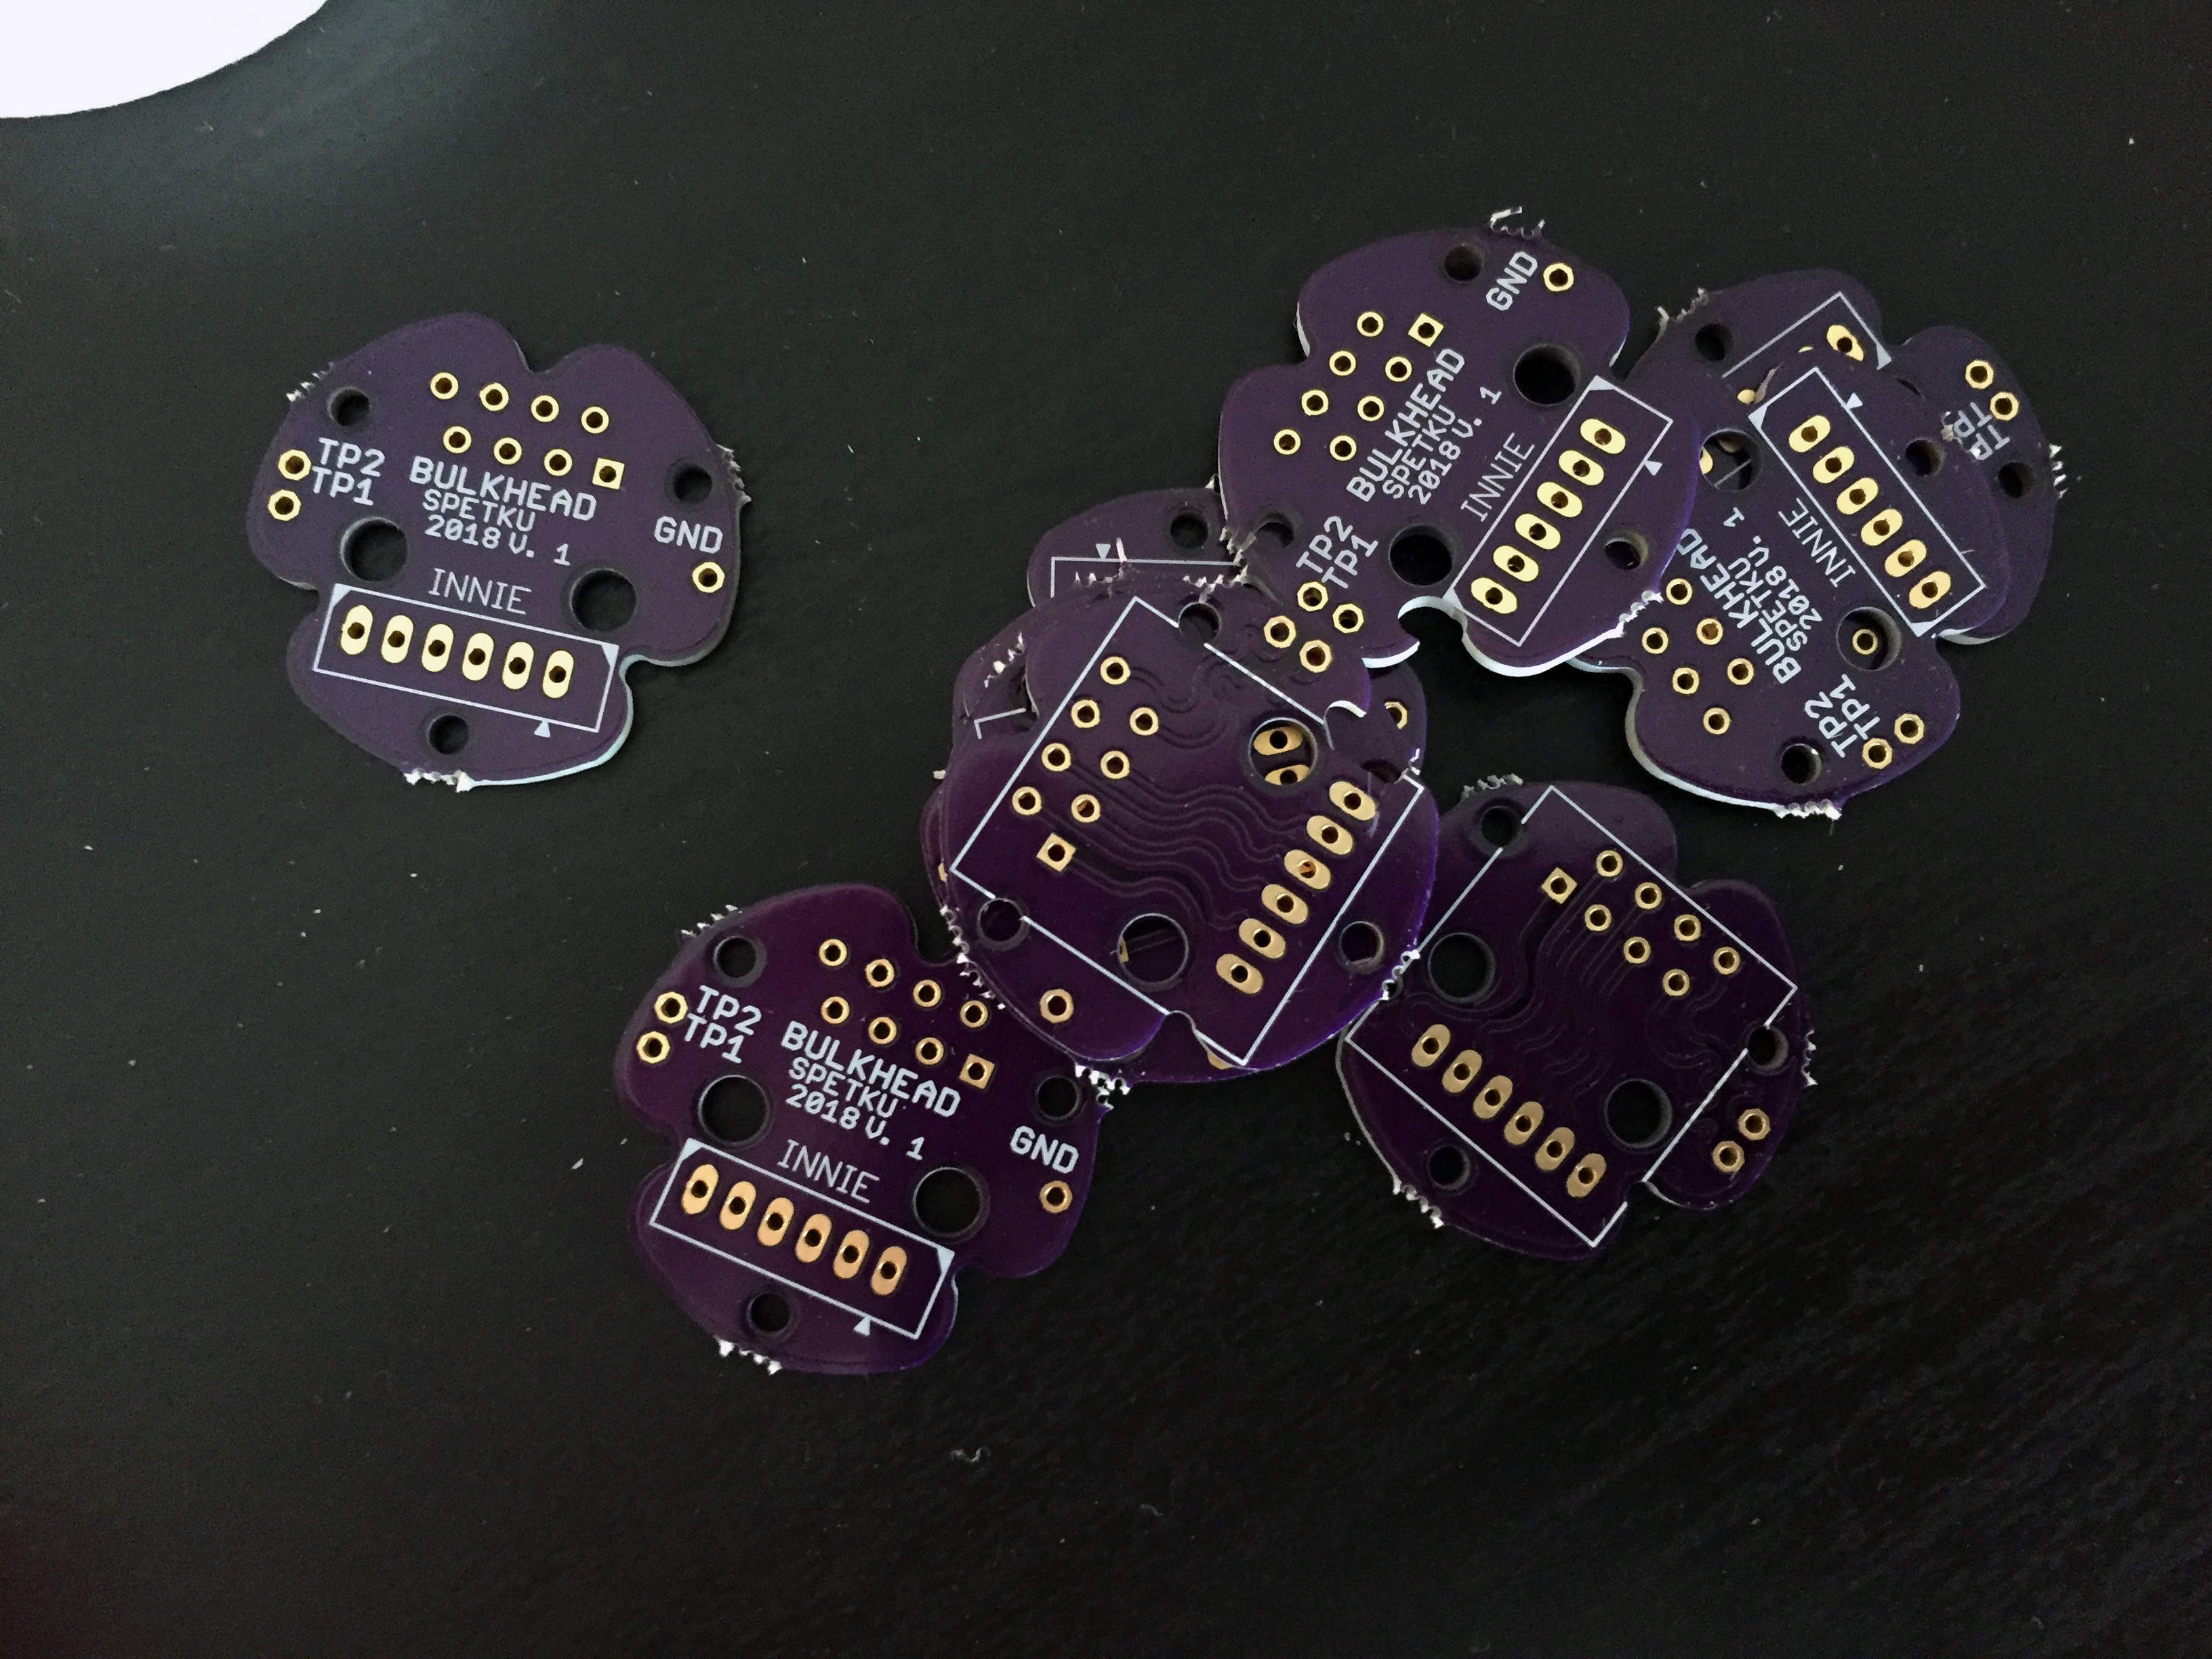
These sad empty holes need to be filled with something! A silver porthole adaptor threads through these gaps and houses a special PCB which converts wires for a molex connector into a cat 5 terminal.
![]()
So many holes:
![]()
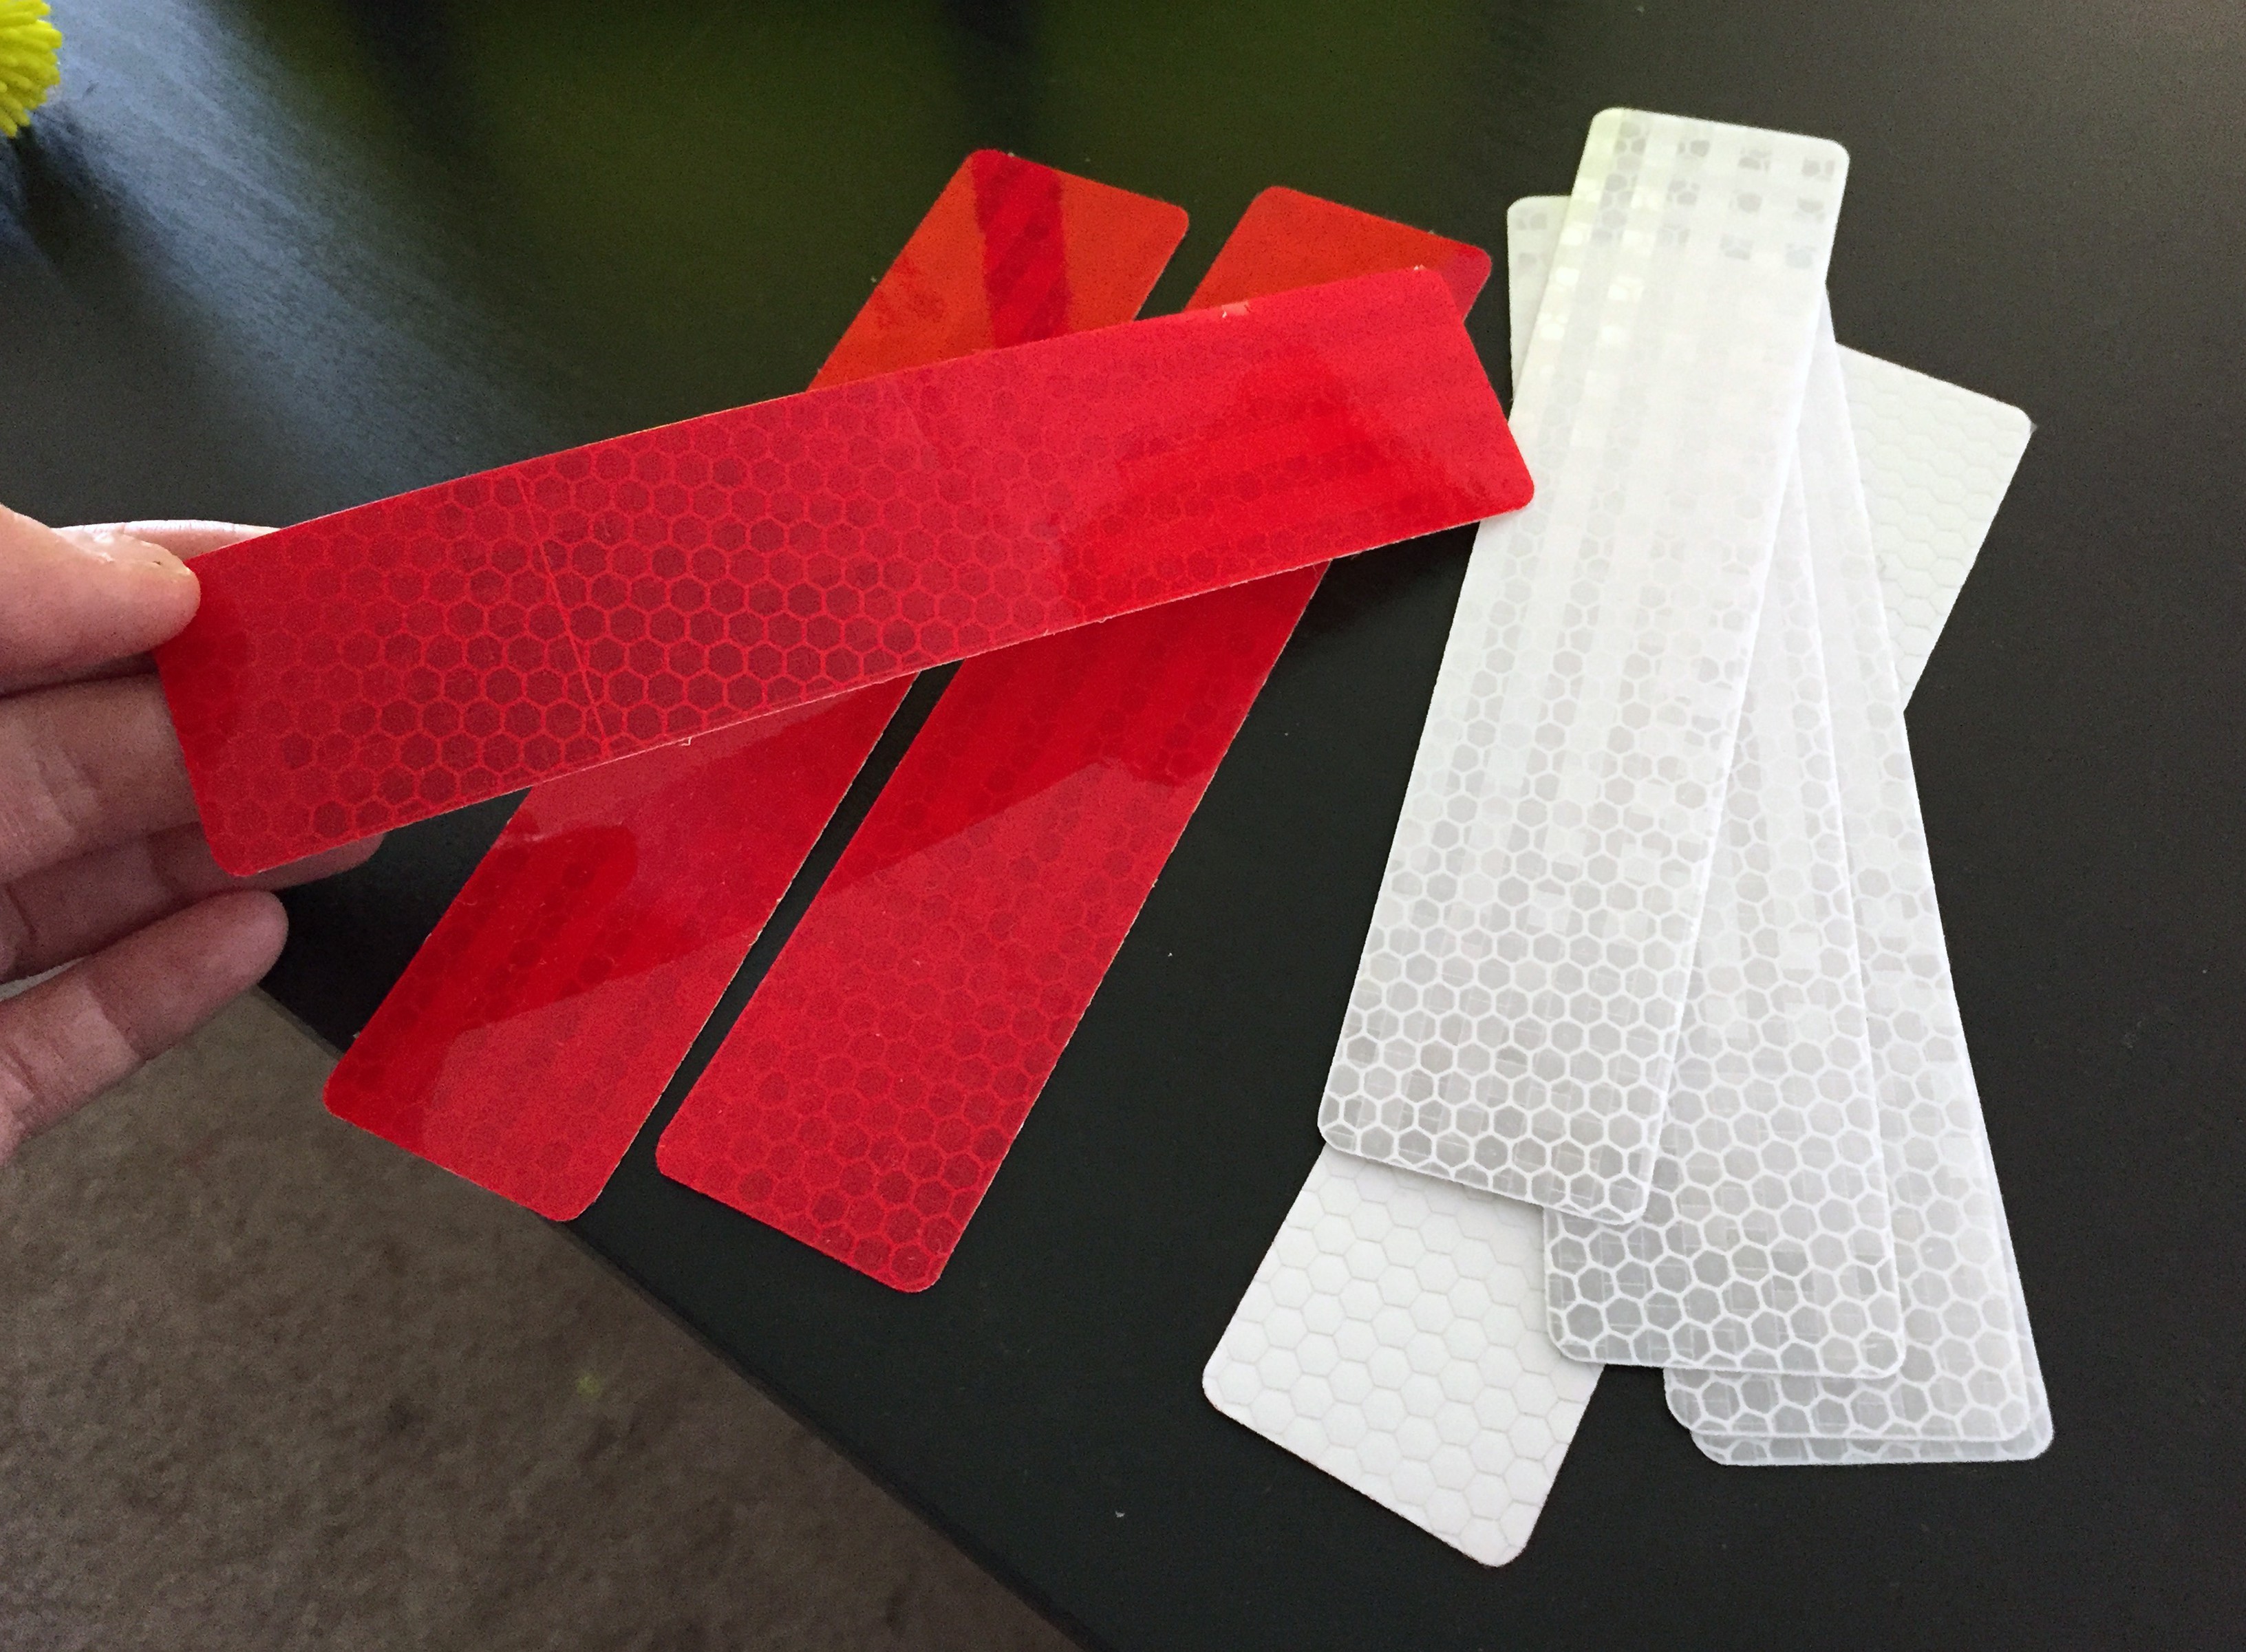
While I print (9) of these "bulkhead" adaptors, I'll dress up my brackets a little :P I picked up some adhesive reflectors from Home Depot!
![]()
I cut the red and white shinies into small strips to place on every-other bracket:
![]()
Around the time I was done with this task, the port-hole pieces and their corresponding nuts were finished printing and ready to go into the outer wall of the enclosure:
![]()
![]()
THE STRAPS
It was my goal that the straps of the backpack form to the contours of my shoulders. This wasn't hard to do, but I did need Mark's help placing short segments of masking tape directly on my skin to sculpt out the first rough pattern (in blue). The first two versions on the left were blind attempts where I just guessed at the curve needed to pull this off... and both were very much unsuccessful. The two on the right were the result of adhering tape directly to my body. You can see how off my first attempts were: =P
![]()
I chose to use an old roll of shelf liner material for my straps. This particular beige-colored fabric was slightly thick and had a spongy quality which I thought would be comfortable to wear. Most importantly, it doesn't deform when stretched or pulled, even with significant force:
![]()
I used my handy template to cut my straps in the beige material, as well as in vinyl. Since I wanted the vinyl to wrap around the edges of the shelf liner, I added a quarter inch margin past the template.
In order to fold the margin around the edge of the shelf liner, I had to cut out small wedges at the apex of each major curve (if you aren't sure where to cut them, just do so every inch or so on average!):
![]()
Next I folded the tabs down and taped them in place using some micro-pore paper tape. This shit is awesome because its incredibly thin, but sticks very well to pretty much everything! Since its soft, thin, and fabric-like, I am able to leave it permanently inside my straps instead of worrying about finding a way to remove it later:
![]()
To make the straps of the backpack a bit more comfortable to wear on my shoulders and chest (and to cover up this unsightly abomination of secret tape), I added neon yellow fleece to the back side:
![]()
I even got some matching neon yellow thread to stitch the seams together with:
![]()
A short loop of elastic at each end will allow the harness to give slightly while I'm trying to get the backpack on, and will also help me mount them to the adaptor plate seen below:
![]()
THE HARNESS ADAPTOR
Theharness adaptor screws directly onto the mounting plate within the main enclosure. It is also the thing that the harness attaches to directly:
![]()
I skinned the adaptor plate in the same fashion as the harness; with vinyl on the front, and fleece on the side which makes contact with my body:
![]()
fleece do:
![]()
Basically, the harness and the adaptor are their own separate assembly
![]()
COUPLING THE HARNESS TO THE ENCLOSURE
The harness adaptoris mounted to the back of the main enclosure, directly onto themounting plate:
![]()
The hardware used to make the connection screws into the nuts that are captured on the other side of these holes pictured below:
![]()
Once bolted down, this is what the back of the heart enclosure looks like:
![]()
Flip it around to view the whole assembly from the front, and you're now looking at this:
![]()
Here is the shiny new yellow next to the seasoned red backpack:
![]()
so pretty!
![]()
![]()
THE PULSE PCB
The circuitboard running the show is called the PULSE, and for the time being... it is more or less a repackaged Arduino MEGA. As mentioned, there will be (is) a separate post all about it. For this build, all you need to know is that this heart-shaped thing mounts in the center of the backpack on some standoffs =P
![]()
the red PCB looks pretty sharp mounted in the new yellow enclosure, me thinks:
![]()
MOLEX TO CAT 5
I think first and foremost, the concept evolved around the aesthetic of having large chunky cords stemming form a central location at the core of the body, and feeding out to other locations, like veins.
In some miscellaneous daydream of mine early this year, I imagined this being something transparent and heart-shaped. Once my mind saw it, that was what it had to be.
From the PCB mounted inside the enclosure, I saw many delicate wires terminating at the edge of the fabric, grouping together into bundles and then feeding out in all directions. I knew early on that I didn't want wires stretching all the way to parts of my body directly off the main board. That'd be silly, right?
The initial solution was to use a common connector, like molex, to come off the primary circuitboard. It would then terminate at the edge of the backpack and switch to something else at this junction. The "what" is still largely undecided, but for this first iteration of the backpack I went with CAT5. Its what I have an abundance of in the lab.
I designed a tiny little PCB that has the six wires from my molex connector going in one side, and a cat5 connector on the other side:
![]()
Once everything is soldered onto these little guys, they slide into those silver bulkhead adaptors like so:
![]()
Here is a closeup of the wires terminating into the BULKHEAD:
![]()
...and becoming a CAT5 socket on the other side of the outer wall of the backpack:
![]()
Once rigged up, the nervous system looks something like black spaghetti:
![]()
USB POWER
For now, v. 1 of the PULSE board receives its power from a rechargeable USB brick. There are (14) LEDs on the back side of the PULSE, so in the case that nothing is jacked into any of the sockets, it can at the very least pulse with colored light and look pretty:
![]()
NOW WHAT...
I now have two core systems: one in red and one in yellow! I can wear whichever hue suites my current mood. That's the beauty of it. <3
![]()
If any of this inspires you to develop your own platform; if not to sense arousal per-se, but maybe something else about your physical status that you'd like to communicate out in the wild- I hope you choose to create it!
In closing: the point of this whole project is to get people talking about how we can use the technology we create to communicate better with one another (through new forms of self expression). This project focuses on intimacy, but really... a dialogue about anything matters just the same to me. =)
Keep creating the things you wish to see exist, AND be the person who makes the experience of living more interesting for everyone. <3


 The system works pretty reliably. This is the first iteration of this particular system, so there are of course improvements to be made for the next version. as a proof of concept however, I am super happy with how these turned out. ;)