 Makerfabs
1. Basically, an anemometer;
2. Temperature and humidity sensor;
3. Air pressure sensor. As they are forecasting for strong wind/rain;
4. Connection module to the internet. I use the ESP12 wifi module;
5. And, a waterproof case, and power bank; Besides, I designed a baseboard so all the electronic modules can be inserted easily, as the attached pictures.
Of course, you can also use a breadboard for this.
In the hardware design, The Anemometer is analog output, so it needs to be connected to the ESP12 ADC module, And the BMP180 Barometer uses the I2C for communication to connect them to ESP12 GPIO4/5, which supports the I2C communication, and the DHT 11 to a digital output.
check the open hardware at Makerfabs.
Firmware&software:
Modify the WIFI setting and MQTT. Of course, if not, you need to register an account, and created a new instance. And modify them in the firmware:
const char* ssid = "xxx"; // Wi-Fi SSID<br>const char* password = "xxx"; // Wi-Fi Password
and the MQTT info (if you are not familiar with this, please refer to Makerfabs ESPwatch for the MQTT detailed usage )at:
const char* hostname = "postman.cloudmqtt.com";<br>int port = 16265;
const char* user = "xxx";
const char* user_password = "xxxx";
const char* id = "xxxx";
And in the firmware loop, the ESP12 module read the sensor
or wind/temperature/air pressure by:
int windspeed = analogRead(windpin);humi = dht.readHumidity();
temp = dht.readTemperature();
Upload the firmware to the ESP node MCU board.
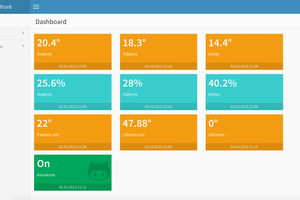
The Esp8266 WIFI module sends weather info to the MQTT server, by publishing a message on the topic to the MQTT server. The last nodejs get weather info from the MQTT server, by subscribing topic on saving MQTT server.

I deploy my NODE JS on the AWS server, so anybody that interest in this can access my wind station at:
http://34.220.205.140:8080/wind

 Harri Ohra-aho
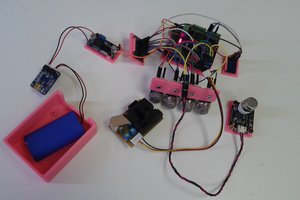
 mikrotron
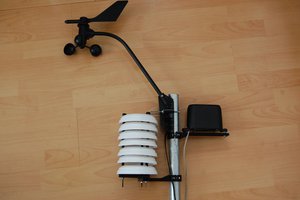
 hardas999
 lagunacomputer