Close
0%
0%

Arduino Based Digital Thermometer

In this project, an Arduino based digital thermometer is designed that can be used to analyze the temperature of the room.

Similar projects worth following
350 views
0 followers
The thermometer is generally used as a temperature measuring instrument. There are various principles that can be used to measure the temperature like the thermal expansion of solids or liquids, the pressure of the gas, measurement of infrared energy, etc.

Arduino based digital thermometer is outlined that can be used to analyze the temperature of the room.

LM35

LM35 is a temperature sensor. The output voltage of this sensor is directly proportional to the temperature in centigrade. LM35 can be utilized in the range of -550C to +1500C with +/- 0.750C accuracy.

Circuit Design of Digital Thermometer

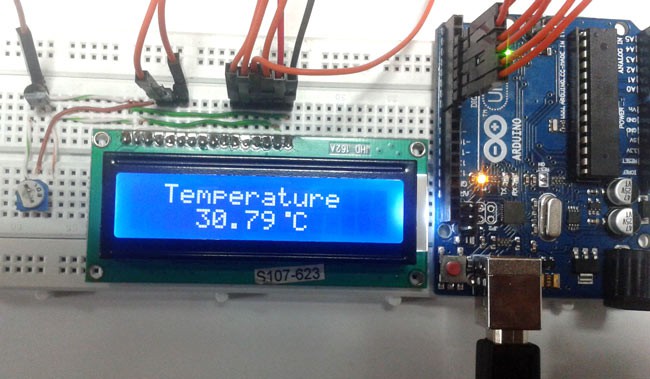
The temperature sensor used in this project is LM35. The output of a temperature sensor is directly proportional to the temperature but in analogue form. Hence, the output of LM35 that means pin 2 is connected to analog input A0 of Arduino.

As it is a digital thermometer, we need to convert the analogue values of temperature to digital and display the result on a display like LCD etc. 16X2 LCD is used. Pin no 1 and 2 of LCD are connected to ground and supply respectively.

In order to manage the contrast of the display, Pin 3 of LCD is attached to the wiper of a 10 KΩ POT. The remaining terminals of POT are attached to supply and ground. Pins 15 and 16 of LCD are used to revolve the back light of the LCD which is connected to supply and ground respectively. In order to display the information on LCD, we require 4 data pins of the LCD. Pins 11 – 14 (D4 – D7) are attached to Pins 5 – 2 of Arduino. Pins 4, 5 and 6 (RS, RW and E) of LCD are control pins.

Pins 4 (RS) of LCD is connected to pin 7 of Arduino. Pin 5 (RW) is connected to ground. Pin 6 (E) is connected to pin 6 of Arduino.

Working

A high precision digital thermometer is outlined in this project.The working of the circuit is as explained below.

The temperature sensor i.e. LM35 constantly analyzes the room temperature and gives an analogue identical voltage which is directly proportional to the temperature.

This data is given to Arduino through A0. As per the code written, the Arduino transforms this analogue voltage value to digital temperature readings. This value is showed on the LCD.

The output displayed on the LCD is an exact reading of room temperature in centigrade.

The final outcome will be like this:

hIOTron's IoT Training Online developed a various IoT Solutions over such a applications to enhance user's experience.

JPEG Image - 86.08 kB - 08/27/2019 at 11:01

Preview
Download

  • 1 × Arduino Uno
  • 1 × LM35 Temperature Sensor
  • 1 × 16X2 LCD Display

  • 1
    Run a Code
    #include<LiquidCrystal.h>
    LiquidCrystal lcd(7,6,5,4,3,2);
    
    const int Sensor = A0; byte degree_symbol[8] =              
     {      
            0b00111,                
            0b00101,               
            0b00111,                
            0b00000,               
            0b00000,               
            0b00000,                
            0b00000,                
            0b00000             
     };
    void setup()
    
    {  
      pinMode(Sensor, INPUT); 
      lcd.begin(16,2);  
      lcd.createChar(1, degree_symbol); 
      lcd.setCursor(0,0);  
      lcd.print("    Digital    "); 
      lcd.setCursor(0,1); 
      lcd.print("  Thermometer   ");  
      delay(4000); 
      lcd.clear();
    }
    void loop()
    {       
      float temp_reading=analogRead(Sensor);     
      float temperature=temp_reading*(5.0/1023.0)*100;     
      delay(10);       
      lcd.clear();    
      lcd.setCursor(0,0);   
      lcd.print("Temperature in C");    
      lcd.setCursor(4,1);    
      lcd.print(temperature);   
      lcd.write(1);    
      lcd.print("C");   
      delay(1000);
    }

View all instructions

Enjoy this project?

Share

Discussions

Similar Projects

Does this project spark your interest?

Become a member to follow this project and never miss any updates