My build started in Fusion 360. First modeling everything that needed to fit within the back and arranged them somewhat to fit tightly. I left room for a raspberry pi, which I did not model because I measured the space between the components and found it would fit. Saved a little bit of time there.
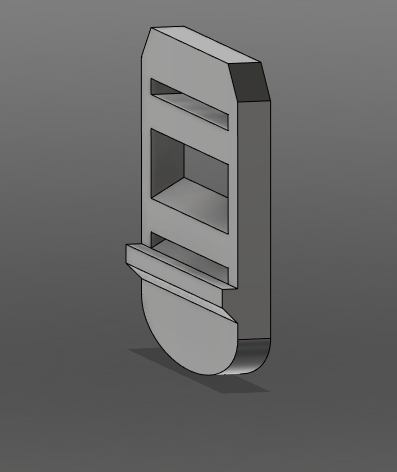
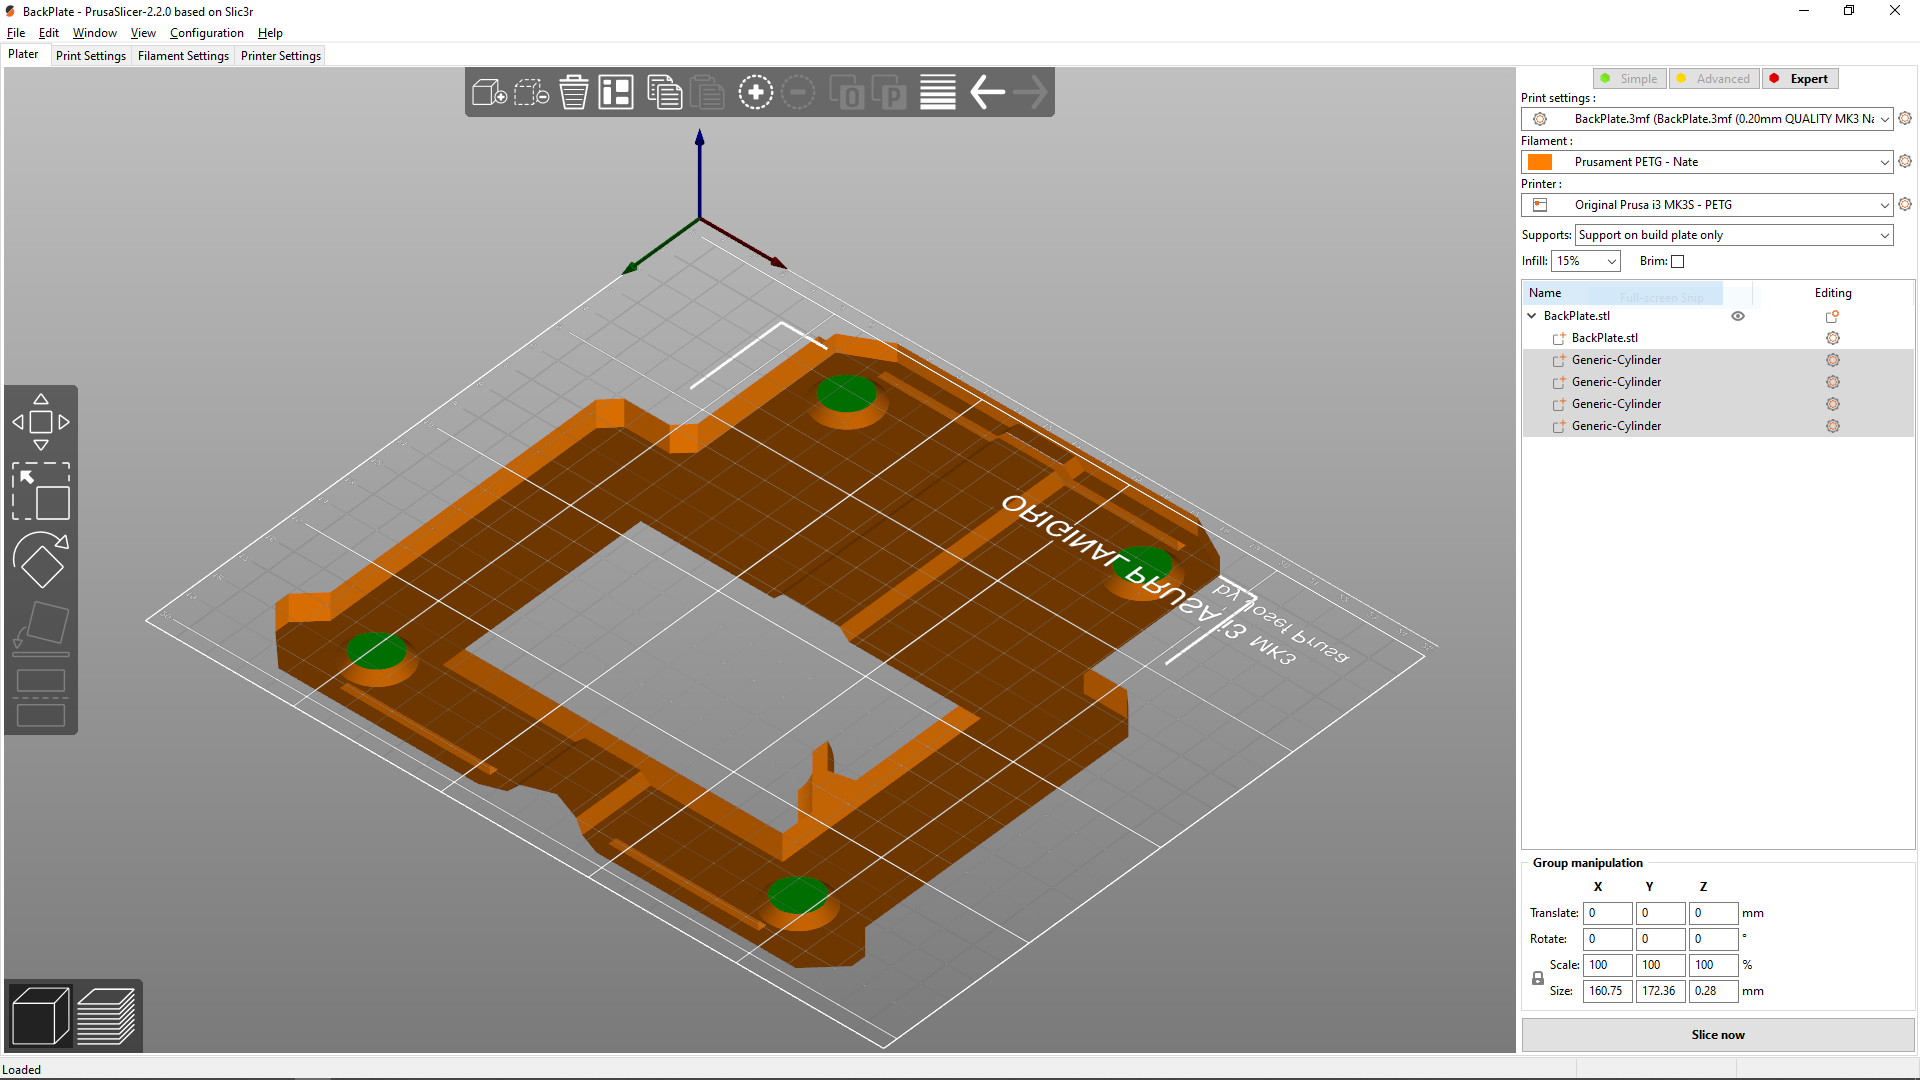
I then started the arduous process of building a shell around the components. First the back-plane of the pack, adding a little extra support to the battery pack. Including some ridges for it to fit together with the main shell and room for my spine
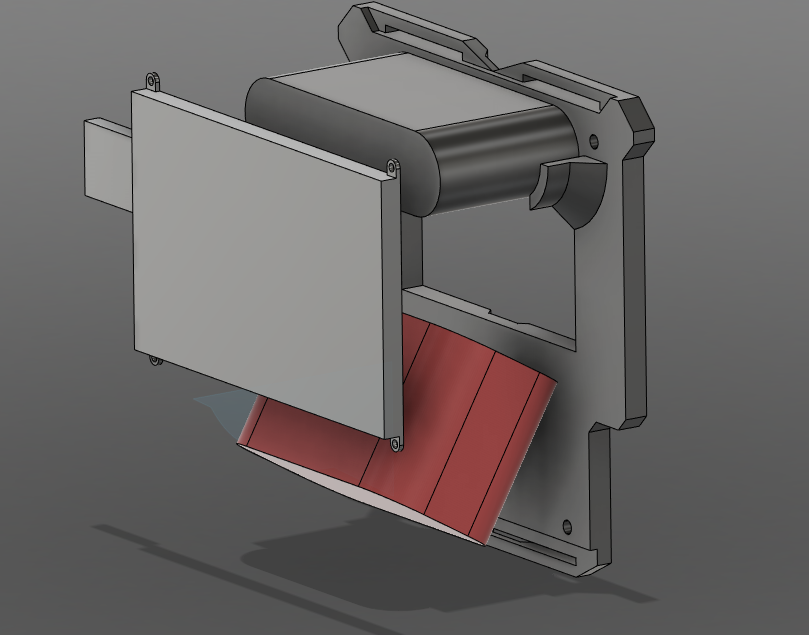
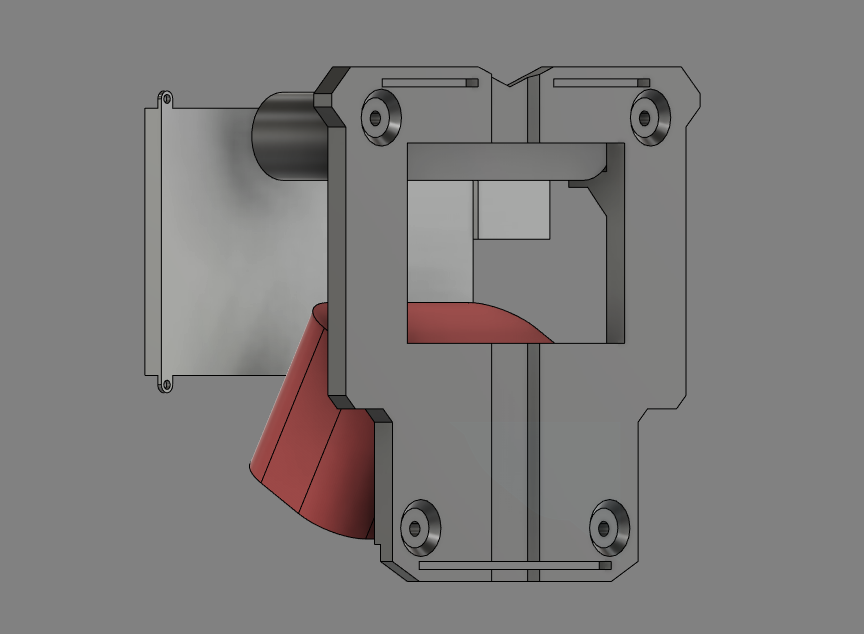
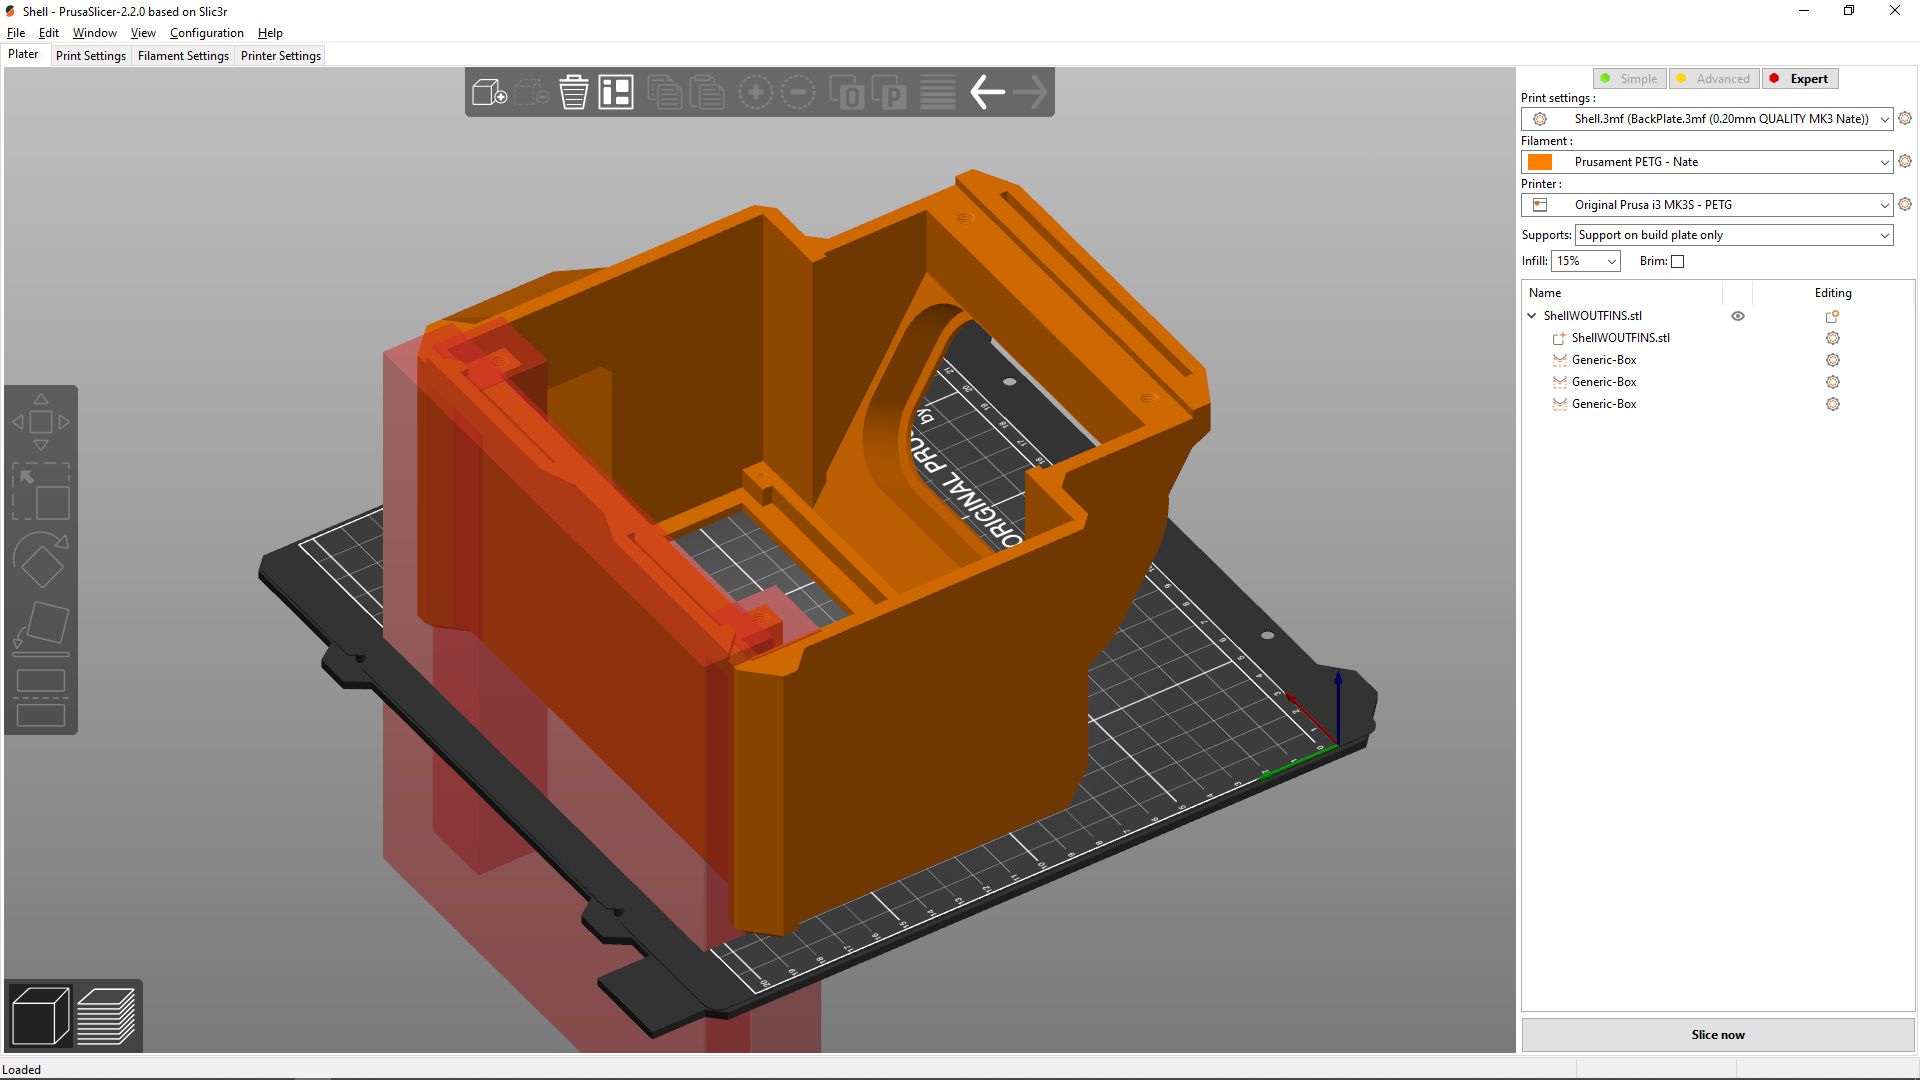
Don't forget to sink your your bolts back. I decided not to countersink, because I didn't want to print with supports for the ridged portion. In the printing section you'll see how to achieve a sunken bolt hole without support material. I then built the shell around each part, adding indention around components for them to slot within. Again I tried to model this so that it could print with the least amount of support material as possible.
There are definitely areas to improve the shell. Like where the top plane meets the raised ridge lines, the cross section is rather small.
Lastly, I designed some strap components for the pack.
All things improve with time, however it'll work for now! So on to step two!
Oh well before that, let me know if you have any questions about the modeling, I'll do my best to answer them! :)
2
3D Printing
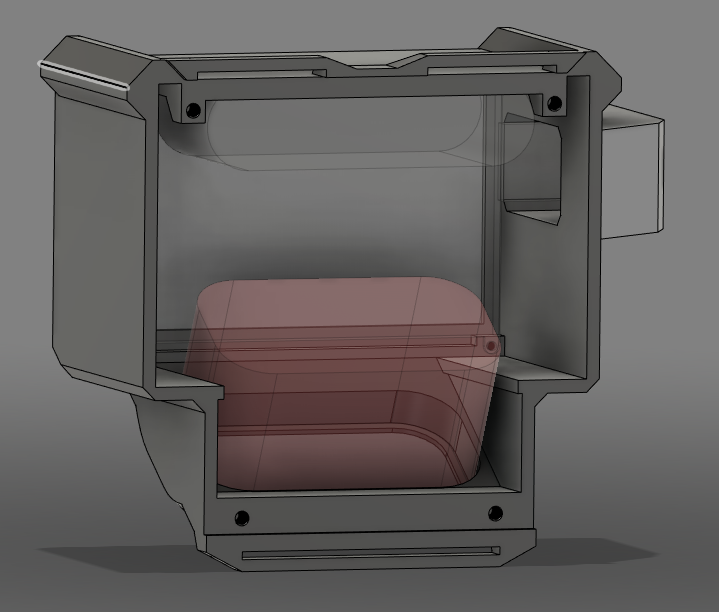
To print bolt holes, offset from the plane of the printer, I created 4 cylinders and aligned them a layer or two below where the hole would start to print. Each cylinder is a solid model, two layers thick. Once sliced, support will not need to be generated, since the slicer will treat it as a bridged surface and then build the hole on top of the surface.
The larger shell was mostly designed to be self supporting, so I added in a few boxes of no support zones. Everything took me about 3 days to print. The 3mf files can be found the files section. Happy Printing.
3
Assembly of Pack Components!
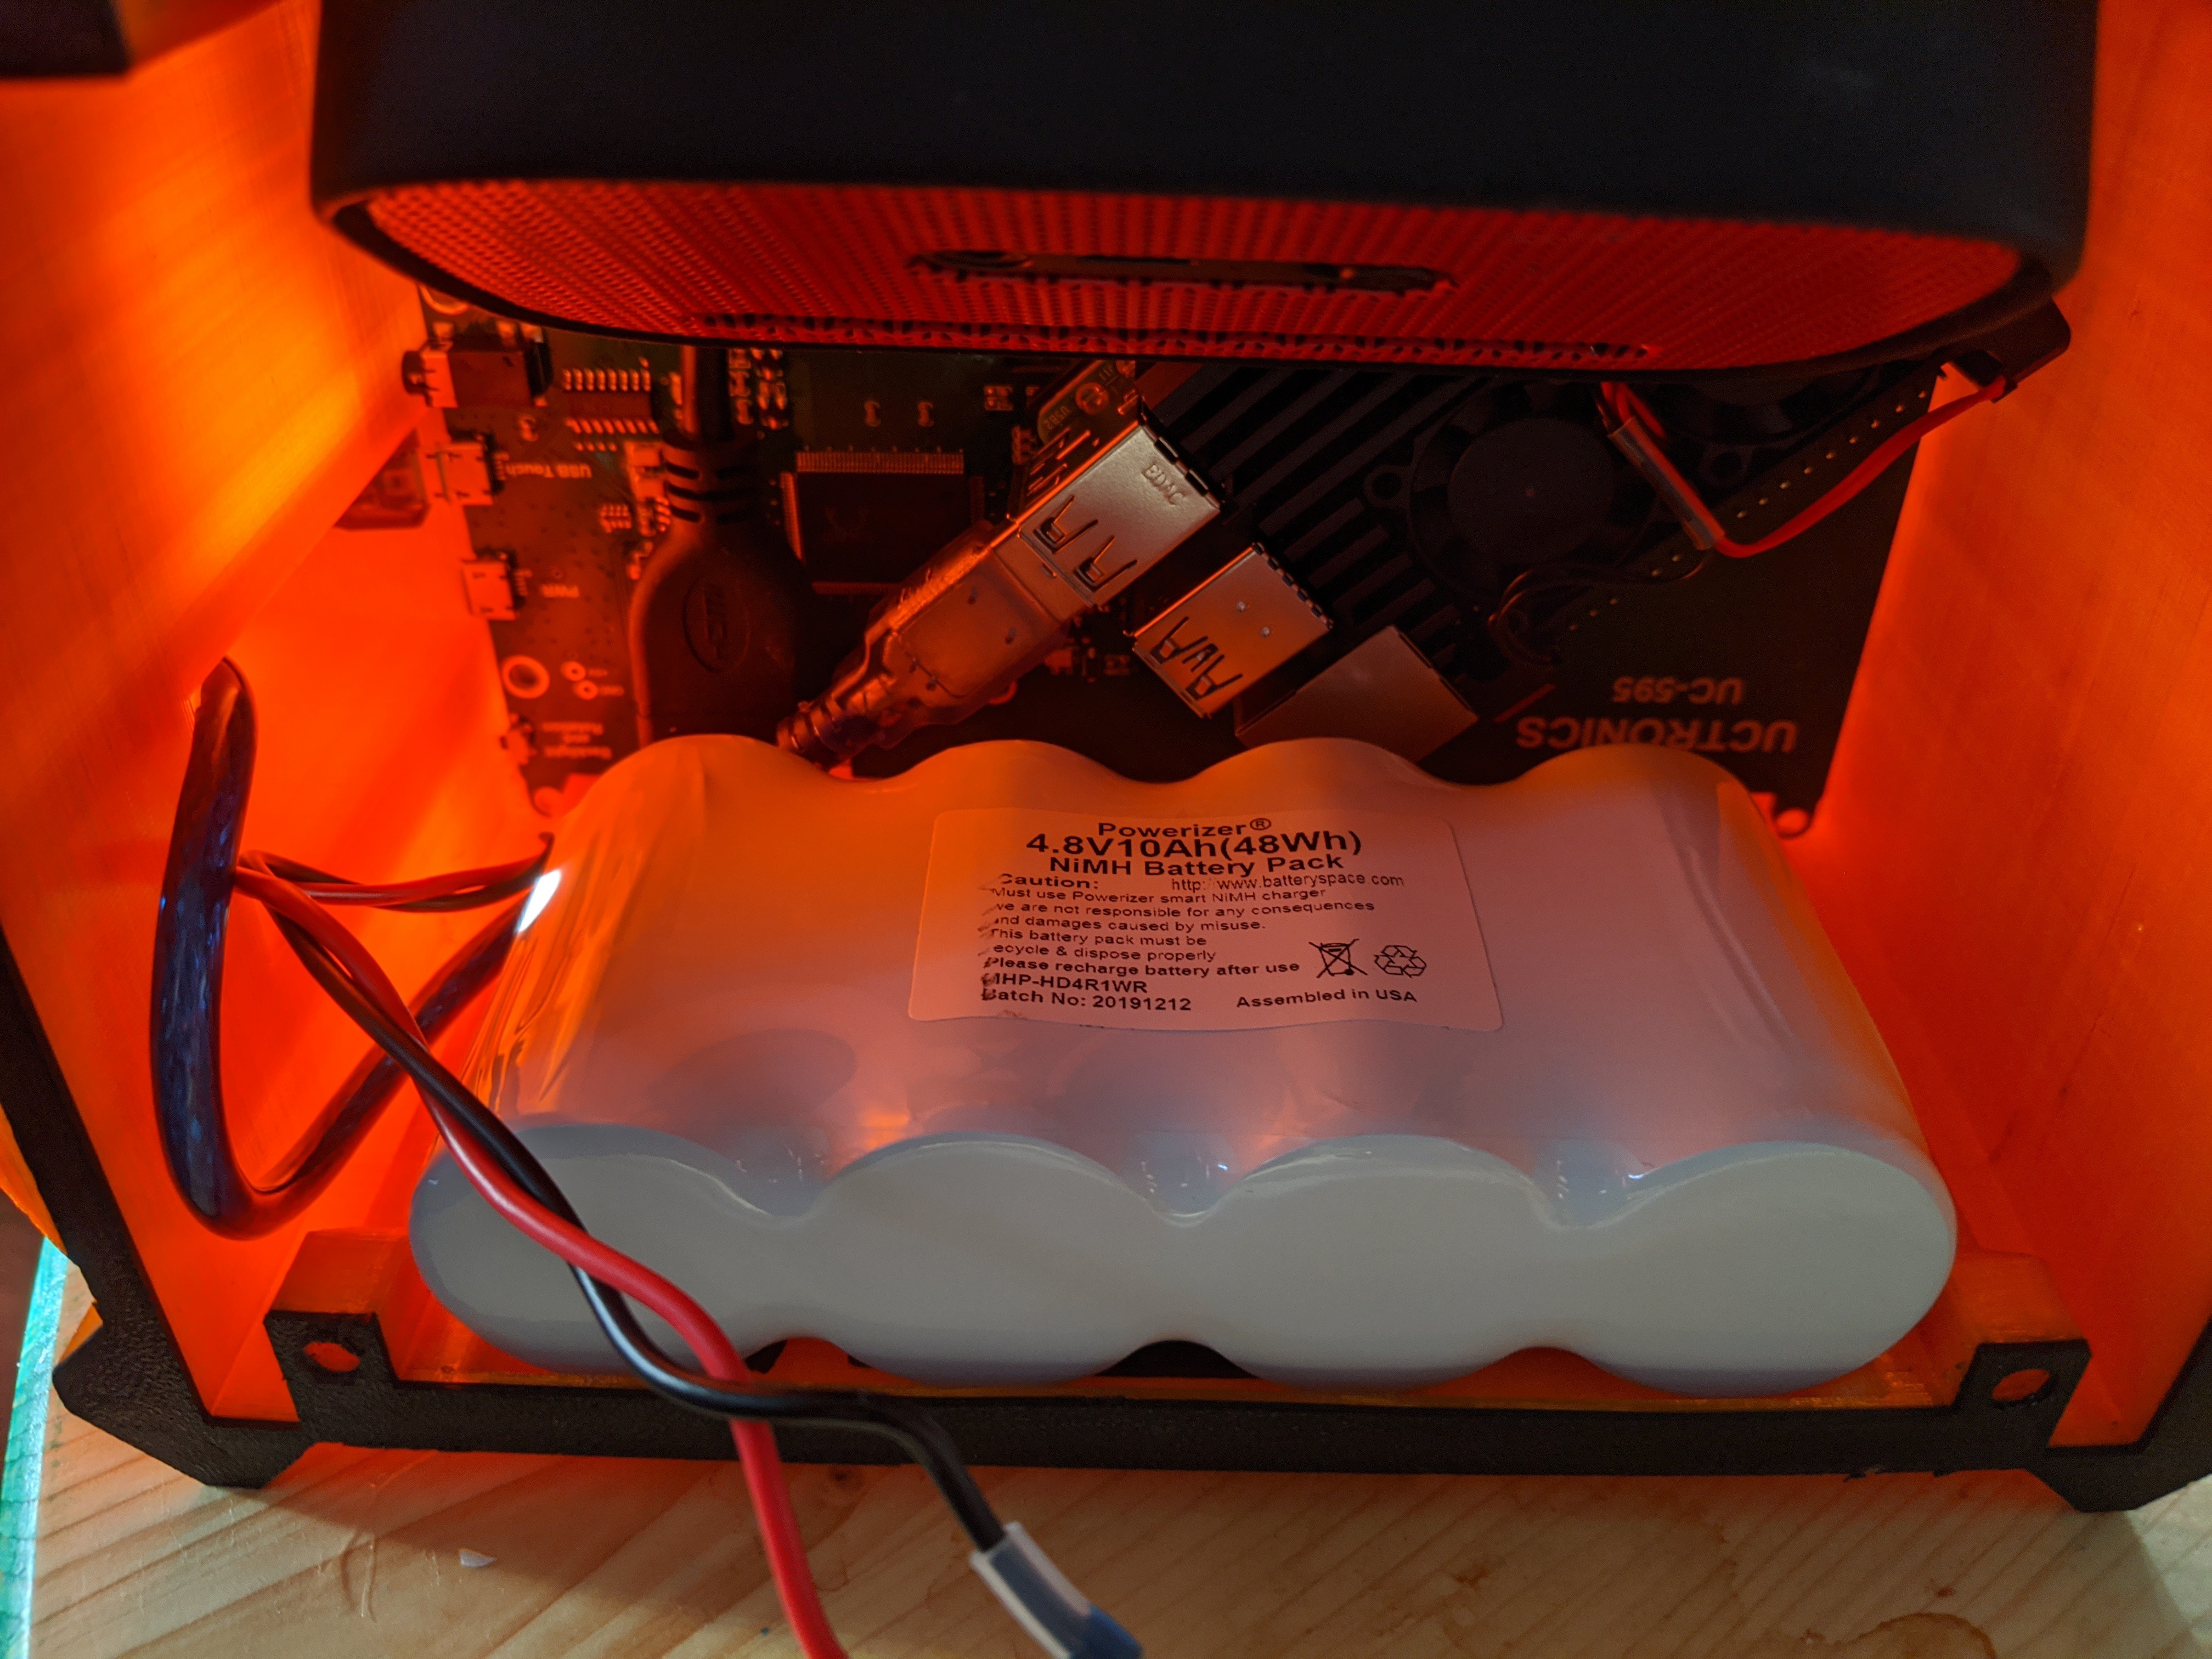
I started with a two pin Molex connector, which the batteries from Batteryspace.com comes with as an optional add on for their batteries. Snipping all of the usb lines, and connecting power and ground to the molex connector with those solder-in-heatshrink jumpers
The power lines are for the following:
USB C for Raspberry Pi4
Micro USB for Touch Screen
Output for the Neopixel LED's in my tvhead.
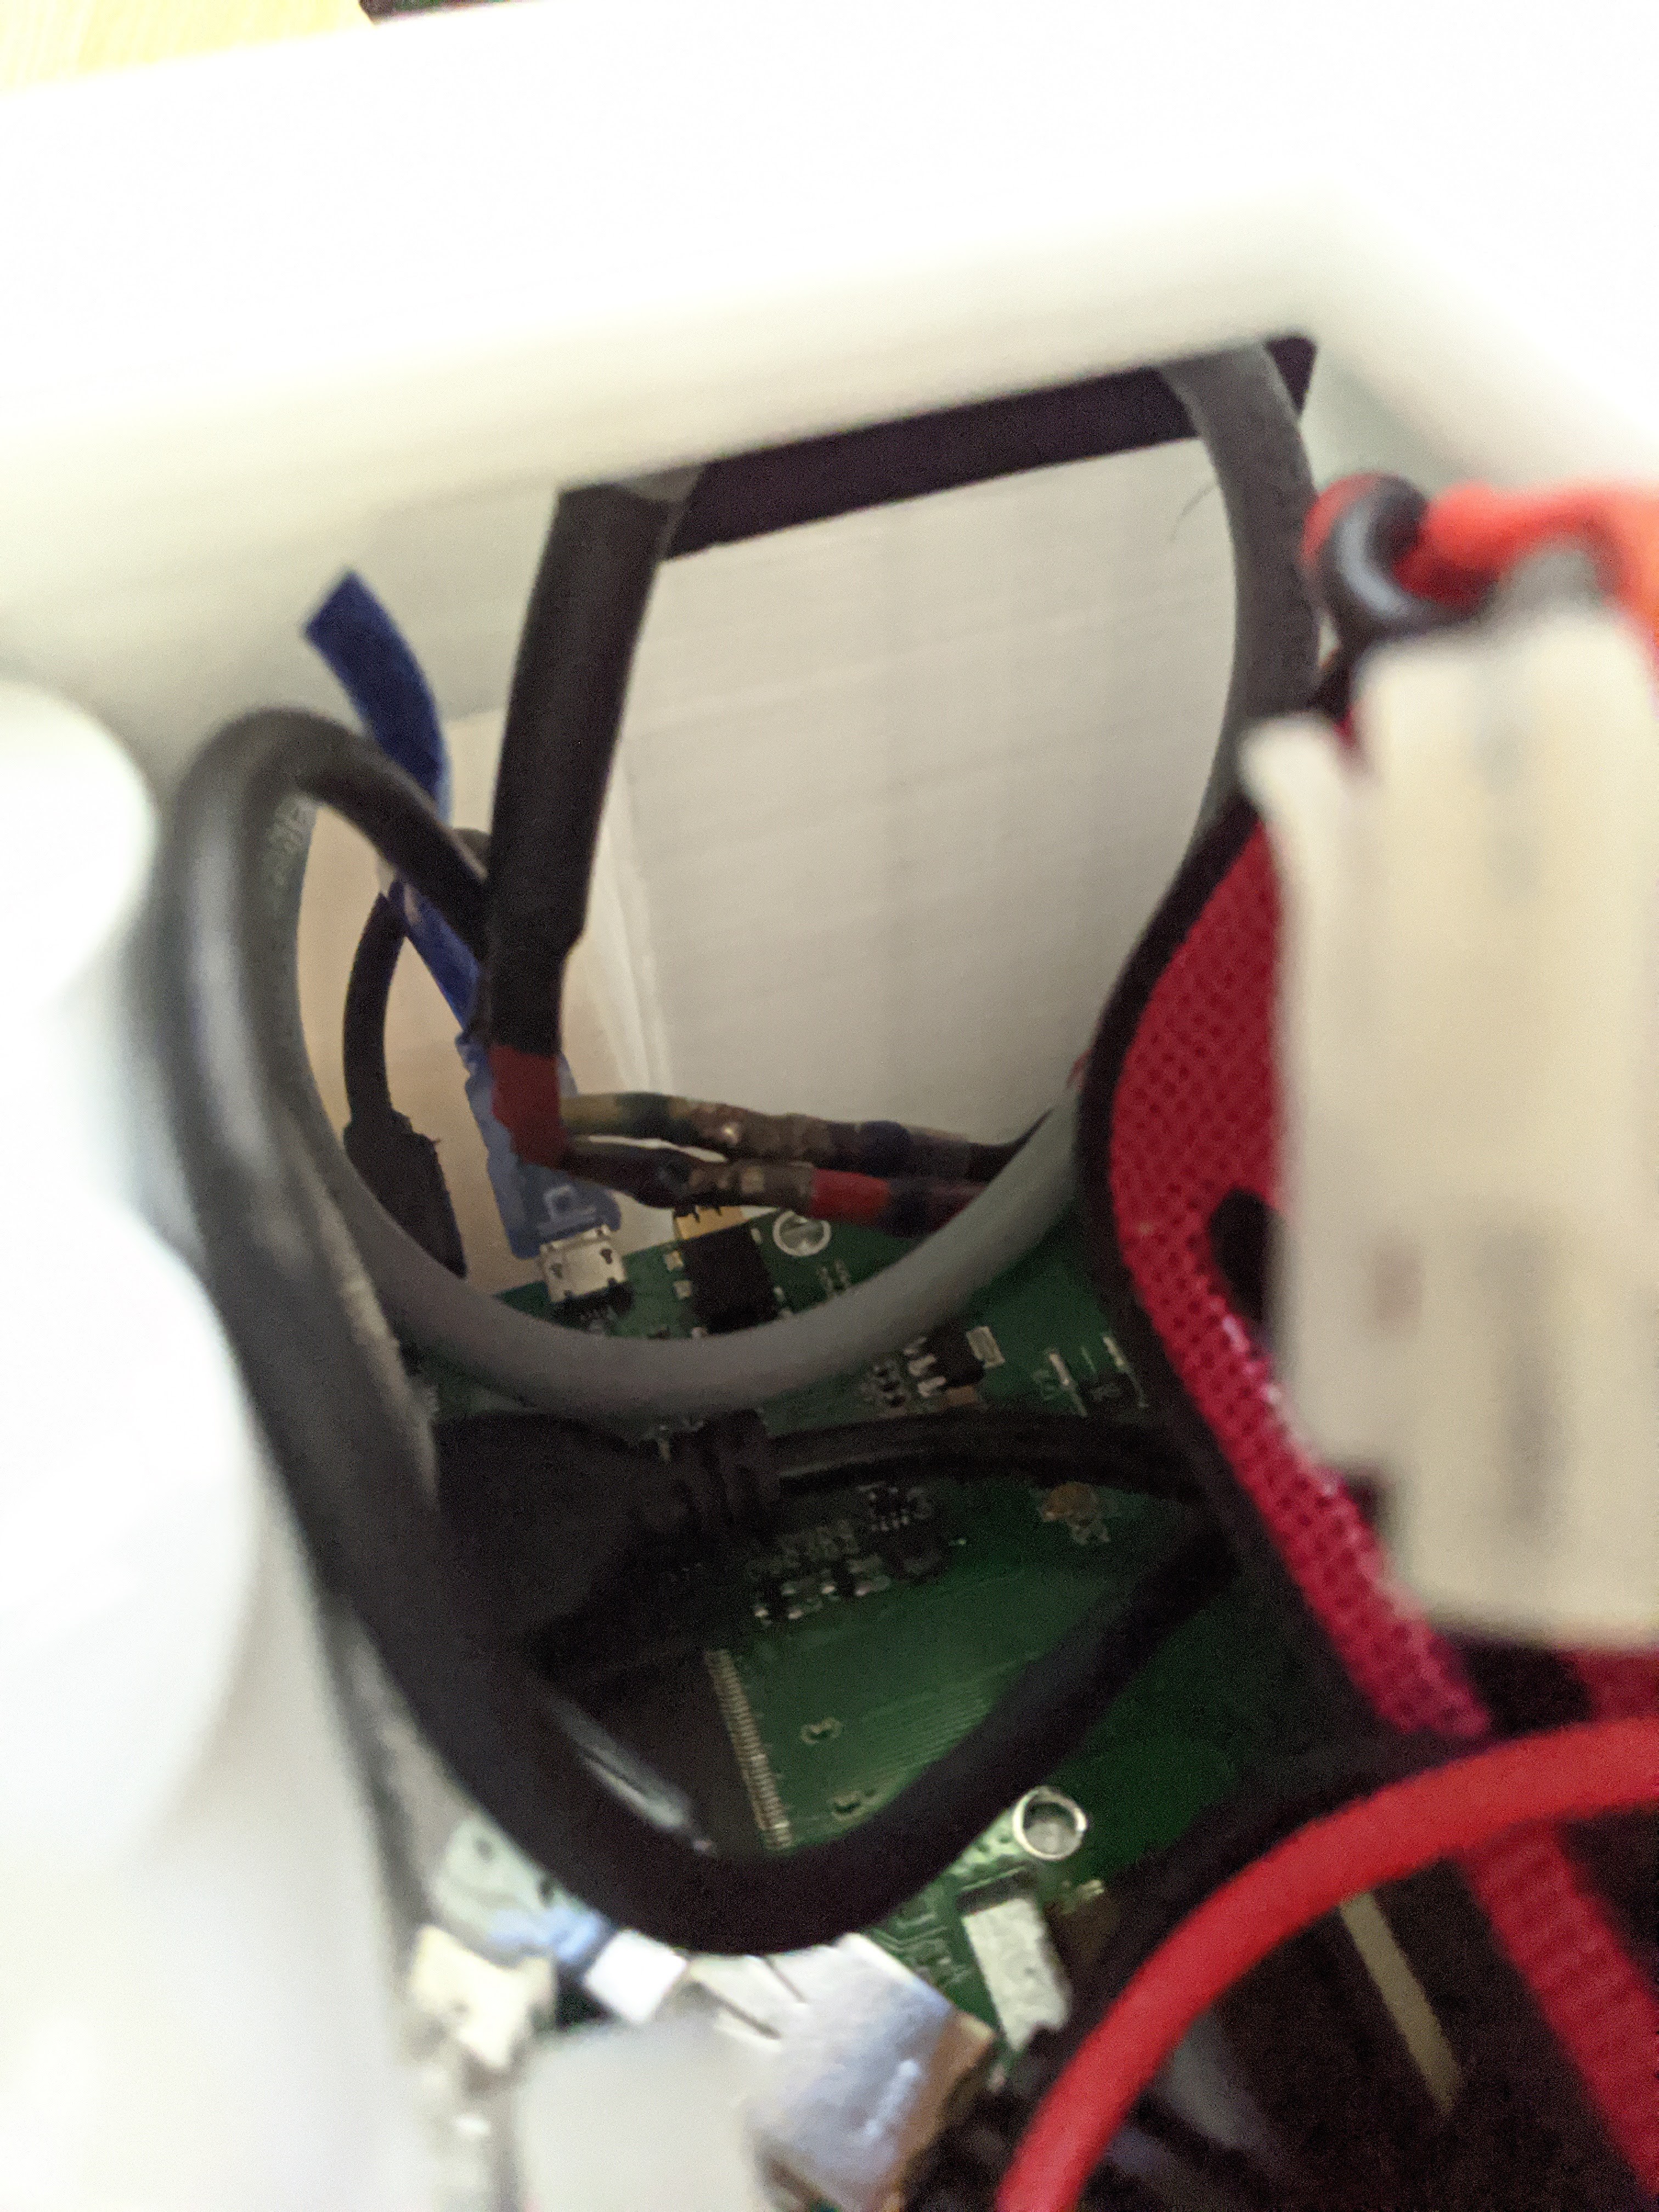
Sorry, the photo is not great, I took it after the fact. In the back, you can see the two solder-in-heatshrink jumpers. The molex connector is rather blurry on the right side of the photo. The Black usb in back, is power and the blue usb is touch data going to the pi. The grey cable is the power line for my tvhead, and the black cable is the usb power line for the raspberry pi.
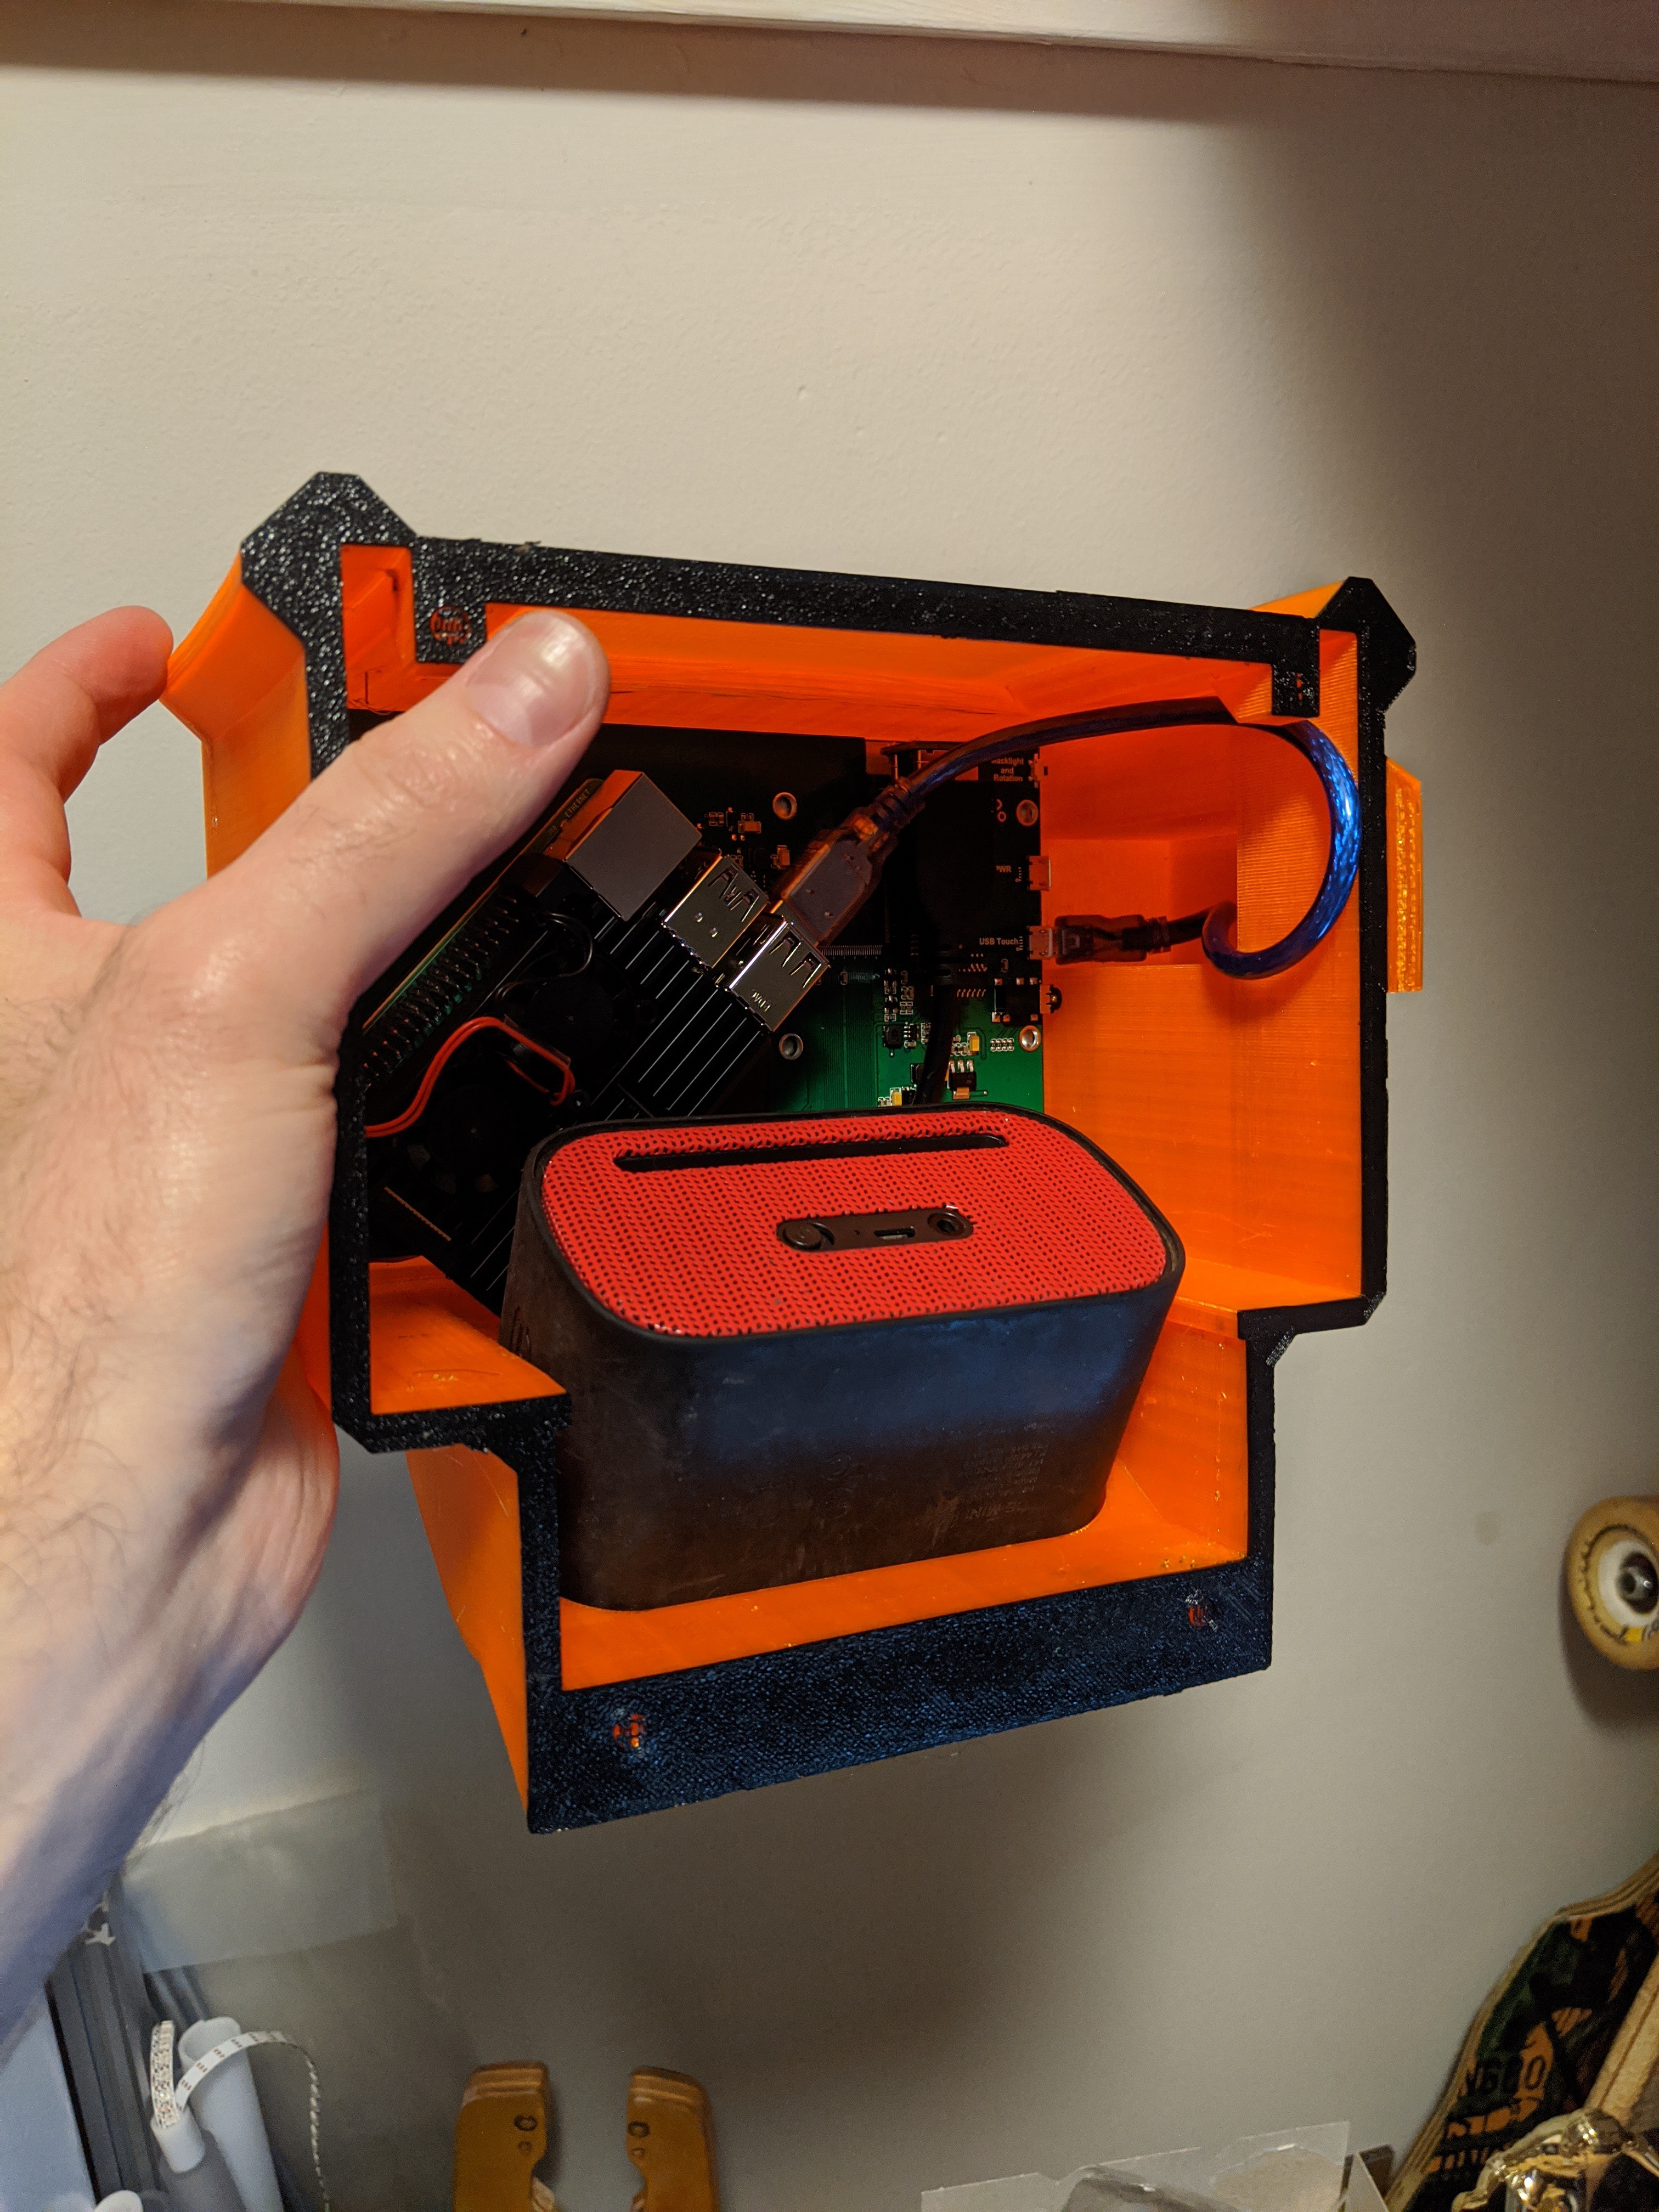
After everything was soldered together, I started to place the components in the shell of the pack. The build is simple, connecting a raspberry pi HDMI and usb to the touch screen. That's all that's really needed besides power.
4
Sewing the Backpack straps
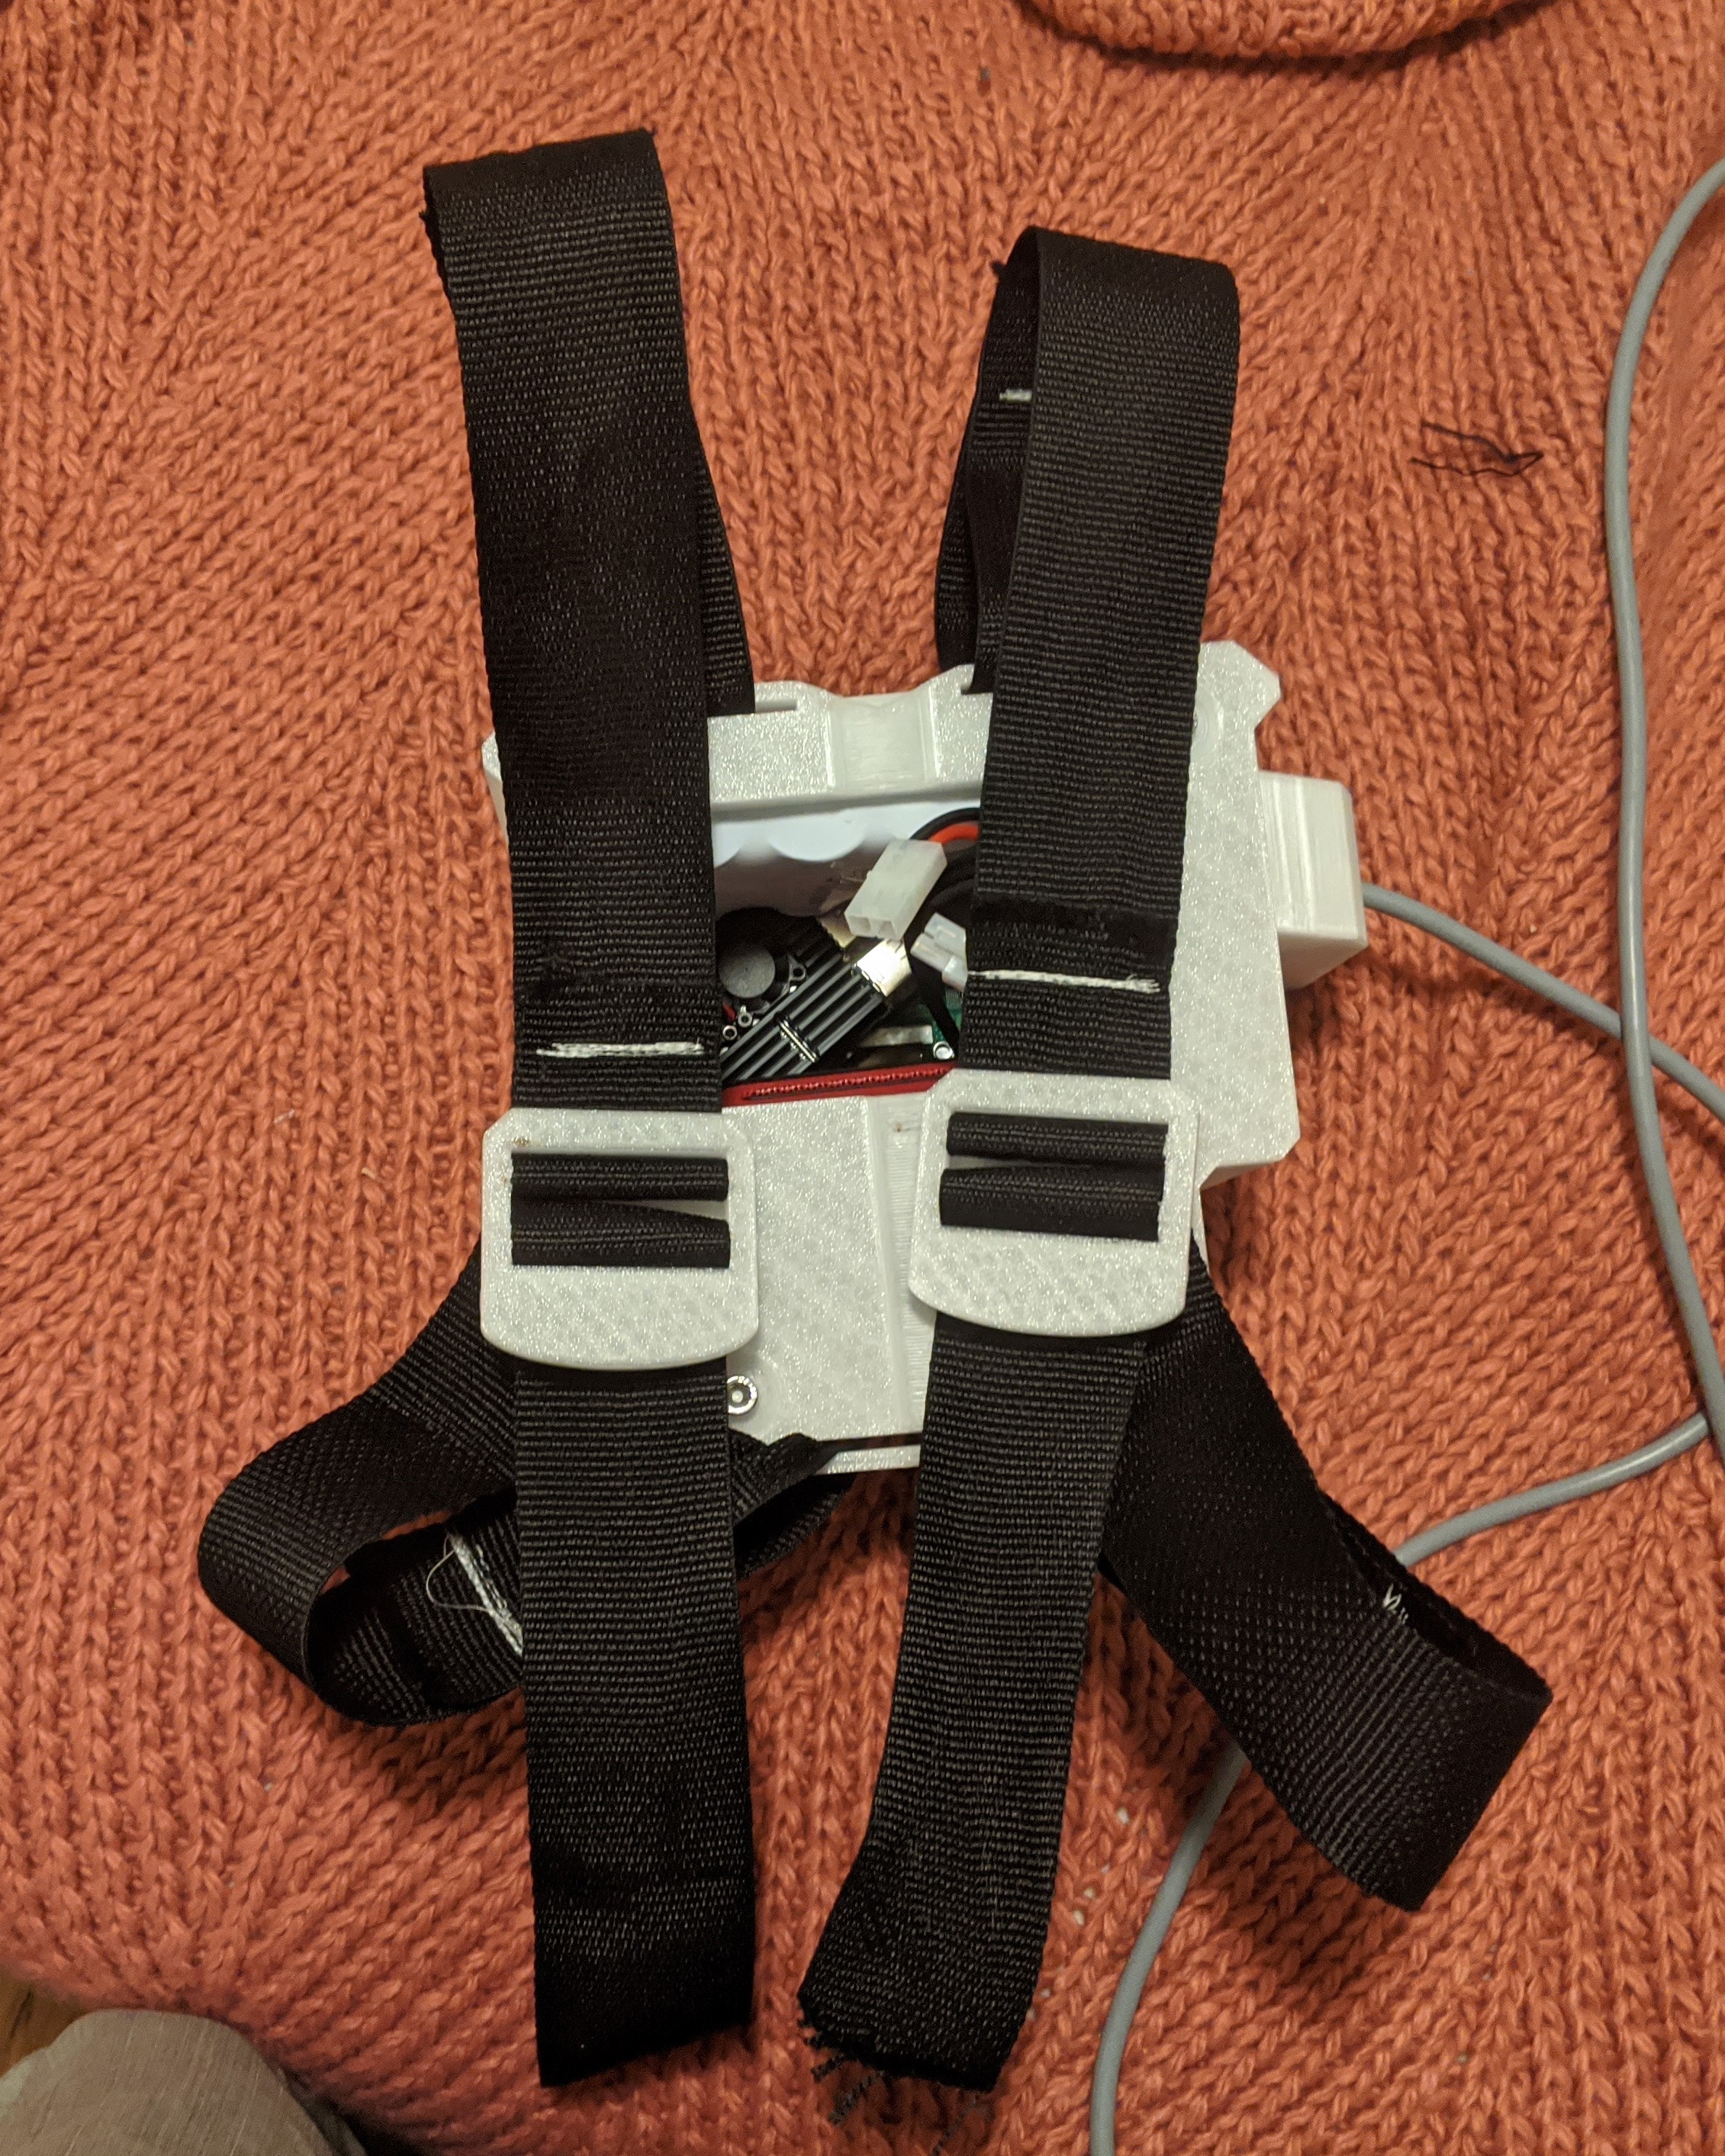
Starting off I focused on the top straps. Feeding them through both the shell and backplate, sewing the loop rather large in case I need to detach them in the future.
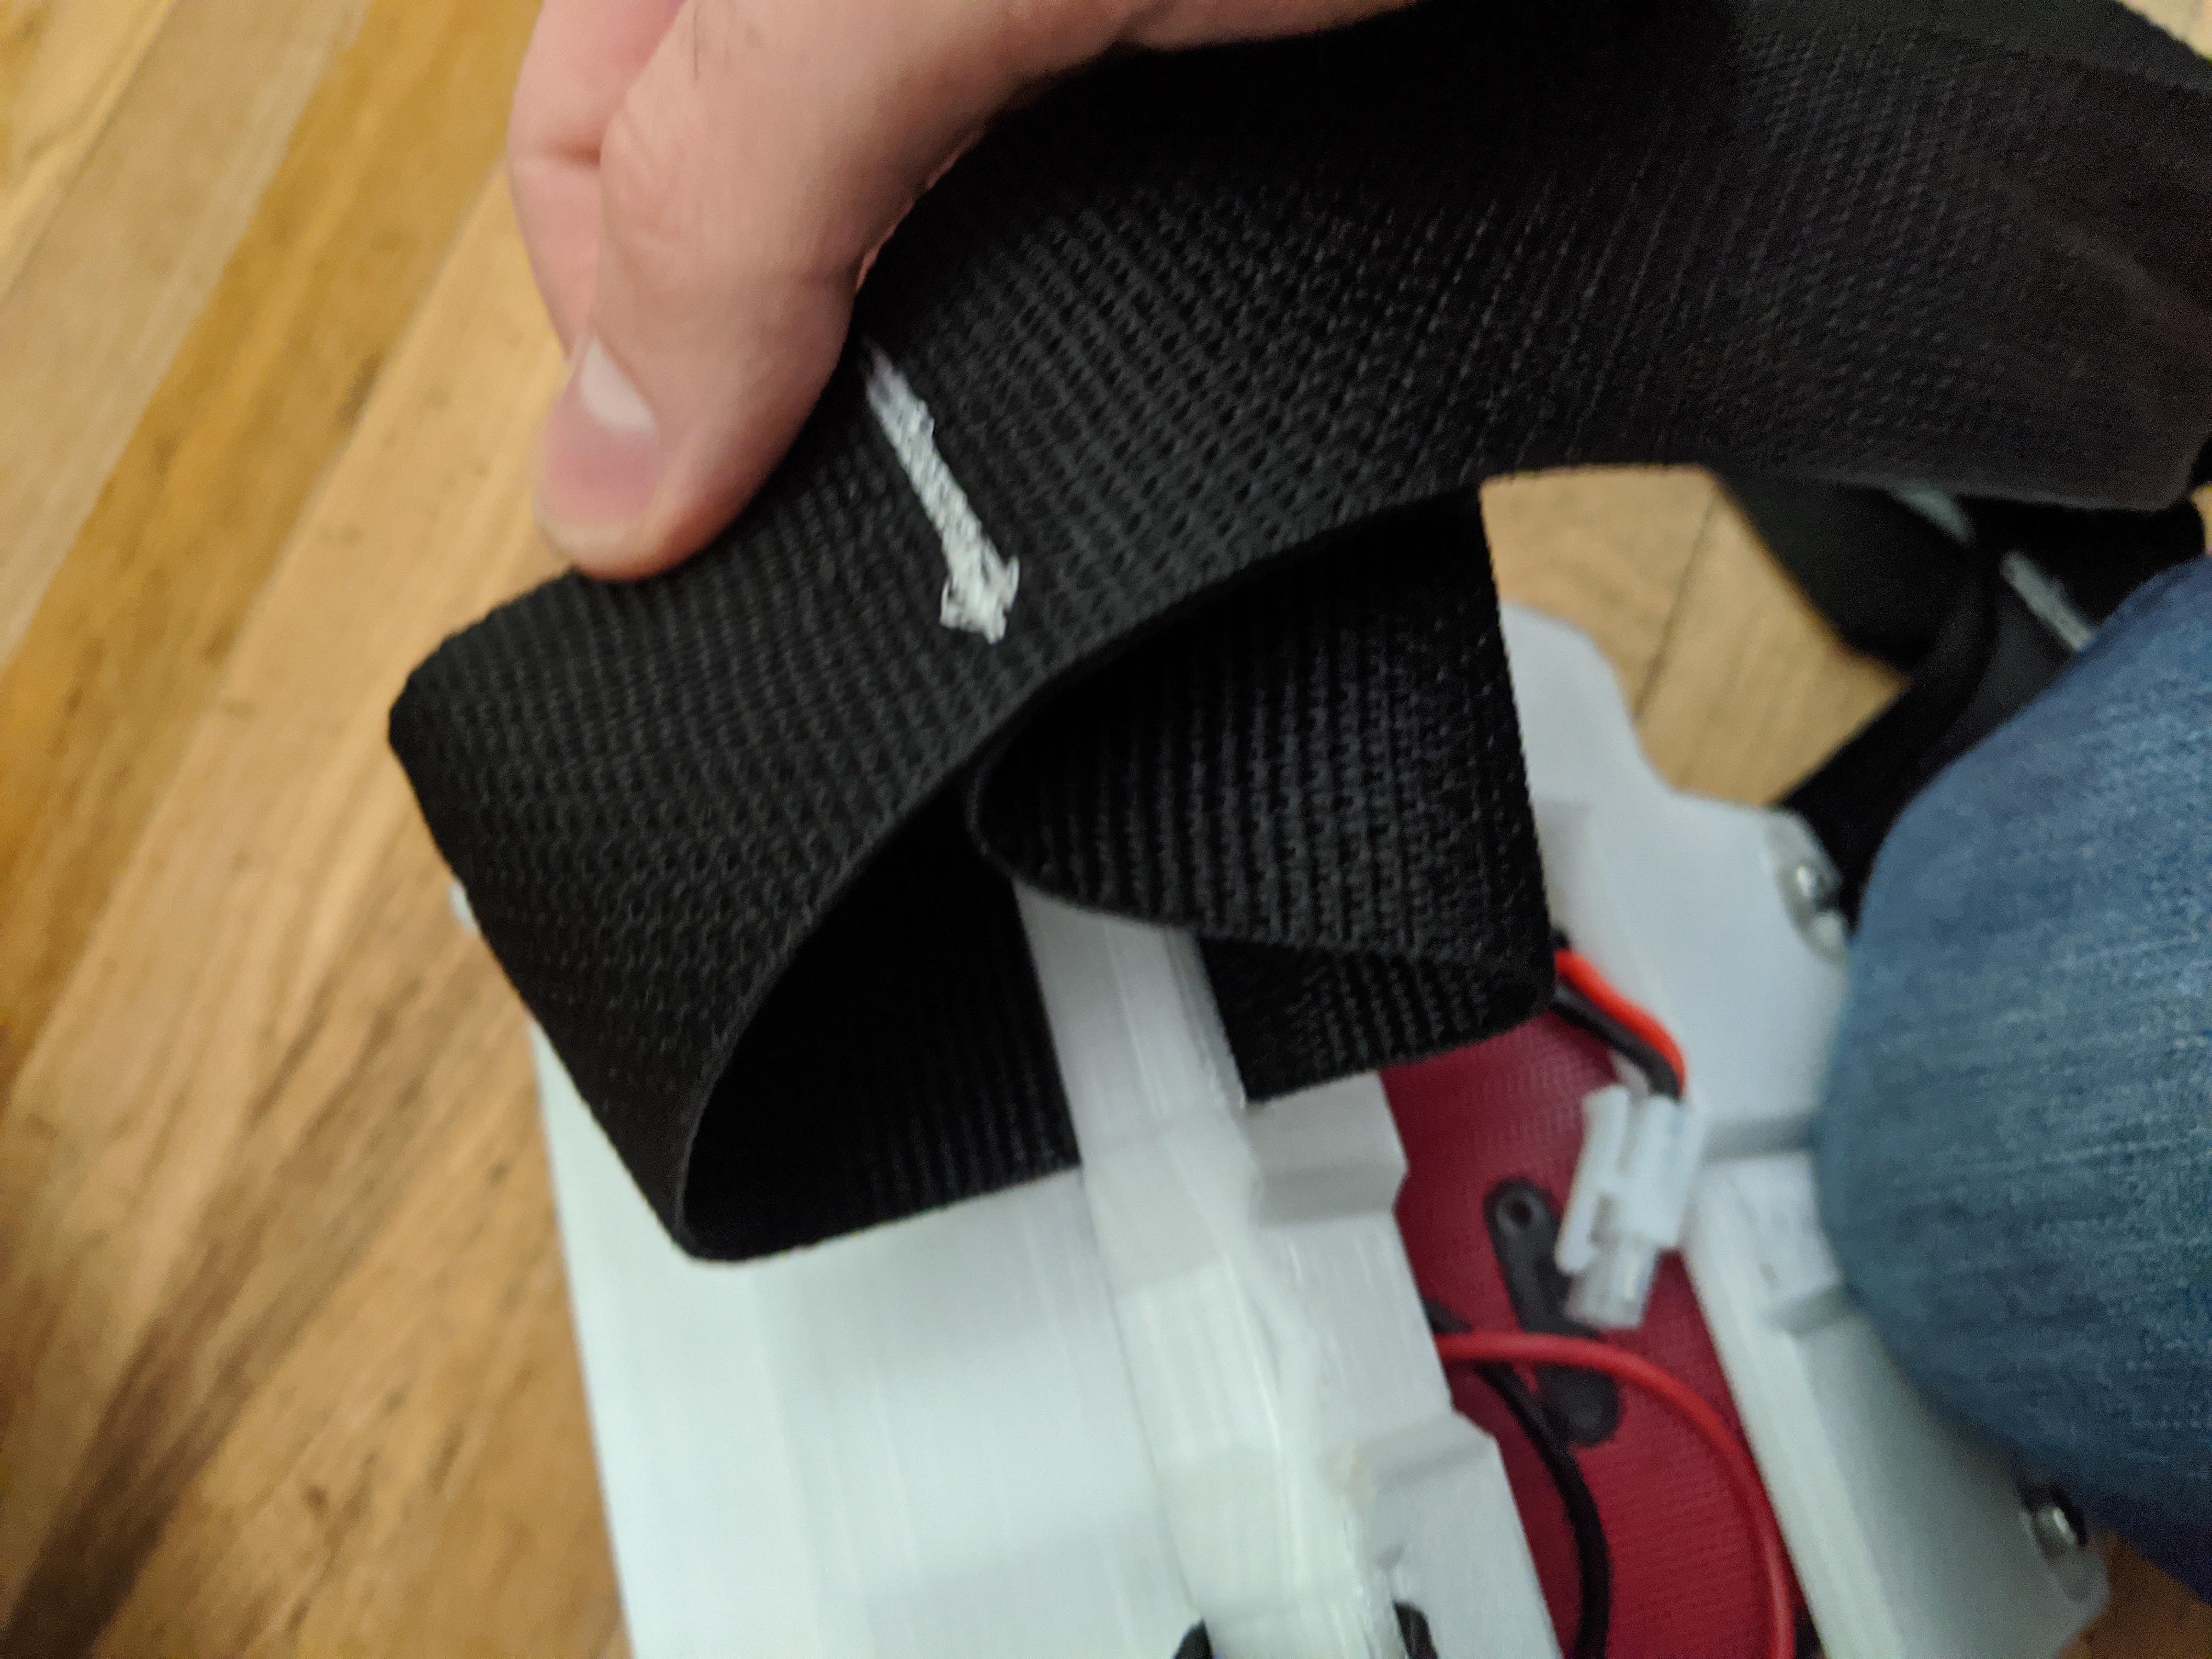
I then had some help holding the pack up to my back while I figured out how high to put the plastic strap tensioners.
Then I sewed the tensioners in place. Don't worry if you get them in the wrong spot at first, its a bit of trail and error because everyone's body is different.
Next, feed the bottom straps through the bottom slot of the shell and backplate. Sew a large loop again, in case you need to remove the plate later.
Lastely, I fed the bottom strap up and around the bottom half of the tensioner. The straps are complete. Feel free too clean up the end of the bottom strap with a knot or sew it back if you like. If you ever struggle during this process just look at another bookbag's straps for length references. Follow the straps on a bookbag around the tensioner, if you get confused what side to sew.
5
Website Positive Message Data Collection
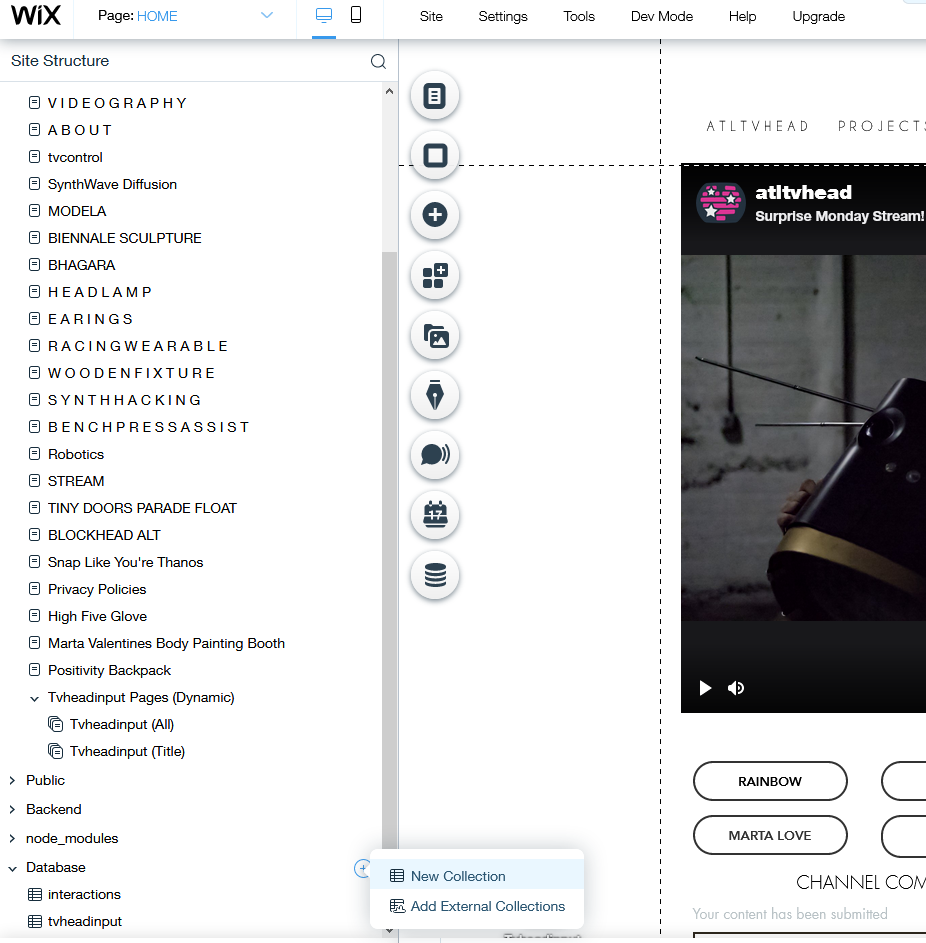
During the first half of message collection, I asked my Instagram followers for their messages. However, I wanted to establish something longterm. So I created a database on my wix website.
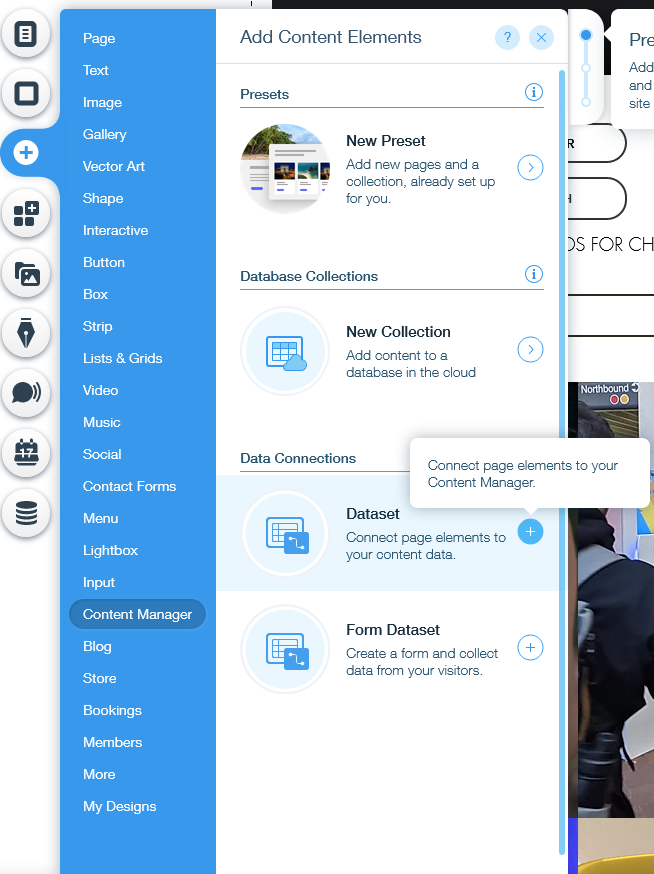
To do this, go into your wix site and click the plus next to collections. Don't forget to give you collection a name.
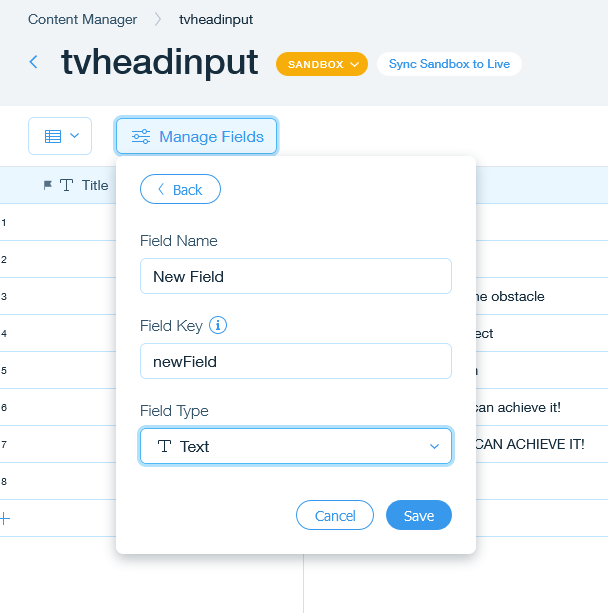
Make a new collection and create a new field as text. Don't forget to give your field name a new name.
It should look something like this if completed.
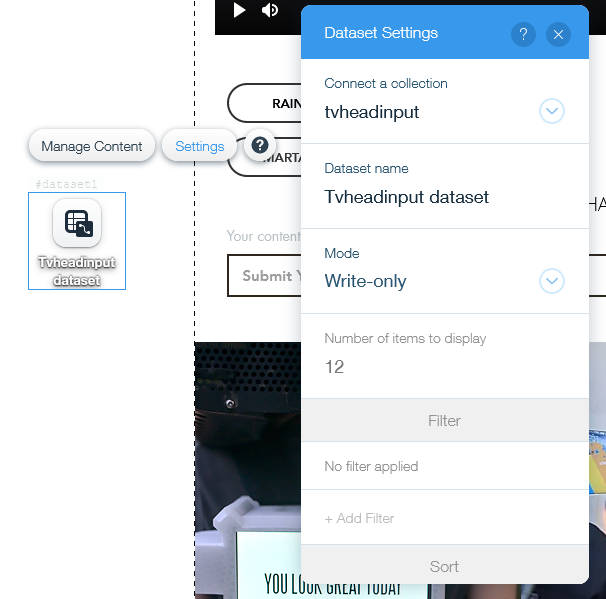
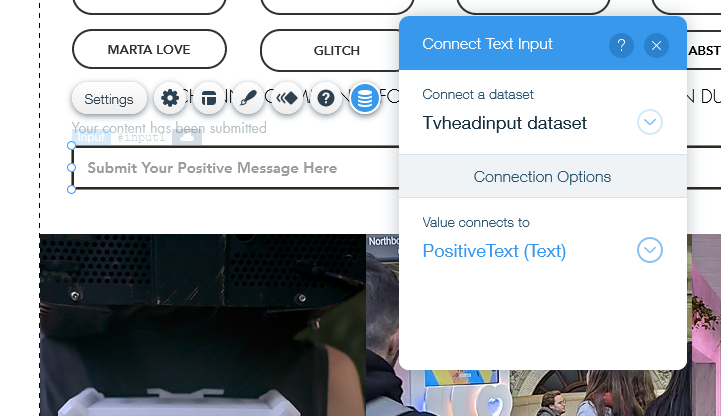
So my collections name is tvheadinput and my field name is positiveText. This is useful when creating an entry point on your site to this field.
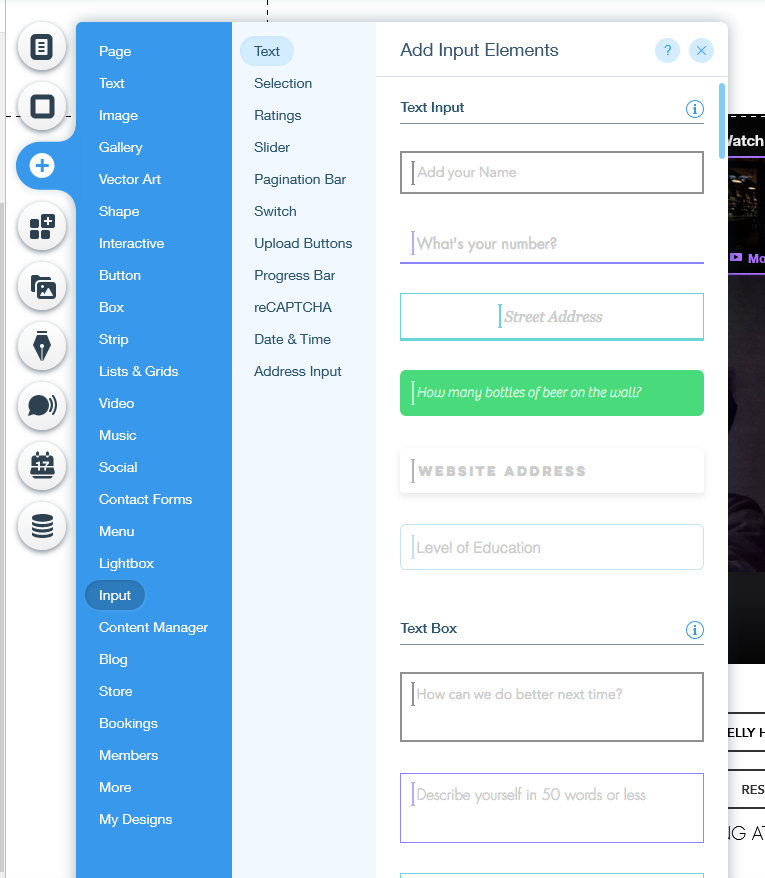
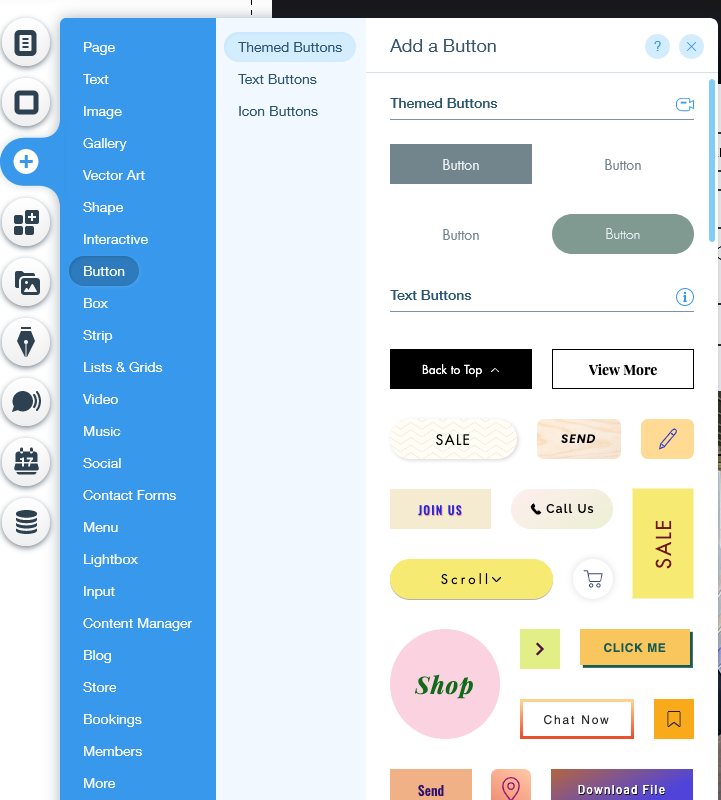
Go back to your website and add a new text input box to your page. Now lets add a button to that page
Place the input box and button next to one another. Now add a link to your dataset to that page you are on. Alter the data set settings for your collection's name and write only.
Next lets alter our input settings to connect with the data set and tag name for where it'll input the positive message
Let's do the same to the button, but set it's action to submit.
Everything should input to the database! If things aren't working let's change the permissions of the collection. Go to the collections settings, click on permissions, change the permission type to custom and select the following.
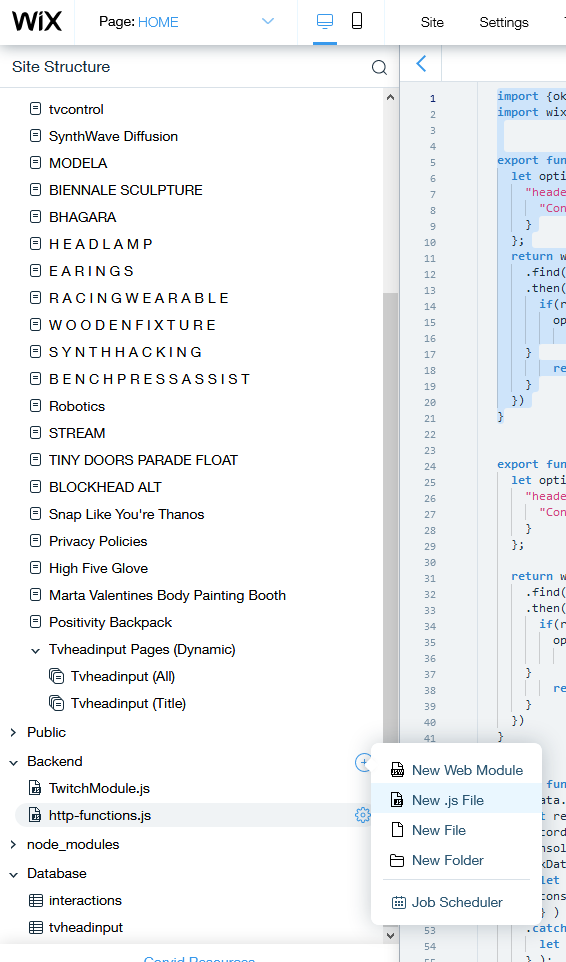
Whey are we doing this? Well to setup a way to read the collection with http get request, of course! Go the Backend tab of the drop down menu, click the plus and create a new js file.
input the following code to create an api http request function call for the database
// import the wix libraries for handling HTTP functions and the wix data handling library
import {ok, notFound, created, serverError} from'wix-http-functions';
import wixData from'wix-data';
//Create a function for external use, this is a request, called readPositiveText, it can be called anything you like
exportfunctionget_readPositiveText(request) {
let options = {
"headers": {
"Content-Type": "application/json"
}
};
//This is block of code asks wix to query all of the database and return it in json format, place your database name in query("database_name")
return wixData.query("tvheadinput")
.find()
.then( (results) => {
if(results.items.length > 0) {
options.body = {
"results" : results.items
}
return ok(options);
}
})
}
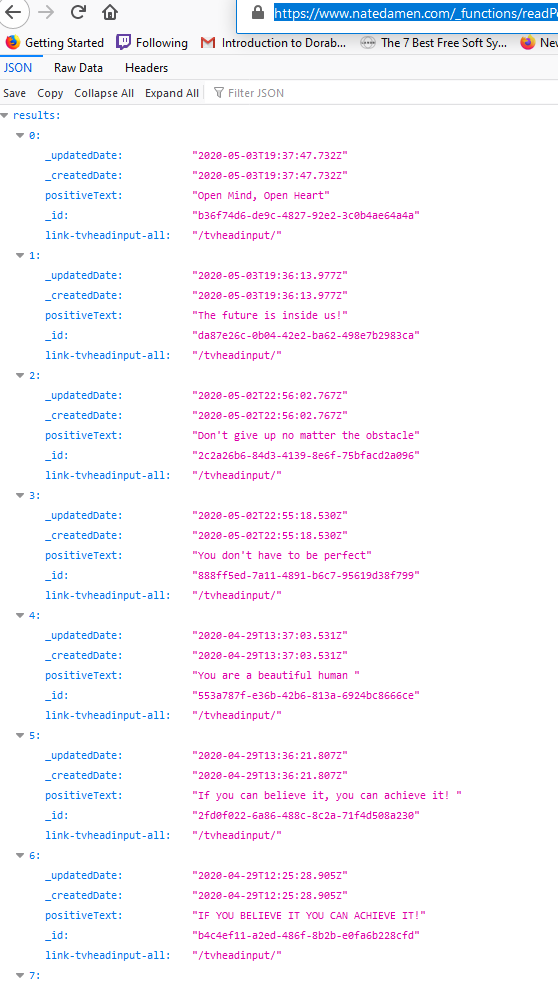
Once that is saved, you can now poll your database using an http get request or for wix, typing out the following address which is linked to the export function. Mine is located at the following link.
The output should look like this if done correctly.
BOOM! Anyone can now submit a positive message through your wix website and can read it back through get request. Time to filter all of this text so even if someone types in something terrible, it won't be displayed.
6
From Website to Python, preprocessing for NLP
Now that the positive message data is accessible through my website it's time to put it into a pandas dataframe with python.
# This code Reads in the json from my webpage, then converts it to a pandas dataframe, then adds a new column to the dataframe with just the positive text

#import the pandas library
import pandas as pd

#Using pandas, create a new dataframe from the json response of my website
posTextJjsonDataFrame=pd.read_json(r'https://www.natedamen.com/_functions/readPositiveText')

#the response needs a bit of cleaning so lets create a new pandas series to hold the cleaned up text
newCol= pd.Series([])

#iterate through the main dataframe, adding the results to the place holder series
for index in range(len(posTextJjsonDataFrame.results)):
    newCol[index]= posTextJjsonDataFrame.results[index]['positiveText']
    #print(newCol[index])

#finally insert the series containing just the positive text as a new column in original dataframe
posTextJjsonDataFrame.insert(1,'Positive_Text', newCol)
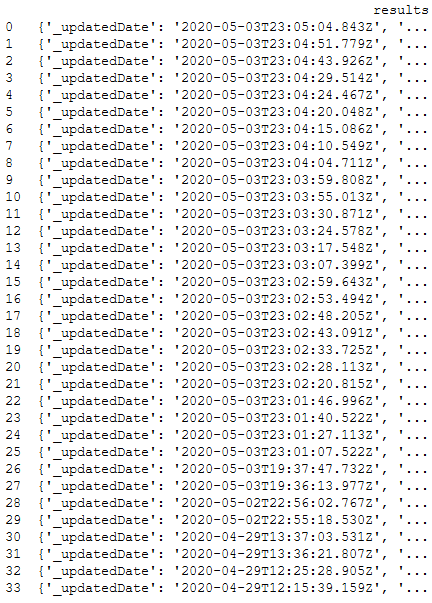
Printing out the Dataframe raw from the json state yeilds the following:
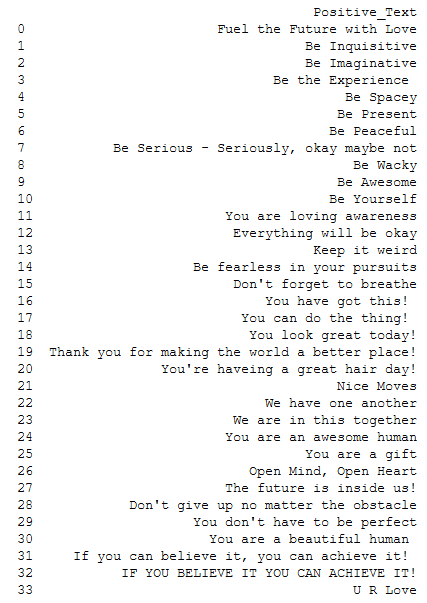
But now with cleaned text if we print the new column
print(posTextJjsonDataFrame.Positive_Text)
we will see the following
Our text data is now cleaned and easily accessible.
7
The base Twitch Python Chatbot
import socket
import cfg
import re
import time
sock = socket.socket()
sock.connect((cfg.HOST,cfg.PORT))
sock.send("PASS {}\r\n".format(cfg.PASS).encode("utf-8"))
sock.send("NICK {}\r\n".format(cfg.NICK).encode("utf-8"))
sock.send("JOIN {}\r\n".format(cfg.CHAN).encode("utf-8"))
chat_message = re.compile(r"^:\w+!\w+@\w+.tmi.twitch.tv PRIVMSG #\w+ :")
defchat(s,msg):
s.send("PRIVMSG {} :{}\r\n".format(cfg.CHAN,msg).encode("utf-8"))
defgetMSG(r):
mgs = chat_message.sub("", r)
return mgs
defgetUSER(r):try:
user=re.search(r"\w+",r).group(0)
except AttributeError:
user ="tvheadbot"
print(AttributeError)
return user
whileTrue:
response = sock.recv(1024).decode("utf-8")
print(response)
if response == "PING :tmi.twitch.tv\r\n":
sock.send("PONG :tmi.twitch.tv\r\n".encode("utf-8"))
else:
mess= getMSG(response)
who = getUSER(response)
#print(who +": " +mess)if mess.strip() == "!love":
chat(sock, "I love you " + who +"!")
time.sleep(1/cfg.RATE)
Like all good things, chatbots. Well this one is really just a chat scrubber to recognize specific keywords and do things based off of them.
The first thing is import the libraries we will be using. Sockets to actually connect and send messages over the internet to twitch. A configuration file of my twitchbot auth token, twitchbot name, the twitch channel we are connecting into, and a delay time specific to make twitch not angry with us. The Regular Expressions library for handling the messages to and from twitch. The Time library for handling delays in message sending.
The Next step is create a socket and connect it to twitch. Sending it the Host name and Port in a single package.
Using the re library to section out certain parts of the messages twitch sends us.
Lets create a new function that allows us to chat a little easier. Create two variables for the socket and messages to be passed in and then the socket send function with proper configuration for twitch messages.
The next two functions allow for twitch messages from socket receive to be passed in and searched to parse out the message and the user who typed it.
Lastly we set up a loop to listen to the socket, send a pong back if pinged, to keep our connection alive, and if it's a message read the message and who it is from.
Finally if we receive a message that matches a particular set of characters, then we do something. In this case we send some love to the one who asked for the command. Don't forget to delay our messages out to twitch, otherwise our connection to the server will be terminated.
Next we will actually use this section of code to create commands that will change which messages are displayed on the positivity pack!
8
Swapping between the Images with OpenCV python
import socket
import cfg
import re
import time
# import Numpy and Open CV for pythonimport numpy as np
import cv2
# These commands set the screen to full on whatever display is being used. Don't use if you dont mind it being in a window that can move around
cv2.namedWindow("PositiveMessage", cv2.WND_PROP_FULLSCREEN)
#cv2.moveWindow("PositiveMessage", screen.x - 1, screen.y - 1)
cv2.setWindowProperty("PositiveMessage", cv2.WND_PROP_FULLSCREEN,cv2.WINDOW_FULLSCREEN)
#loading some of the images in and resizing them to the dimensions of the screen, which isn't really needed but hey whatevas
message1= cv2.imread('photos\img_2.1.1.png')
message1= cv2.resize(message1,(1024,600),interpolation = cv2.INTER_AREA)
message2= cv2.imread('photos\img_2.1.2.png')
message2= cv2.resize(message2,(1024,600),interpolation = cv2.INTER_AREA)
message3= cv2.imread('photos\img_2.1.3.png')
message3= cv2.resize(message3,(1024,600),interpolation = cv2.INTER_AREA)
message4= cv2.imread('photos\img_2.1.4.png')
message4= cv2.resize(message4,(1024,600),interpolation = cv2.INTER_AREA)
message5= cv2.imread('photos\img_2.1.5.png')
message5= cv2.resize(message5,(1024,600),interpolation = cv2.INTER_AREA)
message6= cv2.imread('photos\img_2.1.6.png')
message6= cv2.resize(message6,(1024,600),interpolation = cv2.INTER_AREA)
message7= cv2.imread('photos\img_2.1.7.png')
message7= cv2.resize(message7,(1024,600),interpolation = cv2.INTER_AREA)
message8= cv2.imread('photos\img_2.1.8.png')
message8= cv2.resize(message8,(1024,600),interpolation = cv2.INTER_AREA)
message9= cv2.imread('photos\img_2.1.9.png')
message9= cv2.resize(message9,(1024,600),interpolation = cv2.INTER_AREA)
message10= cv2.imread('photos\img_2.1.10.png')
message10= cv2.resize(message10,(1024,600),interpolation = cv2.INTER_AREA)
message11= cv2.imread('photos\img_2.1.11.png')
message11= cv2.resize(message11,(1024,600),interpolation = cv2.INTER_AREA)
message12= cv2.imread('photos\img_2.1.12.png')
message12= cv2.resize(message12,(1024,600),interpolation = cv2.INTER_AREA)
message13= cv2.imread('photos\img_2.1.13.png')
message13= cv2.resize(message13,(1024,600),interpolation = cv2.INTER_AREA)
message14= cv2.imread('photos\img_2.1.14.png')
message14= cv2.resize(message14,(1024,600),interpolation = cv2.INTER_AREA)
message15= cv2.imread('photos\img_2.1.15.png')
message15= cv2.resize(message15,(1024,600),interpolation = cv2.INTER_AREA)
message16= cv2.imread('photos\img_2.1.16.png')
message16= cv2.resize(message16,(1024,600),interpolation = cv2.INTER_AREA)
message17= cv2.imread('photos\img_2.1.17.png')
message17= cv2.resize(message17,(1024,600),interpolation = cv2.INTER_AREA)
message18= cv2.imread('photos\img_2.1.18.png')
message18= cv2.resize(message18,(1024,600),interpolation = cv2.INTER_AREA)
message19= cv2.imread('photos\img_2.1.19.png')
message19= cv2.resize(message19,(1024,600),interpolation = cv2.INTER_AREA)
message20= cv2.imread('photos\img_2.1.20.png')
message20= cv2.resize(message20,(1024,600),interpolation = cv2.INTER_AREA)
message21= cv2.imread('photos\img_2.1.21.png')
message21= cv2.resize(message21,(1024,600),interpolation = cv2.INTER_AREA)
message22= cv2.imread('photos\img_2.1.22.png')
message22= cv2.resize(message22,(1024,600),interpolation = cv2.INTER_AREA)
message23= cv2.imread('photos\img_2.1.23.png')
message23= cv2.resize(message23,(1024,600),interpolation = cv2.INTER_AREA)
messages = [message1,message2,message3,message4,message5,message6,message7,message8,message9,message10,message11,message12,message13,message14,message15,message16,message17,message18,message19,message20,message21,message22,message23]
#Creating a variable that we can swap messages to
displayimage = message1
#Creating our socket and passing on info for twitch
sock = socket.socket()
sock.connect((cfg.HOST,cfg.PORT))
sock.send("PASS {}\r\n".format(cfg.PASS).encode("utf-8"))
sock.send("NICK {}\r\n".format(cfg.NICK).encode("utf-8"))
sock.send("JOIN {}\r\n".format(cfg.CHAN).encode("utf-8"))
#handling of some of the string characters in the twitch message
chat_message = re.compile(r"^:\w+!\w+@\w+.tmi.twitch.tv PRIVMSG #\w+ :")
#Lets create a new function that allows us to chat a little easier. Create two variables for the socket and messages to be passed in and then the socket send function with proper configuration for twitch messages. defchat(s,msg):
s.send("PRIVMSG {} :{}\r\n".format(cfg.CHAN,msg).encode("utf-8"))
#The next two functions allow for twitch messages from socket receive to be passed in and searched to parse out the message and the user who typed it. defgetMSG(r):
mgs = chat_message.sub("", r)
return mgs
defgetUSER(r):try:
user=re.search(r"\w+",r).group(0)
except AttributeError:
user ="tvheadbot"
print(AttributeError)
return user
whileTrue:
#listen to twitch messages incoming
response = sock.recv(1024).decode("utf-8")
print(response)
#pong the pings to stay connected if response == "PING :tmi.twitch.tv\r\n":
sock.send("PONG :tmi.twitch.tv\r\n".encode("utf-8"))
else:
#otherwise get the user and message
mess= getMSG(response)
who = getUSER(response)
# If the message matches one of the cammands do somethingif"love"in mess.strip():
#Sets the image to be displayed to our image 1, do the same for every message
displayimage = message1
elif"values"in mess.strip():
displayimage = message2
elif"dont"in mess.strip():
displayimage = message3
elif"perect"in mess.strip():
displayimage = message4
elif"future"in mess.strip():
displayimage = message5
elif"friends"in mess.strip():
displayimage = message6
elif"community"in mess.strip():
displayimage = message7
elif"neighbor"in mess.strip():
displayimage = message8
elif"another"in mess.strip():
displayimage = message9
elif"together"in mess.strip():
displayimage = message10
elif"gift"in mess.strip():
displayimage = message11
elif"nice"in mess.strip():
displayimage = message12
elif"look"in mess.strip():
displayimage = message13
elif"got"in mess.strip():
displayimage = message14
elif"beautiful"in mess.strip():
displayimage = message15
elif"breathe"in mess.strip():
displayimage = message16
elif"united"in mess.strip():
displayimage = message17
elif"heart"in mess.strip():
displayimage = message18
elif"weird"in mess.strip():
displayimage = message19
elif"okay"in mess.strip():
displayimage = message20
elif"aware"in mess.strip():
displayimage = message21
elif"be"in mess.strip():
displayimage = message22
elif"play"in mess.strip():
displayimage = message23
# add in a countdown to change to a random display after a period of time of no chat interaction#add a delay so twitch doesn't get mad at our bot
time.sleep(1/cfg.RATE)
#displays the image output to the fullscreened window
cv2.imshow("PositiveMessage",displayimage)
#Setting this wait key to 1, converts the output to video, only showing the image every 0.1 seconds. allowing for the display image output to be set to various images
cv2.waitKey(1)
#Closes all the windows
cv2.destroyAllWindows()
9
Code Rewrite to include the Atltvhead Gesture Recogntion Bracer Project
New Code Improvements are:
- Socket is nonblocking
- Machine learning Gesture recogntion added
# PositivityPack.py# Description: Recieved Data from ESP32 Micro via the AGRB-Training-Data-Capture.ino file, make gesture prediction and tell it to twitch# Display an image that changes according to what is said in twitch chat or after 30 seconds # Written by: Nate Damen# Created on July 13th 2020# Updated on July 15th 2020import socket
import cfg
import re
import time
import random
import numpy as np
import pandas as pd
import datetime
import os, os.path
import tensorflow as tf
import serial
import cv2
import traceback
#PORT = "/dev/ttyUSB0"#PORT = "/dev/ttyUSB1"
PORT = "COM8"
serialport = None
serialport = serial.Serial(PORT, 115200, timeout=0.05)
#load Model
model = tf.keras.models.load_model('../Atltvhead-Gesture-Recognition-Bracer/Model/cnn_model.h5')
# These commands set the screen to full on whatever display is being used. Don't use if you dont mind it being in a window that can move around
cv2.namedWindow("PositiveMessage", cv2.WND_PROP_FULLSCREEN)
#cv2.moveWindow("PositiveMessage", screen.x - 1, screen.y - 1)
cv2.setWindowProperty("PositiveMessage", cv2.WND_PROP_FULLSCREEN,cv2.WINDOW_FULLSCREEN)
#loading some of the images in and resizing them to the dimensions of the screen, which isn't really needed but hey whatevas
message1= cv2.imread('photos/img_2.1.1.png')
message1= cv2.resize(message1,(1024,600),interpolation = cv2.INTER_AREA)
message2= cv2.imread('photos/img_2.1.2.png')
message2= cv2.resize(message2,(1024,600),interpolation = cv2.INTER_AREA)
message3= cv2.imread('photos/img_2.1.3.png')
message3= cv2.resize(message3,(1024,600),interpolation = cv2.INTER_AREA)
message4= cv2.imread('photos/img_2.1.4.png')
message4= cv2.resize(message4,(1024,600),interpolation = cv2.INTER_AREA)
message5= cv2.imread('photos/img_2.1.5.png')
message5= cv2.resize(message5,(1024,600),interpolation = cv2.INTER_AREA)
message6= cv2.imread('photos/img_2.1.6.png')
message6= cv2.resize(message6,(1024,600),interpolation = cv2.INTER_AREA)
message7= cv2.imread('photos/img_2.1.7.png')
message7= cv2.resize(message7,(1024,600),interpolation = cv2.INTER_AREA)
message8= cv2.imread('photos/img_2.1.8.png')
message8= cv2.resize(message8,(1024,600),interpolation = cv2.INTER_AREA)
message9= cv2.imread('photos/img_2.1.9.png')
message9= cv2.resize(message9,(1024,600),interpolation = cv2.INTER_AREA)
message10= cv2.imread('photos/img_2.1.10.png')
message10= cv2.resize(message10,(1024,600),interpolation = cv2.INTER_AREA)
message11= cv2.imread('photos/img_2.1.11.png')
message11= cv2.resize(message11,(1024,600),interpolation = cv2.INTER_AREA)
message12= cv2.imread('photos/img_2.1.12.png')
message12= cv2.resize(message12,(1024,600),interpolation = cv2.INTER_AREA)
message13= cv2.imread('photos/img_2.1.13.png')
message13= cv2.resize(message13,(1024,600),interpolation = cv2.INTER_AREA)
message14= cv2.imread('photos/img_2.1.14.png')
message14= cv2.resize(message14,(1024,600),interpolation = cv2.INTER_AREA)
message15= cv2.imread('photos/img_2.1.15.png')
message15= cv2.resize(message15,(1024,600),interpolation = cv2.INTER_AREA)
message16= cv2.imread('photos/img_2.1.16.png')
message16= cv2.resize(message16,(1024,600),interpolation = cv2.INTER_AREA)
message17= cv2.imread('photos/img_2.1.17.png')
message17= cv2.resize(message17,(1024,600),interpolation = cv2.INTER_AREA)
message18= cv2.imread('photos/img_2.1.18.png')
message18= cv2.resize(message18,(1024,600),interpolation = cv2.INTER_AREA)
message19= cv2.imread('photos/img_2.1.19.png')
message19= cv2.resize(message19,(1024,600),interpolation = cv2.INTER_AREA)
message20= cv2.imread('photos/img_2.1.20.png')
message20= cv2.resize(message20,(1024,600),interpolation = cv2.INTER_AREA)
message21= cv2.imread('photos/img_2.1.21.png')
message21= cv2.resize(message21,(1024,600),interpolation = cv2.INTER_AREA)
message22= cv2.imread('photos/img_2.1.22.png')
message22= cv2.resize(message22,(1024,600),interpolation = cv2.INTER_AREA)
message23= cv2.imread('photos/img_2.1.23.png')
message23= cv2.resize(message23,(1024,600),interpolation = cv2.INTER_AREA)
messages = [message1,message2,message3,message4,message5,message6,message7,message8,message9,message10,message11,message12,message13,message14,message15,message16,message17,message18,message19,message20,message21,message22,message23]
#Creating a variable that we can swap messages to
displayimage = message1
# header for the incomming data
header = ["deltaTime","Acc_X","Acc_Y","Acc_Z","Gyro_X","Gyro_Y","Gyro_Z"]
#define Gestures, current data, temp data holder
gest_id = {0:'wave_mode', 1:'fist_pump_mode', 2:'random_motion_mode', 3:'speed_mode'}
data = []
dataholder=[]
dataCollecting = False
gesture=''
old_gesture=''
t=0
ot=0#Creating our socket and passing on info for twitch
sock = socket.socket()
sock.connect((cfg.HOST,cfg.PORT))
sock.send("PASS {}\r\n".format(cfg.PASS).encode("utf-8"))
sock.send("NICK {}\r\n".format(cfg.NICK).encode("utf-8"))
sock.send("JOIN {}\r\n".format(cfg.CHAN).encode("utf-8"))
sock.setblocking(0)
#handling of some of the string characters in the twitch message
chat_message = re.compile(r"^:\w+!\w+@\w+.tmi.twitch.tv PRIVMSG #\w+ :")
#Lets create a new function that allows us to chat a little easier. Create two variables for the socket and messages to be passed in and then the socket send function with proper configuration for twitch messages. defchat(s,msg):
s.send("PRIVMSG {} :{}\r\n".format(cfg.CHAN,msg).encode("utf-8"))
#The next two functions allow for twitch messages from socket receive to be passed in and searched to parse out the message and the user who typed it. defgetMSG(r):
mgs = chat_message.sub("", r)
return mgs
defgetUSER(r):try:
user=re.search(r"\w+",r).group(0)
except AttributeError:
user ="tvheadbot"
print(AttributeError)
return user
#Get Data from imu. Waits for incomming data and data stopdefget_imu_data():global serialport
ifnot serialport:
# open serial port
serialport = serial.Serial(PORT, 115200, timeout=0.05)
# check which port was really used
print("Opened", serialport.name)
# Flush input
time.sleep(3)
serialport.readline()
# Poll the serial port
line = str(serialport.readline(),'utf-8')
ifnot line:
returnNone
vals = line.replace("Uni:", "").strip().split(',')
if len(vals) != 7:
returnNonetry:
vals = [float(i) for i in vals]
except ValueError:
return ValueError
return vals
# Create Reshape function for each row of the datasetdefreshape_function(data):
reshaped_data = tf.reshape(data, [-1, 3, 1])
return reshaped_data
#Create a way to see the length of the data incomming, needs to be 760 points. Used for testing incomming datadefdataFrameLenTest(data):
df=pd.DataFrame(data,columns=header)
x=len(df[['Acc_X','Acc_Y','Acc_Z']].to_numpy())
print(x)
return x
#Create a pipeline to process incomming data for the model to read and handledefdata_pipeline(data_a):
df = pd.DataFrame(data_a, columns = header)
temp=df[['Acc_X','Acc_Y','Acc_Z']].to_numpy()
tensor_set = tf.data.Dataset.from_tensor_slices(
(np.array([temp.tolist()],dtype=np.float64)))
tensor_set_cnn = tensor_set.map(reshape_function)
tensor_set_cnn = tensor_set_cnn.batch(192)
return tensor_set_cnn
defgesture_Handler(sock,data,dataholder,dataCollecting,gesture,old_gesture):
dataholder = get_imu_data()
if dataholder != None:
dataCollecting=True
data.append(dataholder)
if dataholder == Noneand dataCollecting == True:
if len(data) == 760:
prediction = np.argmax(model.predict(data_pipeline(data)), axis=1)
gesture=gest_id[prediction[0]]
data = []
dataCollecting = Falsereturn data,dataholder,dataCollecting,gesture,old_gesture
defmessage_changer(displayimage, messa):#otherwise get the user and message
mess= getMSG(messa)
# If the message matches one of the cammands do somethingif"love"in mess.strip() or"love" == mess.strip():
#Sets the image to be displayed to our image 1, do the same for every message
displayimage = message1
elif"values"in mess.strip():
displayimage = message2
elif"dont"in mess.strip():
displayimage = message3
elif"perect"in mess.strip():
displayimage = message4
elif"future"in mess.strip():
displayimage = message5
elif"friends"in mess.strip():
displayimage = message6
elif"community"in mess.strip():
displayimage = message7
elif"neighbor"in mess.strip():
displayimage = message8
elif"another"in mess.strip():
displayimage = message9
elif"together"in mess.strip():
displayimage = message10
elif"gift"in mess.strip():
displayimage = message11
elif"nice"in mess.strip():
displayimage = message12
elif"look"in mess.strip():
displayimage = message13
elif"got"in mess.strip():
displayimage = message14
elif"beautiful"in mess.strip():
displayimage = message15
elif"breathe"in mess.strip():
displayimage = message16
elif"united"in mess.strip():
displayimage = message17
elif"heart"in mess.strip():
displayimage = message18
elif"weird"in mess.strip():
displayimage = message19
elif"okay"in mess.strip():
displayimage = message20
elif"aware"in mess.strip():
displayimage = message21
elif"be"in mess.strip():
displayimage = message22
elif"play"in mess.strip():
displayimage = message23
return displayimage
if __name__ == "__main__":
#flush the serial port
serialport.flush()
whileTrue:
t=time.time()
try:
#listen to twitch messages incoming
response = sock.recv(1024).decode("utf-8")
except:
data,dataholder,dataCollecting,gesture,old_gesture = gesture_Handler(sock,data,dataholder,dataCollecting,gesture,old_gesture)
if gesture != old_gesture:
chat(sock,'!' + gesture)
#print(gesture)
old_gesture=gesture
if t-ot > 30:
displayimage = random.choice(messages)
ot=t
cv2.imshow("PositiveMessage",displayimage)
cv2.waitKey(1)
continueelse:
if len(response)==0:
print('orderly shutdown on the server end')
sock = socket.socket()
sock.connect((cfg.HOST,cfg.PORT))
sock.send("PASS {}\r\n".format(cfg.PASS).encode("utf-8"))
sock.send("NICK {}\r\n".format(cfg.NICK).encode("utf-8"))
sock.send("JOIN {}\r\n".format(cfg.CHAN).encode("utf-8"))
sock.setblocking(0)
else:
#print(response)if response == "PING :tmi.twitch.tv\r\n":
sock.send("PONG :tmi.twitch.tv\r\n".encode("utf-8"))
else:
displayimage = message_changer(displayimage,response)
cv2.imshow("PositiveMessage",displayimage)
cv2.waitKey(1)
#Closes all the windows
cv2.destroyAllWindows()
 atltvhead
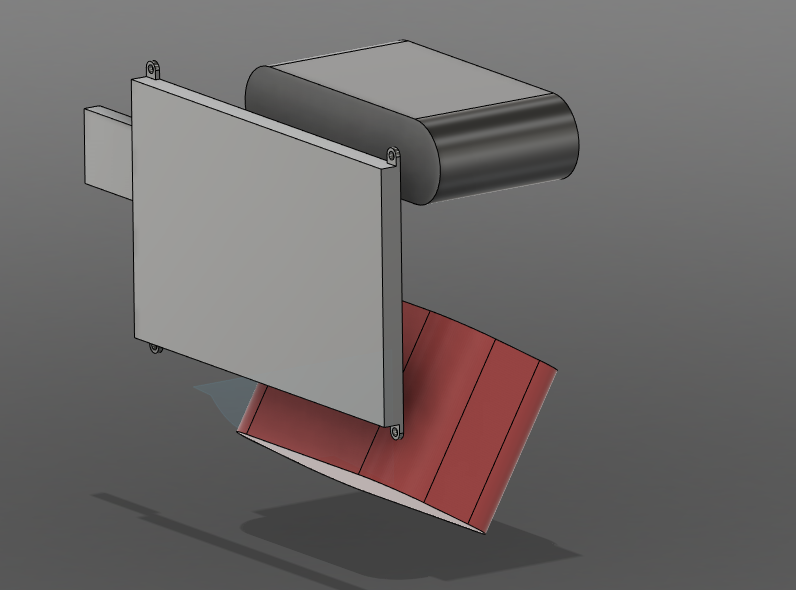


 Let's do the same to the button, but set it's action to submit.
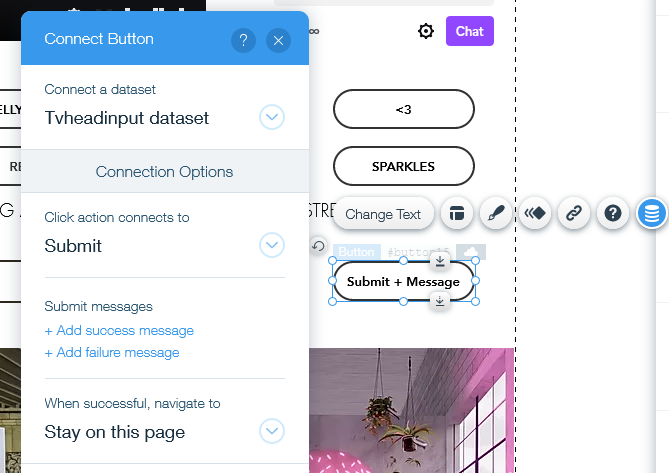 Everything should input to the database! If things aren't working let's change the permissions of the collection. Go to the collections settings, click on permissions, change the permission type to custom and select the following.
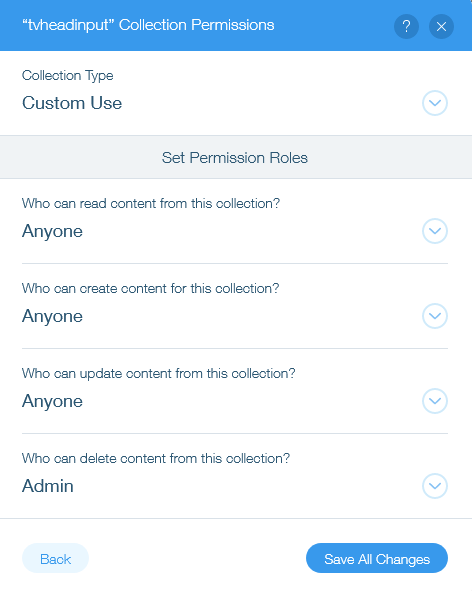
 Our text data is now cleaned and easily accessible.
Discussions
Become a Hackaday.io Member
Create an account to leave a comment. Already have an account? Log In.