Close
0%
0%

3D printed Joystick

Analog 3 axis 3D printed JOYSTICK using FiberGrid.

Public Chat
Similar projects worth following
This thumb joystick is a FiberGrid technology demo. It uses my freeware FiberGrid fiber optic framework available here: https://hackaday.io/project/167317-fibergrid. It is analog, 3 axis and 3D printed. It also has 3 printed parts. And it's 30x30x12 mm in size. Takes about 45 minutes to print using 0.3 mm layer height. FreeCAD and STL files are available for printing in the file section.

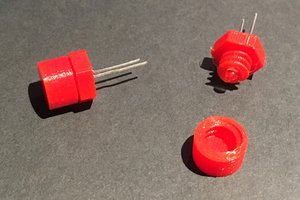
There is an LED in the center of the joystick that is always lit.  This LED needs to be bright.  A clear 3 mm 20 mA LED might work.  When an edge is lowered by pressing the joystick it blocks some of the light that reaches the fiber in the corner.  By calibrating the joystick it should be possible to figure out how much it was pressed.

Your joystick resolution depends on the brightness of the LED, on how clean the fiber was cut and other parameters such as filament color.

I consider this a 3 axis joystick since it is possible to press all 4 edges at once for Z axis motion.  

This is not the best joystick in the world.  It took me about an hour to sketch it up.  It's just a demo created to promote FiberGrid technology.  However I know you can build an AWESOME custom controller for your gaming or ROV operations and share it with the world!  When you do, drop me a note with your design and I will put a link to it here or on the FiberGrid page.  FiberGrid can be used to create a million other input devices and sensors: music keyboards, position sensors, you name it!

TODO:

Joystick makes noise when operated.  Consider printing with 0.1 mm layer height for smoother operation.  Springs seem to be adding to noise.  Four dimples in the lid for springs might constrain their movements and reduce noise.  Adding a drop of Lithium Grease might help.  However make sure it does not block the light.

JPEG Image - 3.86 MB - 06/28/2020 at 23:03

Preview
Download

JPEG Image - 3.75 MB - 06/28/2020 at 23:03

Preview
Download

joystick_cam_view_june-11-2020.png

Fibers as seen by a FiberGrid camera.

Portable Network Graphics (PNG) - 524.16 kB - 06/11/2020 at 06:57

Preview
Download

Zip Archive - 413.14 kB - 06/09/2020 at 23:47

Download

  • 1 × Plastic end glow optic fiber
  • 1 × 3D printer filament I suggest BLACK PLA
  • 2 × clicking ball point pen you need 2 springs from a pen
  • 4 × 2.5 - 3 mm diameter screws use them to attach the lid
  • 1 × LED (light source for all axis) Light Emmiting Diode and a resistor or an LED driver

  • Everything in the world is CRAP!

    rand328906/12/2020 at 03:23 0 comments

    Spent the whole day today trying to get a nice picture through OpenCV.  Can't get it to work.  It looks OK in Guvcview but only if I toggle the resolution and wiggle the  Brightness control !  In addition it works only on high (1920x1080) and medium (1280x720) resolutions.  Maybe I should cross my fingers, get a rabbit's foot for good luck and spit over my left shoulder?  Can't even see the dots in VLC with which I took that nice snapshot yesterday any more!  What is wrong with the world? Everything is broken!  But hey, look on the bright side, we got lots of pretty buttons on the web - the ultimate achievement of this civilization :)

  • First test

    rand328906/11/2020 at 06:45 0 comments

    Joystick seems to be working well.  Gently pressing one side of the button seems to dim the fibers slowly as intended!  Fibers are illuminated by a 3 mm red LED.  The LED is powered by 2 AAA batteries through a resistor.  Here is how they look in the camera:

     First impression is that the button(s) can be pressed too deep on one side blocking the light on all fibers.  I will make the lid thicker to prevent this.  Also, I think I am going to turn the "X" in the joystick body 45 degrees to make it easier to read the joystick... I though having 2 fibers dim when one corner is pressed would be better but it might be the opposite.

View all 2 project logs

  • 1
    Print 3 parts using BLACK filament​

    Black filament blocks the light better than other colors but it's not required.

  • 2
    Cut 2 ball point pen springs in half to make 4 springs

    If the springs are too strong when the joystick is assembled, cut them a bit shorter.

  • 3
    ​Insert 4 springs into the joystick cross holes

    Leave the center hole empty.  It is used for an LED.

View all 7 instructions

Enjoy this project?

Share

Discussions

Similar Projects

Does this project spark your interest?

Become a member to follow this project and never miss any updates