 Rune Kyndal
This Pano-bot was built before we could buy single shot 360 cameras..
but it still significantly exceeds the quality of stitched panoramas
Robot Hardware
Arduino nano
Stepper motor driver
Stepper motor for Azimuth
Servo motor for Elevation
Lithium-ion Charger circuit
Mechanical bits,Buttons, LED's, and a photo transistor
the Camera is a Canon PowerShot ELPH 110HS 16.1 megapixel
for this design a Canon camera is critical here, as it is running CHDK and my Lua scripts.
Software
the key point to this design, is to achieve "very high" panorama sequence speeds.
for this I need to take the Exposure and move the robot as quickly as possible to the next location..
however critically.. not prior to the exposure having finished.
so a simple "delay" will not work here. with the different exposure times etc.
the Arduino and Camera need to "talk"
to accomplice this. I implemented a fairly crude "two way" link between the Arduino and the camera
I had plans for a slow serial protocol. for setting up the Arduino with various parameters.
(number of Elevations / Azimuth steps etc.) but did not end up implementing this
Simply put.
when the sequence is started on the hardware buttons.
the Arduino triggers the Camera by connecting 5V to the USB plug on the camera. (HIGH)
this is detected by CHDK, as "Shutter" and the Lua script on the camera starts the exposure(s).
then when the Exposure is done, the Lua script Blinks the Amber focus light on the front of the camera.
the Arduino detects this with a Photo transistor built in to the epoxy "dock" right on top of it.
The Arduino now starts moving the camera to the next position,
all while the camera is still busy saving the picture to the SD-card. thus saving a lot of time.
this is done dynamically regardless of the cameras exposure period and number of exposures
Panorama speed is essentially limited by the exposure period. the Camera and SD-card write speed.
and not so much by the Robot mechanical movement.
Sequences.
the number of pictures, and number of exposure steps, AV, TV for HDR etc.
is all set up using a CHDK / Lua based menu system.
the Arduino itself remains a fairly "dumb" motor controller and is controlled by the the Camera.
here is a short YouTube clip showing the Pano-Bot doing a "3 elevation" 1/3 overlap
Single exposure "fast sequence"
 Ashraf Minhaj
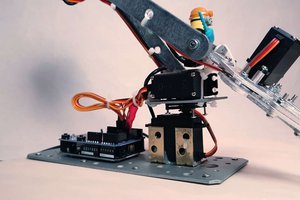
 Gaultier Lecaillon
 Adia Stansbury
 dgragnolati