Close
0%
0%

Automated Hydroponic Garden

An NFT hydroponic setup integrated with a gantry to allow for automated processes.

Similar projects worth following
The cost of produce is highly impacted by two factors: the cost of the manual labor involved, and the transportation costs associated with moving produce from climates in which they grow to areas all over the world. This automated hydroponic system is intended to provide a means by which to reduce or remove manual costs, as well as transportation costs, by providing an automated system that grows produce in a controlled climate unaffected by outside variables. I hope that by reducing the production costs and travel time, fresh produce can become more readily available and affordable for a wider demographic.

While there are systems today aimed at resolving the same problems, they often use cost-prohibitive equipment, such as multi-axis robots. By reducing the size and cost, the system may be used by individuals for gardening or homesteading. The modular construction offers a means to customize the system for different produce and/or operations.

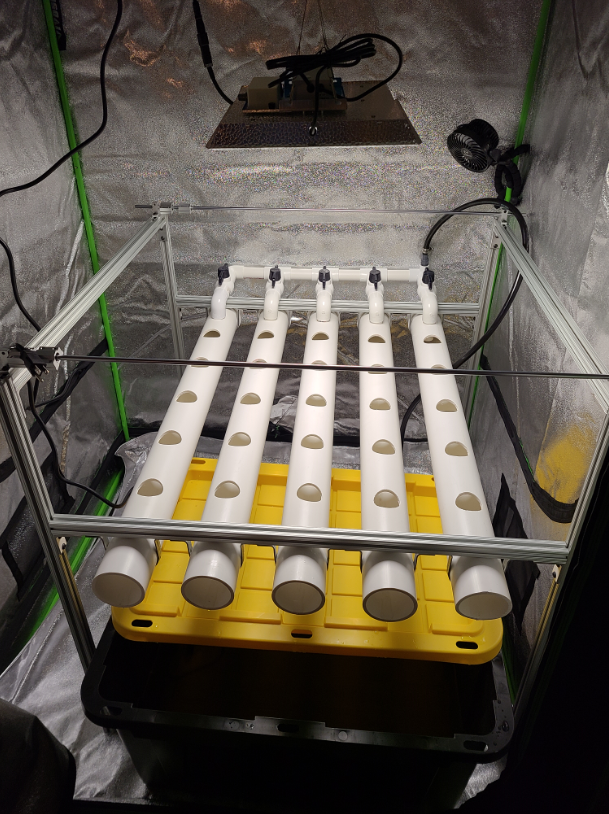
    While a hydroponic system can handle a wide variety of produce, I limited my scope to lettuce, specifically buttercrunch lettuce.  Lettuce is commonly used as a standard for hydroponic research due to the ease with which it grows and the time it takes until it is ready to harvest.  As this project is geared towards providing a mechanical solution to growing produce, I will not delve deeply into the intricacies that different variables can have on the produce, and instead focus on how the system improves the growing process.

    Below are some of the articles I have been using as a basis for this project.  Cornell has a department of Controlled Environment Agriculture and has done in-depth research into hydroponics, including different recipes for various produce and the methods they used.  In addition to the method and recipe used, lighting has a huge impact on your plants.

Cornell Hydroponic Recipe - http://www.greenhouse.cornell.edu/crops/factsheets/hydroponic-recipes.pdf

Cornell Lettuce Research - https://gpnmag.com/article/growing-hydroponic-leafy-greens/

Effects of Lighting on Lettuce - https://www.sciencedirect.com/science/article/abs/pii/S0304423812004797

  • 1 × JR Peters 77251 Fertilizer, Brown Water Soluble
  • 1 × JackS Calcium Nitrate 15.5% Nitrogen 18% Calcium Water Soluble
  • 5 × Bearing Rod for 8mm bore, 1000mm length
  • 1 × MARS HYDRO TS 1000W Led Grow Light
  • 10 × SK8 Linear Rail Shaft Support 8mm Inner Diameter

View all 14 components

  • First Grow!!

    rgleason9208/31/2020 at 05:05 0 comments

       In order to try and simplify the process, I planted the seeds directly into the system instead of doing a separate process and transferring them in later.  For the time being, they have to be watered by hand until the roots grow long enough.  I wanted to test doing it this way, hoping to reduce the amount of human interaction required.  One problem that may arise is whether or not the roots will find their way through the gaps in the net pots; if not, I will have to see if I can find another method to directly plant them.  Now that the seeds have sprouted, I set the light on 8 hour intervals.  There is also a fan that circulates air to both reduce tip burn and help the sprouts grow stronger.

        The next step will be to get the gantry mounted to the frame and get it moving.  Once it's moving between all the growing spots, I can start automating tasks.

    GrowCurrent Progress

  • Gantry

    rgleason9208/31/2020 at 04:52 0 comments

        Using more 1"x1" aluminum extrusion, I made a frame for the y and z motion of the gantry.  The y motion is similar to the x motion; a pair of linear rails with bearings will allow it to slide freely with the motion being controlled by the motor(s).  The z axis is using a lead screw to control the motion, with a linear rail to help guide everything.  For simplicity, I used a 3D printer bed for the main plate that mounts to the bearings for the y direction.  This frame will mount to the bearings on the x-axis linear rails and slide freely within the system.  The linear rails will need to be cut to length, but the hardened material will require me to find a different way to cut it aside from the band saw I've been using up to this point.

    Gantry

  • System Plumbing

    rgleason9208/31/2020 at 04:43 0 comments

        As I planned on using 2" net pots for growing the lettuce, I decided to use 3" PVC tubing for the main tracks.  This size of tubing, combined with the dimensions of the frame, allow for and even 5x5 grid for the net pots.  The net pots are evenly spaced from each other at 6" in both the x and y directions, allowing for easier setup with our program later.  I used 1" PVC for the end where the water flows into the system with ball valves to allow for flow control.


        The main difference with the plumbing in my current system is that the tracks are not all connected together.  In most system of this size, the tubes would be positioned in a way that water flowed into the system from one track and traveled through all of them before being deposited by the last track.  There are a couple of reasons that I chose to feed each track individually, primarily for the gantry and flow control.  The current layout allows me to put all the tracks at the same heights, making it easier for our gantry to interact with each position.  In addition, I put valves on each track to control their flows individually.  The reason I want to control the flows individually is because the track closest to the water inlet will always be stronger than the one farthest.  Also, if someone wants to stagger the grow period of each track (to have some lettuce each week as opposed to a lot of lettuce all at once, for example), they can cut the flow to the tracks currently not in use.

  • Aluminum Frame Completed

    rgleason9208/31/2020 at 04:30 0 comments

        I ordered 8' lengths of 1"x1" aluminum extrusion and 2"x2" L-bracket to cut down into parts for the aluminum frame.  The frame was designed to be a 3' cube, so there wasn't much to be done to the aluminum extrusion besides cutting it to length.  The L-bracket required a little more work as it had to be cut down into 1" thick brackets, then have two holes drilled in each side for screws.  The process wasn't difficult, but it took a while to make all of the needed brackets with a few extra just in case.

        The reason I chose aluminum extrusion is because it is readily available, relatively cheap, and easy to use.  Assembly is simple once you have the brackets, requiring just 1/4-20 T-nuts and screws to put it all together.  I also set up the linear rods for the x-axis motion along the top of the frame.

    Aluminum Frame

View all 4 project logs

Enjoy this project?

Share

Discussions

rgleason92 wrote 08/31/2020 at 05:32 point

Most of the pictures did not load properly with the logs.  I instead uploaded them to the gallery.

  Are you sure? yes | no

Similar Projects

Does this project spark your interest?

Become a member to follow this project and never miss any updates