 Mark Wilson
I did some sketches but concluded it was best to prototype it. Initial efforts produced what looked like an undifferentiated mess o’ segments. The individual digits didn’t really stand out. Discouraging, and I was prepared to just discard the idea as simply a failed experiment, fortunately having invested very little effort on it. But I let it sit for a while and eventually had the idea of staggering the characters, alternating “upper” and “lower” versions. This seemed to make the display readable, although others may disagree!

Call it digital calligraphy. I find the fluidity of letter-forms quite interesting.
Pleased with the look, I made it into a complete project.
Using two daisy-chained 8-digit 7-segment displays kept things fairly simple. I had to grind off a little of the long edge of one display's board so I could sit them together with the digits flush.
I found a nice aluminium enclosure online

I replaced the end-plates with layers of laser-cut acrylic.
The front is three layers. The first has the through-holes which connect the top and bottom halves of the enclosure. The second is effectively just a spacer to make the 7-segment displays sit flush with the front. The third layer is a clamp which holds the displays in place. The back is two layers, the outer replaces the original metal plate and labels the push-buttons SET & SEL, the Alarm toggle switch and the power jack. The second layer acts as a recess for the buttons etc.
The sides of the enclosure have slots for a captive M3 bolts which I use to attach legs to the sides, so the viewing angle can be adjusted.
 John
John
 Cadmium
 Morning.Star
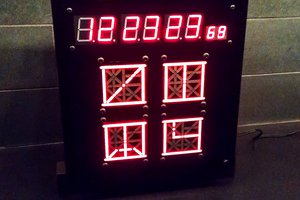
 RIUM+ (Mike Ando)