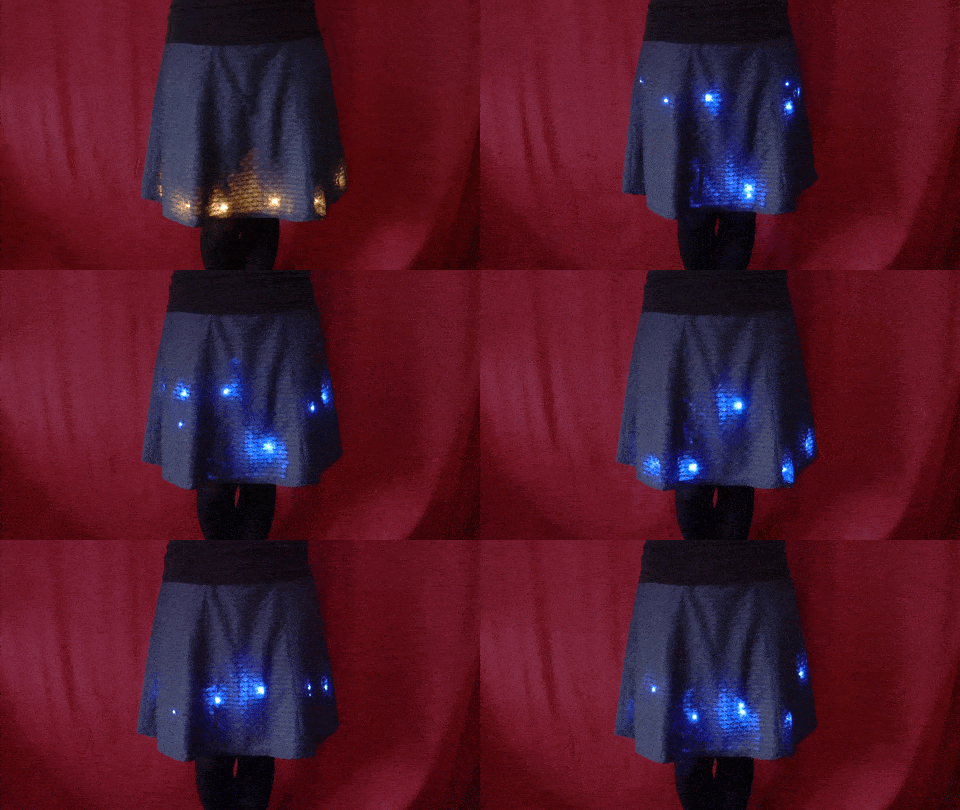
Video showing the fist implemented light effects:
- bouncing balls (motion triggered)
- meteor rain
- fire
DIY Skirt with 120 Neopixel LEDs and motion detection
To make the experience fit your profile, pick a username and tell us what interests you.
We found and based on your interests.

Video showing the fist implemented light effects:
meteor_rain.inoMeteor rain example from the videoino - 2.66 kB - 02/03/2021 at 17:50 |
|
Simple circuit diagram for connecting the strip and sensor:
Simple example using the following lib: https://github.com/ArminiusM/Neopixel which I have found on https://www.tweaking4all.com/hardware/arduino/adruino-led-strip-effects/
To install the library, you have to download the AGNeoPatterns folder from the repository above, put it into a zip-file and include this AGNeoPatterns.zip in the Arduino IDE as a library.
It allows me to define virtual strip segments in a long LED strip, so I can control the 6 strips separately even if they are connected to a single pin of the controller.
added to my Github: https://github.com/makeTVee/ledskirt as a PlatformIO project.
special version with rainbow color change balls, looks even better ;-)
If you are using RGBW strips instead of RGB strips, you have to change the init parameters for the Neopixels:
RGB: npNeoPixel pixels = npNeoPixel(20, NeoPin, NEO_GRB + NEO_KHZ800, 1.0);
RGBW: npNeoPixel pixels = npNeoPixel(20, NeoPin, NEO_GRBW + NEO_KHZ800, 1.0);
6 LED stripes with 20 LEDs each are installed only at the front of the skirt. There are no LEDs at the back because of practical reasons (sitting, rest room etc.).
The stripes are connected in a serpentine layout, so only one pin on the QT PY is used. Therefore, there are three connections at the bottom of the skirt, which are secured on the stripe with some hot glue (not the final solution).
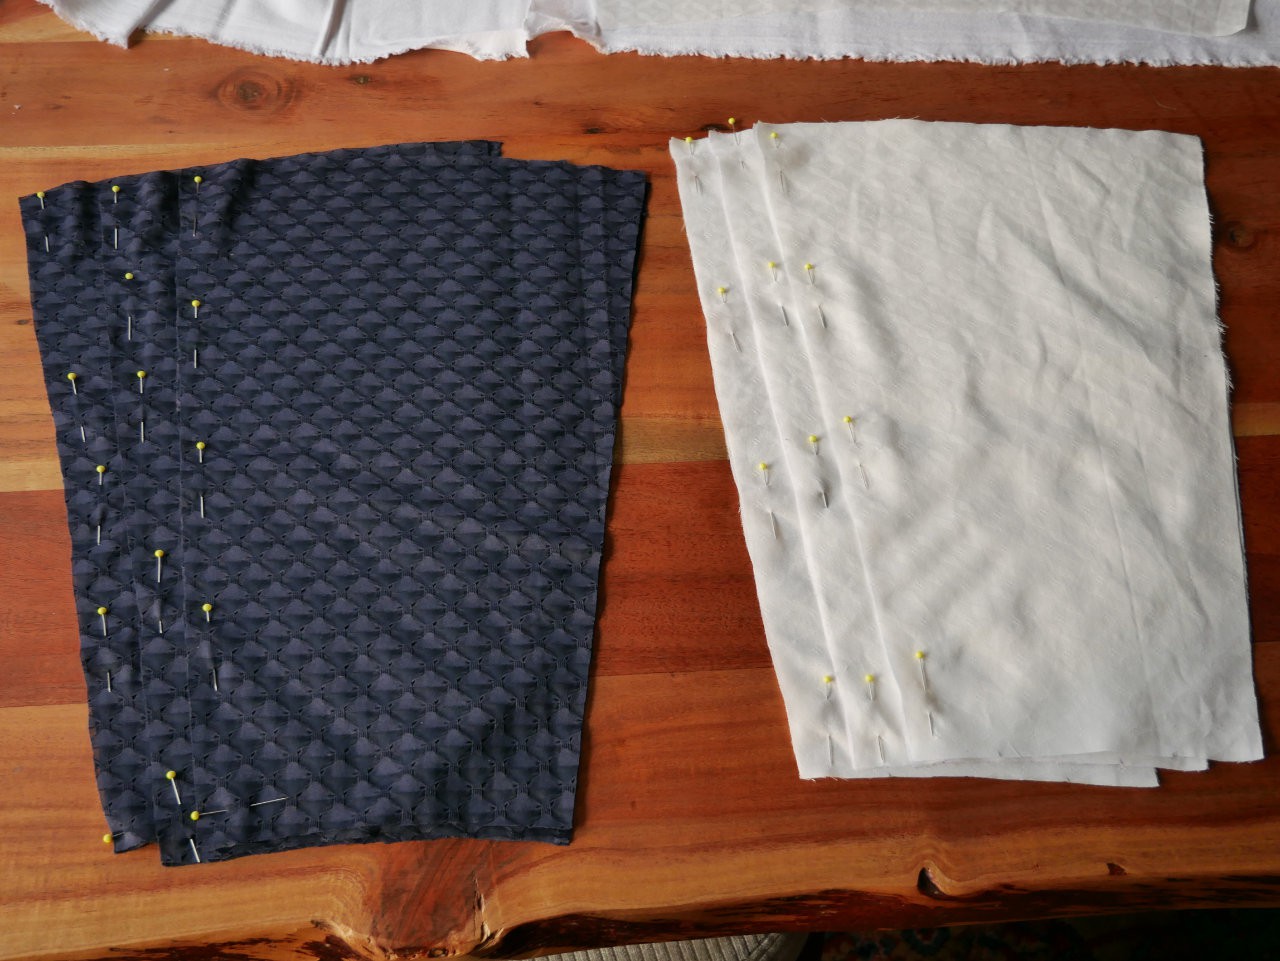
The skirt itself has 3 layers:
The stripes are attached to the skirt with Velcro, one side glued to the stripe, the other one sewed to the fabric. Every stripe has 4 Velcro points.
Power is distributed at the top of the stripes and hidden in the white double layer at the top.
Shrinking tubes are already installed, but not shrinked yet.
The cable is guided to a pocket at the back of the skirt. There is a buttonhole to reach the pocket from inside.
As mentioned, there are no LEDs at the back for better daily use. Of course, for special reasons (e.g. dancing), this skirt can be easily updated to a full LED set by adding stripes on the back via Velcro.
The pocket at the top of the back is large enough to hold the USB power bank and the controller, but still small enough to hide it under a shirt.
All 6 stripes are accessed by this single cable ending in the pocket.
If everything is install, the pocket looks like this
Apart from this, the skirt is a normal skirt with full functionality ;-) So it is also a nice skirt without LEDs. But why should someone do this....
So better switch the lights on:
:-)
Some pictures from the build process:
Pattern cut out:
Velcro points on fabric: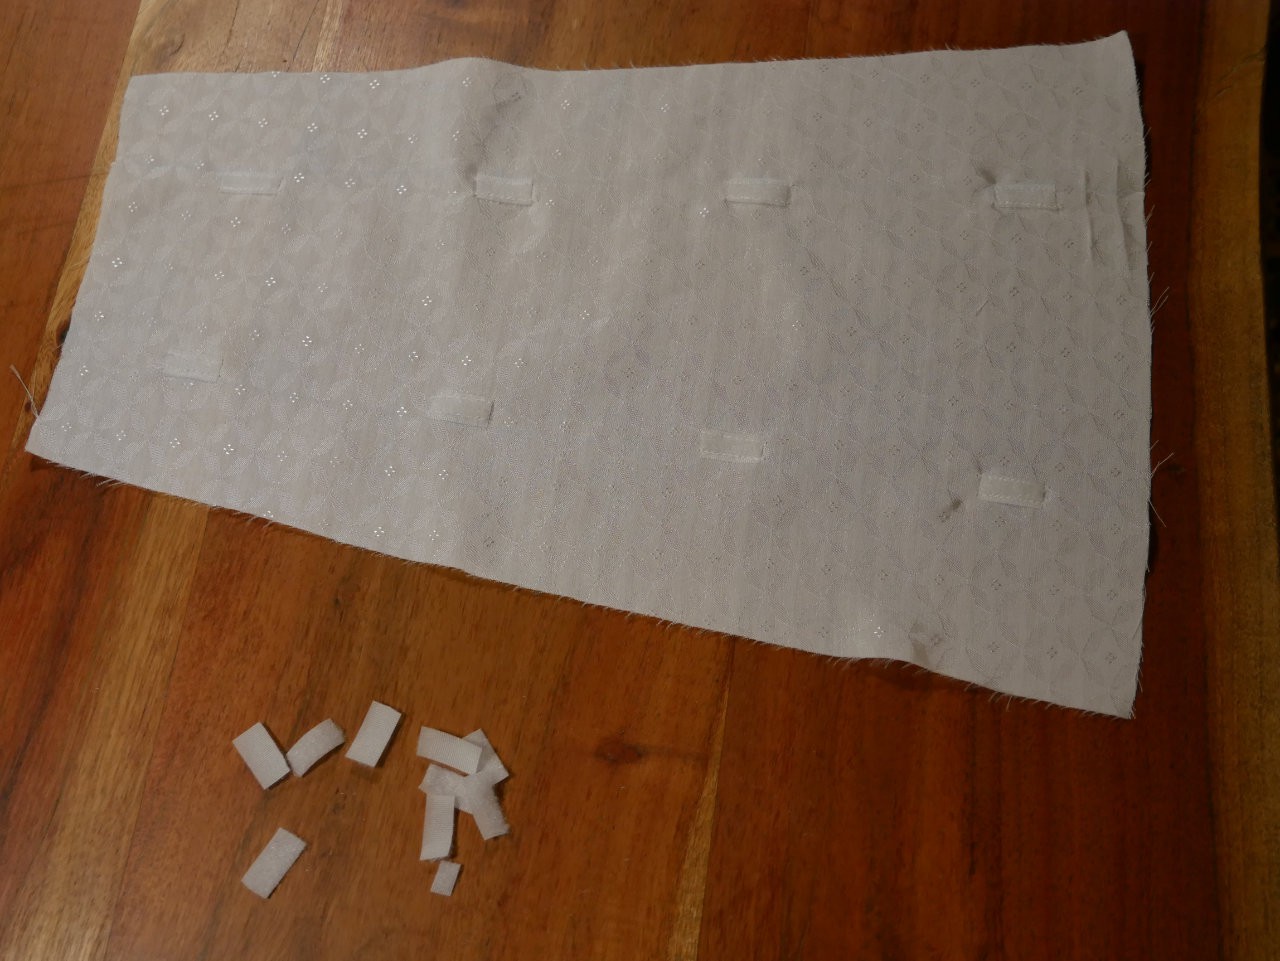
Fastener on waist band:
Create an account to leave a comment. Already have an account? Log In.
Hi!
Seems like the standard bus speed of the ESP32 is 100kHz, but the sensor uses 400kHz, so you can try to set the sped to 400kHz.
Also, there seems to be a small bug in the I2C, but it looks like it only affect the 100kHz settings:
https://learn.adafruit.com/adafruit-qt-py-esp32-s2/esp32-s2-bugs-and-limitations
For further discussion you can just send me a message via hackaday to discuss other solutions.
Please also check this:
https://learn.adafruit.com/adafruit-qt-py-esp32-s2/i2c-scan-test
This is really, really, really Cool!! I see your bouncing balls pattern is platformio. Did you ever program that pattern for the Arduino IDE? I'm having trouble converting for Arduino. ThX
I would assume you have just used the code from the main.cpp? Did you included the libraries correctly? Please share the error you are getting. Best would be to send it via direct message, there you can also share the code if necessary.
Thanks so much for the amazing rapid reply. So all I need is the main.cpp and the libraries? I'll work on getting the libraries corrected and let you know. I appreciate your help - bouncing balls in multiple columns is so amazing! ThX
I've got this working now! I renamed main.cpp to main.ino and properly installed the libraries from https://github.com/ArminiusM/Neopixel. I'm looking for how to change the speed of bouncing. I can't find a variable in the main.cpp that controls the speed. The syntax from library seems more complex than the constructor in the main loop.
I am currently working on making this skirt and can not get the bouncing ball code to work. I have tried it on the QT Py, Arduino Uno and Nano. Is there something that I am missing? The fire and meteor code work perfectly.
Didn't see you post, sorry. Please send me a message if you have still issues.
Disregard the comment below, I got the library installed by clicking "add .zip library" and just clicking on the AGNeoPatterns folder (not a .zip). I have 11 strands at 25 LEDs per strand. I verified the wiring and tested it in a few configurations, 6 strands at 20 each, etc. It verified fine and uploaded but is just not working correctly. The strand tests work fine. Here's a link to a video of what my fire looks like. https://youtu.be/RGSmi7xWxsQ.
Any ideas would be much appreciated!
I have answered you in the chat, can't access the video because it's private.
Hi, thanks for the Instructable and inspiration! I've been wanting to make an LED skirt for a while.
So I completed the Skirt and LED set up per your instructions. For many different reasons, I finally got it done just in time for my daughter's Halloween costume this Halloween afternoon. All test sketches work just fine, but I can't get any of your fire or meteor sketches to load because I'm having trouble with the libraries. My daughter went out with an Example sketch "Pacifica" but disappointingly not with the fire we were planning on.
I can't get the AGNeoPatterns library to load on my Mac. It's not a .zip so can't use the manager, but when I manually drag it to the libraries folder, Arduino IDE doesn't see the library either. I tried to make it a .zip and use the manager, no luck that way either. The error I'm getting is "the folder/zip does not contain a valid library."
I'm at a dead-end searching online for a fix, I'd appreciate any help or point me in the right direction!
Thanks in advance!
Hello!
I'm new here and plan to give this project a go. I've done plenty of software before but very little electronics and no arduino...
I have a question if I may?
As all the strips are connected in parallel to the data pad on the board, how are the bouncing effects asymmetric?
I would expect them all to behave identically.
Thanks
Hi
The stripes are connected in serial (zig-zag oriented), you will find more details on the instructables page: https://www.instructables.com/Neopixel-LED-Skirt-motion-Triggered/
ahh yes of course, that makes sense. Thanks, My components should arrive tomorrow. Really looking forward to this!
I've gone with a QT PY rp2040
Sorry to bother you, (I'm just so enthusiastic about this project) I've got to the point of attempting some code. As this is my first attempt at microcontroller programming there are a few things I'm unsure about.
Firstly, I got a QT PY RP2040, as I mentioned before, and the docs for that mention using Mu as an editor, but I have had some simple success with simply using VsCode and python.
However, as PlatformIO in VSCode doesn't seem to list the QTPY RP240 I'm not sure what method might be best to move forward with the bouncing ball project?
Any suggestions welcome :)
Hi, did not tested the RP2040 yet, as far as I know it is already supported by the Arduino IDE, but never used it with the Neopixel libs. You can use the code form the main.c in the bouncing ball example and copy it to an .ino file in Arduino IDE. I would start from there.
Sorry for being slow, my notifications are not right yet.
Thanks for replying, I switched to the other type of QT PY and have had great success. It looks amazing, thanks so much for posting this.
I have one last question, I was wondering why the Vcc and Gnd are chained across the top rather than serpentine along with the data.
The length (2m @ 60 per m) should be fine with no appreciable voltage drop. Or is it for extensibility without changing design?
Thanks
Main reason was to minimize the number of wires at the bottom to make the skirt more flexible and more natural.
Thank you for the inspiration. I've always been "eh LEDs in clothes, that looks strange" but this is very well done. I just purchased the parts and am going to get started ASAP. This will also be my first "real" project that I'll be listening to the instructions :) Good work!
I made it!
The first project I have finished. Sort off, my bouncing balls are syncretic, and I can't figure out why!?
But it's was a cool project to make, thank you for sharing it.
Great stuff! If you want to have fixed colors for the balls, just uncomment line 82.
On the clip you have posted it looks like the LED strip's bouncing more random. I basically have a line of LEDs moving up and down my wife.
okay, that is unexpected, can you send me your code via direct message here at hackaday? I will test it on my setup.
Ported the software to an Arduino pro mini. Substituted a mercury tilt switch for the accelerometer. Very simple. Works great. Got to learn PlatformIO and blinky lights. Thank you for the project.
I am still having problems. The error I get is
Meteor_rain:11:10: fatal error: npMeteor.h: No such file or directory
11 | #include <npMeteor.h>
| ^~~~~~~~~~~~
compilation terminated.
exit status 1
npMeteor.h: No such file or directory
I have downloaded Neopixel-master.zip. I have pointed Arduino IDE at it and asked it to install the library. I have tried this a few times but I still get the error. If I look in Sketch/Include Library I see at the bottom Recommended Libraries - Adafruit NeoPixel. The file npMeteor.h is in the zip file. I checked that.
However, it is clearly not seeing it. Any ideas. My version on Arduino is 1.8.12 which is the penultimate one. I am puzzled as to what is awry. Any ideas?
Hi Simon,
then please try to copy the AGNeoPatterns folder from the zip into the folder with your .ino file.
I have tried that and got the same error. It does not see the npMeteor.h file, even though it is plainly there. I then moved over to a Mac where I have Arduino IDE running but I get the same error there. I have downloaded Visual Code Studio with the Arduino add on but as I feared it is a new program to me and I am lost at the moment. I have already built the circuit and it is ready to attach to the QT PI but I am stuck. I do feel rather dumb. I know what the purpose of npMeteor.h is and it clearly must be used elsewhere. It is in both examples of the code you have posted. Other people must use it too. I have googled this error but I am still stuck. What else can I try?
just to add it here, issue is fixed now by importing the AGNeoPatterns.zip to the Arduino IDE as a lib. Already updated the project log.
IIRC #include <> searches in standard directories but not the current directory. Try changing the <> to "", thus #include "npMeteor.h"
A couple of questions. I cannot find the file npMeteor.h. Any idea where I can find that? Also, does it need a resistor inserted on A3.
Hi Simon,
npMeteor.h is part of the mentioned external library
https://github.com/ArminiusM/Neopixel
Please download the library as a zip file and install it in Arduino IDE (add .zip lib):
https://www.arduino.cc/en/guide/libraries
Resistor on A3 is recommended (470 Ohm), but it works also without.
What IDE would recommend for uploading the code. I am new to this but have some Arduino experience.
With Arduino experience, I would recommend Arduino IDE. If you like a more modern approach, use Visual Studio Code with PlatformIO. That's my preferred setup.
Good gracious. It is as straight forward as that. I was thinking that it had other components. Am I right that it is possible to individually address each string? I noticed that in the bouncing video some decay slower than others.
Its a cool project. Until you look at the price to make it due to using proprietary boards. an esp32 and a 6dof sensor with cheap ws2812b/11 strips would be cheaper and more effective.
Thanks, but I don't get your point. As you can see on the pictures, I am using cheap WS2812B IP30 strips from China, QT Py is 6 $ and as proprietary as esp32 boards. Why using an ESP32 if Bluetooth and Wifi are not used? There are cheaper Arduino boards out there. And Adafruit documentation is brilliant, so using an Adafruit board is always my prefered way to finish projects fast. But of course, it is always possible to save some money in the next iteration after finishing the prototype...
OMG I LOVE THIS!!! Putting on my list of things to try :)
This looks fantastic. My daughter has a tenuous relationship with gravity so she'll love something that bounces when she does.
I like this idea of virtual kinetics.
I've integrated IMUs in some of my LED wearables, but I haven't figured out a good application for them yet. I've implemented a halter-top that sparkles if you jump (somewhat unreliably), but this is much cooler.
Unfourtunatly not, it is a custom pattern designed for a perfect fit to the designers body. But if you start with a thick waistband, you can use a panel skirt design with 6 panels to get a similar result. If you need more information, send me a direct message and I will try to help with more details.
Reminds me of my wedding suit from a couple of years back! But you've made it more interesting with the bouncing balls!! Though mine was WiFi controllable so guests could change the pattern while the speed adjusted to the music.
https://drive.google.com/file/d/1VyNpC937IBbmlaqxTE2OGfFStnYrnntp/view?usp=sharing
What a great, clever concept! And well executed! I love it, great job!
Become a member to follow this project and never miss any updates
 Grayson Schlichting
 Petri Varsa
 kieron.gillespie
 Jens Hauke
This looks great and I'm in the process of trying to get this made for my wife. I can get the Fire and the Meteor modes working but the Bouncing Ball mode doesn't seem to work. It doesn't get beyond "begin_I2C()": -
// setup LSM6DS032 sensor
if (!dso32.begin_I2C()) {
while (1) {
delay(10);
}
}
So it would seem it isn't detecting or working with the LSM6DSO32 board. I'm connecting to it using the ESP32-S2 QT Py using the STEMMA cable connecting them directly to each other. The LSM6DSO32 board lights up but attempting other code examples to try and connect doesn't seem to work although with those they mostly want to operate by pins on one board to the QWIIC connector on the other.
Any help or suggestions on this would be greatly appreciated.