What you can do with this robot now is as follows.
(1) The depth camera (ZED2) recognizes the person in three dimensions and automatically hands over the sweets they are holding.
(2) Use the depth camera (ZED2) and color vision filter to recognize an object in three dimensions and grab it.
(3) Create an environmental map and let it navigate automatically.


The mechanical design has followed the transition as shown in the attached figure.
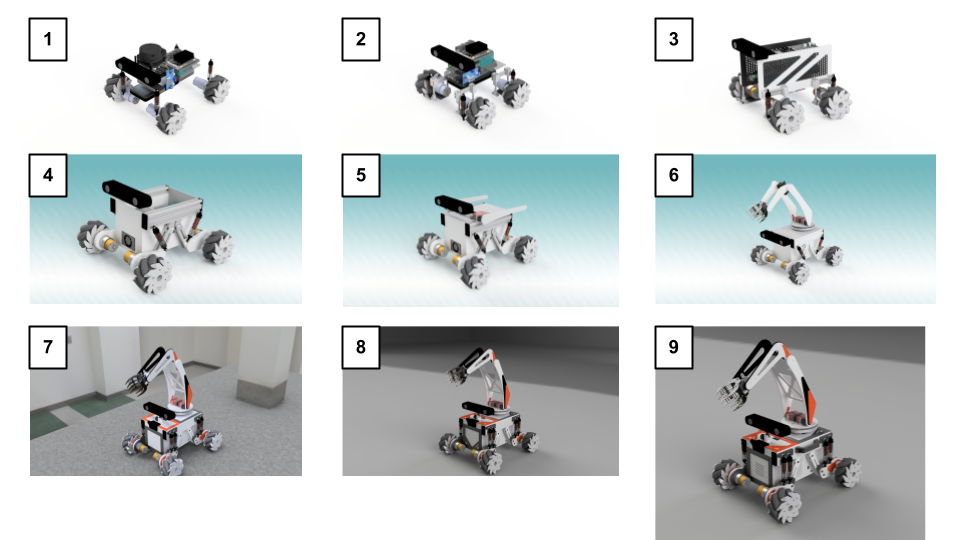
(1) First, arrange the parts you want to use roughly and check what shape they will have.
(2) Add a little more detailed parts and consider the layout.
(3) I also installed a cover that will be the housing of the robot, but it was too clumsy and was abandoned. I'm sick of my lack of talent.
(4) Regain your mind, think of a mechanism that allows the four Mecanum wheels to firmly set the ground, and devise a shape that can pursue functional beauty.
(5) I want to add an arm to this robot, and seek out what kind of arrangement is good.
(6) An additional plan for the robot arm can be seen, but the position of the depth camera is low.
    I was afraid that my field of view would be limited. Also, you will want to change the angle of the camera later.
    Furthermore, I noticed that the suspension I bought for trial had less repulsive force.
(7) Review the fixing of the depth camera and arrange it so that it feels more robotic. Double the number of suspensions was installed.
    Furthermore, start considering coloring.
(8) Determine the suspension fixing method and internal component placement. Make a realistic CG and search for the actual result.
    It's not good. The front grill is ugly!
(9) Change the design of the front grill to reduce the heat generated by the Jotson Xavier NX, battery, and motor driver inside.
    Completed by opening the vents that were taken into consideration.


The electrical configuration is shown in the figure below.
(1) Use Jetson Xavier NX as the main board
(2) Connect ZED2 with USB3.0 and acquire a 3D point cloud. In addition, IMU information is acquired and an environmental map is created.
    Used for self-position recognition
(3) Connect M5Atom Lite via USB and move the robot arm using the data communicated by rosserial. It seems that the communication load on rosserial is heavy for M5 series microcomputers, so the amount of communication on ROS was reduced as much as possible to stabilize the operation.
(4) Connect Teensy 4.0 via USB and move the Mecanum wheel using the data communicated by rosserial. I used this time
    The DC motor driver does not seem to be able to handle the counter electromotive force during deceleration well, so the deceleration will be slow.
    The problem was solved by tuning using PID control.


The software uses the basic ROS package and the ZED ROS package provided by steleo Labs as shown in the procedure below, and creates a program that connects them with the movement of the robot.
(1) Introduced automatic navigation by ROS navigation package (https://github.com/ros-planning/navigation)
(2) Point cloud drawing + 3D person recognition is performed using the ZED package (https://github.com/stereolabs/zed-ros-wrapper) provided by steleoLabs.
(3) Use the ROS jsk_recognition package (https://github.com/jsk-ros-pkg/jsk_recognition) to create a 3D point cloud.
    A color vision filter is attached so that only points of a specific color can be extracted from the point cloud obtained from ZED2.
(4) Create a node that connects (1) to (3) with the operation of the robot
 Tom Quartararo
 BTom
BTom
 Jack Qiao
 madis.merila