 Jon Hobbs
Introduction
So, we have a home automation system, HAL, in our home (crazy place for it, huh?). Based on OpenHAB 2, it provides a number of user interfaces on various platforms. Smart phones, web browsers, tablets, etc. However, sometimes you need a good, old-fashioned physical interface. Do you really want to whip out your phone, open an app, navigate to the right screen and tap a widget just to turn on the garage lights so you can find a Phillips screwdriver? Sometimes, but not always!

In an effort to fortify our standing as uber-geeks, my sons and I set out to build a Star Trek the Next Generation (STNG) style control panel for our garage (not so old-fashioned, but a physical interface nonetheless). Our control panel is based on a Raspberry Pi 3, the official Pi touchscreen, and some custom web pages. Of course, the whole thing integrates with HAL (for more details on HAL, see this project write-up).
That's right, we're slamming together 2 classic science-fiction icons, 2001 A Space Odyssey meets Star Trek (yes, we went there!)
Grab your favorite obelisk, pull up a seat in Captain Jean-Luc Picard's command chair, and enjoy the ride!
NOTE: This project works hand-in-hand with Home Automation Laboratory (HAL) Part 4 - Custom Interfaces
Overview
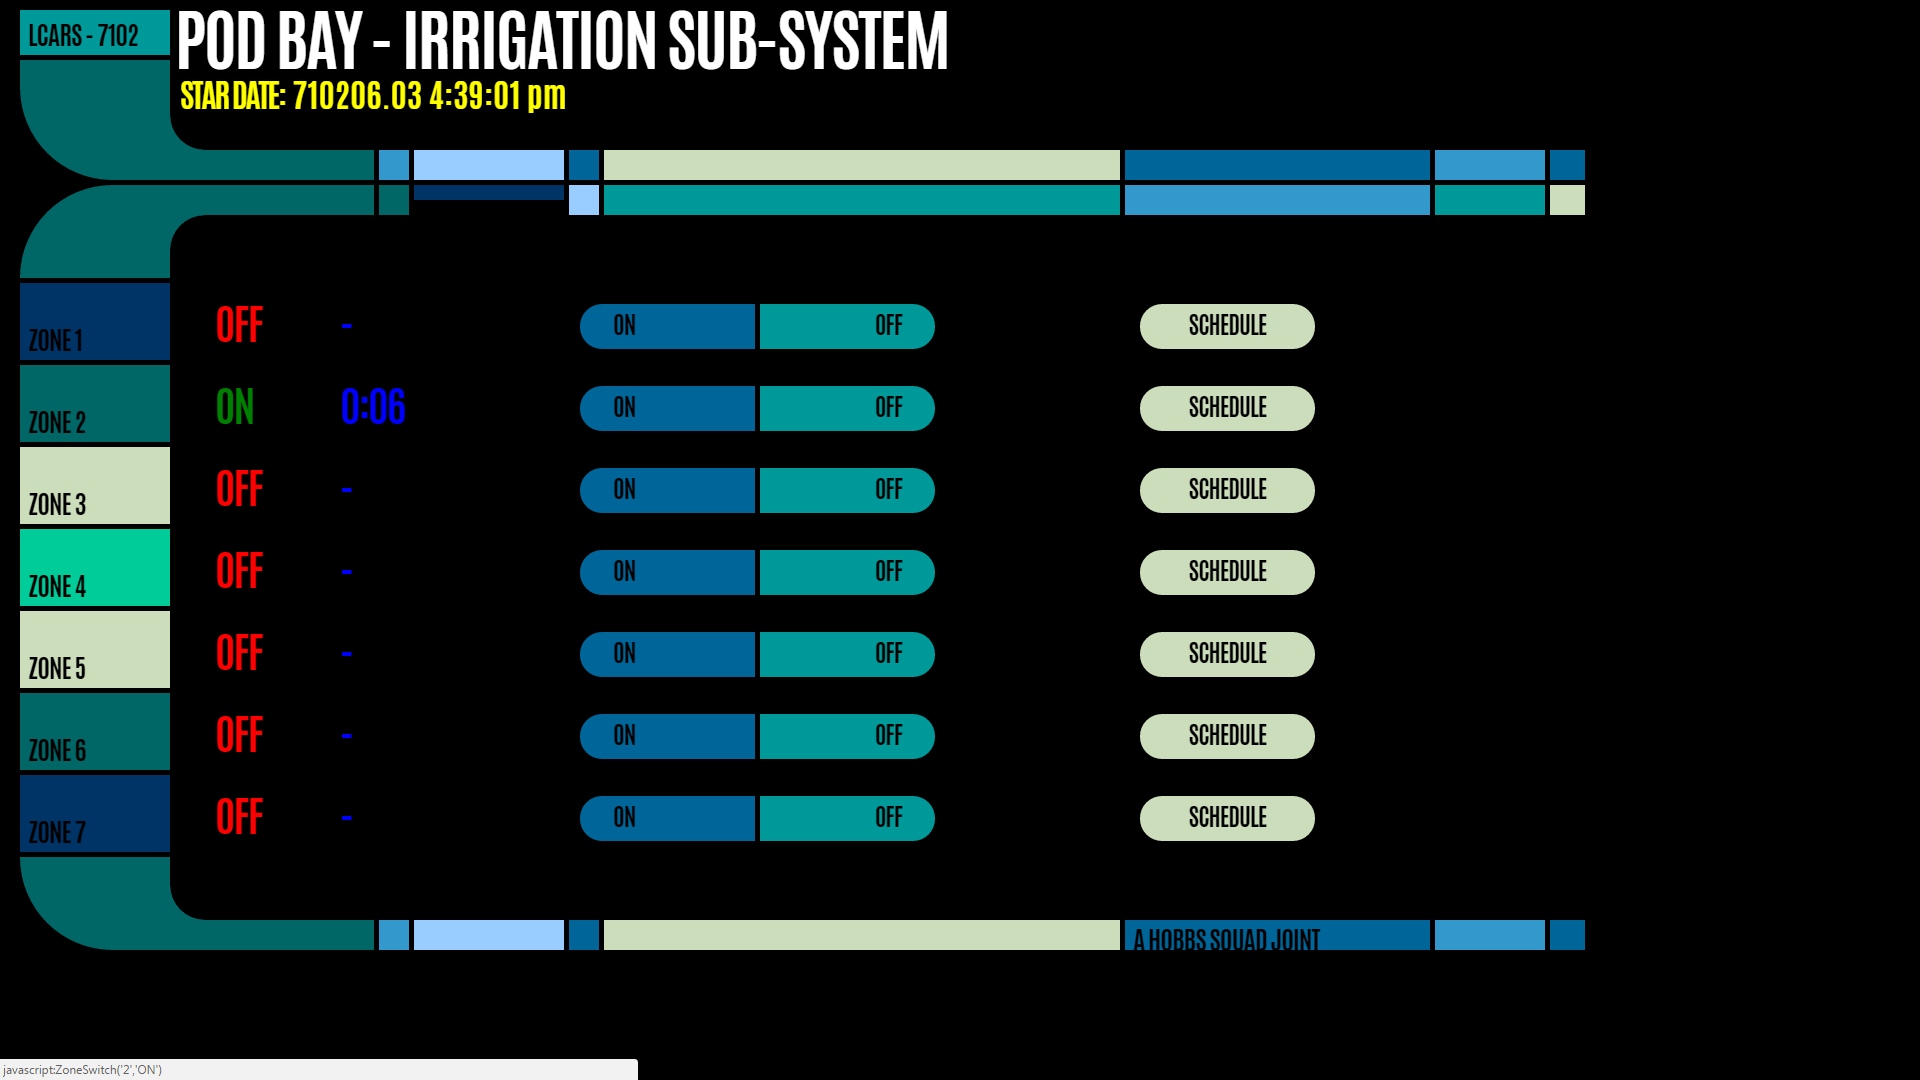
This project will cover the user interface for our custom sprinkler system controller. Our home has an in-ground sprinkler system for watering the yard. It is divided into 7 zones, each of which can be independently turned on and off.
Additional details on the sprinkler system controller (TBD). Basically, our user interface needs the ability to manually turn on a zone, leave it on for 5 minutes, then automatically turn it off. Also, it needs the ability turn off a zone manually. Finally, we need to be edit the schedule that determines when each zone will be turned on and off automatically.
Hardware
The hardware aspect of this project is quite simple. We just used a Raspberry Pi running the latest version of Raspbian. All we really need the Pi to do is run it's native web browser, pointed at some custom web pages on our Apache web server, in full-screen mode. Add an official Raspberry Pi 7" touchscreen, mount the whole kit-and-caboodle in Smarticase's mount so it all looks neat, tidy and professional, and we're good to go.
Software
Apache web server. We installed and configured an Apache web server on a Raspberry Pi. The details of that project are documented here.
The true meat-and-potatoes of this project lie in the custom web pages we built. In order to get the look and feel of the STNG computer operating system - Library Computer Access/Retrieval System (LCARS), we leaned heavily on Aricwithana's github repository for his LCARS SDK. Aric provides 2 ways of building LCARS web pages - javascript and CSS. We opted for the pure CSS methodology.
We've designed things such that HAL is the hub/system of record for everything. Therefore, the sprinkler controller will communicate with HAL. It'll receive commands from HAL and report status information back to HAL. Likewise, our LCARS panel will only communicate with HAL. This keeps things pretty simple for the custom web pages that comprise the LCARS screen.
So a bit of HTML, some CSS, an Apache web server coupled with OpenHAB's REST API and we have everything we need.
<architecture diagram>
Construction
Hardware
Raspberry Pi - setting up the Pi is easy and well-documented. We didn't do anything fancy or extraordinary here. The Pi exists only to run a web browser with a wifi or hardwired network connection to an on-premise Apache server. The standard Raspbian install works perfectly.
We found that the instructions on the official Raspberry Pi web site were more than adequate. Hit the "instructions" link for step-by-step details. Here's the high-level run-down:
- Using another computer (Mac, PC, Unix/Linux), copy the OS installer "Noobs"...
 RodolpheH
 NaranInc
 Smart Technology