In this project, we'll be installing The Rclone program on your Raspberry Pi.
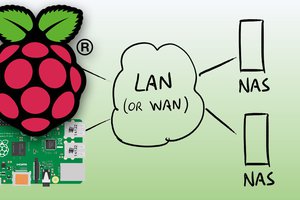
Rclone is an open-source programme that allows you to manage files on cloud storage systems like Google Drive and Amazon S3.
You may use this programme to do a variety of activities, including file synchronisation between your Raspberry Pi and your cloud provider. It's even feasible to mount cloud services on your Raspberry Pi as if they were physical drives.
Rclone is a great way to connect to your cloud storage provider because it supports over 50 different backends. Amazon Web Services, Microsoft OneDrive, and Google Drive are among the most popular cloud storage options.
Rclone can also communicate with self-hosted cloud services such as OwnCloud and Nextcloud.
Most importantly, the programme is quite simple to operate. Rclone leads you through the process of connecting to each of its backends.
Rclone may be installed on your Raspberry Pi with just a few simple hardware that you probably already have on hand.
Recommended
- Raspberry Pi
- Micro SD Card
- Wi-Fi or Ethernet Cable
Optional
- Case for Raspberry Pi
- Keyboard with USB
- Mouse (USB)
This guide was tested on a Raspberry Pi 400 running the most recent version of Raspberry Pi OS Buster.
Rclone setup on your Raspberry Pi
We must first prepare our Raspberry Pi so that we can easily set up and install Rclone.
This entails upgrading our operating system as well as installing certain essential software.
1. Let's start by making sure we're working with the most recent operating system.
The following two commands can be used to upgrade Debian-based operating systems like Raspberry Pi OS.
sudo apt update
sudo apt full-upgrade
2. Next, we must make certain that the unzip package is installed.
We won't be able to install the latest version of Rclone on our Raspberry Pi without this.
sudo apt install unzip
Rclone installation on the Raspberry Pi
While we may install Rclone from the package repository, we will be using an old version.
The disadvantage of utilising an outdated version is that cloud services frequently change, which means that what used to function may no longer work.
To get around this, we can get the most recent builds straight from the Rclone project.
1. The latest stable edition of Rclone is now ready to be downloaded to our Raspberry Pi.
To get the newest ARM version, use the wget command on your device.
wget https://downloads.rclone.org/rclone-current-linux-arm.zip
2. We can extract the archive after Rclone has done downloading to your Raspberry Pi.
To extract Rclone, run the following command using the unzip package we installed.
unzip -j -d rclone-temp rclone-current-linux-arm.zip
With this command, we utilise two parameters. The first parameter (-j) instructs unzip to extract everything to the top level only, without creating any folders.
The second parameter (-d DIRECTORY>) instructs unzip to extract all of the files into the given directory.
This directory will be called "rclone-temp" in our case.
3. Now that the files have been extracted, we must relocate them to locations where the operating system can find them.
The Rclone binary is the first file we need to relocate. We'll put this programme in the "/usr/bin" directory because the command line looks for packages there automatically.
To relocate the binary to the right place, use the following command.
sudo mv ~/rclone-temp/rclone /usr/bin/rclone
4. Now we'll build up the Rclone documentation pages.
We do this so that when you enter "man rclone," you will obtain the program's manual.
Let's copy this folder from the extracted folder to the "/usr/share/man/man1" folder.
5. We need to clear up some of our file permissions so that the root user, not our pi user, controls the file.
We'll use chown to grant the root user ownership of the file we just relocated with the following command.
sudo chown root: /usr/bin/rclone
By changing the permissions, anyone with...
Read more »

 Dmitry