Close
0%
0%

Y Ddraig Fach - A 6809 computer

A computer designed around the Motorola 6809 CPU

Public Chat
Similar projects worth following
A break from my Motorola 68K designs but keeping with a Motorola CPU, this is my 6809 based computer

"Y Ddraig Fach" which means the little dragon in Welsh. 
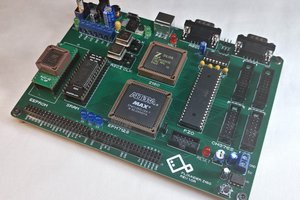
I'm continuing the computer naming scheme I started with Y Ddraig. This is my take on what would have been a powerful 80's computer. The PCB has designed with the goal of creating a case for it. The shape of the PCB and the use of a C64 keyboard should allow a case to be designed that will resemble an 80's computer when finished.

Specifications

  • MC68B09 CPU running at 2Mhz
  • 512K banked SRAM
  • 32K ROM (2 x 16K Banks)
  • Commodore 64 keyboard interface
  • 2 x Serial port
  • 2 x Joystick ports
  • SD Card interface
  • Commodore style IEC interface
  • Real time clock
  • V9958 video output with RGB and composite outputs
  • YM2203 sound chip
  • Expansion slot

Design has been completed for a while, just need to build the board next.

Adobe Portable Document Format - 1.51 MB - 09/10/2022 at 14:35

Preview
Download

  • Failure and Success

    Stephen Moody02/19/2024 at 17:53 0 comments

    It's been a year since the last update on this project. 

    The PCB has been built for quite a while now but no work had been done due to lack of time and I was missing a few ICs on the decode logic.

    I have finally started looking at this again and attempting to get the board up and running. I had performed some basic testing when I built the PCB, checking for obvious shorts and making sure that the quadrature clock was working correct. Until I populated the decode logic ICs I couldn't run any code.

    Several months later I have everything I need and some spare time so thought it was time to get the board up and running. Initial attempt was to try and write some simple code to write a message out of the SC26C92 UART serial port.

    I was not expecting everything to work on first attempt and was not disappointed, nothing happened. Time to fire up the oscilloscope and try and work out what's happening. 

    Looking at the decoding logic, a lot of signals seemed to be active even when they should not be used. Addresses bus also was showing a lot of activity on address lines that should not be used on a simple looping code. It looked like the CPU was just free running. Checking the data lines showed that some of them were changing between 5V and 2.5V so looks like a short along them somewhere. Checking for shorts and removing all devices connected to the databus except for the ROM and DUART didn't fix the issue. 

    Removing the DUART and putting a very simple loop ROM in and there seems to be a bit of life in the computer. Logic analyser seemed to confirm that it's running code at least.

    Plugging the UART back in caused issues so found the obvious culprit. Probing the signals with the scope wasn't showing what I expected, no clock signal from the oscillator and every other signal looked strange. Checking with the datasheet I discovered the problem fairly quickly. This IC has 2 different pinouts for 44 pin parts, the PLCC version that I'm using and the QFP which I used the pinout for in the schematic and has a totally different pinout!

    I was going to go the dead bug route of swapping out the UART and soldering a lot of wired but a friend suggested using the expansion port to add it. Still a lot of soldering wires but a much neater solution in general. The first addon board for the computer before it's even fully running.

    It's currently connected to a TTL serial to USB adaptor but will add some connections back to the MAX208 on the board.


    I required a few changes to my serial port code but it now seems to be working great.

    A stupid mistake caused a lot of head scratching but at least managed to find a solution so I'll call that a win. Next steps are to test the RAM and then to get a simple monitor up and running to allow me to test the rest of the computer.

  • PCB has arrived

    Stephen Moody02/26/2023 at 13:40 0 comments

    A long soldering job ahead I think.

View all 2 project logs

Enjoy this project?

Share

Discussions

Similar Projects

Does this project spark your interest?

Become a member to follow this project and never miss any updates