 Steph
Steph(Drag and) Drop It Like It's Hot
Installing the UF2 image
The Raspberry Pi Pico W comes with a "permanent ROM UF2 bootloader". What do those words mean? Let's dig in.
- "Permanent ROM" means this functionality can't be overwritten
- The "bootloader" is the basic code that loads our real code, sort of like the BIOS of a PC.
- UF2 is a file format developed by Microsoft, for use in programming microcontrollers. It stands for USB Flashing Format, and it's used for loading firmware easily over USB.
For simplicity, Positivity Pusher is programmed with a custom UF2 image that contains CircuitPython and all the code and other files needed for operation. You'll be done in three easy steps:
Step 1:
Download the latest Positivity Pusher Firmware here.
Step 2:
Install it! All you have to do is plug in the Pico W to your computer while holding down the BOOTSEL button. A removable drive called RPI-RP2 should appear.
Now, simply drag the positivityPusher.uf2 file to the RPI-RP2 drive.
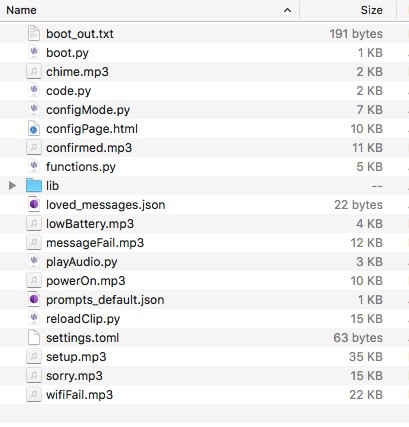
Once the board reboots, you'll see a USB drive now called CIRCUITPY. The contents should look like this:
Step 3:
Almost there! The last step is to provide your API keys for OpenAI and Microsoft's Azure Speech Services. If you need to get those keys, here's how.
Open the file "settings.toml" with any text editor. You'll see this:
OPEN_AI_KEY="Bearer xx-xxxxxxxxx..."
AZURE_TTS_KEY="xxxxxxx..."
Overwrite the placeholders with your actual keys and save the file. (note: the OpenAI key must start with "Bearer ", don't replace that part)
That's it! Your firmware is now installed and ready.
You'll probably hear an audible message asking you to set up wifi now. Press the "configure" button to reset your board and enter the wifi setup process. Supply your network credentials and prompt information. You're now ready to get affirmations!
Discussions
Become a Hackaday.io Member
Create an account to leave a comment. Already have an account? Log In.