 dhruv wadhwa
To make it easy and convenient to follow along I have made the same project on an online simulator, feel free to try out the project. to open the project click on the link given below:
https://wokwi.com/projects/349315762155946580
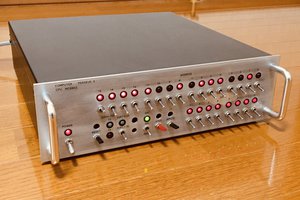
- dip switch to the right selects RUN MODE, towards the left selects PROG MODE.
- 4 buttons arranged in joystick arrangement helps to navigate through RAM in PROG MODE.
- push button below the dip switch is the CLK button. pressing it once will single step, holding it will run clock continuously.
- button towards right of dip switch is RST. pressing once will reset program counter. holding it for few seconds will reset all internal registers.
- 8 buttons on top are for entering 8 bit instruction and data in PROG MODE.
I have written a few example programs such as:
- Addition at location 0x08
- Multiplication at location 0x10
- Fibonacci series at location 0x28
at RAM location 0x00 there is a JMP instruction followed by the address to jump on location 0x01.
so for example to run the Fibonacci series program just enter its starting address ie. 0x28 at location 0x01.
now you can switch to RUN MODE and hold down the CLK button to view the Fibonacci series upto 255 in the output register.
the source code is available on GitHub too: https://github.com/dhruv221/8bit_pipico_cpu/tree/main
or : https://wokwi.com/projects/349315762155946580
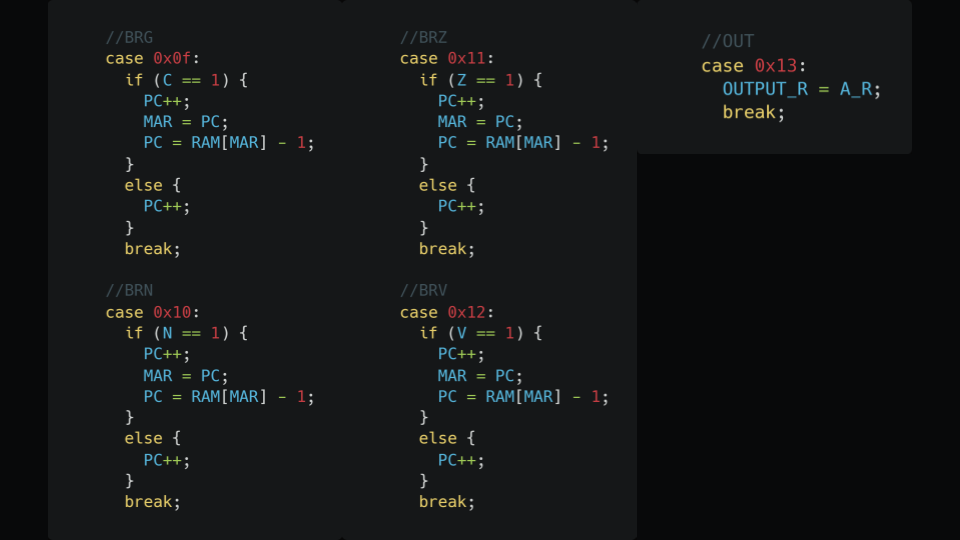
list of instructions:

This product can be used to teach 5 UG level courses starting from:
- Basic Electronics: soldering, buttons, debouncing, pull-up/down resistors.
- Oops with c++: making functions and classes to write a scalable code or firmware.
- Digital design: understand the functioning of different modules in a Von Neumann Architecture.
- Data Structures: implement RAM and stack in c++ to emulate cpu inside a microcontroller.
- Embedded Design: efficiently program microcontrollers like arduino, esp32 or pi pico and implement communication protocols like I2C, SPI, UART etc,
Do write your own codes and share : ) <3
 Mitsuru Yamada
 Alex Bowen
 Foxchild
 Tim Ryan