WIRING

The wiring for this solar powered actuator project is as follows:
LDR to Arduino
- LDR lead 1 – Ground
- LDR lead 2 – 5V (via 10k resistor)
- LDR lead 2 – Analog Pin 0
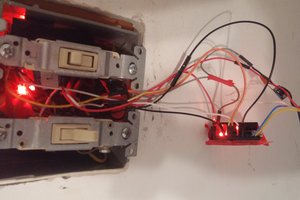
Relay Module to Arduino
- VCC – 5V
- GND – GND
- IN1 – Pin 2
- IN2 – Pin 3
Relay Module to Power Supply and Actuator
- +12V to NC1 (normally closed terminal on relay one)
- -12V to NO1 (normally open terminal on relay one)
- NC1 to NC2
- NO1 to NO2
- COMMON1 to Actuator Lead 1
- COMMON2 to Actuator Lead 2
Using a 2-channel relay module, the above instructions are how you wire this project. This is a very simple setup that is easy to code, but it does have its limitations. If you want to add features such as speed control or force feedback.
CODING YOUR SOLAR-POWERED ACTUATOR
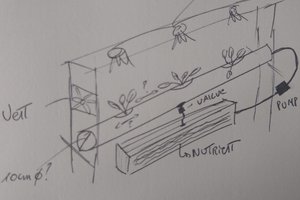
The functionality of the provided code is meant to be as simple as possible. When there is light, the actuator will retract. When it is dark, the actuator will extend. To prevent the actuator from being triggered unintentionally, (if someone walks by and blocks the light, or if a flash of lighting is picked up by the sensor) the change from dark to light (or light to dark) must last at least thirty seconds. This delay can easily be changed by changing the value of “const int triggerDelay”.
The amount of light present is determined by reading the voltage going to analog pin 0. The more light there is, the less resistance our light dependent resistor will have. Since we are using a pullup resistor, this will mean the voltage will go down as the environment gets brighter. The Arduino reads this as a value between 0 and 1028. If you want to change the value at which the state of the actuator will change, simply change the value of “const int threshold” (set to 650 by default).
This code will serve its purpose as is, but the great thing about projects like these is that there is always room for improvement. Feel free to modify this code to better suit your solar powered linear actuator application! A few examples of extra functions that could be added to this code are: a timeout to prevent the actuator from continuing to travel if it does not hit the limit switch within a certain period of time; collision detection via current draw monitoring; or a function that would allow the actuator to be set to various positions based on the amount of light (not just all the way up or all the way down).
/*The hardware required for this project is an Arduino, one light dependant resistor (LDR), a 10K resistor and a 2-channel 5V relay module. Its purpose is to control the extension and retraction of an actuator based on the amount of light that is present.  Written by Progressive Automations 12/02/2020
*/

#define relay1 2 //relay used to extend actuator
#define relay2 3 //relay used to retract actuator
int ldr; //analog reading from light dependent resistor int countOpen = 0;//counts how long sensor is recieving light
int countClose = 0;//counts how long the sensor is not recieving light
const int triggerDelay = 3000;//number of seconds x 100 to wait after lighting changes before triggering actuator const int threshold = 650;//
void setup() {
Serial.begin(9600);
pinMode(relay1,OUTPUT);
pinMode(relay2,OUTPUT);
digitalWrite(relay1,HIGH);
digitalWrite(relay2,HIGH);
}

void loop() {
checkSensor();
}

void checkSensor()
{
ldr = analogRead(0);
Serial.println(ldr);
if(ldr > threshold)//if reading is greater than threshold, start counting
{  countOpen++;//count how long the sensor is not recieving light  delay(10);
}
else
{  countOpen = 0;//reset count to zero if statement is not true
}
if(countOpen > triggerDelay)// wait x seconds before triggering actuator {  extend();//extend actuator
}

if(ldr < threshold)//if reading is less than threshold, start counting
{  countClose++;//count how long sensor is recieving light  delay(10);
}
else
{  countClose = 0;
}
if(countClose > triggerDelay)// wait x seconds before triggering actuator {  retract();
}

}

void extend()
{ digitalWrite(relay1,LOW); digitalWrite(relay2,HIGH);
...
Read more »
 BelgianTinker
 Arduino KIT
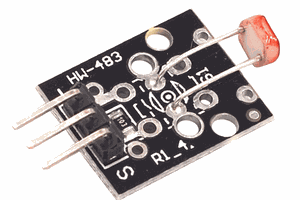
 thjubeck