Subhajit
In this ESP32 tutorial, I have explained how to connect the TTP223 touch sensor with ESP32 to control relays. We will discuss what changes you must make in the circuit and source code to add to control relays with the TTP223 touch switch.

So after going through this article, you can add the TTP223 sensor to any of your home automation projects.

What is the TTP223 capacitive touch sensor?
The TTP223 is a compact capacitive touch sensor module that detects touch or proximity. It operates with low power consumption, making it suitable for battery-powered devices. When a conductive object, like a finger, approaches or touches the sensor pad, it provides a digital output signal (high or low) to indicate touch status.
During this article, I have covered the following topics:
- How to control relay with an inbuilt capacitive touch sensor of ESP32.
- Limitations for controlling multiple relays without TTP223 sensor.
- Control relays with TTP223 touch sensor. Explained the circuit and source code for connecting the TTP223 touch sensor.
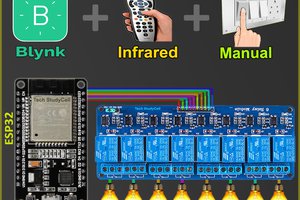
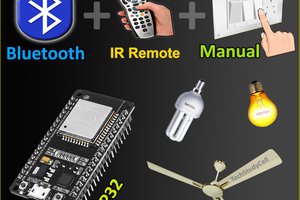
Here I have used one of my previous Blynk projects. So with this home automation project, you can control the appliances with Blynk IoT, Bluetooth, IR, and touch switch.
So, you can easily make this touch-sensitive home automation project at home just by using an ESP32 and relay module or you can also use a custom-designed PCB for this project.
Required components:
- ESP32 DevKIT V1
- 4-channel 5V SPDT Relay Module
- TTP223 4-channel touch sensor
- TSOP1838 IR Receiver (with metallic case) Optional
- Any IR Remote
You can make this project just by using ESP32, an 1838 IR receiver, and a 4-channel relay module. But if you use PCB then you need the following components.
Required components for PCB:
- ESP32 DEVKIT V1
- DHT11 sensor
- 1838 IR receiver (with metallic case)
- Relays 5v (SPDT) (4 no)
- BC547 Transistors (4 no)
- PC817 Optocuplors (4 no)
- 510-ohm 0.25-watt Resistor (4 no) (R1 - R4)
- 1k 0.25-watt Resistors (6 no) (R5 - R10)
- 10k 0.25-watt Resistor (1 no) (R11)
- LED 5-mm (6 no)
- 1N4007 Diodes (4 no) (D1 - D4)
- Push Buttons (4 no)
- Terminal Connectors
- 5V DC supply
Inbuilt Capacitive Touch Sensor of ESP32
The ESP32 is a popular microcontroller module that comes equipped with various built-in features, including an inbuilt capacitive touch sensor. This capacitive touch sensor is a part of the ESP32's GPIO (General-Purpose Input/Output) pins, which can be configured to sense touch or proximity without the need for additional external components.
- Sensing Mechanism: The capacitive touch sensor on the ESP32 works by measuring changes in capacitance. When a conductive object (such as a human finger) approaches or touches a capacitive touch-enabled GPIO pin, it causes a change in the capacitance, which is detected by the ESP32.
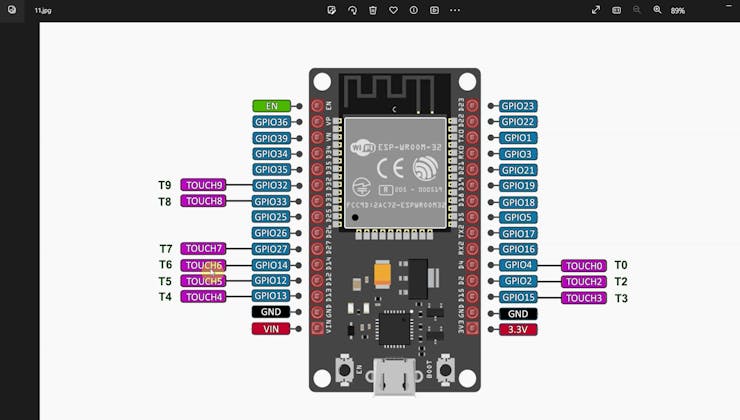
- Number of Touch Pins: Here we are using the DOIT ESP32 DevKIT V1 model, so it has a total of 10 GPIOs that can be used as the touch pin. (Please refer to the Pinout diagram on the top).
- Configuration: To use the capacitive touch sensor, you need to configure the GPIO pin as a touch input using the ESP32's software development environment, such as the Arduino IDE or ESP-IDF. You can set the sensitivity and other parameters for each touch-enabled pin.
ESP32's software libraries and development tools provide easy-to-use functions for configuring and reading the capacitive touch sensor values, simplifying the development process.
Control Relay Without External Touch Switch

Here I have used the inbuilt Capacitive Touch Sensor of ESP32.

If you want to control a single relay, then refer to the above circuit.
The GPIO D27 which T7 is used as the Touch pin.
And the relay is connected to the GPIO D13.
Please refer to the following code for the 1-channel relay.
Now if you want to control multiple relays then I will recommend...
Read more »