-
Drum feeder (2)
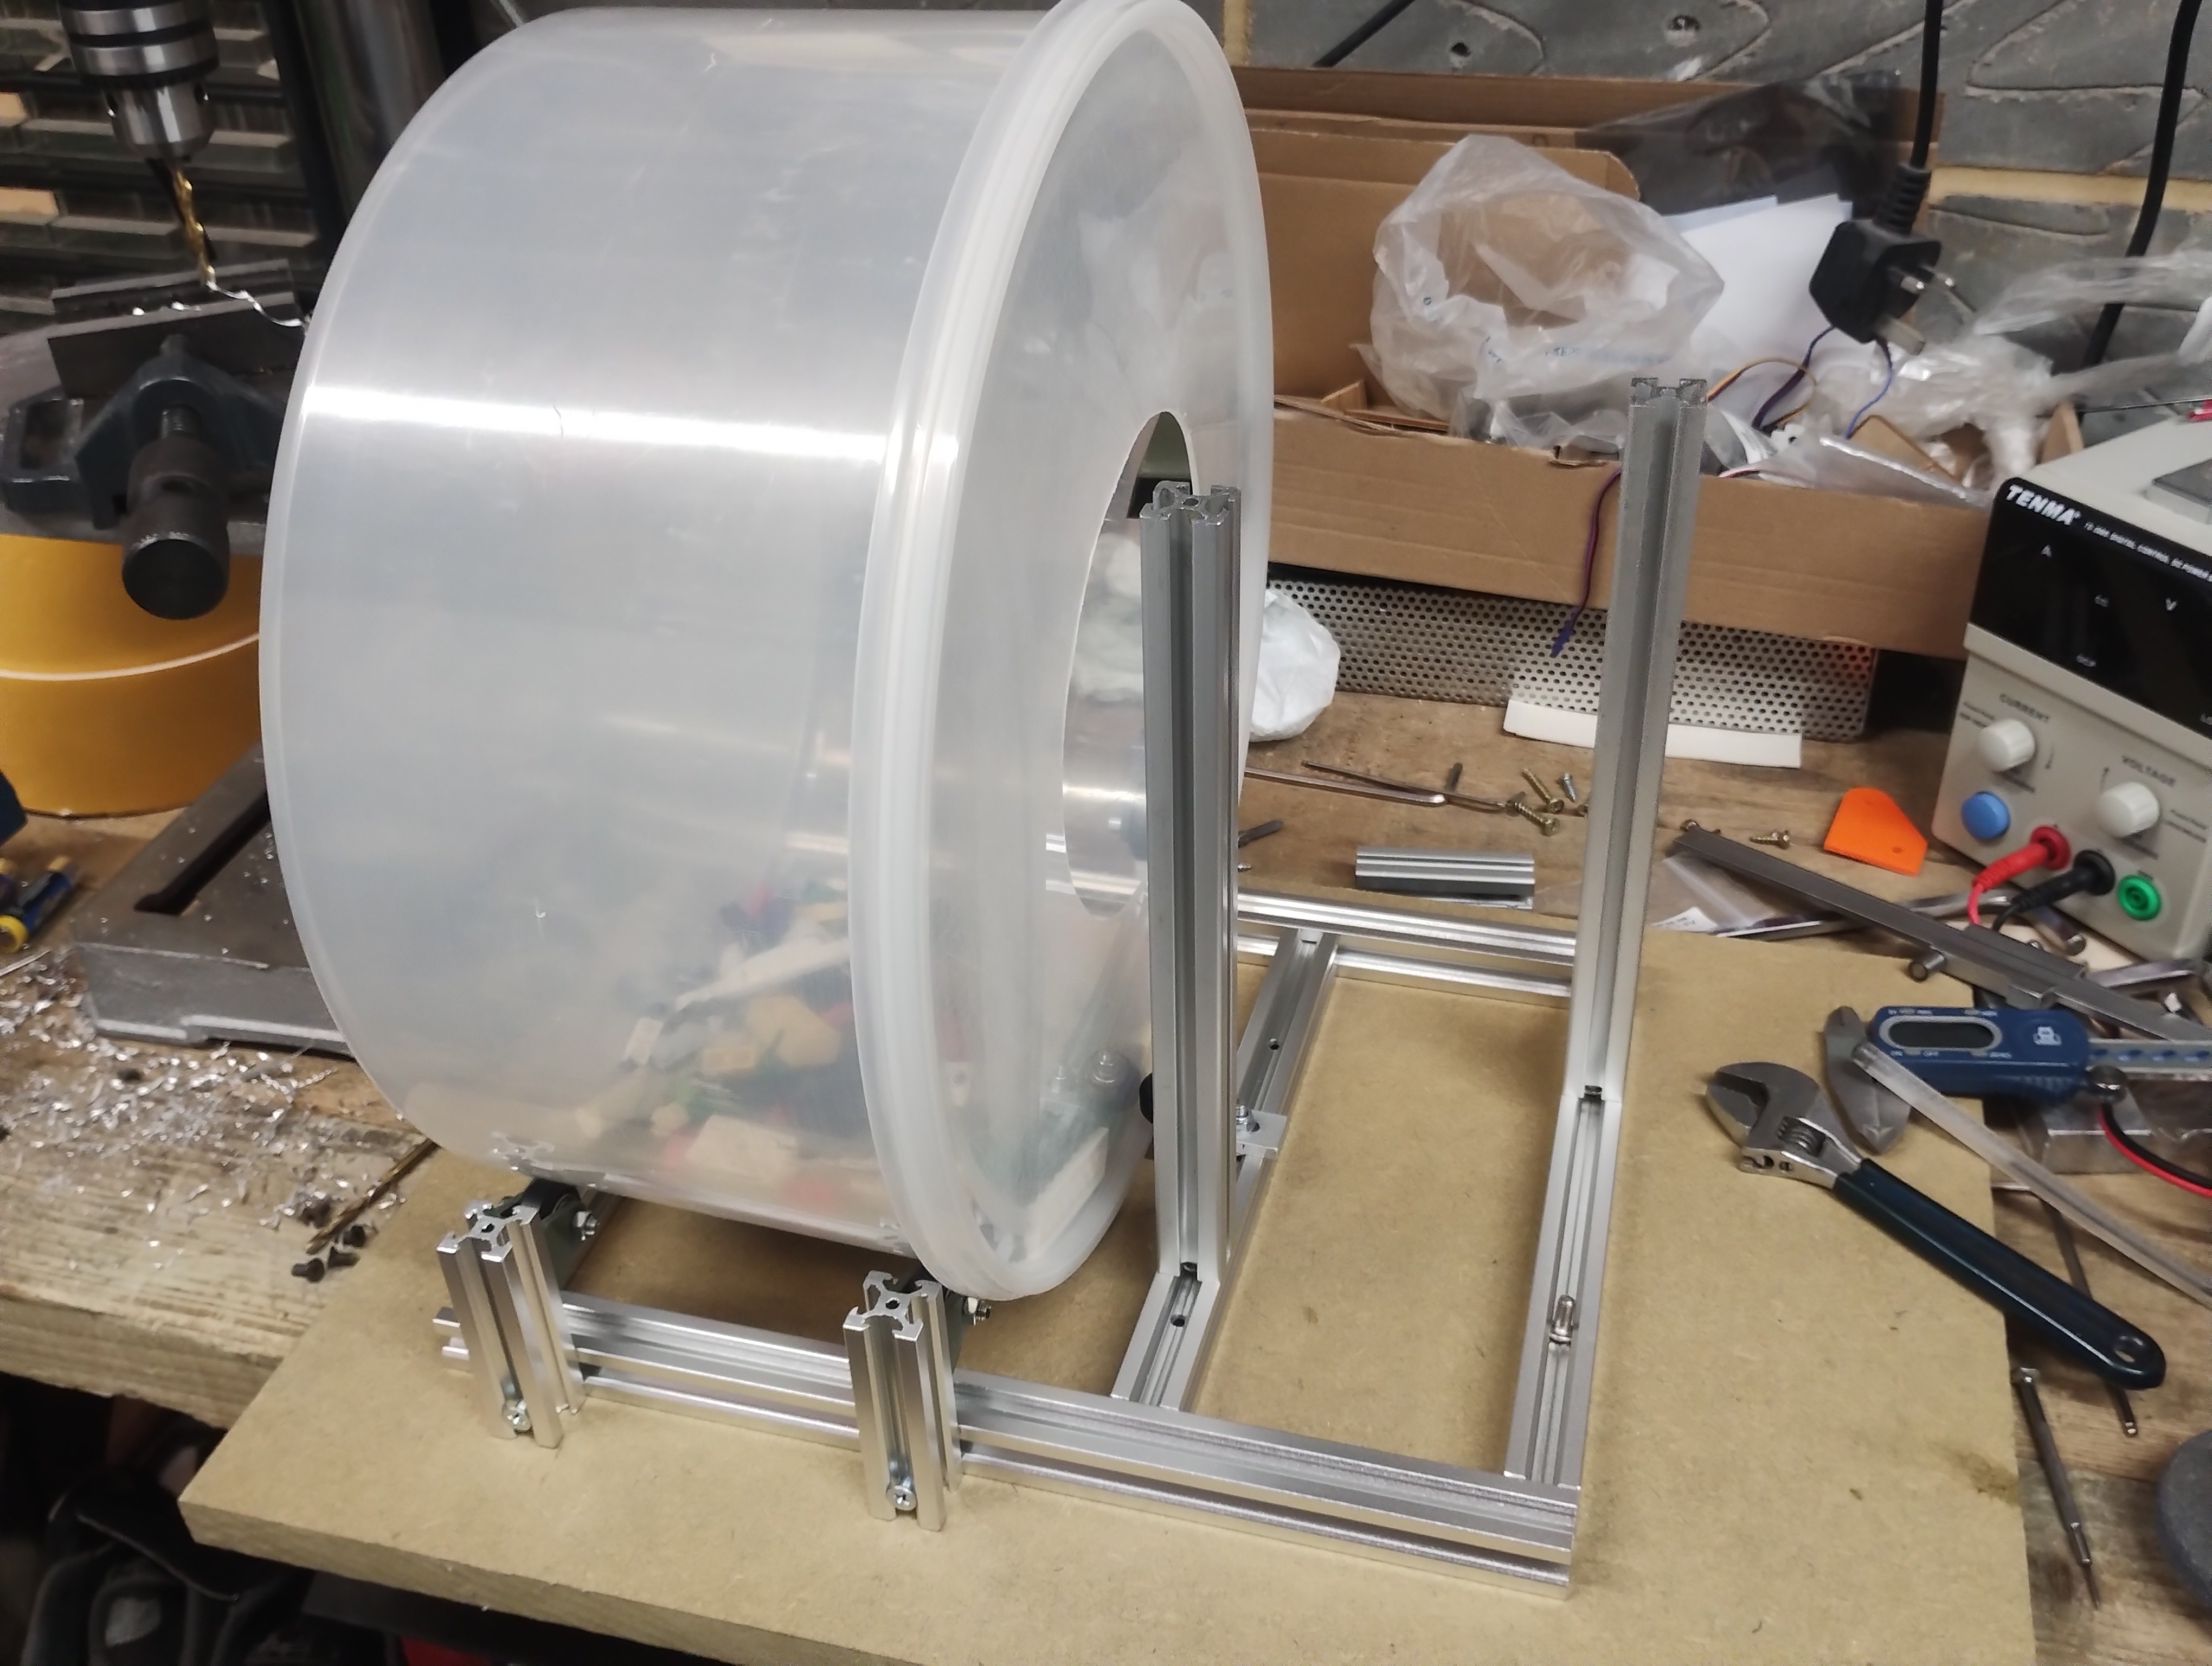
4 days ago • 0 commentsThe drum feeder is looking good now. After a bit of trial and error making paddles/scoops from card I've committed to a 3D printed design that works well enough for a first attempt. Physically positioning all the various parts was getting really tricky using the wooden lash-up so have also started the 'finished' build in 2020 profile and M5 fittings.
![]()
I think I'll try a belt-drive to power it, from a DC motor and reducing gearbox. Only problem with a belt is that the drum has a slight draft to the sides, meaning that the belt will undoubtedly tend to wander off...
-
Drum feeder (1)
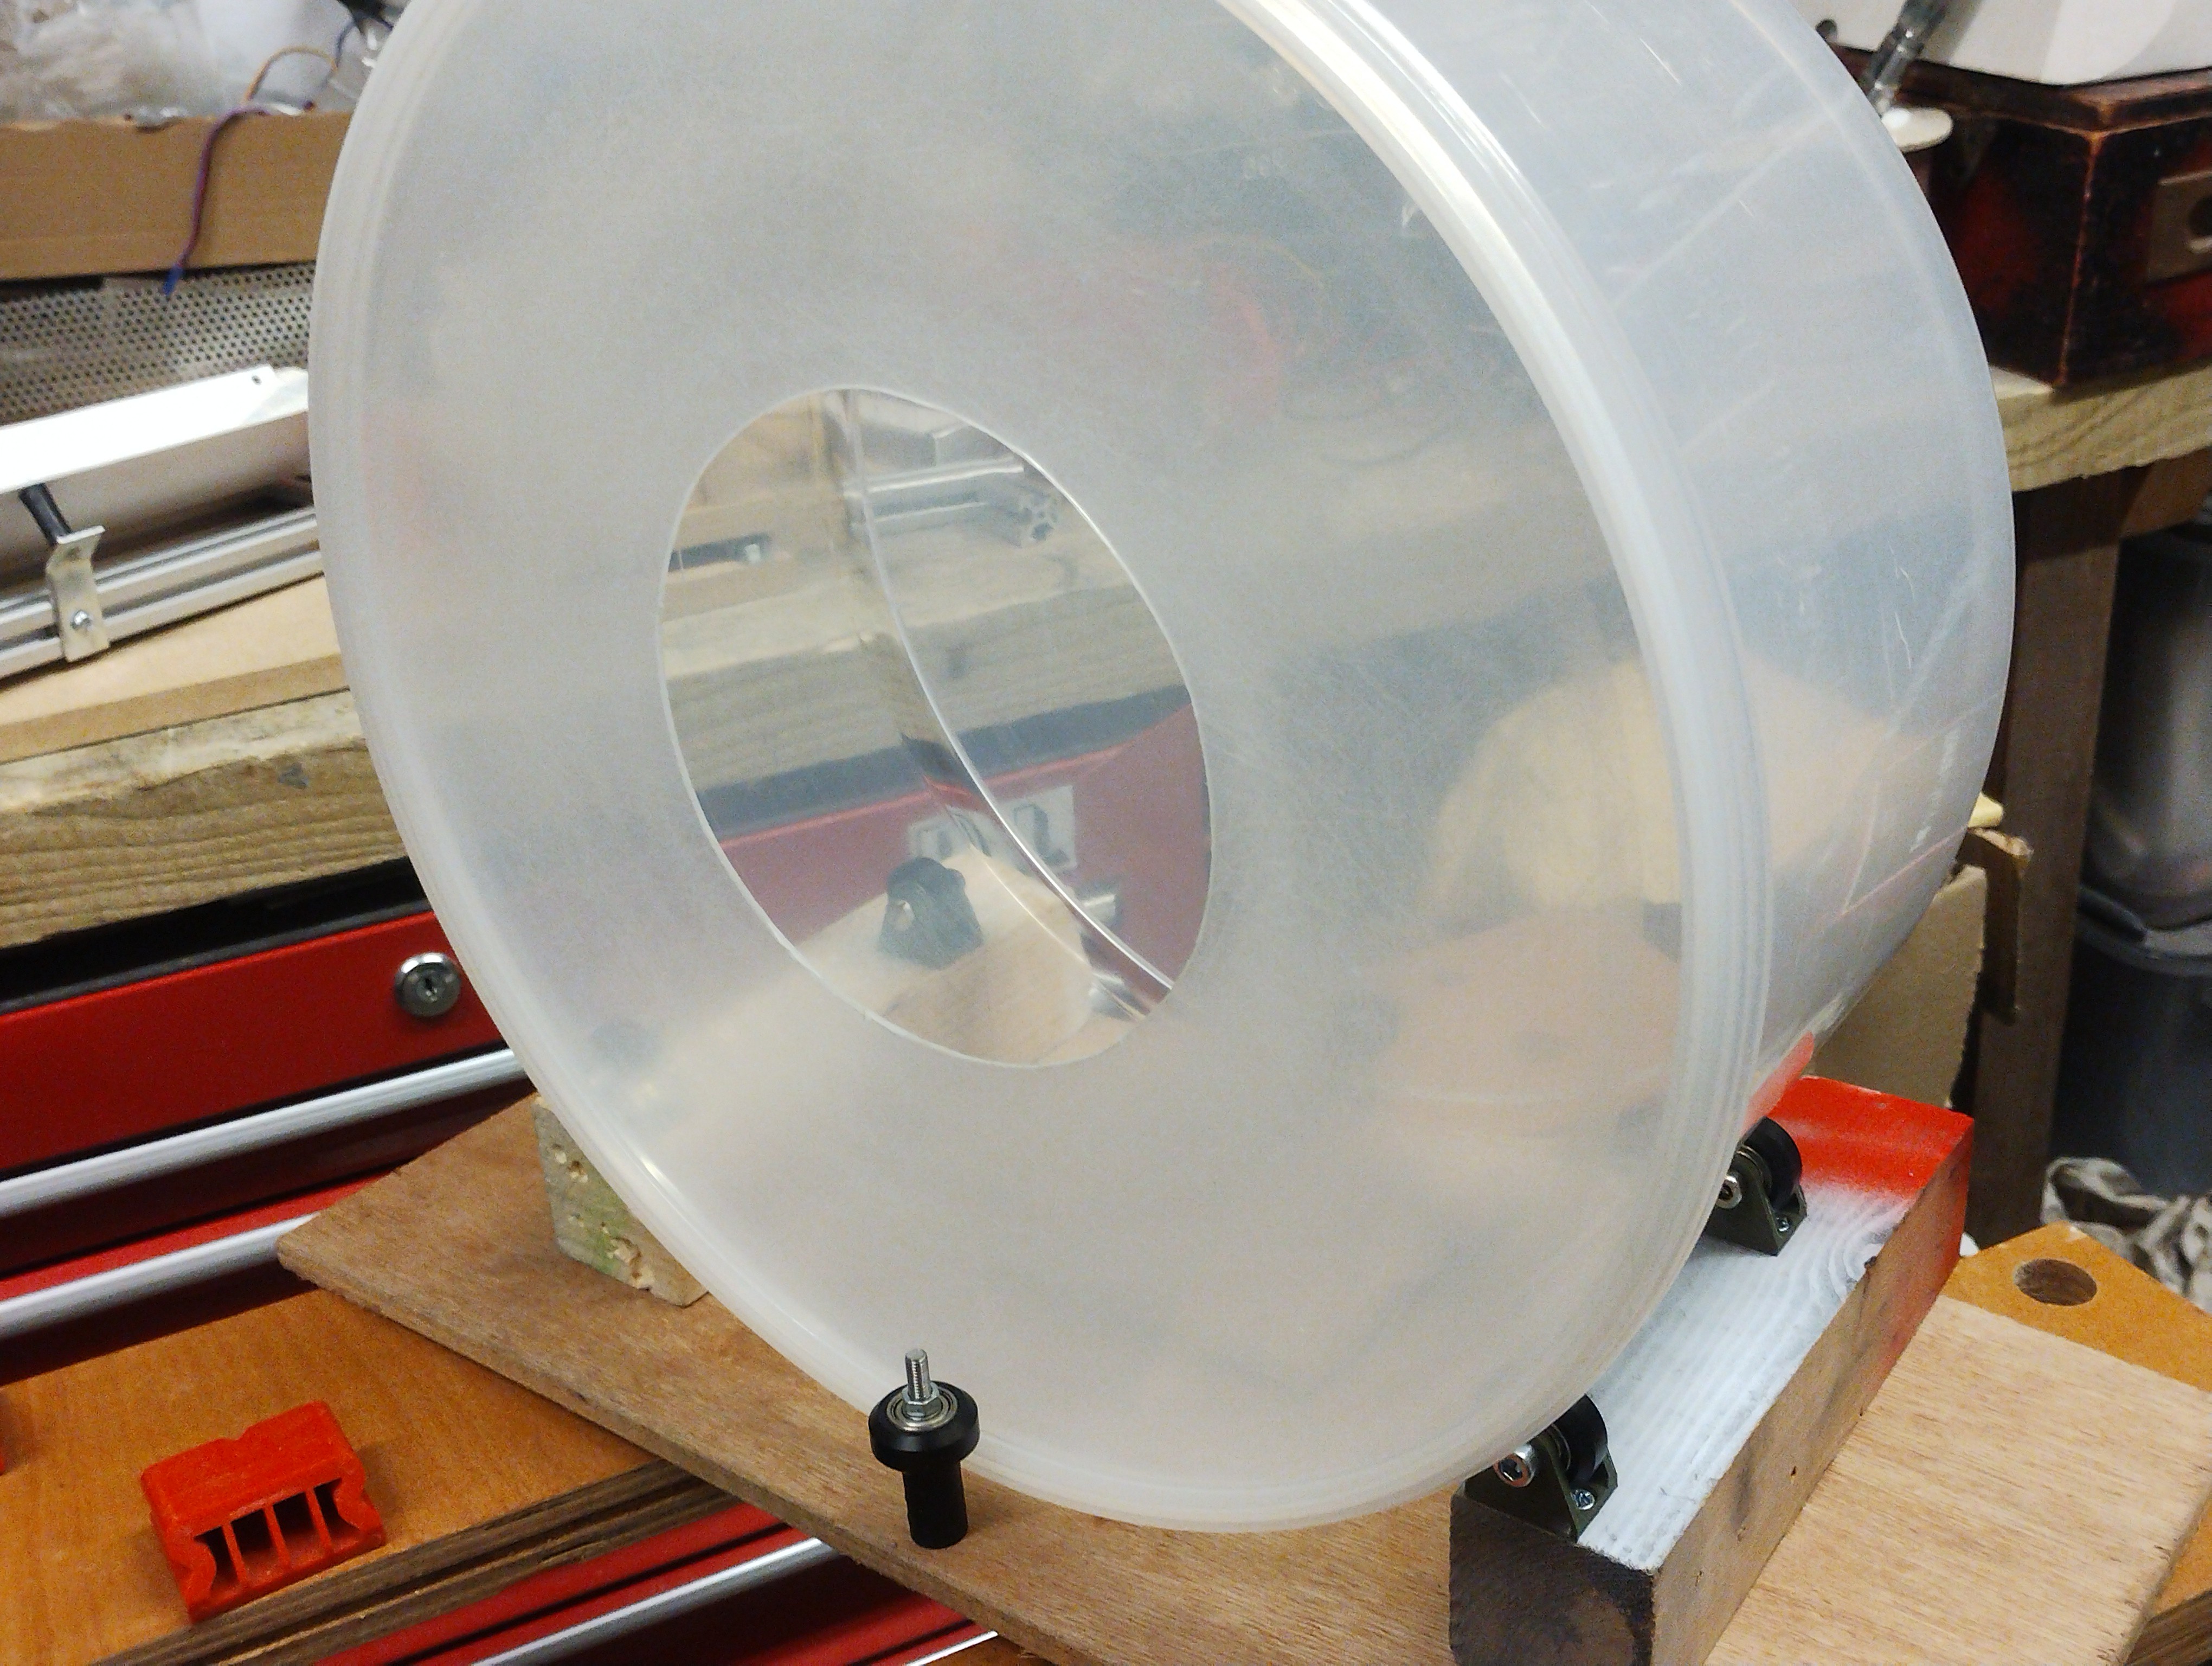
05/08/2024 at 20:12 • 0 commentsSo after a long break to get some other projects finished, I'm back to the Lego sorter and its drum feeder.
![]()
It may look like a food container, sat on some rollers, and with a hole in the lid, but it's much more than that! Actually, not really. That's exactly what it is.
-
Adding a motor controller
02/17/2024 at 16:05 • 0 commentsUsing a bench supply to control the current (and therefore speed/vibration frequency) of the vibrating feeder was getting a bit annoying, so I finally took the plunge and added an H-bridge driver and PWM control. Initially I tried an L9110S-based module (very cheap on the 'bay) but it wasn't up to it and kept overheating. Plus it doesn't support 'coasting' so ended up being quite noisy and inefficient.
I swapped it out for an L298N-based module (almost as cheap) which is much better. By driving the ENABLE line with PWM, and holding the IN1/IN2 inputs H/L for fixed direction, it's possible to employ coasting, which keeps the motor happier.
However, the Arduino's built in PWM frequency (977Hz) is very noisy, and changing the prescaler to get other values is no better (3.9kHz is also noisy, 31kHz is too fast for the driver). So ended up with a bit of code to set it at about 15kHz, which is perfect. Pretty much silent (to my deaf ears anyway) but with smooth power control and no overheating.
Plus, the L298N has dual outputs, so I've still got a spare channel I can use to control the drum feeder's motor, when I get to that stage.
-
Vibrating feeder first try
01/26/2024 at 12:51 • 0 commentsAfter quite a lot of trial and error on the feeder, I've settled on a design where one end is a hinge, forcing the vibrating motion to be confined to up-down only, and with low amplitude at the hinge end, and a large amplitude at the free end. It seems to work well at separating parts as long as there aren't too many at once:
Obvs this is a dirty quick prototype using scraps lying around, I'll do a neat version one day out of profile aluminium...
-
Colour sensing (5)
01/24/2024 at 09:04 • 0 commentsOk, definitely last log on colour sensing! I think it's good enough now.
I've significantly sped up the colour sampling code by using the low-level read16() rather than the getRawData() library function, since the latter includes an unnecessary delay equal to the integration time. Another significant step is to read a few (e.g. 5) samples in quick succession starting as soon as the brick's presence is detected, and then picking the RGB measurement corresponding to the brightest (largest C) of the series. Colour accuracy seems best when the reflectance is as high as possible.
Timing was still a bit tight, but I noticed that I could make the diverter stepper motor go a bit faster than previously thought - the battery I'd been using was flat! Charging it up made quite a difference. Using the slo-mo mode on my phone, and stepping through the videos frame-by-frame, I've measured the time it takes for a piece to fall through the diverter at 160-190ms. By contrast, the diverter takes - at most - 125ms to move. In fact, when it only needs to move one place (nearest neighbour) it has finished moving before the piece even enters the top of the tube! Eeeek that's fast!
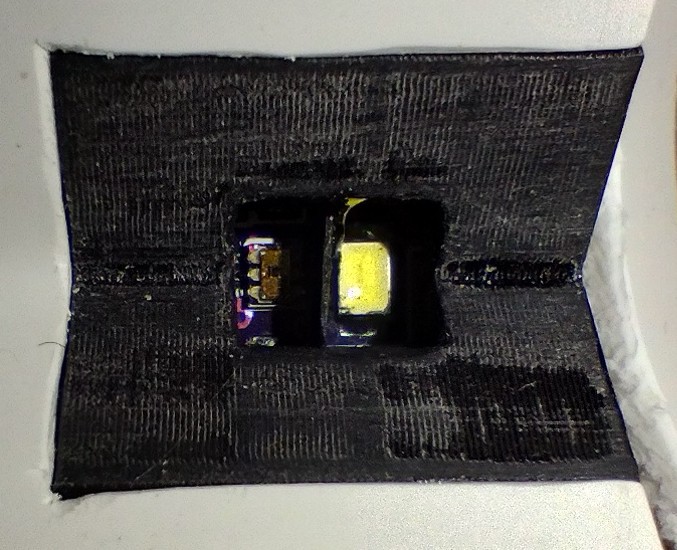
A bespoke, 3D-printed 'hood' and 'scoop' part, painted inside with BLK3.0, now cuts out most of the stray light, and helps funnel the pieces into the diverter.
Oh, one last thing, for pieces that are classified by hue as "white, grey or black" the code now does an additional classification based on brightness to attempt to distinguish between black and white/grey.
Video to follow....
-
Colour sensing (4)
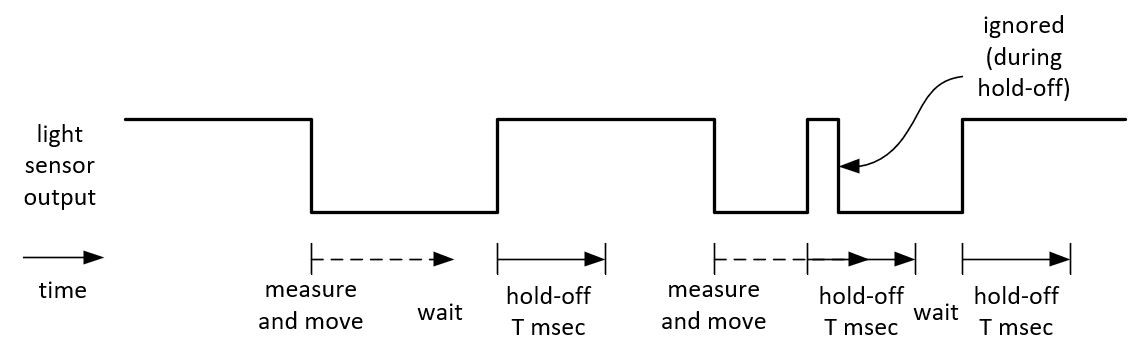
01/17/2024 at 14:35 • 0 commentsWith a light sensor positioned to detect the light from the illuminating LED it can now sense when a brick arrives and leaves. If two bricks come down together (of different colours) we need to make sure the diverter isn't moving whilst one is in transit else it will jam. So we need to implement a 'hold off' period where new bricks don't trigger a change of position:
![]()
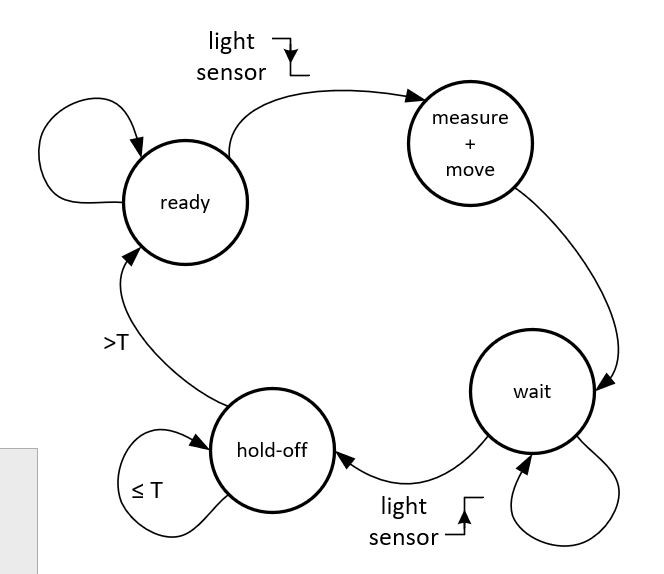
This can be implemented using a state machine, with rising- and falling-edge interrupts driving some of the changes of state:
![]()
This is now coded up and seems to work ok, just need to adjust the value of T (about 100ms) to get the best compromise between fast changing of output bins and no jamming.
Also, I've added a thin piece of black card between the light source and colour sensing chip, plus BLK3.0 black paint on all the surfaces, to try and block any direct illumination which I'm sure will help:
![]()
[Update: this is now working very nicely, with pretty much zero instances of jamming the mechanism. Even the very smallest Lego pieces (4-5mm) get correctly detected. The remaining challenge is to ensure they are fed in one-at-a-time with ~100msec or more gaps between them.]
-
Colour sensing (3)
01/11/2024 at 15:48 • 0 commentsI've implemented an algorithm for colour classification that seems to work ok:
- detect brightness changes from below to above threshold, i.e. a piece arrives at the sensor
- each sample is matched to nearest colour in a library of about 30, using 'redmean' distance
- wait until M out of the last N samples are the same (because the detected colour can change significantly as the piece arrives and as it leaves the sensor, where it's only partly in the field of view)
- determine output bin and move diverter
- wait small fixed delay for piece to fall down diverter
- repeat.
This seems to work ok for big bricks, but small pieces will be a problem because they are moving too quickly to get more than 2 or 3 samples total, so the "M out of N" consistency check will fail. This is exacerbated by using a fixed (non-vibrating) section of feeder which needs to be at a fairly steep angle to ensure pieces don't stop, but means they're moving pretty fast by the time they reach the sensor:
- smallest piece/dimension: 8mm
- max. speed of travel along feeder: 0.8m/s
- min. time passing sensor: 8mm / 800mm/s = 10ms.
- sensor rate: 5ms/sample (including processing)
- min. number of samples: 10 / 5 = 2
But it works well enough as a starting point:
An alternative plan I'll try next is to position a second light sensor above the feeder, trained to detect the light from the illuminating LED. When the light dims sufficiently, we can be pretty sure there's a piece in just the right place, so should be able to exactly time a single colour measurement (taking only 5msec) rather than needing a whole string of them. [Update: yes this approach works very well! More to follow in next log.]
-
Colour sensing (2)
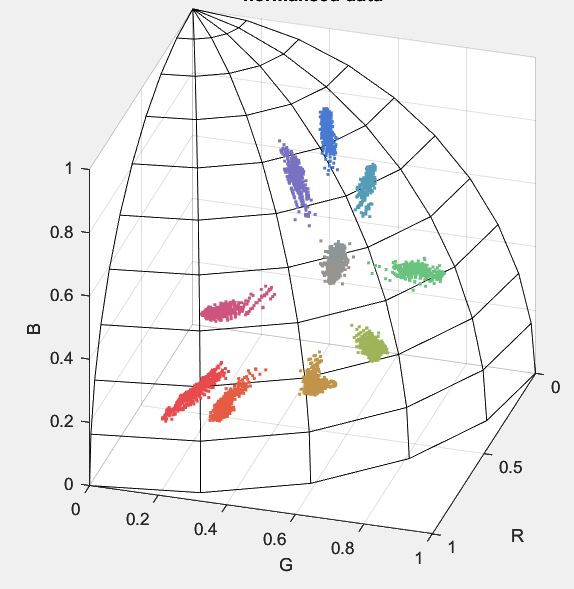
01/10/2024 at 09:32 • 0 commentsTrying a different approach, I took a whole bunch of raw sensor readings whilst holding/moving/rotating different coloured bricks in front of the sensor, at a variety of distances from 5mm to about 20mm. Then imported the readings into Matlab so that I could scatterplot them in 3D (rgb-space) and observed that all the points relating to a certain brick formed a straight line. One end tends towards the origin (black, i.e. poor illumination) but the other end does not tend towards (1,1,1) i.e. white. This means that the shade or hue(1) of each brick does not change with distance or brightness of illumination. We humans might see a white, specular flash from a shiny face, but the sensor just sees brighter red (or whatever colour). I'm sure this effect is obvious and well-known, just not to me.
![]()
RGB values normalised to unit magnitude (very low brightness outliers removed) I think it means, as I suspected, that I can classify the bricks' colours by normalising the rgb values to account for brightness of illumination, resulting simply in hue and ignoring brightness. The down-side is that black, grey and white bricks all get classified the same, and cannot be separated. Maybe that's not a problem, at least for now.
It's also surprising how much 'desaturation' there is, e.g. the green and blue channels show significant responses when shown a 'red' brick. Perhaps it's correct, or perhaps I'm getting light from the illuminator LED scattering directly onto the sensor by accident.
(1) Not really 'hue', since it includes all levels of saturation including grey, so really it's a mix of hue and saturation.
-
Colour sensing
01/08/2024 at 12:08 • 0 commentsI've parked the feeder problems for now, since the TCS34725 colour sensor arrived in the post the other day and I've been playing with that instead.
I knew it was going to be tricky, and I wasn't wrong, but it's halfway there. I can now classify a brick from a library of 'known' colours with reasonable success, even when it's placed at different distances (and therefore vastly different lighting/brightness) from the sensor. I'm using a modified form of the 'redmean' colour distance algorithm, extended to include a fourth brightness dimension using a weighting factor that I'm still experimenting with.
I'm also going to try and find a tiny lens to fit to the sensor, so that its field of view is focussed to a small spot, meaning that the Lego piece size doesn't matter too much. I'll probably also try a separate, more distant light source so that lighting is a bit less dependent on sensor distance.
Nothing much to see yet, photos to follow...
-
Not feeling the vibes...
01/04/2024 at 10:38 • 0 commentsAaagh. The vibratory feeder is turning out to be as difficult as I'd feared.
The plastic vee channel I'm using is so soft that its fundamental resonant mode occurs at pretty low frequencies - too low to make the Lego pieces dance about and separate themselves. Worse, the motor that drives it is so tightly coupled that it too gets locked into the resonances (particularly mode 2) and it becomes impossible to change its speed by simply increasing the current through it. After a lot more experimenting I'm still stuck with mode 2 that includes a dead spot (node) where the vibrations are weak, and the pieces don't move along properly.
I think what I need is a stiffer channel, so that I can drive it at higher frequencies but still below the first harmonic - i.e. the fundamental mode with the uphill end relatively fixed forcing the downhill end to waggle the strongest, no nodes. Cantilever beam, mode 1. Or even operate below first resonance?
Notes to self:
Beam type mode 1 (KnL)2 Fixed-free (cantilever) 3.52 Free-free 4.73 Fixed-fixed 4.73 Since frequency is proportional to (KnL)2, might want to choose free-free or fixed-fixed as they have slightly higher fundamental mode frequencies. Both have nodes though. Maybe fixed-fixed, and take of the pieces just before the exit end (where the node is)?
Clearly more to do...
Colour sorting machine for Lego
Automatically sort random Lego pieces by colour!