Close
0%
0%

Delta Printer - Capacitive Nozzle Probe

Test accuracy and consistency improvements of a capacitive bed probe triggered by contact with nozzle.

Similar projects worth following
Inaccuracies in delta 3d printer construction results in the effector platform not remaining parallel to the print bed. Probes rigidly attached to the platform will tilt with the platform resulting in inaccurate measurements (variable probe offset). The magnitude of the platform tilt can vary based on x-y position and may even be unstable or chaotic as the travel path taken to reach a probe point influences the direction and magnitude of effector platform tilt. Manual paper probing can be used to mitigate the error introduced by traditional switch based probes. The project will attempt to implement a capacitive probe that mimics the paper test execution but allows for automatic probing and machine repeatability.

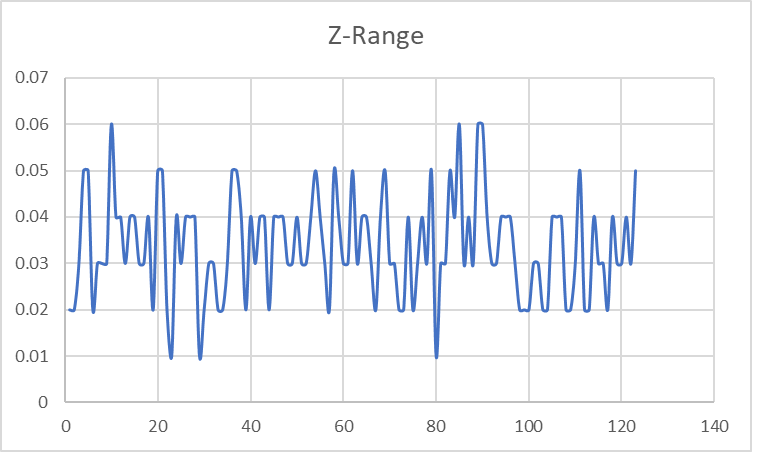
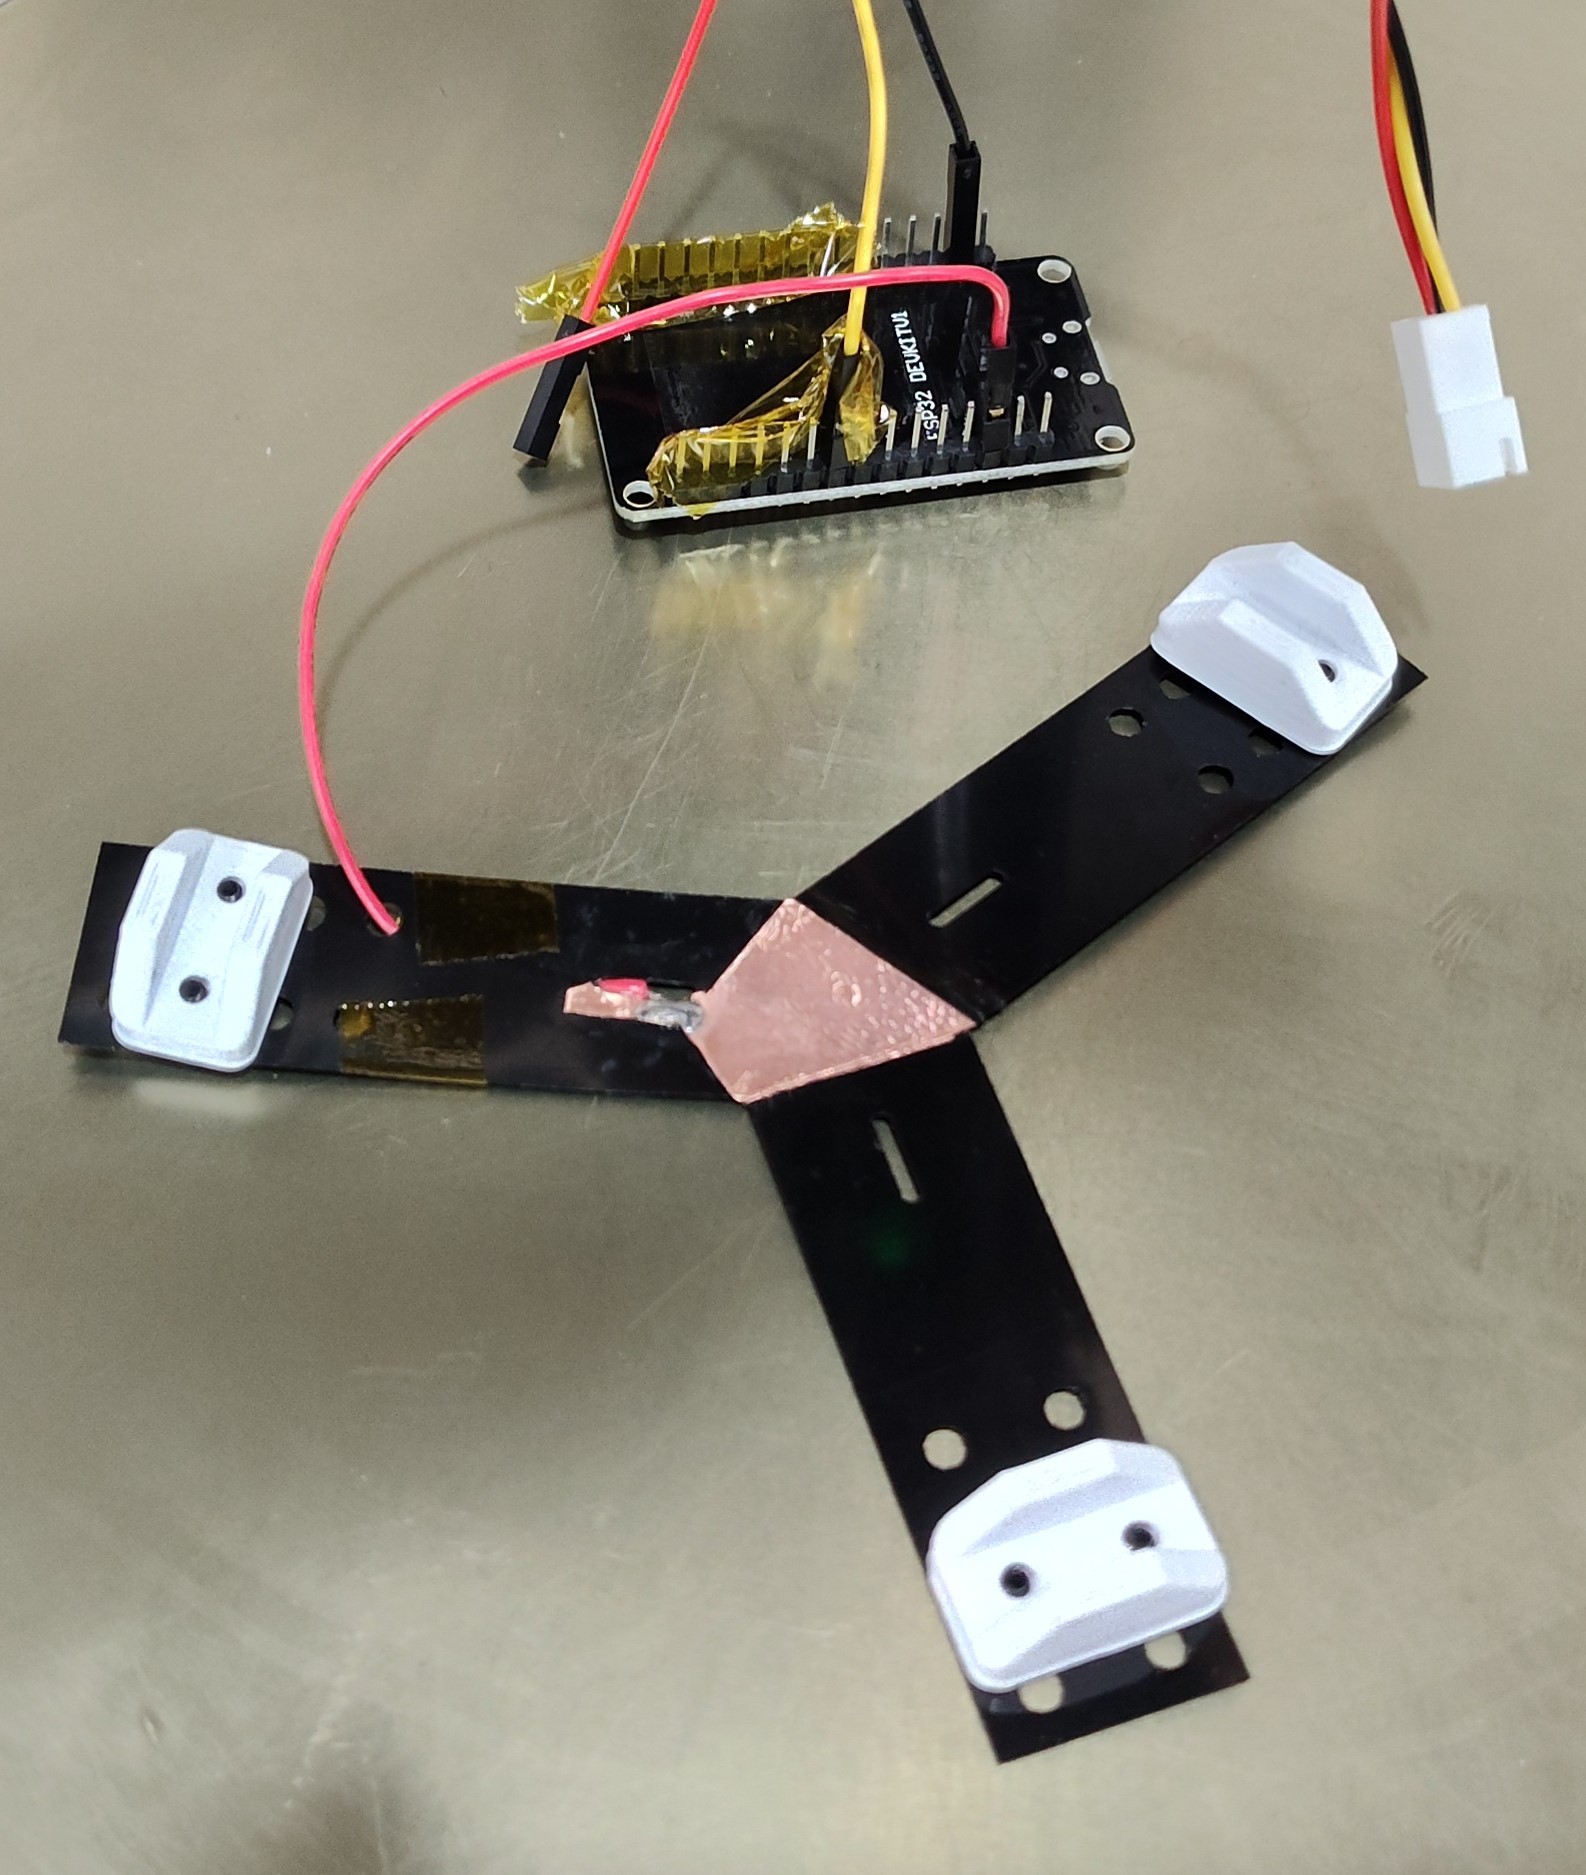
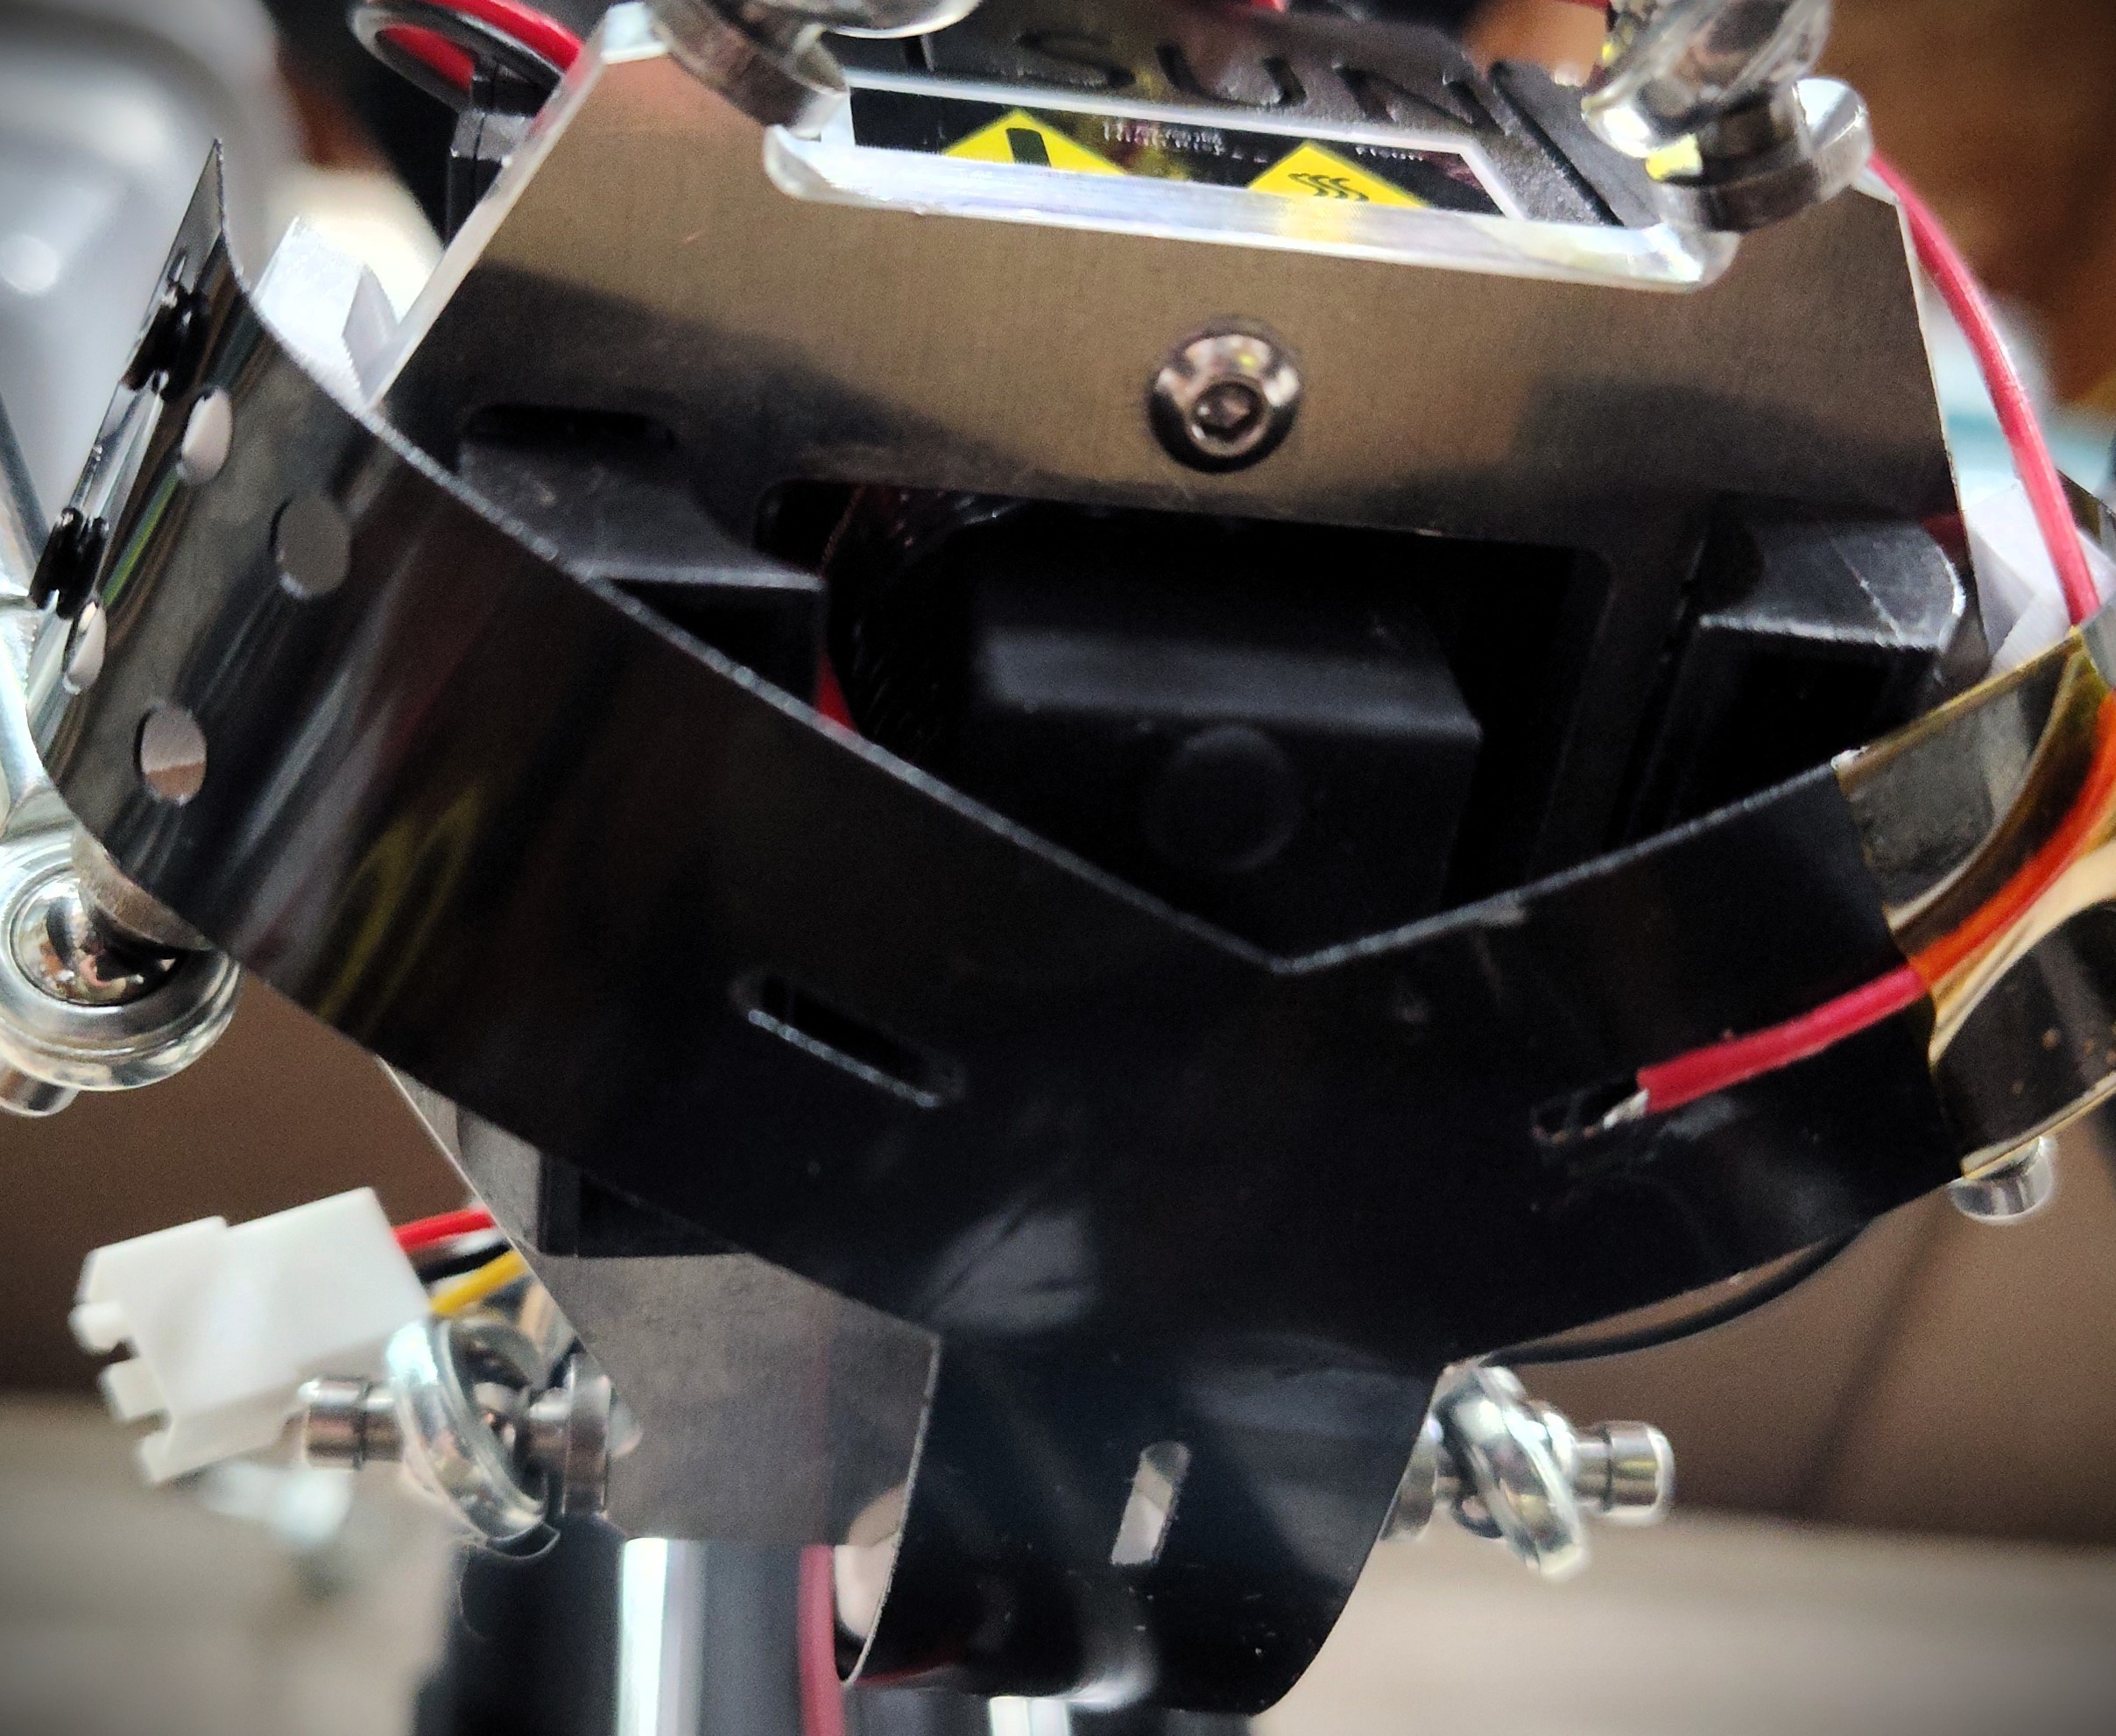
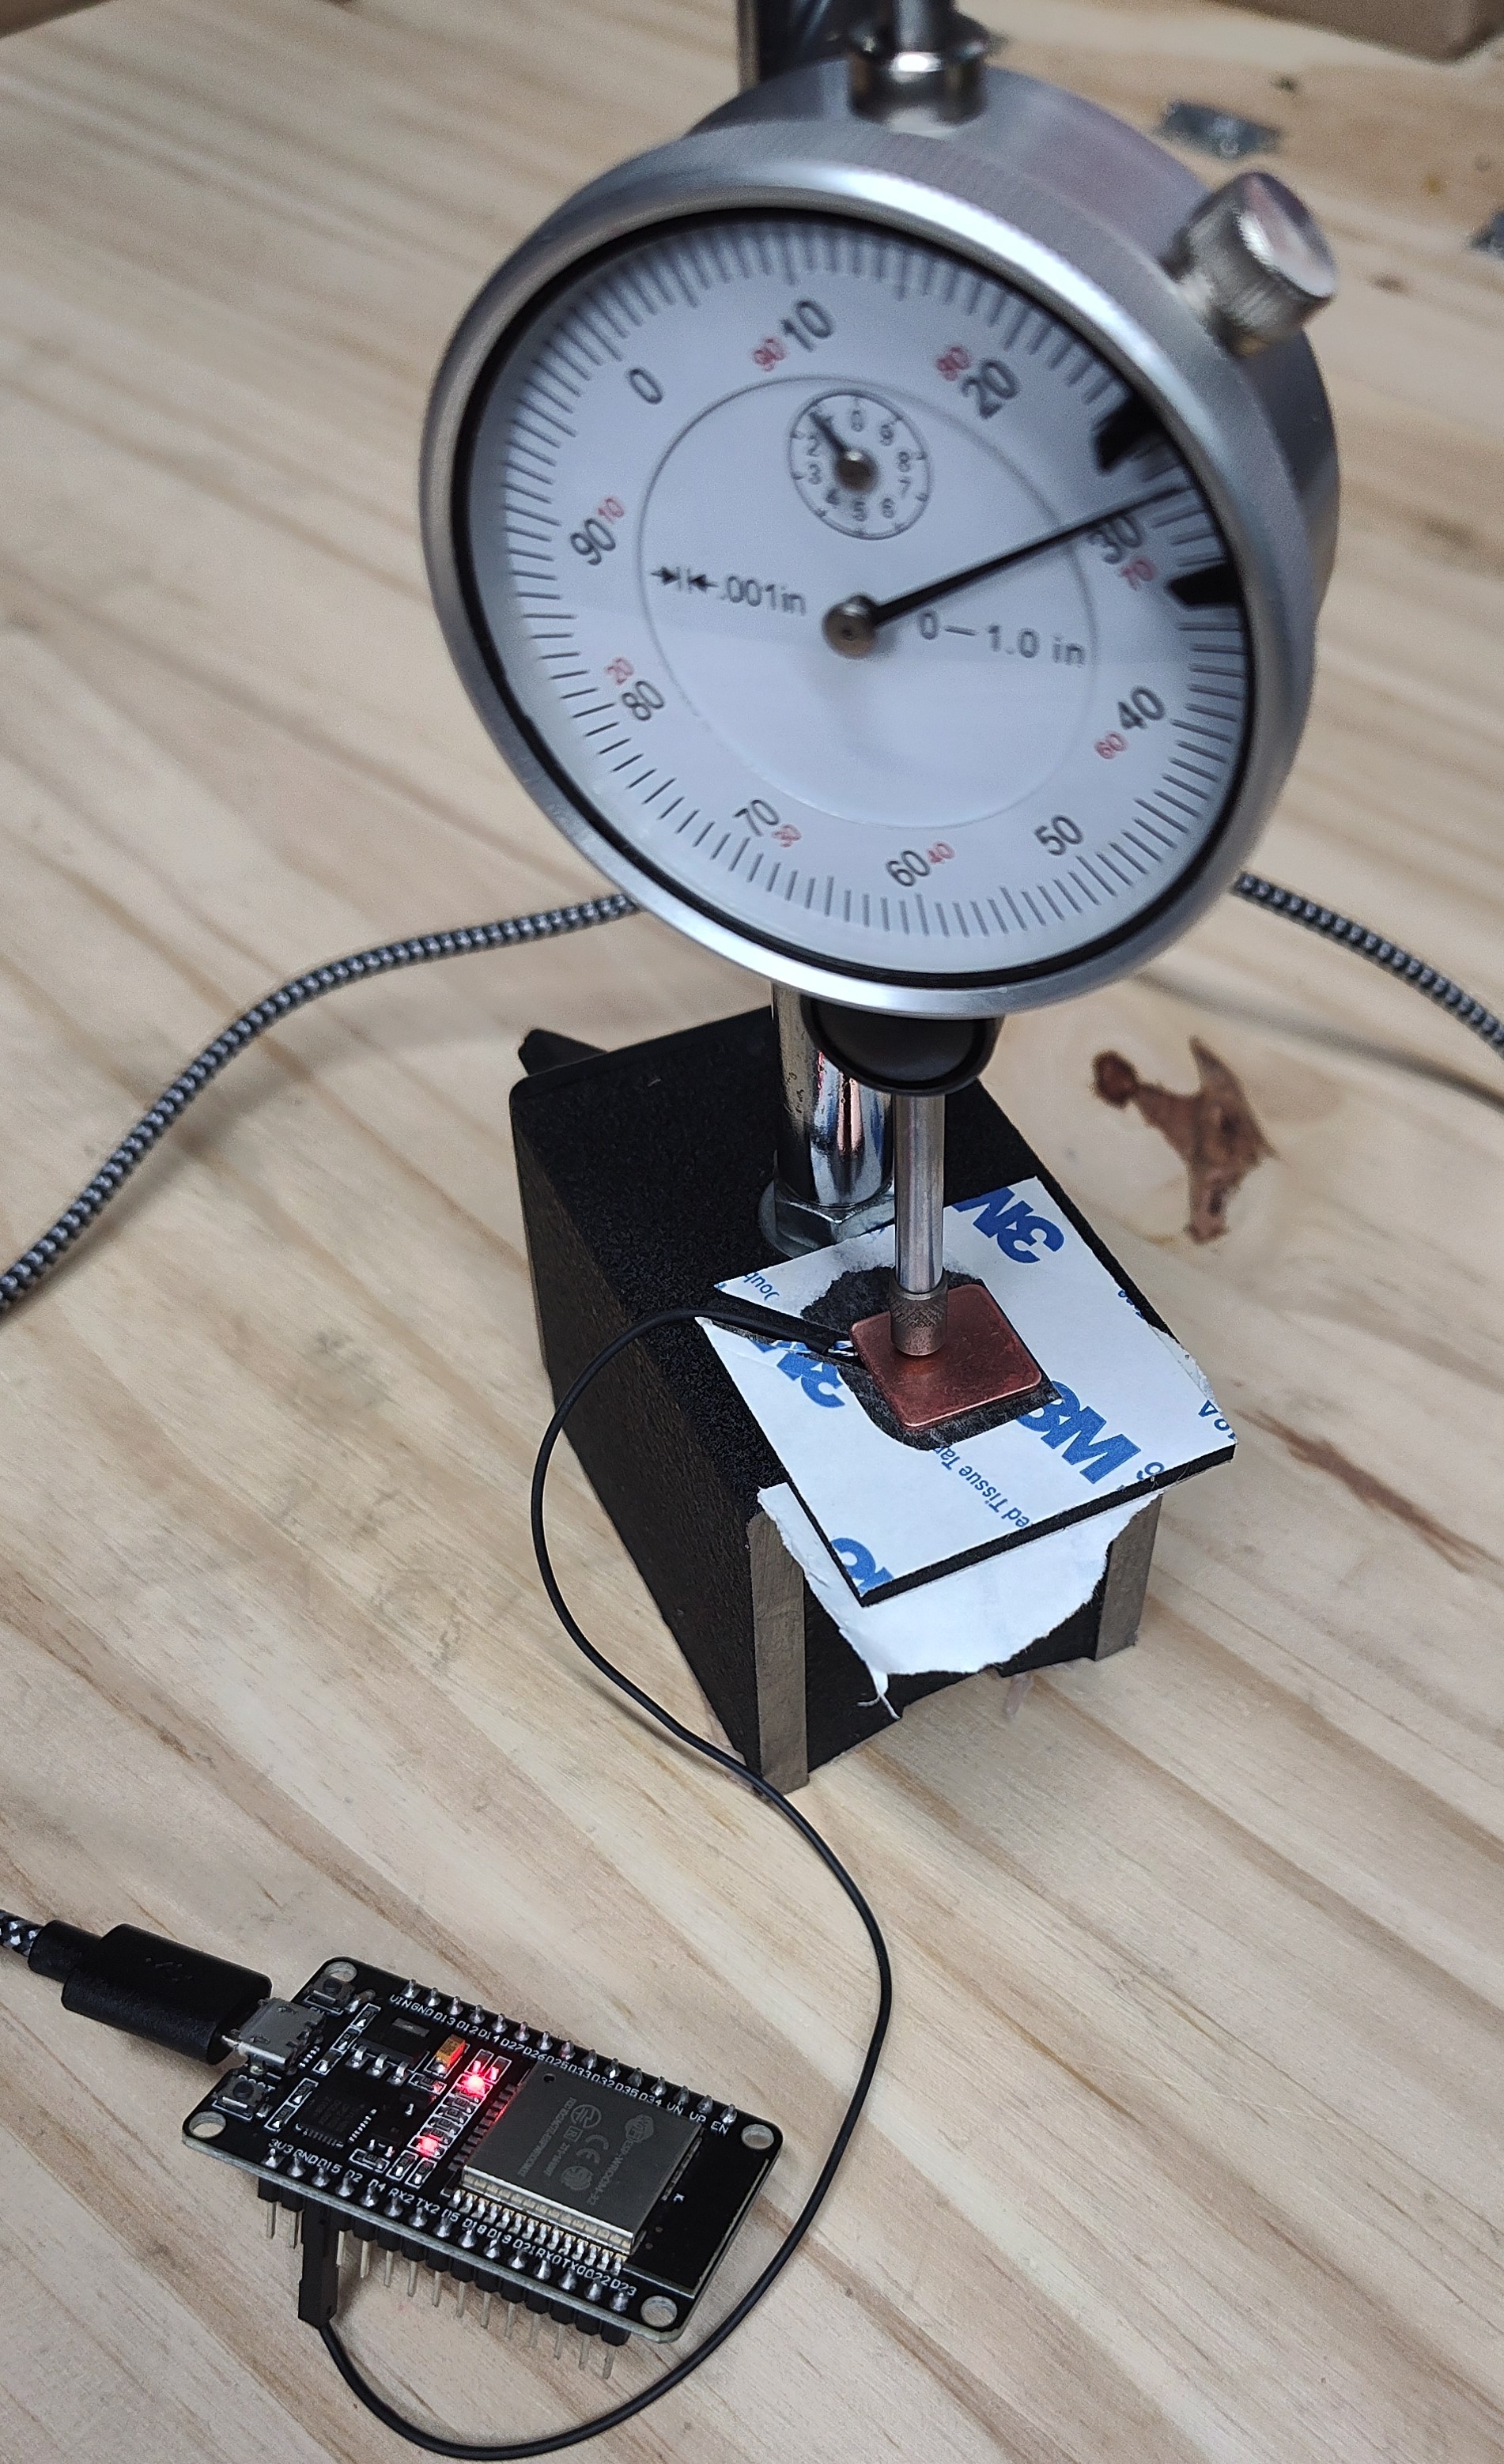
The delta calibration guide for klipper recommends a 0.025 mm consistency or better for automated probing.  Testing of this probe location bias on my FLSUN QQ-S Pro with the stock magnetically attached probe showed the bias was at least an order of magnitude higher.  A concept was developed to retain a 15mm x 15mm copper pad under the nozzle.  As the nozzle lowers the pad will first contact and become parallel with the bed prior to the nozzle touching the pad.  The design was refined to use a 40mm x 40mm foam pad and 2nd copper shim to basically make a 5mm thick sheet of paper.

  • Lots of probes later

    mulcmu03/16/2024 at 21:04 0 comments

    Working on getting the printer calibration optimized.  Probing a hexagon grid, range of 10x samples at each point is still a little higher than desired.  The optimization logic seems to be working much better than with the stock probe.

  • Sensitivity

    mulcmu03/09/2024 at 17:33 0 comments

    Took a bit of a break to use printer for making stuff..

    After reinstalling probe there seemed to be a regression in performance.  Initial testing started using glass plate on top of the magnetic PEI to make sure bed surface was planar as  possible for testing some calibration ideas.  Center probed okay with higher variance between probe, edge probes were very noisy and triggered the probe consistency limit.  Went through some troubleshooting to figure out root cause.  Cleaned nozzle better, cleaned foil, cleaned bed, tried without glass plate, double checked all connections to the ESP, removed sock...  Variance still persisted.  Tried probe with a new piece of foil on top of the existing foil.  There was marking under the nozzle location but no remotely concerning damage.  Anyway the extra foil seemed to get probe performing like it was previously.  Not sure if any of the other actions were necessary too.  So still prototype is still pretty fiddly at this stage but at least there wasn't a significant difference between results probing on PEI spring steel and glass plate.

  • Mylar V2

    mulcmu02/28/2024 at 03:05 0 comments

    A Y-shaped section of black mylar was cut on the laser cutter with some holes to attached to clips printed from PLA.  A section of copper foil tape was placed in center of the Y for contact with the nozzle.  With the probe clipped onto the printer, the copper foil hovers a few mm below the nozzle.  When it approaches the bed the mylar levels and conforms to the bed surface nice and flat while the nozzle approaches.  Minimal extra external force on the effector is an added bonus.

    The slow drift was seemed to converge at a stable value over hundreds and hundreds of relative probes in the same location.  The probe speed was 1 mm/sec and the lift after contact was 1 mm as well so during the probe it just moves up and down by 1mm.  Previously the initial few probes were found to be consistent after homing the printer.  Instead of homing the printer was commanded back to near the top and back down.  Nearly same travel as home movement but without triggering or resetting stepper positions.  This process cleared the observed drift and returned back to the initial probe reading.  Smaller changes in Z height as well as just travel in X and Y also reset the drift to initial value.

    The copper foil and the mylar are about 0.3 mm thick so a smidge thicker than paper 0.15mm.  A hole in the mylar for the nozzle to pass through with two layers of the foil tape on the bottom of the mylar would get this to be truly a digital paper test.  The mylar should be good for contact with heated bed, contact with heated nozzle might cause problems with plastic ooze and deformation from the heat.

  • Iterations

    mulcmu02/24/2024 at 15:32 0 comments

    Went through several iterations of testing the accuracy with minor tweaks to the Arduino ESP32 code.  Activation by ISR, different types and levels of filtering, and changes to the touchRead() default configuration.  The default (0x1000) measurement clock (ULP) cycles should result in about 50 measurements per 0.025 mm interval while lowering.  This was decreased by factor of 8 (to 0x200) for 400 measurements per 0.025 mm interval.  The quicker measurements reduce the magnitude of the touchRead() return value but was high enough to still distinguish between triggered and not triggered.  

    During the first 2 or 3 probe accuracy cycles with 100 sample points the trigger height will slowly drift downward by 0.01 to 0.02 mm for each 100 cycle iteration.  This was also observed with a micro switch fixed to the bed and actuated by the nozzle.  At this point it seems like the capacitive sensor is triggering consistent when compared to a physical microswitch.  Not sure yet if this is a klipper quirk, mechanical or electrical issue.  Haven't run it enough times to see if it ever stops drifting lower.  After home command it does revert to the original height. 

    Anyway, starting to rework the clip design to use copper foil tape and mylar sheet for the probe.  This will get probe offset (thickness) down to 0.20 mm range.  There are still a few things to improve the code like doing measurement and filtering on separate core to improve sampling frequency with the trigger logic and serial output on the other core and tweaking the high and low charge voltages.

  • Side Project

    mulcmu02/17/2024 at 02:00 0 comments

    A digital bubble level was built to measure the platform tilt over the travel range.  This consists of an ESP32 dev board with 1.9" LCD and Sparkfun ICM-20948 breakout board.  The base was small enough to mount on the effector platform (with hot end removed).  Some python code was used to have Klipper move the platform around and record the x and y tilt from the bubble level.  

  • Initial Testing

    mulcmu02/03/2024 at 16:32 0 comments

    An Arduino ESP32 was setup using touchRead() in the main loop to toggle the onboard led and stream the read value out over Serial.  A single 15mm x 15mm x 1mm pad was tested with dial indicator to get a feel for the trigger range.  The led was toggled consistently at same location, the range of motion was less than 0.001-inch, maybe 3 to 5 tenths, so about 0.01 mm.  Looking good so far...

    Code was modified to use an ESP32 output to trigger the probe input on the printer.  Testing started with the clip mount with an ungrounded 40mm x 40mm x .5mm pad on the bottom of the 3mm thick adhesive foam.  The touchRead() values were plotted with serial plotter, 5ms delay was added to slow down the stream of data.  Manually controlling the z-height, the probe would drop 2 to 3 units with a quick transition from values above 50 to values less than 20.  Cycling z-offset ±0.0005 triggers output on and off.  This was very consistent and repeatable.

    Testing was started with Klipper PROBE_ACCURACY command.  The range was way higher than expected 0.1 mm or more.  Testing to get this to improve was started.  The delay in the loop was removed, different trigger points were tested, the output was latched to stay on after initial trigger for 250 ms, different filtering was tried, grounding the bottom pad was tested, different springs on the probe holder were tried, rigidly attaching the sensors to the bed, eliminating the 3mm foam section, changing probe speeds and retract distances, ground connection to the nozzle, removing silicone sock, cleaning nozzle, unplugging heatsink cooling fan.  This improved things, 10 probes would typically trigger over a range of 0.02 to 0.04.  Consistent 0.00 to 0.01 mm is the goal.

    Some testing with the stock probe micro switch and another smd microswitch soldered to perfboard and actuated by nozzle seemed to perform a bit better,  Pretty consistent sometimes but sometimes range was in 0.02 to 0.04 as well.

    I cleared out the old delta calibration and started from scratch with DELTA_CALIBRATE using the clip probe to see how things changed.  When probing near the C tower the range increased drastically when the wires bumped into the tower.  Rerouted the wires to eliminate the contact and keep them as fixed as possible.

    Testing still in progress, things to look into:  trace on the trigger voltage (is it getting pulled down quickly / consistently), recheck position bias, (is this digital paper making it better or gone), test probe position bias with the smd switch (less parts and code if this  would work), put Klipper on another delta and test (maybe something odd mechanically going on).

  • Prototype

    mulcmu01/28/2024 at 04:56 0 comments

    A prototype design for the probe was created that will clip loosely around the effector platform.  Springs will force the probe assembly downward into the bed as the platform is lowered.  A 15mm x 15mm copper plate will be used as a capacitive sensor.  A 3mm thick foam pad will connect the plate to the 3d printed clip.  Springs will engage under the effector platform and force the foam pad to contact the bed as the platform is lowered.  Once the platform takes up the spring travel the nozzle will contact the copper plate and triggering capacitive sensor.

View all 7 project logs

Enjoy this project?

Share

Discussions

Similar Projects

Does this project spark your interest?

Become a member to follow this project and never miss any updates