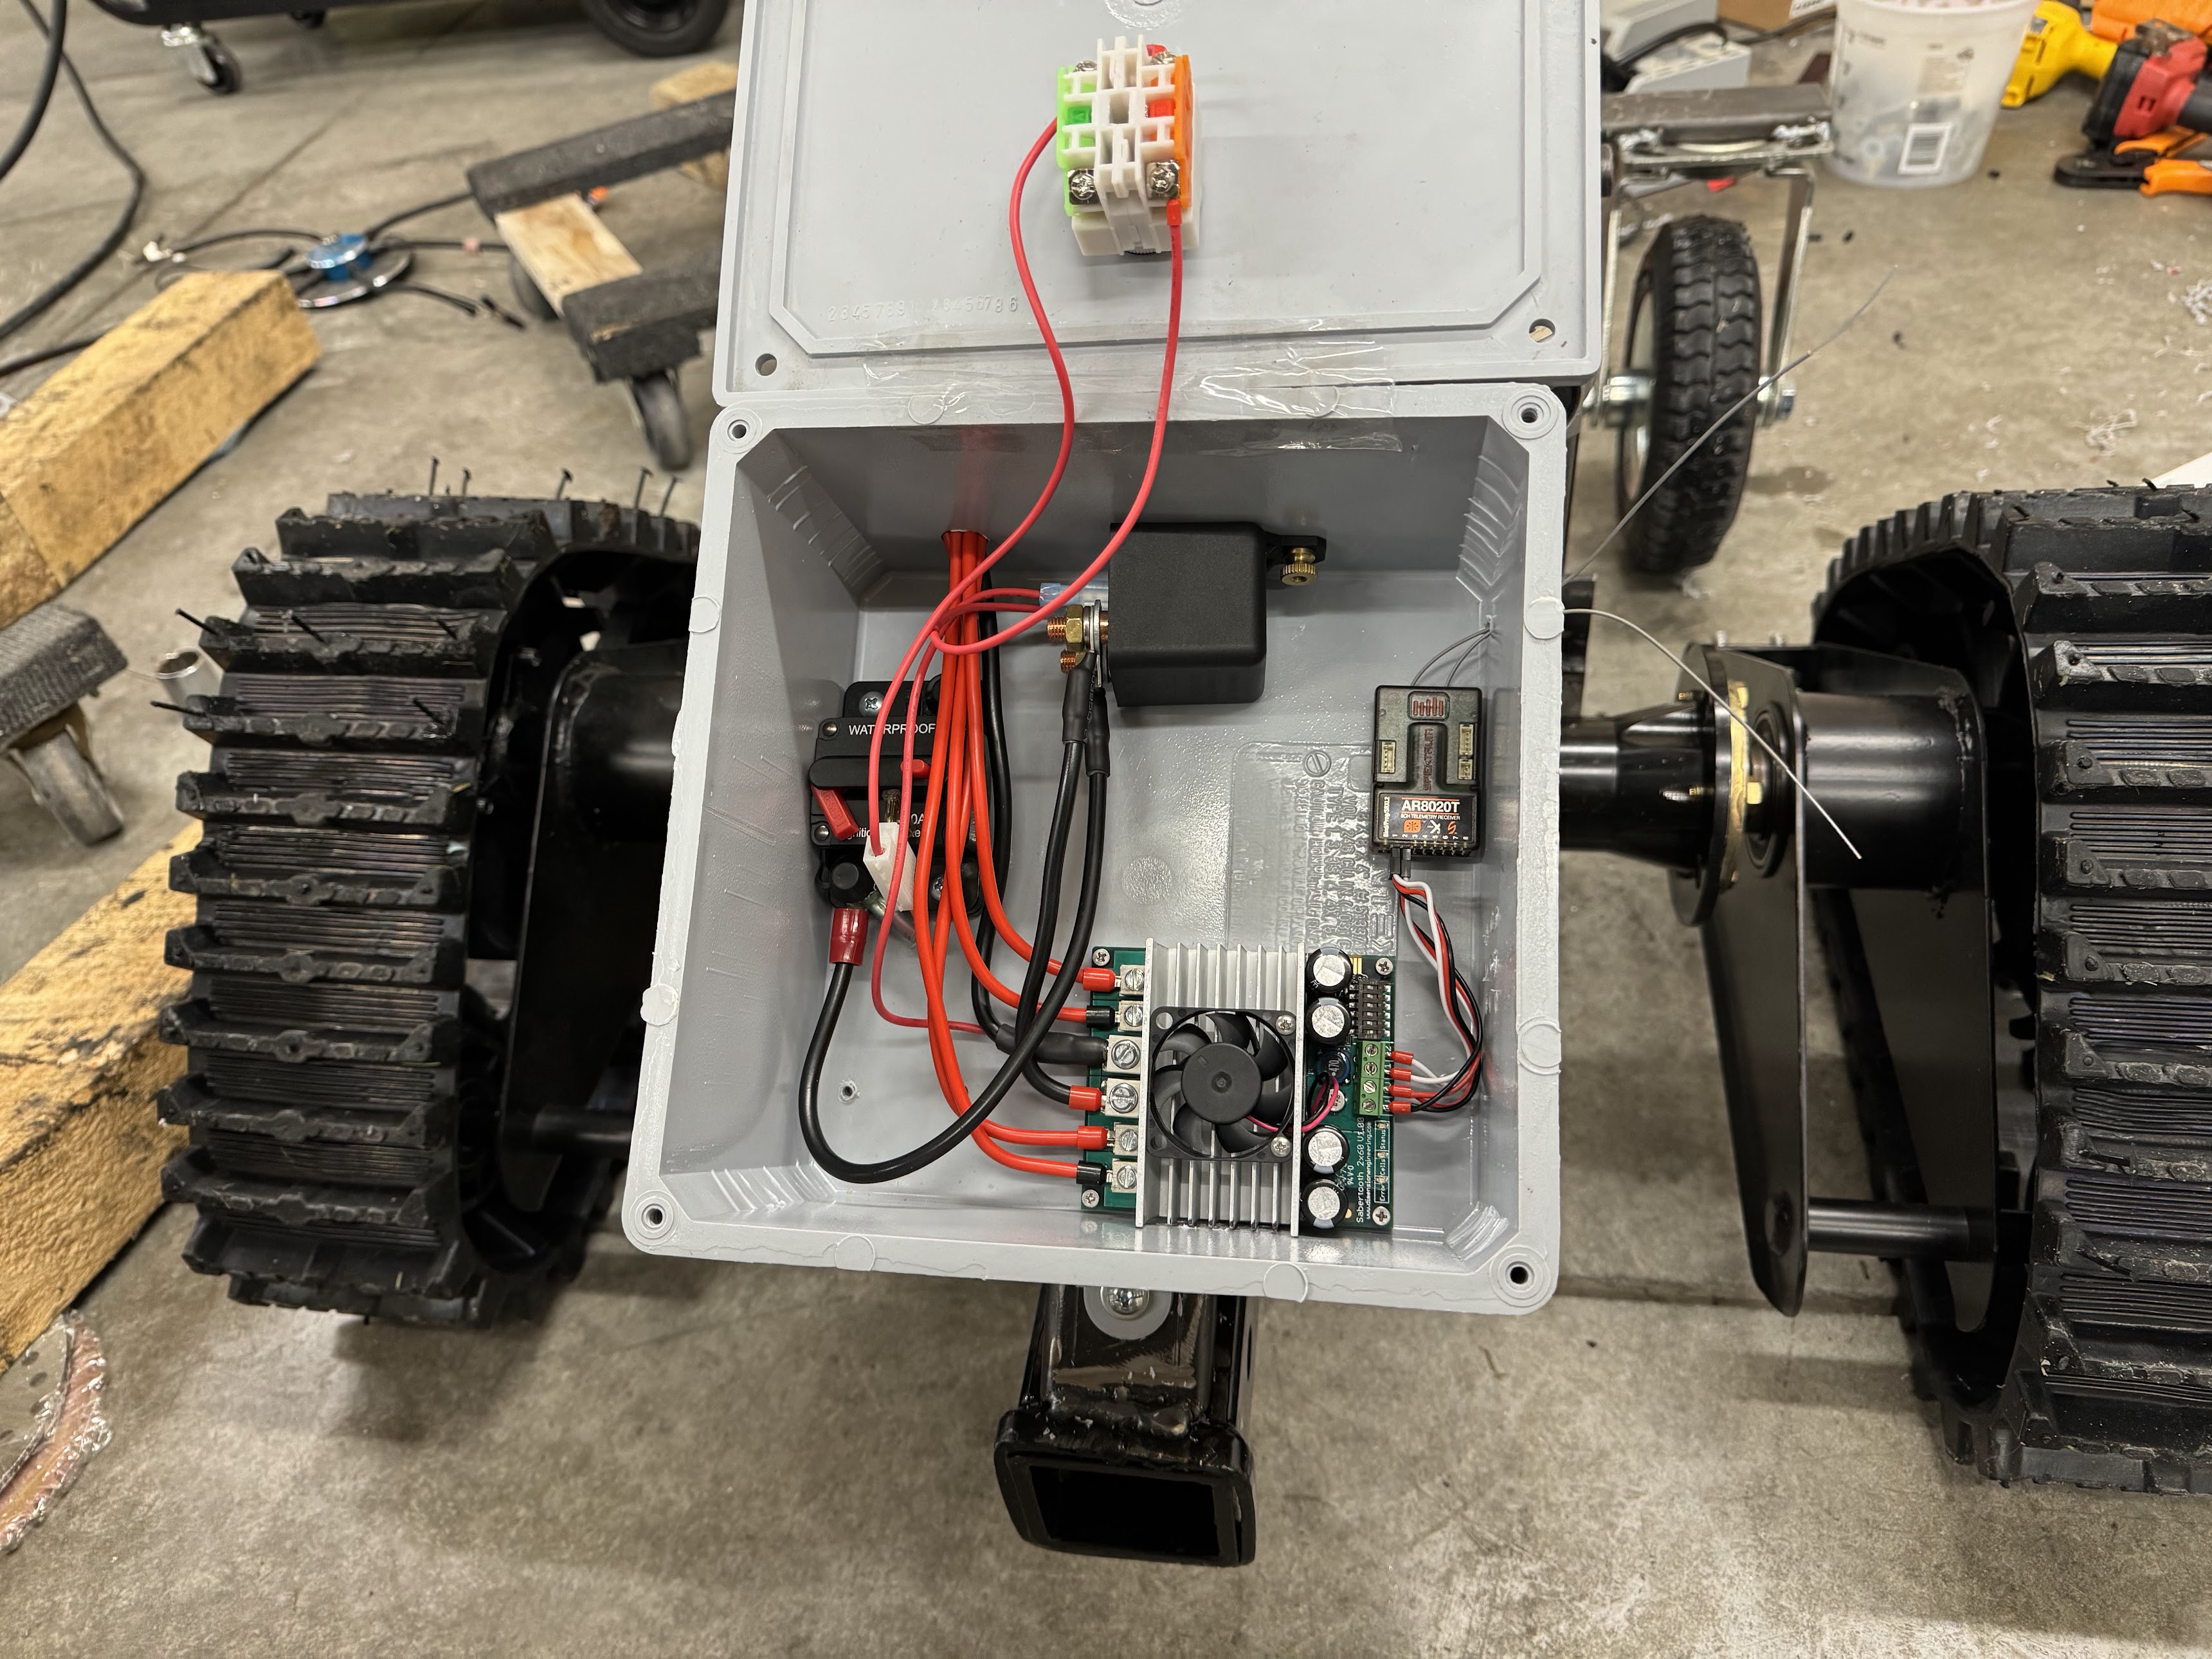
• Playing follow the leader

    Jim Heising8 hours ago 0 comments

    Made some create progress this week in adding more functionality to Lawwny 5 by starting to leverage machine learning and computer vision!

    One of the goals I wanted to accomplish with Lawnny is to have him follow me around the yard without having to whip out a controller. I thought of the idea of using computer vision to recognize hand gestures and then to track my hand in realtime and that's pretty much what I've been able to accomplish this week.

    I was able to accomplish this using a Luxonis Oak-1 Lite Camera (https://shop.luxonis.com/collections/oak-cameras-1/products/oak-1-lite?variant=42583148101855) and the excellent github project here https://github.com/geaxgx/depthai_hand_tracker.

    Here is the basic way it works:

    1. The camera loads a ML model for hand gesture recognition.
    2. I've set the ML model to recognize any hand holding up the index finger in a "we're # 1!" pose.
    3. Any time the #1 pose is recognized I calculate the distance to my hand using the focal length of the camera and the size of the bounding box around my hand in pixels. Even though having a depth component in the camera would be nice, I'm very impressed with how accurate it is just using basic math.
    4. I feed the distance of my hand into a PID with a goal/set point of 1 meter from me.
    5. I also calculate the distance in pixels that my hand is from the center of the image.
    6. I feed the distance to center into another PID with a goal/set point of 0 pixels from the center.
    7. Each PID output gets converted into a ROS2 Twist message and published for the motor controller to pick up and move the robot.

    The PID needs a little tuning, but as you can see it seems to be working pretty well!

  • Latest Updates

    Jim Heising5 days ago 0 comments

    It's been a while since I've posted, but that doesn't mean that Lawnny 5 hasn't been a very busy robot. Here is an update of progress:

    Active Duty

    One of the reason's I haven't been posting as much is that the recent progress on Lawnny has been a bit boring, but also extremely encouraging as well. What I mean by that is that he has been doing boring, but very real and useful, work in the yard almost every weekend for a few weeks in a row now. Reliability has been stellar, and he's pretty much fulfilled all of my original goals for the project. Here are a couple of videos of him in action:

    That being said, even though he's doing regular and useful work, I still have a lot more planned for him.

    Dethatching, Aeration and Spreading

    One of the jobs I do twice a year is to dethatch, aerate and fertilize, and as I was doing laps around the lawn a few weeks ago I had a sudden thought— why the heck am I doing this when Lawnny could be doing it? I have no idea why it didn't occur to me sooner. Anyway, because Lawnny is designed around trailer hitches and is meant to function identically to a ride-on mower/tractor it was an easy solve. Currently I'm looking at purchasing and hooking up one of these:

    https://www.amazon.com/Brinly-AS2-40BH-P-Combination-Aerator-Spreader/dp/B09YCQFKQC

    Should hopefully be an easy hookup, and will post some video soon.

    Simulation

    This has been a lot slower going than I would have ever thought. The main reason behind this is the sorry state of affairs for robotics simulation for people on Mac machines. I decided very early on that I wanted to do a lot of autonomous software development using simulations before I got anywhere near doing it in the real world, so I knew getting a reliable simulation environment up and running was going to be super important. What I did not realize was how ridiculously bad support is for doing this on an Apple Silicon. It's a long story which I may write about in the future, but at this point I have to run a virtual machine within a virtual machine (Docker running in UTM) in order to get anything to work, and it's still very flaky. And worse, it took me nearly a month to get to the point of even being able to run a simulation. As for simulation environments I've chosen to use Webots— Gazebo just seems overly janky to me.

    <small_rant>I have to say that my experience in open-source robotics software over the past few months has been anything but pleasant, and it shows how ripe this area is for disruption. Obviously I can't complain— I'm using free software that people are spending their free time building— but it's just surprising. When you compare the open-source robotics ecosystem to something like open-source web application frameworks (the stuff I'm used to) it's striking how far behind robotics is. Granted, robotics is a much more complex problem than building web apps, but even the newest of web frameworks seems lightyears more refined than some of the most mature robotics projects. After learning more and more about the robotics industry during this project I suspect it really just has to do with economics— very few robotics companies actually make money and VC investments are becoming harder and harder to get. But I am convinced this will change eventually when we hit an inflection point, but who knows how long that will take.</small_rant>

    First Steps Towards Autonomy

    I've decided that my first step towards autonomy will be to use my Luxonis Oak-1 Lite camera, and the amazing work of this repo https://github.com/geaxgx/depthai_hand_tracker to be able to get Lawnny to follow me around the lawn using hand signals. Here is a basic idea of what I'm thinking:

    1. The mobile app will be used to set Lawnny into "follow-me" mode.
    2. This will start up a ROS2 lifecycle node that will run some of the code in the depthai_hand_tracker repo.
    3. Holding up my index finger in a "we're number 1" pose will cause Lawnny to follow my...
    Read more »

  • Need Input!

    Jim Heising03/15/2024 at 22:58 0 comments

    We've taken the first steps towards autonomy!

    Microcontroller and IP-Based Control

    As most of you know by now, the ultimate goal for Lawnny is to provide some amount of autonomous functionality. But even though I want to automate as much as possible I don't want to lose the ability to control him manually, so a hybrid control system would have to be implemented.

    The easiest way to accomplish this would probably be to leverage an off-the-shelf flight/rover controller— something like an Ardupilot. With this, I could control Lawnny autonomously with the flight controller, but then maintain the RC transmitter/receiver combo to override the FC when I wanted to control it manually. I did a lot of research into flight controllers, and long-range data links, but ultimately decided to start simple— control the robot directly from the Raspberry Pi through standard wifi.

    Here are a few of the reasons I chose this route:

    1. I thought it'd be nice to manually control the robot with something most people already carry with them— a mobile phone. This means I don't have to lug around a bulky RC transmitter.
    2. To gain high accuracy GPS positioning, I'll most likely have to leverage RTK, which will require some sort of realtime data link to a base-station. With standard wifi this should be easy without any additional data modem hardware.
    3. Sending video over a wifi IP connection is common and well understood, and does not require additional FPV equipment.
    4. I don't have to spend additional money to purchase a drone/rover flight controller, but I'm also not excluded from integrating one in the future.

    So with all of this in mind, I figured that a standard wifi connection would be the cheapest and easiest solution. But it does have some drawbacks— mainly relatively low range.

    Dealing with Range Anxiety

    Because out-of-the-box wifi has relatively low range, I figured I would have to deal with potentially two bad scenarios:

    1. The Bad: I lose connectivity and Lawnny just stops. He weighs hundreds of pounds, so he's not exactly easy to pick up and bring back into range.
    2. The Downright Ugly: I lose connectivity and Lawnny just keeps moving in a straight line until something gets in his way. With a weight of hundreds of pounds and two mower blades, this is not something I want to ever experience.

    Addressing the Bad

    The way I'm addressing this is to implement two wifi radios. I've added a wifi dongle to the Raspberry Pi with a removable antenna. This antenna will be extended to run outside of the metal enclosure box and should provide a relatively stable connection to the wifi in my house. Obviously this wouldn't work if you had many acres of land, but my home wifi reaches most parts of my yard without any problem.

    That being said, there is the chance that the wifi connection for this main USB-based radio could become weak or non-existent in certain parts of the yard, so that is where the second wifi radio comes in. The onboard wifi radio on the RPI is set to be a wifi hotspot. So if for some reason I lose connectivity on the shared wifi, I can just walk up near Lawnny with my phone and connect to its built-in access point and control it directly from there. This should work in theory, but only time and testing will tell.

    Addressing the Downright Ugly

    Out of the two problems this is by far the worse, so I had to go deep into "brain stem" of Lawnny to address this. The way I solved this was to employ the timeout functionality in the Sabertooth motor controller.

    By default, the Sabertooth motor controller will continue to run the motors at the speed of the last command it was sent. For obvious reasons this would not be optimal if the controller became disconnected from manual control via wifi. So to address this, the controller has what is called a timeout mode. The timeout mode will continue to run the motors for only a short amount of time and will automatically stop unless it receives another command. So it acts a bit like...

    Read more »

  • Lawnny gets a makeover!

    Jim Heising02/29/2024 at 02:25 0 comments

    There was one benefit to the unfortunate RUD (rapid unscheduled disassembly) of my motor controller in my last build log— it gave me an opportunity to spend some time on quality of life improvements.

    A fresh coat of paint

    Lawnny is an outdoor bot, so at some point I was going to have to deal with the potential of rust on his steel frame. While he was disassembled it felt like a good time to lay on a coat of paint. For this I chose spray-on truck bed liner, but if he lives past a single season I will probably upgrade him to powder coating.

    A new brain bucket

    Lawnny's original control box was just an outdoor electrical junction box that I picked up from HomeDepot. It was big enough to hold the initial "dumb" (aka RC) electronics. However the end goal is to make him partially autonomous, so I knew I was eventually going to need more room.

    I looked around quite to find an off-the-shelf box, but really never found the right solution. So I decided to just weld one up myself. I'm still relatively new(ish) to welding so it was a bit of a pain, but ultimately I ended up with something I could almost stand to look at.

    A more professional (aka less shitty) wiring job

    I'm a software engineer by trade, but a hardware enthusiast at heart. So I really do appreciate the artistry of a beautiful wiring job and also enjoy putting in the time to make things look neat and tidy. Unfortunately the time I invest never seems to end up looking how I imagine it— but at least I try.

    Anyway, here is my best attempt...

    A few of the most notable changes:

    • I wanted something where I could use self tapping screws to easily mount things. But I also wanted it to be resistant to moisture, so wood was out of the question. I figured some sort of soft plastic sheet was the answer, but I don't have a plastics store near me. Keeping in-line with trying to source parts from local stores I could pick up the same day, I figured a plastic cutting board would to the trick. I found the perfect solution in a $12 cutting board from Walmart.
    • I swapped out the 60 amp resettable fuse that I previously used (and didn't trust) with a more traditional inline maxi-blade fuse. I also dropped the fuse down to 40 amps because I don't think I'm drawing anywhere near 60 amps in the current configuration. I'm probably not even close to 40 amps, but at least now I can easily swap in different fuses to size it properly (https://www.amazon.com/dp/B072JHSW5J).
    • I added some terminal lugs to make it easier for future expansions to tap into the battery power (https://www.amazon.com/dp/B0BJVRXSND).
    • I added a bus-type fuse block so I could add individual fuses for different legs of the wiring. Bought it at AutoZone.
    • I added a 12-24V DC to 5V 5A DC converter (https://www.amazon.com/dp/B09SD9SH8C) so I can power my RaspberryPi, cameras, and sensors in the future. Right now it's not hooked up.
    • I added thru-panel connectors for both the motors and battery so I can easily disconnect them. The motors use Anderson PowerPole connectors (https://www.amazon.com/dp/B097QDKJJ2) and the battery uses an SAE connector (https://www.amazon.com/dp/B0BHYYLTC2). 
    • I added some thru-panel air vents (https://www.amazon.com/dp/B07TDD9CH1).

    I also plan to add the following when the parts arrive this weekend:

    Anyway, that about sums up the major quality of life changes, and Lawnny is once again up and running after our last mishap!

    I think he looks slightly more svelte than last time, would you agree?

  • Lawnny Catches on Fire...

    Jim Heising02/23/2024 at 19:07 0 comments

    Well the first setback occurred, and boy was it spectacular... I wish I had a video of it.

    So what happened? 

    My very expensive Sabertooth 2x60 shorted out and caught fire. And not just like a bunch of sparks, but literally caught fire to where I started to run and grab my fire extinguisher. But luckily at the last second the fuse tripped and stopped it from getting out of control.

    Where did I go wrong?

    Well I'm still not 100% sure, but maybe some folks here have an idea. First of all, I don't think it was an issue with the Sabertooth controller, because it happened after I made some changes to wiring, so it's more than likely 100% my fault.

    What were the changes I made to the wiring?

    One of the things I've been wanting to do is to be able to monitor my voltage remotely from my radio transmitter so I can start to calculate how much battery life I'm going to get out of Lawnny in real working conditions. My Spektrum receiver has a voltage sensor port which it uses to send telemetry to the transmitter, so this seemed like a perfect solution.

    Spektrum sells a battery sensor cable for $12, but after looking online I found that it's just a standard JST ZH connector and I could buy 12 of them for $8. Seemed like a no-brainer.

    From everything I could read online, this voltage sensor port is capable of handling up to 24v, so it seemed like I should just be able to hook it up in parallel to the battery and be done with it. The closest and easiest place I could hook it up was at the battery positive and negative terminals on the motor controller.

    Now I wasn't fully sure if the JST ZH connectors I ordered were properly colored for the positive and negative inputs on the receiver, but I figured in a worst case scenario that I would just get a negative voltage reading instead of a positive one and would have to swap the wires around. So rather than clamping the wires into the terminals I figured I would just hold them against the terminals by hand like I would my multimeter. This may have been the fatal flaw...

    When I switched on the power I immediately saw huge sparks and a fireball surrounding the motor controller, followed by a scream of "Noooooooooooo!!!" (I think that was me). I immediately removed the wires, but it kept sparking and shooting flames. After what seemed like a long time (even though it was probably only 5-10 seconds), I started to run for the fire extinguisher, and a moment later it stopped. I suspect that's when the 60 amp fuse finally popped.

    So many questions...

    Did I hook up the voltage sensor backwards? This is my working theory, but I'm still not sure why that would have caused the motor controller to go up in a blaze— if I hook up my multimeter backwards, it doesn't cause things to blow up. If anything would have gone up in smoke my guess is that it should have been the receiver. 

    The only thing I can think of is that maybe the BEC circuitry in the motor controller (which powers the receiver) shares a common ground with the high power motor ground. By hooking it up backwards I suppose I created a short across the motor controller, and the reason this is different than hooking up my handheld multimeter backwards is that my handheld doesn't share a common ground with the battery and controller. What do you all think?

    The second question: what took the fuse so damn long to blow? The fuse for the motor controller is this: https://www.amazon.com/dp/B08LYG7ZYF.

    Did this short draw less than 60 amps? I doubt it— the fireball I witnessed seems to beg to differ.

    Maybe the fuse is more of a slow-blow type? Maybe it's just a cheaply made Chinese part and doesn't work well? Who knows, but I don't think I can trust it and will need to find a better replacement.

    Anyway, it was a setback, but not worth crying over too much. Within 10 minutes of the accident I painfully shelled over another $200 for a new motor controller, and figured it'd be a good time to take...

    Read more »

  • Need mow input

    Jim Heising02/08/2024 at 05:43 0 comments

    In order for Lawnny 5 to live up to his name, he really needs to learn how to mow the lawn. So for the past few days I've been working on connecting him up to my 30" Toro TimeMaster lawnmower.

    Here are the early results of this work:

    As you can probably tell, Lawnny appears to have no trouble slinging this beast of a mower around, and it's starting to take the shape of capable lawn tractor.

    Starting Small

    A portion of my lawn has a roughly 20° slope, so my first concern before investing a ton more time into the project was to find out if Lawnny was capable of pushing this chonky mower (150+ lbs) up that slope. This 30" mower is about as big and heavy as it gets for a residential walk-behind mower, so I figured if it could handle this beast it would be capable of handling just about any other mower you could throw at it.

    To run this test I started as simple as possible— I put the mower at the bottom of the hill, pulled up Lawnny behind it and simply nudged it up the hill. It pushed the mower up the hill without even a hint of a struggle— absolutely no change in motor RPM. Even better, it appeared to have plenty of traction on the wet lawn and didn't leave any marks. This resounding success meant I could now invest the time into making a more permanent mount.

    The Mounting System

    By now you probably know that Lawnny is based on an attachment system built around 2" hitch receivers. But how to you connect a 2" receiver to a piece of equipment with wheels?

    Like everything else with Lawnny, I wanted the mounting system to be as versatile as possible, so I defined the following requirements for it:

    1. The mounting system should not require any permanent changes to equipment. If this project fails miserably, I want to be able to use my equipment again.
    2. The mounting system should not interfere with the ability to make adjustments to the equipment. For example: I don't want to lose the ability to adjust the mower deck height.
    3. The mounting system should be able to accommodate equipment with varying wheel-bases and widths.

    Addressing requirements 1 and 2 were simple— attach the frame to the wheel axles. The entire weight of the machine is already supported by the wheels, so I know those mounting points are going to be strong enough. And the deck height of the mower is adjusted by changing the height of the wheel axles. It was a no-brainer decision.

    Requirement 3 was a bit more complicated. I contemplated all sorts of ideas and one of the first that came to mind was to use something like Unistrut. But my rudimentary and error-prone organic physics simulator (my brain) ran some virtual simulations and determined that the Unistrut probably wouldn't be stiff enough (specifically in the torsion axis).

    I started to imagine other things that were easy to adjust yet capable of handling extremely heavy loads, when it hit me— a forklift. With this in mind I set out to create a mount that could be adjusted like a forklift, and this is what I came up with:

    The "forks" (the supports in this case) can slide from side-to-side to accommodate equipment of differing widths, and are held in place with some simple set screws. The supports can then be attached to the equipment frame via any means necessary— in this case (at least at the moment) they are attached with some u-bolts.

    The Mower Frame

    You'll also notice from the picture above how the frame of the mower attaches to the wheel axles and is easily removable with a few nuts and bolts to return the mower back to original.

    Also notice how the adjustment levers for the mower deck are easily accessible. To keep those levers free of interference with the frame was a bit of a challenge, and frankly the right-angles aren't exactly structurally optimal. But the frame is surprisingly stiff already, and a few more added supports should shore it up to be pretty bulletproof.

    What's next?

    Now that I have a mounting system which is able to...

    Read more »

  • First Stumbles...

    Jim Heising02/02/2024 at 01:30 0 comments

    One of the goals I have for Lawnny is for it to be able to move my boat into its parking spot behind my house. While it is possible for me to back it in directly with my vehicle, it's an extremely tight fit and the margin for error is just an inch or two on each side. Because of this, I generally park it by pushing it in by hand. Because I have a relatively flat driveway, amazingly it is possible to push the 2,500+lb boat trailer by hand, but it's not exactly fun.

    I'd like to mimic a trailer dolly, similar to this:

    But instead of pushing it, I want Lawnny to do the work for me.

    Now there are a few major concerns here:

    1. Will the weight of the boat trailer crush Lawnny?
    2. Will Lawnny have enough power to move the boat?
    3. Will Lawnny have enough traction to move the boat?

    Will it crush?

    Success: 🟢

    After my experiments today, I can say..... it will not! I wasn't really worried about the frame— the 2" receivers are made from 1/4" steel and would probably support a 747. I was mostly worried about the motor axles. The treads are connected directly to the motor axles with no support from a pillow-block on the frame, so the motor axle itself is pretty much taking all the load. The other issue is that the treads are offset quite a bit away from the motor, and this creates a lever-arm which increases the force load on the axles. I was extremely worried they would just snap or strip a gear.

    Apparently they've taken this into account when building these mobility scooter motors (probably thanks to the obesity epidemic in America), because there was absolutely no issue taking the weight. I think the tongue weight on my boat trailer is around 350 lbs, and it seemed to barely register when I lowered it on the ball hitch.

    Will it have enough power?

    Success: 🟢

    Yes. It was able to get the boat moving without any trouble. Buuuuuut there is more to the story below....

    Will it have enough traction?

    Partial Fail: 🟠

    As you can see here, it did not.

    But I'm going to say it wasn't a completely fair test. This part of the driveway is slightly uphill, and I was starting from a complete stop (no momentum) and the ground was wet from rain.

    Did I fully think this through?

    Fail: 🔴

    As you can see from the following video, I did not...

    Remember above when I told you I got the boat moving? Well I didn't really think about stopping it...

    So I'll start out by saying that I was very aware up front that Lawnny would have trouble towing from this position if he moved in reverse— there is nothing to stop him from tipping over the front. My solution to this problem was always going to be "When towing: don't drive in reverse. if you need to go backwards just turn Lawnny 180° in the opposite direction and move forward". You can see this working in the first video.

    But what I didn't account for was the cruel mistresses of inertia and gravity. Lawnny can get the boat moving without any trouble, but when Lawnny wants to stop the boat, the weight of the boat and the slight slant of the driveway say otherwise. It's pretty much the same as if Lawnny started to back up, which rendered my so-called solution useless.

    Anyway, I'm starting to think that towing such a large trailer may not be the best idea. I think I could solve the tipping issue by putting another set of wheels in front— which is super easy to do because of the modular nature of the hitch receiver frame— but it won't solve the braking problem. Luckily my driveway is relatively flat so I'm less worried about gravity running away with it, but the inertia problem still exists.

    At the end of the day I'm still interested in getting this to work, but I'm going to tread lightly— I don't want a 2,000 lb boat careening down the neighborhood street dragging a helpless robot along for the ride.

  • Lawnny Five is Aliiiiive!

    Jim Heising02/02/2024 at 00:50 0 comments

    Wish I could say it was an eventful experience, but it worked almost perfectly the moment I put power to it. I was pretty nervous powering it on because of the weight of the bot and power of the motors— it could do some serious damage.

    Only thing I had to do extra was remap the forward/reverse channel to the elevator channel on my transmitter so that it controlled more like a joystick. I also had to set the failsafes in the receiver so it would default to stopping instead of going in reverse if/when the transmitter became disconnected.

    Anyway, I kind of expected it to take a while to get the system debugged, but it works so well that I’ll probably be ordering my cameras and sensors and get to writing some software to make it autonomous.

  • The Basic Design

    Jim Heising02/02/2024 at 00:24 1 comment

    I’ve seen a lot of robotic lawnmowers over the years, but I wanted build something that was capable of more than just mowing the lawn— the ability swap different attachments for various jobs. Something more like a lawn tractor.

    The primary missions I’m designing for are:

    • Mowing the lawn
    • Snow plowing the driveway
    • Towing lawn trailers around the yard
    • Moving my boat trailer into its tight parking spot.

    The Frame

    I thought long and hard about how I would connect attachments to the robot, then it hit me— standard 2” hitch receivers make an excellent platform to attach just about anything you could think of. Other than trailers, there are all sorts of crazy things you can attach to 2" receivers, like https://ironbaltic.com/us/agricultural/receiver-mount-system. It's just a nice and easy to understand mechanical standard to build around.

    After deciding to use 2" receivers as the attachment system, I figured, why not just make the frame out of the receivers themselves?

    The foundation of the frame is three 2” x 12" receivers welded into an upside down T. The two horizontal receivers will be used to attach implements on the front or rear of the bot, and the top receiver will be used to dolly around larger trailers (like my boat).

    Luckily Harbor Freight had just the thing— https://www.harborfreight.com/class-iii-12-in-x-2-in-standard-receiver-tube-69879.html.

    Weld in a few pieces of 2" angle iron, and you now have a frame capable of mounting motors and batteries.

    Note that it would not be hard to build this frame if you didn't have a welder. You could probably tie all three receivers together with a T-shaped metal plate bolted to each side. The battery tray and motor mounts could similarly be bolted to the frame as well.

    Another thing to note is that the frame is heavy. I mean really heavy. But this is by design— the heavier the frame the more traction the bot will get, and I think traction is going to be key in doing a lot of the things I want to do with this platform.

    The Motors

    The motors weren't chosen with any particular specs in mind— I ended up just going to eBay and looking for used mobility scooter motors with a reasonable price. I eventually found a set that looked like they might work, but there was very little information other than they ran on 24 volts and they functioned. I was taking a bit of a risk buying them, but in the end it payed off. When they showed up I was able to look up the model number and found them here: https://www.electrocraft.com/products/gearmotors/MPP36/

    The motors are capable of producing 144.9 Nm of peak torque, which is many times greater than the average lawn tractor, so pulling power should not be a problem.

    The Batteries

    Until I received the motors I wasn't really sure how to properly size my batteries. Once I got them I found that they were rated for 12 continuous amps, so that was the basis of my rough battery calculations. Since the motors run on 24V I'll need two 12V batteries in series, and unfortunately I won't be able to add their amp-hour ratings together like I would if they were in parallel. So in perfect/lossless conditions (which don't exist) if I wanted to run both motors for 1 hour, I would need two 12V 24 amp-hour batteries.

    One of the big goals for this project was to be able to source as many off the shelf parts from stores that you might find in your home town. It's one of the reasons I tried to source as many parts as I could from Harbor Freight, and when I started looking for batteries, I found these: https://www.harborfreight.com/12v-35-ah-sealed-lead-acid-battery-56770.html.

    The batteries are rated for 35 amp-hours which should give me over an hour of continuous runtime in ideal conditions. They are also deep-cycle which means they are better suited for running them until they are nearly empty.

    The Wheels/Treads

    The last of the major components to decide on was the wheels....

    Read more »

  • Control Box

    Jim Heising02/01/2024 at 23:22 0 comments

    Here is peek at the initial control box for the bot. The ultimate goal for Lawnny is to make a good portion of it autonomous, but in the meantime I want to debug all the mechanicals without a lot of hassle, so the initial version of the control system is RC based.

    All of this will eventually be redone, so I'm not too focused on aesthetics and durability at the moment

    The major components are:

    1. A 60A resettable fuse - https://www.amazon.com/dp/B08LYG7ZYF 
    2. A 24V 150A relay for the emergency stop functionality - https://www.amazon.com/dp/B08CXPVX11
    3. A Dimension Engineering Sabertooth 2x60 motor driver - https://www.dimensionengineering.com/products/sabertooth2x60
    4. A Spektrum AR8020T receiver - https://www.amazon.com/dp/B08QRXDFT6 
    5. An EStop Switch - https://www.amazon.com/dp/B07BCY7HGN
    6. The box itself was just an outdoor electrical junction box from Home Depot.

    Most of the components are complete and utter overkill for the amount of current these motors draw, but I may eventually have to build bigger so I'm leaving myself a lot of overhead.