1. Introductions
This blog will document how we at SignalRGB recently built a wall of ARGB fans for Bequiet!. This will be more of a guide for you to base your own projects off of and may be used as inspiration and as well as give insight to some problems you may encounter in your own designs. I will give details on products used and will provide links at the end of the blog for some of the specialty materials used.
2. Preparations
Before you begin your project, plan out what you hope to accomplish. This will help you come up with a solid idea for materials and will let you mitigate problems later on. I like to start with a rough 3d render of the project to ensure the design is what I want it to be. Now is an important time to really put thought into how you will overcome obstacles like material choices and layout, the more detail the better. This will come over many design iterations but it is good to solidify the plans now while designing it in 3d.

3.Materials
Note, I give exact numbers of parts used in this project but always recommend buying extra beforehand in case you lose some bolts or damage them. Exactly how many I ordered with extras included will be at the bottom with the parts lists.
3.1 Frame,
For this project I used 2” extruded aluminum extrusions for the frame. The wall is an 8’x8’ square with a 6’x8’ section for the fans and a 2’x8’ section for the signage on top connected by a frame. The frame is 3x identical pieces of 72”x2”x2” aluminum extrusion with M6 tapped ends. The feet are made from 36”x2”x2” aluminum extrusion. The uprights are supported with 12” 45 degree 1020 supports. There are 2” adjustable feet with some bolts and washers that attach to the feet. The uprights attach to the feet with M6x65mm socket head screws.
3.2 Wall, The wall main section is made with 2x 4’x 8’ x 3/4” sanded pieces of heavy duty plywood. Since the frame is not connected to one another this piece must be sturdy to support the weight of the project. The wall is connected to the frame using 24x 90 degree slotted corner brackets with 24x M6x10mm socket head screws , and 24x M6x14mm socket head screws. The bracket attached to the frame with the 10mm screws using a M6 T-nut with centered thread you will need roughly 50x of these M6 T-nuts for this project. The wall will use 24x M6 x 1/2” brass threaded inserts to attach the panels to the frame. The wall uses 192x 140mm fans which are attached to the wall using 768x M4x16mm button head screws with 768x 1/2” OD x 3/16” ID x 1/16” thick rubber washers. These screws need 768x M4x10mm hex socket threaded inserts to attach to the wall. 3.3 Signage, The Signage on top uses some of the 3/4" plywood from the main wall but also uses 2’ x 8’ of 1/4" thick plywood along with 20’ of 1” x 1.75” wood strips. The electronics of the sign will be detailed in their own section.
4. Assembly
4.1 Start by building the frame. Take the 36” foot pieces and mark them at the 18” spot, choose one side and mark 1/2" in the middle of the slots from the middle and again 1” from there to mark where to drill the holes needed for the uprights. Drill the holes using a drill press to ensure they are square using a 6mm drill bit. You will need to countersink the bolt by drilling out the rails using a 10mm drill bit to ensure the bolt can fit snugly against the feet. Next on the same side you countersunk the bolt head 1.5” from each end in the center of the foot, drill a 12mm sized hole for the leveling feet and attach the feet. Follow assembly instructions below to finish building the feet


4.2 The wall panels are next to be built. It is important that while cutting the wall panels on the CNC machine you take great care to keep the same panels together as their slight natural warps later on will make the wall harder to assemble. When we assembled...
Read more »
 Enki
Enki
 Gertlex
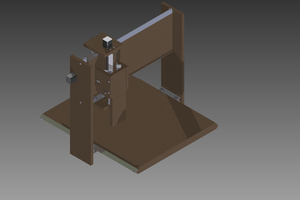
 Steel_9
 Tim Wilkinson