Mike Hendricks
-
WiFi instead of bluetooth
08/21/2014 at 06:39 • 0 commentsMy ideal arming and disarming of the car alarm is when I walk into range of it. I don't want to have to press a button. I've been hoping I could use bluetooth. If my phone is connected by bluetooth it disarms the alarm. If my phone is not connected by bluetooth it arms the alarm(Because you may want to turn off your phone while driving I may make it detect if the car is running so the alarm will stay disabled if you turn off your phone. If you start the car with the alarm armed, it would not disarm.)
I have a iPhone, and most of the arduino Bluetooth adapters I've found wont connect to it, and I would also like to have the arduino serve a web page with arm/disarm controls and the ability to view a log of alarm events.
I just found the wifly wifi shield that can be setup to be a AdHoc network. In this mode I would check the devices the arduino is connected to against a access list. If the device is in the access list it would disarm the alarm.
-
Car Power
08/21/2014 at 06:12 • 0 commentsCurrently to power this I am planning to attach the 12v sensors directly to the battery. Ideally I will use a relay or optoisolator to power them down when I disarm the alarm. I plan to power the arduino circuit by dismantling a car cigarette to usb power adapter.
Given that cars are notoriously noisy environments for electronics, I'm hoping that the alarm sensor is designed to filter out any noise generated by the Jeep. I am also hoping that the cigarette to usb adapter takes care of the noise. If noise turns out to be a problem I will look into adding de-coupling circuits. I found this article informative on the subject.
-
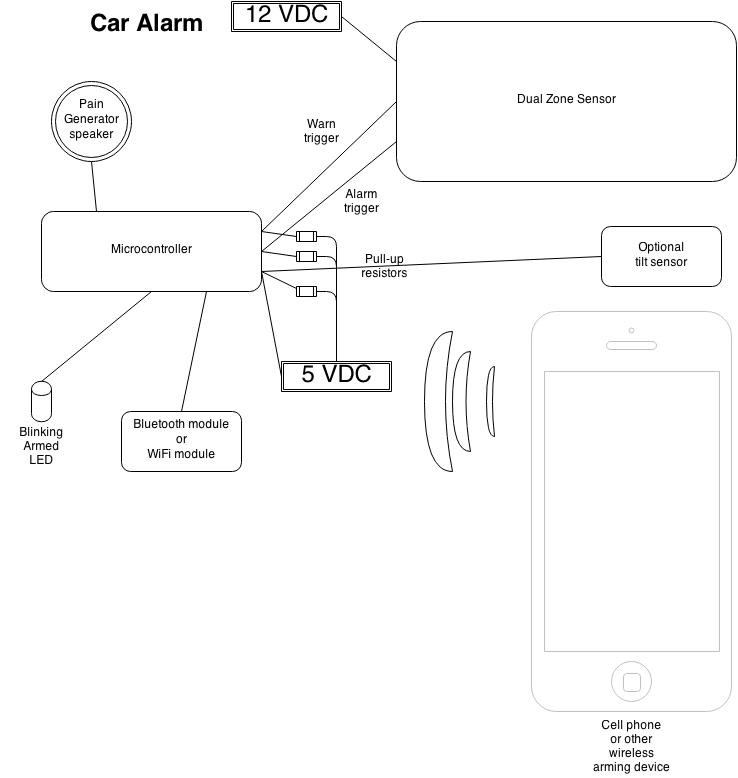
Basic Design
08/20/2014 at 08:10 • 0 commentsConnect the car alarm trigger lines to the Arduino digital input pins. For each of these add a pull up resistor connected to the 5v line. Make sure your 12v and 5v share a common ground. Every Car alarm needs a blinking led on the dash to tell you that its armed, so we will add one of those as well.
![]()
-
Optoisolators not required
08/20/2014 at 07:26 • 0 commentsWhen I first tried hooking this up to my Arduino I was worried about the sensor running on 12v. I didn't want to pass that voltage into the Arduino and fry it. Eventually I realized that the signal pins are left floating when the alarm is not triggered. When the alarm is triggered the signal pin is connected to ground. This means you can connect the signal pin to a Arduino digital input pin, but you need to connect it to a pull up resistor so you get a constant value.
Arduino Controlled Car Alarm
Car alarm controllers are relatively expensive, when they could be replaced by a Arduino or other micro controller