Close
0%
0%

Food dehydrator - simple and cheap

Food dehydrators are conceptually very simple. Let's see if they are that easy in practice.

Similar projects worth following
I wanted a food dehydrator. The decent ones I saw for sale were, in my opinion, absurdly expensive(several hundred dollars here in Japan). It's just a box of racks that blows warm air over the food. Right? How hard could that be to make.
So I made one. It cost $8 for the racks and the rest came from my scrap piles.
As I experiment with it, I will share what I learn so that you can make one too.

If anyone can build a functional dehydrator without expense, technical knowledge, or many tools, then why are they so expensive to buy? Is the proper engineering and injection molded plastic worth the price? Let's find out. For this project I will experiment with a simple, cheap dehydrator design, and share what I learn so you can build one too. Here's the basic concept.

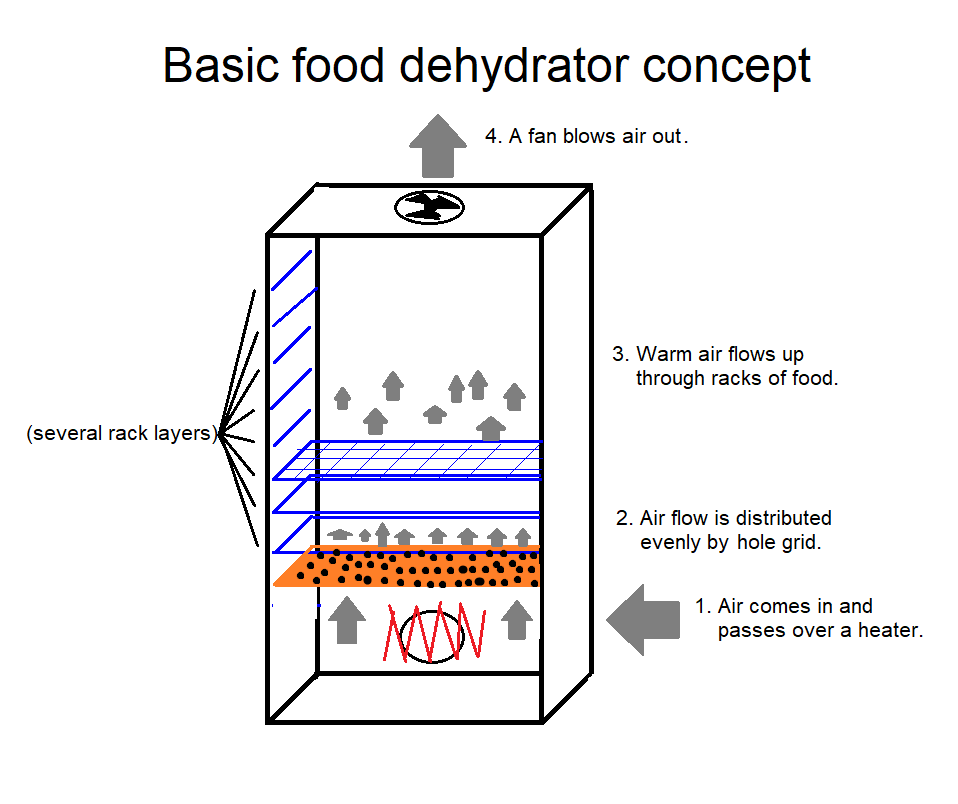
It is essentially a plywood box with a fan, heater, and lots of racks. No Arduino.

More specifically, it consists of:

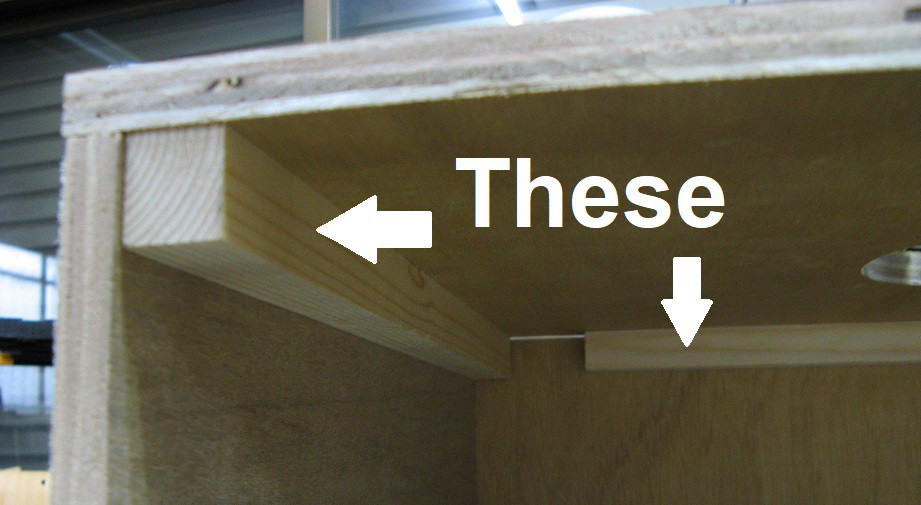
  • A plywood box about 90x43x35cm with thin strips of plywood to hold the racks, holes for air inlet and outlet, and a door.
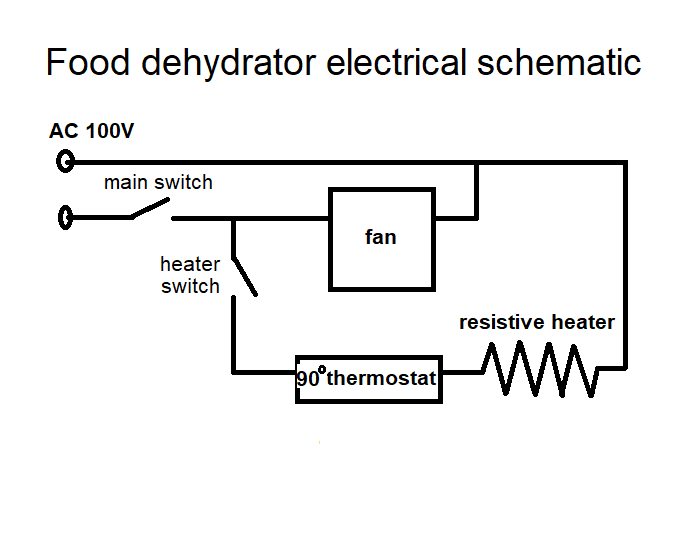
  • A 100V AC 7watt fan. I found a box of about 50 of them new in a garbage pile. I'm still trying to think of a good project with lots of fans.
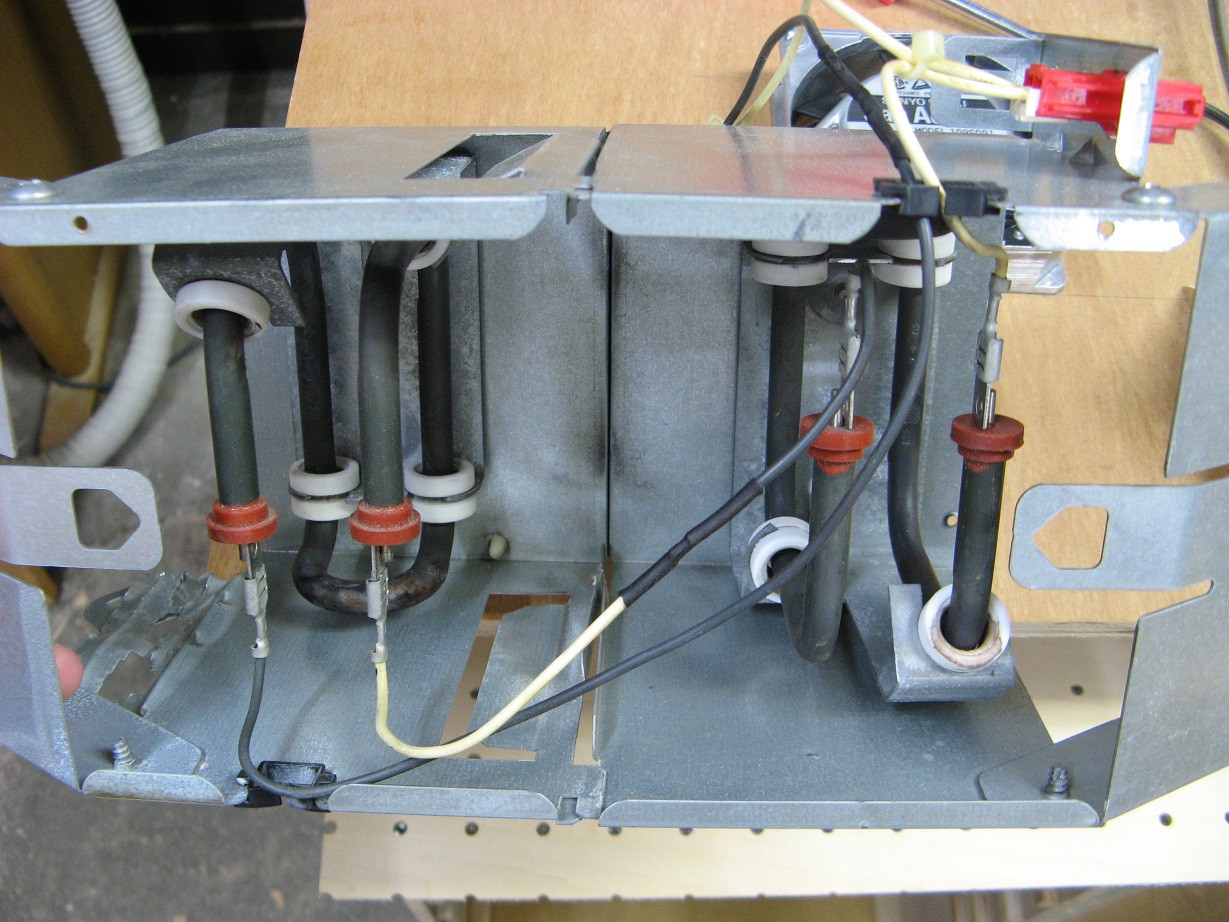
  • A 150watt resistive heater unit salvaged from a vending machine. It conveniently had an attached 90C thermostat.
  • A piece of pegboard as an air distributor. It doesn't significantly impede flow, but it spreads the air flow over the whole rack area.
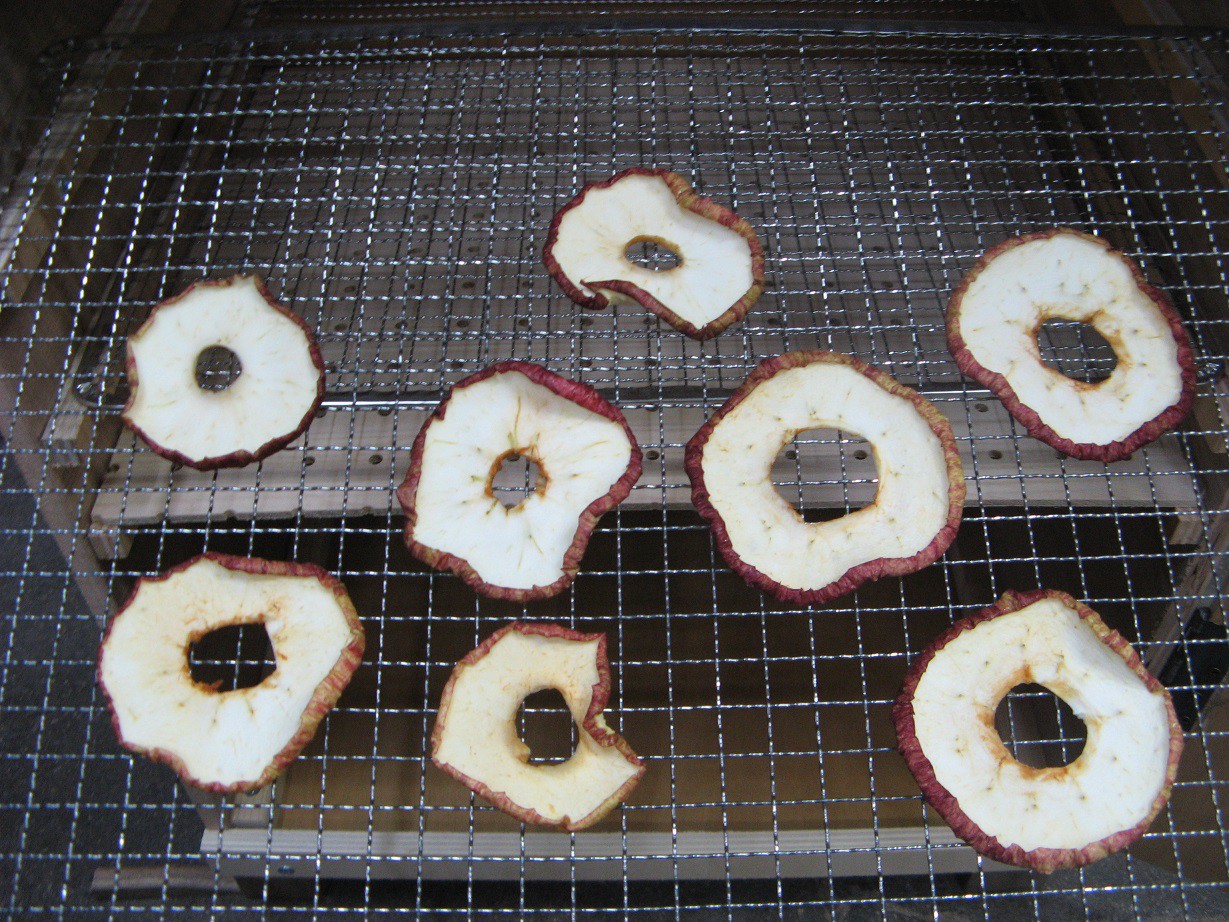
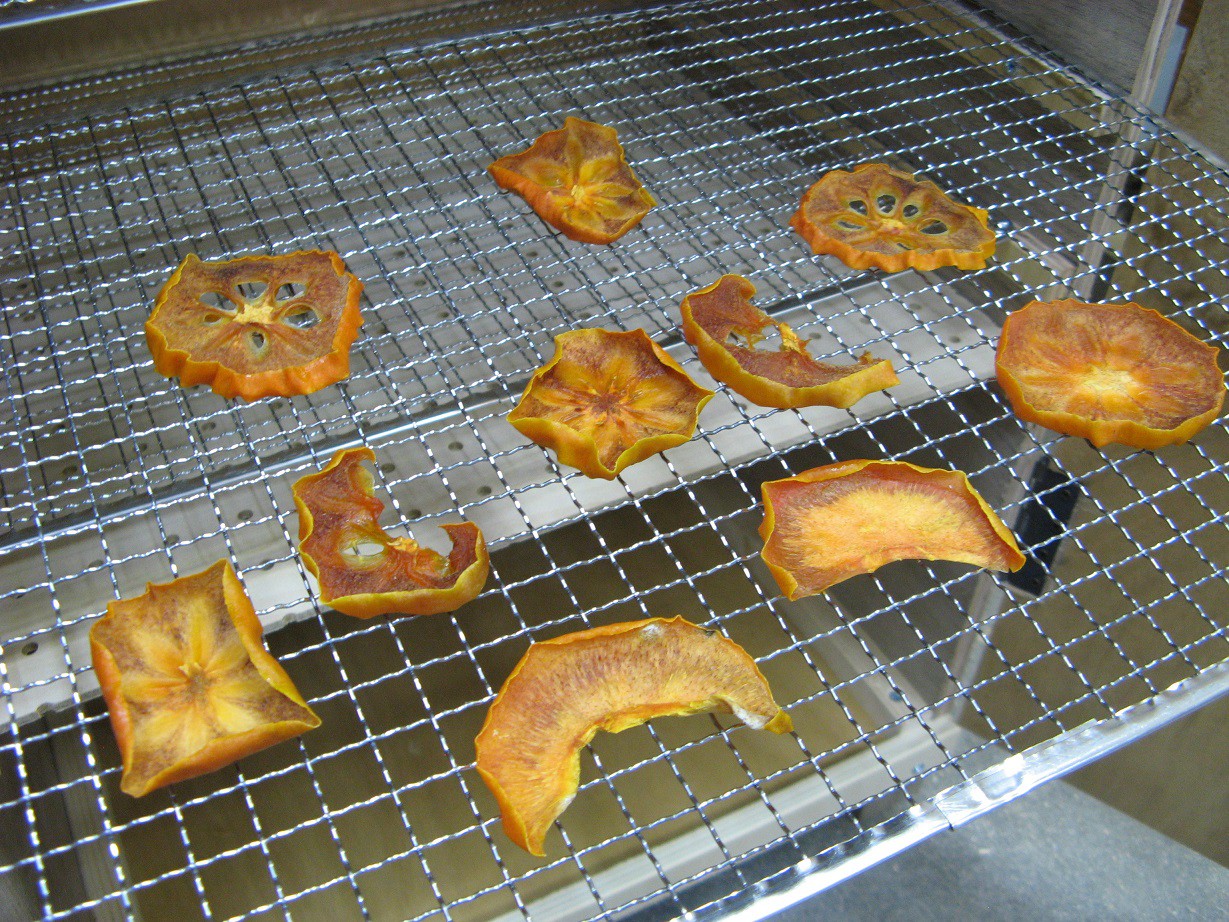
  • 8 steel BBQ racks. 40x30cm. The only parts I had to buy.
  • 2 switches salvaged from junk.
  • An air filter made from one ply of a surgical mask.

The idea is that air is pulled in through a hole near the bottom. It flows over the heating elements then gets spread out by the pegboard. The warm air flows up through the racks of food and exits through the fan on the top.

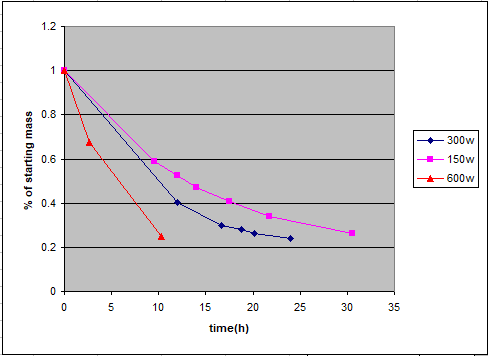
I don't yet know how well this will work. I may be looking at this way too naively. The only way to tell will be to try it. I'm going to stick some fruit in it tonight and if it dehydrates successfully then I will know that it is indeed as easy as it seems. If it doesn't, I will put a little more thought into the design and I'll have a little more respect for the commercial units.

  • 2 × 32x43cm plywood top and bottom
  • 2 × 32x88cm plywood sides
  • 2 × switches see schematic
  • 2 × hinges for the door, of course
  • 2 × 43x90cm plywood back and door

View all 12 components

  • log 5: Jerky and kumquats

    shlonkin01/05/2018 at 05:20 0 comments

    I tried making jerky a couple times. It works great. I have to keep an eye on the drying times because I think I over dried it and it was way tough and not very flexible. Then again, it might be my recipe or the cut of meat that needs changing. I wish I could go to the store an buy a nice flank steak, but that is not the case in these lands.

    I also dried a bunch of kumquats cut in half. I left them in for almost 15 hours and although the outside is completely desiccated to the point of being crisp, there is still lots of juice locked away in the deeper parts. I think they need to be prepared differently. I don't want to make slices because they are already so small to begin with, but I can't think of another way to expose the wet parts.

  • log 4: heater power comparison

    shlonkin10/28/2017 at 09:08 1 comment

    Data has arrived! The persimmons are ripening and the experiments are taking place. The first series of tests were using different heater power levels, 150W, 300W and 600W. Note that most commercial dehydrators of this size use around 1kw, but they also heat the food more than I would like, which kind of cooks it and changes the nature of it.

    I will first apologize for my lack of scientific rigor. The amount of fruit was not kept consistent between tests because my supplies vary and it just takes so much time to do a batch. There were long periods of no measurements due to me being asleep. Also, I did not measure the temperature, which is an important parameter. Having said that, here is the result of the first three tests.


    One cool thing to point out is that the 600W test was drying 999g of fruit. After just 2.7 hours it was down to 672g. That means I evaporated 327g of water in just 2.7 hours. That's almost a full can of beer. In total it evaporated 749g, or about 75% of the mass, in 10.3 hours. I suspect it got to a good level of dryness earlier, but I lack data points due to being asleep.

    So how about energy use:

    • 600W for 10.3h = 6.18kWh
    • 300W for 25h = 7.5kWh
    • 150W for 36h = 5.4kWh (It looks like it would take about 36 hours to get to the same dryness)

    Considering time required, the clear winner is the 600W version.

  • log 3: Second test - more power, more flow

    shlonkin10/16/2017 at 07:32 0 comments

    The 150w heater was rewired to make it 300w. Here's a look inside the heater(before the change) to show you how easy that was to do. I just moved one wire and it now only powers one of the elements.

    Then I replaced the filter with window screen to increase flow. Once I get a less restricting filter made, I'll change this. Now we're ready for test two.

    The air coming out is now significantly warmer, but not hot. The flow rate is also much higher. I think if I left on the more restricting filter the air would be much warmer still. I may keep that in mind for a future test.

    Yes, I know I would need to dry more persimmons to properly compare this test to the last, but there are no more ripe ones on the tree yet, so I used an apple. Again it was sliced to about 7mm and placed on the second from bottom rack. About 20 hours later the slices were nicely desiccated. They were about 2mm thick with a flexible leathery feel. Again, I can't properly compare the drying performance with different fruit, but it does seem faster. On the other hand, it uses twice as much power.

    Testing Plan - Science is good, so I'll have to set up some proper experiments. Once the persimmons ripen and I have buckets full of them, which is one of the reasons I wanted a dehydrator in the first place, I'll do some proper comparisons using a scale to measure moisture loss over time with different configurations. We'll just have to wait a few more weeks. In the meantime, here is an apple.

  • log 2: notes and ideas

    shlonkin10/15/2017 at 00:46 0 comments

    I let the first test fruits dry over one more night bringing the run to about 36 hours. However, I didn't notice much of a change over the last 12 hours, so the fruit was pretty much finished drying in 24 hours. Commercial units claim to work faster(nesco dehydrator manual), so I think there is room for improvement. First I'll list some observations, then some changes I'd like to try.

    • The heater was probably under powered because the air coming out was just barely warmer than ambient and the inside of the box was only heated maybe one or two degrees.
    • The fruit on the lower rack seemed to dry a little faster. Maybe it's because it was a little warmer close to the heater, or maybe it's because the air passed over it first. Anyway, the difference wasn't so dramatic.
    • The filter was more restricting than I would like. There was a very big difference in flow with the door oven vs. closed. I think that more air flow would greatly improve drying ability, but would also make it less efficient to heat. There's probably an ideal balance that could be found with experimentation.

    Here are some things I want to change for the second test.

    • Double the heater power. The 150w heater is actually two 300w elements in series, so I'll just move the wires to only use one. Heat transfer won't be as good, but it might work well enough. Another idea would be to use a couple big diodes to send half the AC wave through one element and half through the other. Then I would have 300w with all of the element surface area.
    • A much less restrictive filter. A piece of window screen would keep out the bugs and big stuff, but dust would go right through. If I use the same filter element(one ply of a surgical mask), but with a much larger surface area, I would get more flow and good dust filtering. Unfortunately This would require an attachment that would increase size and complexity. Ultimately I would like to go with the attachment, but temporarily I will put on a screen.

    To summarize, I will rewire the heater to use 300w and temporarily replace the filter with window screen.

  • log 1: First test food

    shlonkin10/14/2017 at 14:05 0 comments

    Last night I went out to the garden and found two almost ripe persimmons for this test. They were cut into discs about 7mm thick. Some pieces were placed on the second to top rack and others on the second to bottom. This was to see if they dried at different rates in different places. I checked the progress several times over the last 24 hours and I'll discuss my observations in the morning(I'm having a hard time keeping my eyes open), but here is the result of one day of drying.

    Can you see that? That's some dehydrated persimmon. Also known as success.

    I was right. It really is that simple. Those ones for sale really are too expensive. I need to investigate this further and spread what I learn. This project might... matter. Alright, I'm throwing it into the HaD prize.

View all 5 project logs

  • 1
    Cut the wood for the box

    The dimensions of the box are completely up to you, but I recommend sourcing the racks first and making the box to fit them. If you want to copy my design, with 30x40cm racks, here are the pieces you'll need.

    12mm plywood:

    • Two 32x43cm pieces for the top and bottom
    • Two 32x88cm pieces for the sides
    • Two 43x90cm pieces for the back and door
    • Several 1.5x31cm pieces for rack holders
    • Some pieces to mount the switches on

    Other wood:

    • Six roughly 2x2x30cm pieces for edge braces.
    • Four chunks for legs.
    • A 31x40 piece of pegboard, or any board with an array of holes like that

    The top will need a hole cut for the fan. A computer case fan would work fine, but would require a 12V power supply. I used a 100V AC one because I happened to have one.

    The back will need an air inlet hole near the bottom. Mine is an 8x10cm rectangle, but the shape is not critical.

  • 2
    Assemble the box

    Screw the edge braces onto the top and bottom pieces like in the picture. A scrap of plywood is useful for putting them in the right place.

    Then screw all of the rack holder strips onto the side pieces before screwing the box together. The bottom set of holders is for the pegboard. Like this:

  • 3
    Install heater, fan and switches

    Your heater will not be the same as mine. It might be some high power light bulbs or a hair dryer heating element or something from a waffle iron, etc. As such, you'll have to figure this step out on your own. Just set things up so that the incoming air has to pass over the heater before moving up through the box. Once you get this together, the fan and switches are simple. Here's the circuit I used, but variations will work fine. One thing to note is that I put the heater switch and circuit after the main switch so that the heater can't be on when the fan is off. The thermostat is just a safety precaution that was conveniently already attached.

View all 5 instructions

Enjoy this project?

Share

Discussions

naylorandrew890 wrote 09/30/2023 at 10:52 point

What a fantastic concept! I admire your work and approach. You can simply click on Breakfast Hours to access a comprehensive list of breakfast timings across the USA.

https://theopeninghour.com/black-angus-happy-hour/

  Are you sure? yes | no

xoomenu wrote 02/20/2022 at 16:25 point

this is really amazing project of foo dehydrator simple and cheap. i am also working on a  cookinggearlab site , i want to share this on my blog.

  Are you sure? yes | no

visej73493 wrote 12/02/2021 at 05:56 point

What an amazing idea I like your work and approach you can click on portable blenders  where you can see some best blenders.

  Are you sure? yes | no

najib.cambris wrote 10/19/2021 at 07:58 point

I build one using 2 fans. one at the bottom above the heater (which draws air in from the outside and pushes the hot air. the other fan works by extracting the hot air and humidity out of the dehumidifier. So one fan is a puller and the other is a pusher which allows for better circulation. i also added a thermometer on top to monitor the temperature, in addition to a thermostat to set the temperature of the dehumidifier to desired temperature as different vegetables have different heat requirements (my thermostat ranges from 0 to 70 deg C) 

  Are you sure? yes | no

gallenbabes wrote 11/09/2020 at 18:38 point

This is very good step for food maker tool. I'm working on the similar project for the toaster you can see here https://besttoasters2020.com/best-4-slice-toaster/

  Are you sure? yes | no

Michael wrote 10/16/2017 at 02:21 point

The exhaust fan should be on the bottom of the box and the hot air intake should be on the top. As you have it now you're exhausting the hottest, driest air (which rises) instead of the coldest, wettest air.

Also, buy a dado blade and use it. Wood gussets are for hacks (and not the good kind of hack).

  Are you sure? yes | no

shlonkin wrote 10/16/2017 at 05:35 point

Thanks for the comment. Ideally the air comes in cold and dry, heats up, and leaves hot and wet. It's easy to mistake hot air for being drier, but it's just the opposite.

Also, I would love a dado blade. But I would still rather gusset than screw into plywood from the edge. Glue would be better, but would make disassembly and changes impossible.

  Are you sure? yes | no

esopjaw wrote 10/15/2017 at 02:45 point

Nicely built.

If I remember right, temperature typically has a stronger effect on drying compared to air flow, so it's good you're focusing on that first. You could also lower the humidity by running the inlet air through a desiccant. As for the inlet filter, I've had good results using a cartridge filter for respirators; they're fairly cheap, easy to swap out, and you can get a good amount of flow through them.

Don't forget to enjoy the persimmons :)

  Are you sure? yes | no

shlonkin wrote 10/15/2017 at 05:21 point

Thanks. It sounds like you've built something similar. If temperature is more important I'll keep that in mind when experimenting. That's just the kind of helpful info I need.

  Are you sure? yes | no

Similar Projects

Does this project spark your interest?

Become a member to follow this project and never miss any updates