Close
0%
0%

Galileo's Finger

A open source tool that aids in the learning of the sky map in amateur astronomy.

Similar projects worth following
We are designing and building a 2 axis motorized laser pointer, that is controlled via Stellarium (Free astronomy program). The user chooses a star on Stellarium and the laser pointer indicates the same star in the real night sky. As an open source tool it will, hopefully, be used as an easy way to teach the basics of astronomy and get kids or anyone really interested in science and technology.

Overview

The aim of our project is to design an open source, low cost astronomy tool that can aid in the teaching of amateur astronomy. Our project aims to develop interest in science and technology at a high school level through a basic introduction to the stars and some of the interesting mechanisms of our universe. The sky-map can be a difficult thing to follow when starting out in astronomy. We have designed this specifically to break that barrier, hopefully through the use of this tool the novice could teach a class on the basics of sky-watching and identifying major stars and constellations.

Here in South Africa we have a lack of adequate, well trained teachers for the most basic of subjects. As a result, only the more privileged citizens are allowed the opportunity to broaden their understanding of the world around them, and move beyond the scope of the basic education curriculum. The time it takes to train teachers in the necessary skills leaves the current generation at risk of losing out, this fits into part of our aim. We want to remove the need for specifically trained teachers and allow the already available teachers to move beyond their personal scopes.

Design

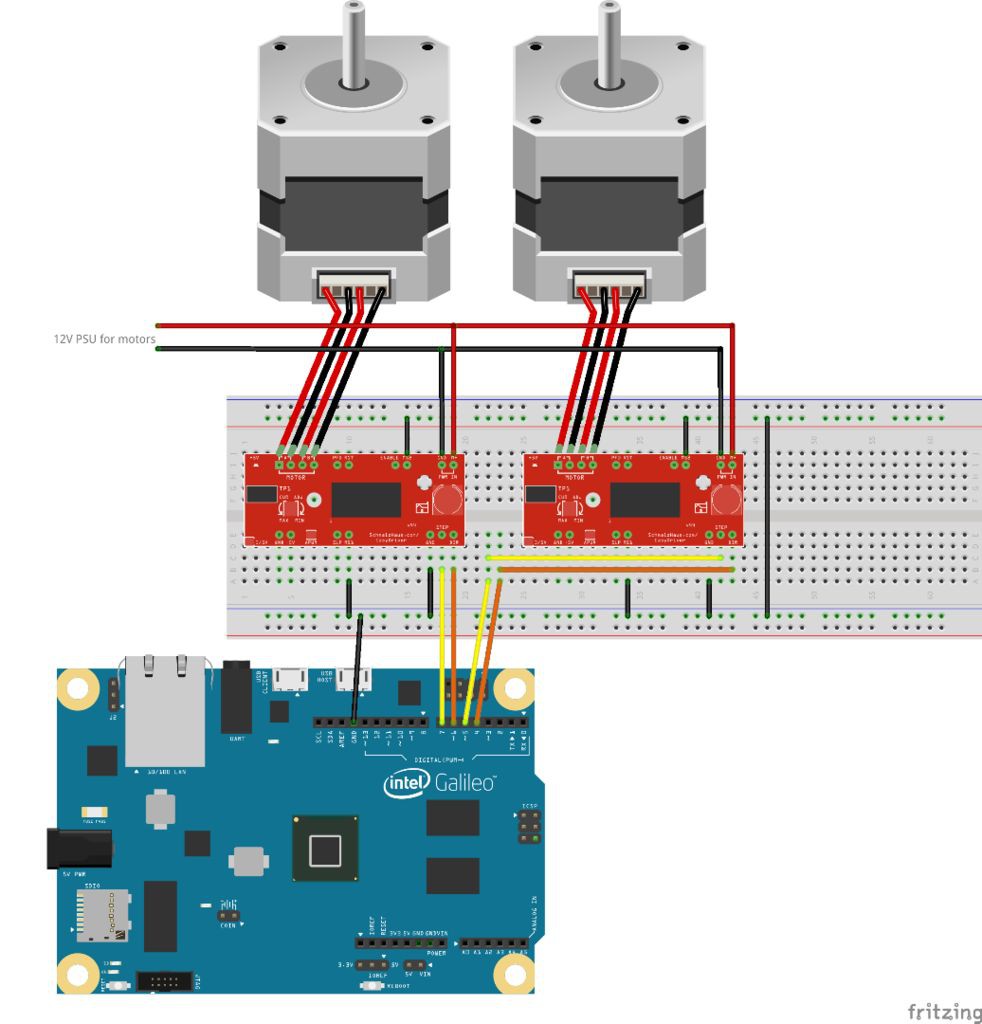
The current iteration consists of a 2-axis motor driven belt system. The custom parts are made from wood and elastic bands, while the electronics are available in most printers (A common e-waste item). The only non-salvageable part is the micro-controller (Intel Galileo, but will run on any Arduino board).

  • 2 × NEMA 17 Stepper Motor
  • 2 × EasyDriver V4.4
  • 1 × Intel Galileo
  • 1 × Handheld Astronomy Laser Pointer
  • 1 × Hard drive platter bearing

View all 6 components

  • Update #1

    Brendan Ardagh04/19/2015 at 12:34 0 comments

    To date we have both been inundated with other work, we are students first after all. Our latest plan of action is re-developing the build into a kit that can be laser cut and used reliably. We decided that a custom board with integrated drivers etc. would be cool, it really is more of an exercise in custom development and design than a real necessity. We've started that development and will post updates as we go, but it won't be a particularly fast process. I'd reckon about 2 months will a working prototype MkII is ready.

    Thanks to everyone who skulled and followed :) It's motivational to know people are interested, you guys make a difference.

  • Testing & Issues

    Brendan Ardagh03/29/2015 at 20:45 0 comments

    Since the prototype was completed we hadn't actually had a chance to test out the system on the real night sky. On Friday we met on campus (UCT) to test out our creation, and of course the 'demo-gods' (yes, demo-gods) would have it that cloud cover prevented us from identifying any major constellation or star...but we waited it out and to our excitement the cloudy night cleared just long enough for us to identify a star and calibrate the laser. Due to the location, we were forced to use a car battery and a DC-AC inverter (square wave, 1.5A). Star chosen (Rigel) and coordinates sent, we expected the laser to do as it was told. As any good first test should go, issues arose. The steppers were stalling and we didn't have a clue why. After a quick deduction, we guessed that the inverter/car battery combo wasn't giving us the current we needed (Still not sure why). "Bummer, guess we aren't destroying any planets tonight then."

    We did however confirm our suspicions in the lab with a PSU, where all systems were 'go'. But getting late and not having had a full nights rest for a week meant that this tonight was unfortunately not the night. Pictures to come soon.

  • Prototype 1

    Brendan Ardagh03/22/2015 at 16:56 0 comments

    We have completed the first working prototype and although not fully featured yet, it does indicate the sun with an acceptable degree of accuracy.

View all 3 project logs

  • 1
    Step 1

    Collect all the necessary parts, tools and software dependencies:

    TOOLS

    • Soldering iron
    • Hot glue gun
    • Drill and appropriate bits
    • Saw
    • Pencil

    PARTS

    • Intel Galileo (Any micro will work – you just need serial communications and 4 output pins)
    • 2 x Stepper Motors (we used Nema 17s)
    • 2 x Stepper motor controllers (we used Easy Driver v4.4)
    • Veroboard/Breadboard
    • Some headers to mount the motor controllers
    • Wires for connecting
    • Ball bearings (we used parts from an old printer and harddrive - see pictures)
    • Elastic bands
    • Solder
    • Laser pointer (please be careful with this)
    • AA battery pack(or anything that can provide a steady 3V - NOT the arduino)
    • Wood

    SOFTWARE

    • Arduino IDE
    • Python 3.3
    • PySerial
    • PyEphem
    • Stellarium
  • 2
    Step 2

    Electronics assembly:

    We used a combination of commercially available parts for the prototype, but future revisions will use a custom controller and e-waste parts (Old printer parts).

    The Galileo's pins (Same layout as an Arduino):

    • Connect MS1, MS2 and the GROUND on both easyDrivers to GROUND on the GALILEO/ARDUINO. (This sets the easyDrivers to 'Full Step')
      Connect M+ and GND (on the PWR IN) on both boards to the 12V power supply for the motor. (External power to power the stepper motors.)
      Connect DIR on easyDriver 1 to Arduino pin 4. (Used to control the direction of the motor)
      Connect STEP on easyDriver 1 to Arduino pin 5. (Used to control when a step is taken)
      Connect DIR on easyDriver 2 to Arduino pin 6.
      Connect STEP on easyDriver 2 to Arduino pin 7.
      Connect each motor to its own easyDriver, paying attention to which coil is which. Each of our steppers has two coils, with 4 wires. Use a continuity tester on any multimeter to figure out which two wires are from the same coil. Connect one coil (two wires) to one set of outputs on the easyDriver (A or B)
  • 3
    Step 3

    Software stack:

    You will need to download and install the following.

    1. Arduino
    2. Python
      • (we used python 3.3)
      • pySerial - choose the one that's correct for your version of python
      • phEphem - again, watch python version you are using
    3. Stellarium

    TelescopeMotorController (both arduino code and python code) - Github Source

    Note: A special thanks to Sven Steinbauer (GitHub) for the python code (pyscope)

    A special note here: You will need to make some changes to the python code. Specifically,

    1. The com port used (this is almost guaranteed)
    2. The city you are in (or at least your lat/long)
    3. The degrees on the stepper motor
    4. The gearing ratio

    All of these are commented as to where you might need to change them

View all 4 instructions

Enjoy this project?

Share

Discussions

Luke Bosshard wrote 12/17/2023 at 15:49 point

hi there! just saw your amazing project, i was planning on building something similar! i would love to develop a 3d-printable version of this. email me - lukeboss@gmail.com lets make this happen :D cheers

  Are you sure? yes | no

suicidal.banana wrote 03/25/2015 at 14:55 point

Great idea! keep us posted on your progress :)

  Are you sure? yes | no

Brendan Ardagh wrote 03/30/2015 at 17:01 point

Thanks :) Definitely will!

  Are you sure? yes | no

dmopalmer wrote 03/22/2015 at 18:01 point

For those readers who don't get the reference, <a href="http://www.atlasobscura.com/places/galileos-middle-finger">this.

Safety concerns: a laser bright enough to be used as a star pointer is going to do damage if it points into a dark-adapted eye.  You probably want to put it on a pole or other platform sufficiently taller than all bystanders, and have a shield so that it can't shine out below horizontal.

If you want to drop the BOM a lot, you can use two servos with 180 degree travel and still be able to point at the entire sky (with a flip at the meridian).  It may require some calibration to get it to point accurately-enough for stars.

  Are you sure? yes | no

Brendan Ardagh wrote 03/22/2015 at 18:25 point

Very good point on the safety concerns, thanks. We were going to go for servo's but we wanted a proof of concept prototype asap, and we already had the steppers and drivers. We will update the BOM as we go. Thanks for the interest!

  Are you sure? yes | no

Similar Projects

Does this project spark your interest?

Become a member to follow this project and never miss any updates