Close
0%
0%

M42 lenses

M42, the answer to life, the universe and everything regarding photography. Information, modern day uses and hack with M42 lenses

Similar projects worth following
The M42 lens mount was a popular mounting system for the better part of the second half of the 20th century. Today these lenses are cheap and collectible, but several of the M42 lenses still have real applications today. In this project I want to share information, hacks and uses for old M42 lenses in our day and age.

Created by Zeiss in 1949, the M42 was very popular right up to the 1990's. Produced in both Germany's , the USSR and Japan, this mounting system has a lot of camera bodies and even more lenses to it's name and second hand, they are cheap.. if you are lucky you can get them for nearly nothing.

The quality of M42 covers the entire spectrum from low end triplets and simple tele lenses to high end precision engineered multi group/element formulas that are revered for their quality and character.

Vintage glass is always fun to play around with, but these lenses are not necessarily novelty gadgets. I film, photography and hacking the M42 lenses can still be very useful and produce amazing quality for tuppence.

Now you can get a lot of information about these lensen and their qualities on various photography fora. There are dedicated sites for M42 lenses alone, so I will not be writing in detail about sharpness, abberations, colorrendering and such. Instead I want to highlight some lenses from my collection that I have used for hacks, work or fun and write about all the features that make that particular lens useful and why.

One lens per log entry is the format and the lenses that are coming up for review are :

  • Carl Zeiss Tessar 2.8/50 (T aus Jena)
  • Aus Jena MC S 3.5/135 (Carl Zeiss Sonnar)
  • Carl Zeiss MC Pancolar 1.8/50
  • Helios 2/58
  • Industar 50-2 F3.5/50
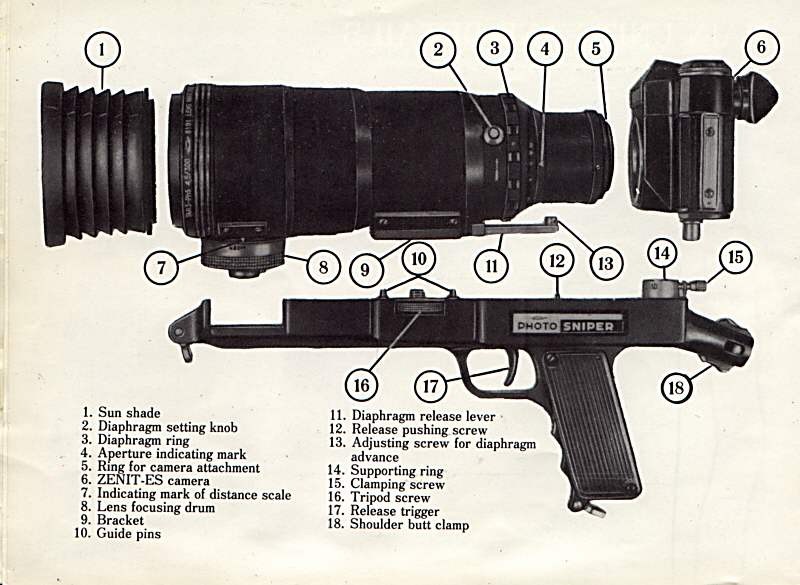
  • Tair 3S 4.4/300m (photosniper kit) (Done)
  • Mir 1A 2.8/37
  • Pentacon 2.8/29
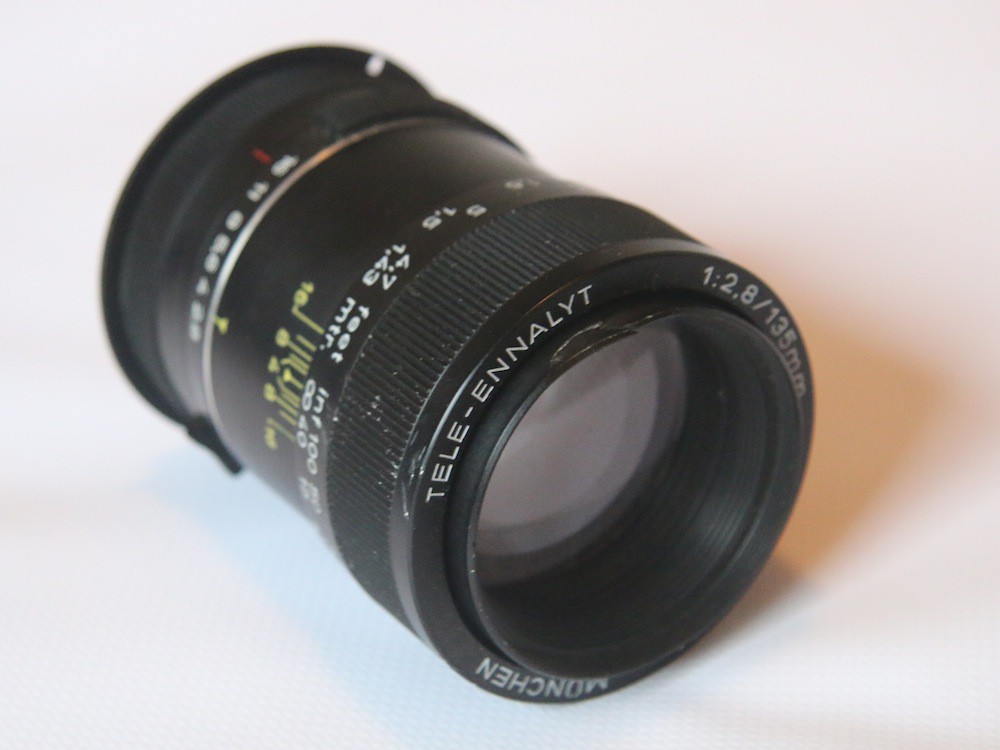
  • Enna München Tele-ennalyt 2.8/135 (Done)
  • Meyer-Optik Görlitz Orestor 2.8/135
  • Meyer-Optik Görlitz Orestegor 4/200
  • Vivitar Tele-zoom 4.5/75-260
  • The big 135mm topic
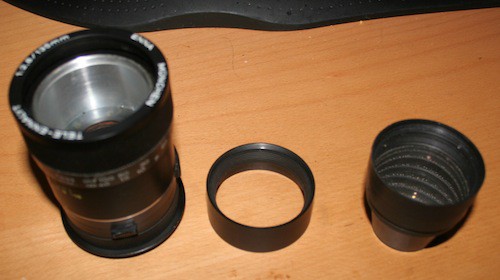
  • Macro tubes and bellows.

The list might grow, but these are the lenses that I use or have used for various jobs and hacks through the years. The write-ups will not necessarily follow the order of the list, but rather the situation in which it is most effective to do a write-up. I might be doing a book cataloging job and write about the Pentacon 2.8/29 which I use for some jobs or I might be filming something and do the Pancolar or the Vivitar zoom lens.

  • Photosniper kit Tair 3S 4.5/300mm

    Timescale10/10/2015 at 14:49 0 comments

    It has been a long time since I had a chance to do another log entry. Sorry for that, but here it finally is!

    Tair 3S 4.5/300m


    The lens I will look at today is the Tair 3S. A 3 element 300mm prime from the USSR/Russia. This behemoth of a lens with its 72mm frontal ring mount is quite a good performer. It is quite sharp considering it's simple formula, has good color rendering and has amazing bokeh due to the 16 blade aperture. There have been various versions of this lens from 1955 all the way up to 2005, but the soviet era versions are the most sought after.

    The lens is build like a tank(muzzle). It is russian over-engineering at it's zenith(there a pun in that). It is big, bulky and heavy at a whopping 1.54 kilograms without anything attached to it. This is the main reason why this lens is most commonly found as part of a kit.


    The fotosniper kits included the Tair 3S in a leather or metal case matched up with a modified Zenit SRL body, some B&W filters, A helios 58mm lens and a gunstock and shoulder rest! The unwieldy Tair at 300mm is much to heavy to operate traditionally without a tripod, so in order to make shooting with it possible, the soviets simply put a gunstock underneath it with a trigger that operated the semi-automatic aperture* and the zenith camera.


    *Semi-automatic aperture : The aperture needs to be reset by hand. You set the spring and halfway the trigger closes the aperture to the desired stop with a loud clang.


    It is a unique lens and quite a solid performer for such a simple lens formula, so it is well worth having it as a 300mm reasonable light sensitive lens for a modern camera. Yes, like all other M42 lenses, you can get an adapter an screw this puppy on your DSLR or Mirrorless system and this looks absolutely amazing.


    So here is where the hacking comes into play. Surely when you go out and shoot this lens you want it to function as it was intended. This means you want the tiger to work in a way that makes sense for your DSLR. So it should be able to activate the aperture, measure the light and give focus confirm and when pressed down, the trigger should have the camera take a shot.


    There are several hacks to be found on the internet that rig this lens to digital cameras, but I did a conversion several years ago that just is a bit more refined. It it suitable for many camera systems, it is reversible if you want to use the old Zenit camera on it again and it is really simple.


    The conversion is based on the HAMA remote shutter control units which are almost the same form factor for various systems or at least easily adaptable if it does not fit your camera.


    Step one is to gut the remote. The PCB needs to be slimmed down to fit and the pins need to be angled backwards. the pressure fit can't work id the second trigger port is there, so cut it off or desolder the part. The connector probably will be in the way of the sleeve is on and you need to take the grommet off.. You can solder the wires directly or use the bare connectors independently to work them around the mechanism later. This is just about all you need to do to the remote.


    Step two. Preparing the gun-stock. There are a few mods you need to do on the gun-stock. A route for the wire to go through and come out and the trigger pin need replacing. After you have disassembled the gun-stock, you can remove the trigger pin by first loosing the worm-screw. I believe it is a standard M4 metric size. Replace this with a shorter screw with a flat head. The routing of the wire is a matter of preference. I used the empty grip to store the excess cable by drilling a hole through it. Because my remote port on the camera is on the left side, I opted for the cable to escape via the top side of the grip, but anywhere that you can route the cable to is fine. Maybe you need to remote the trigger-pin guide at the back depending on DSLR body size, just test fit the lens and find out.


    Step three is putting it together. You need some sleeve or isolator on the PCB so that it can't short...

    Read more »

  • Enna München Tele-ennalyt 2.8/135

    Timescale08/18/2015 at 18:48 0 comments

    The first lens that I'll be looking at isn't the greatest in build quality, rarity or image quality. The Tele-ennalyt is a west-German 135mm tele lens that is nice and fast with it's F2.8 aperture. My version is the 80's rendition and not the zebra stripe version that went before, but this is actually important for this particular feature.

    How does it perform.

    On paper, this is a pretty sweet lens. F2.8 sonnar'esque inspired design with 10 aperture blades made in Germany! What could go wrong? Well, a lot! For starters the lens has pretty mediocre color rendering and isn't to sharp, especially in the edges. It isn't coated that much and it flares like a JJ Abrams movie. The construction is very basic and plastic with a lot of play between the rings and lens sections. My version is battered, scratched, had mould in it, damaging the barrel coating and has rusty aperture blades!!!

    With a myriad of better 135mm primes on the market, why bother with this puppy?

    What is it good for?

    Well, this lens or this class of lens is hackable to the tenth degree! The lens formula is simple and the plastic/aluminium construction was also produced on a budget. So no fiddly cast iron milled precision engineering you expect from a Zeiss lens, but simple straightforward mechanics and construction. This means it comes apart really really easy!

    With it's massively wide aperture there is a lot of space to play around with. The lens comes apart in a couple of turns and now you have access to and beyond the aperture blades, easy as that!

    As this is not a German optical treasure, it is far more tolerable to drill and cut into these puppies than your pretty aluminium -body Flektogon or Orestor. Now you can have fun with optics too!

    What did I abuse this for?

    This particular lens I use to play with custom apertures. Mostly you see people put paper cutouts infront of the lens to get this shaped bokeh effect, but this is less then ideal for various situations. Bokeh won't always be sharp enough and various aberrations can occur. It is much better to put the custom shape near to the actual aperture shutters. This will maximize light and sharpness of the bokeh.

    I cut some custom shapes from flexible magnetic material so it would stick to the blades of the aperture during use. This material is soft enough to actualy use shaped punches to produce the aperture effect. The heart is about the biggest effective size you can get away with.

    Here is a test shot with the stary aperture. The flowers in the background all nicely take the star shape up individually.

    Conclusion

    While not a very great or versatile lens, the Ennalyt is easy to open and play around with. It is easily customization and it does not not ruin a classic M42 lens. If you have to hack a lens itself, this class of lenses are excellent to at least test out the concept before trying it out on better glass.

    Buying advice

    While the zebra can go for 50 to 150 of euros, the 80's version can be had for much less. A reasonable price for a good version would be 15 to 25 euros, but I think I payed 3,50 for it at a dumpsale.

View all 2 project logs

Enjoy this project?

Share

Discussions

Similar Projects

Does this project spark your interest?

Become a member to follow this project and never miss any updates