Close
0%
0%

Smart Card Door Entry Controller

Use a disposable travel card to lock and unlock your door.

Similar projects worth following
This project shows how to use a travel card to lock and unlock a door, in this case a garage door. Travel cards such as the Edinburgh "citysmart" bus and tram pass are issued for the cost of the travel they allow. Once exhausted, they can be used as a cheap (free) electronic key. Each card has a unique ID number that can be recognised to lock or unlock a door. As with a mechanical key, cards can be copied so bear in mind this is a Hackaday project, not a super security system. Don't use it to secure valuable stuff or doors where access is a safety issue.

Introduction

I have an old Henderson 880 garage door lifter. The radio key boxes that came with it have worked perfectly for decades, but not any more. I installed power line modems to get Ethernet where WiFi doesn't reach and the interference they generate stops the 27MHz keys from working.

Interface to the Henderson 880

The door motor unit provides a 24V DC supply and third contact that, when connected momentarily to the -ve supply, causes the door to change state. If the door is closed it starts to open, if it is open it starts to close. If it is already moving it stops. Many other models probably work that way too.

To replace the 27MHz radio keys we need a device that:

  • Operates from 24V
  • Can connect the third contact to the -ve supply for a second or so on demand
  • Only allows a person with a key to operate it


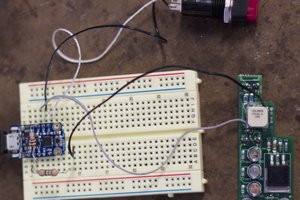
How this NFC Card Door Control works.

  • A regulator drops the 24VDC supply down to 9V for the Arduino (the relay shield needs 9V).
  • An NFC card reader gets the ID from any MIFARE based card presented to it
  • The Arduino compares the ID number of the card to a list of valid IDs
  • If the ID is in the list, a green LED indicator lights and the door is activated. Individual relays are used for each function.
  • If the ID isn't on the list, a red LED indicator lights to show a card has been presented the is not valid. A third relay controls the LED


Possible Improvements.

  • The linear regulator isn't a good solution because it has to dissipate a wee bit of power and gets hot. The regulator will need to have a heatsink fitted. A switched mode supply would be much better but I had the Velleman board to hand....
  • Having to edit and download code each time a new card is to be validated is clunky. You could have the Arduino add a new ID to the valid ID list based on (say) presenting a valid card then the invalid card within a short time window.
  • If you have a simple door lock or a different kind of door you will want to experiment with the timings to get convenient operation

Hackaday_NFC_Door_Control.zip

Arduino Sketch for the door control. Uses SPI and PN532 libraries. The PN532 library is from www.seeedstudio.com.

x-zip-compressed - 1.97 kB - 01/20/2016 at 09:50

Download

  • 1 × Arduino Uno Any Arduino compatible with the relay and NFC sheilds will do.
  • 1 × Maplin NFC Communication Sheild for Arduino Seeed and Adafruit NFC sheilds using the NXP PN532 are alternatives.
  • 1 × Maplin Relay Shield for Arduino Any relay shield of your choice can be used.
  • 1 × MULTICOMP G212 Enclosure An IP65 box so that the unit can be fixed outside if required. Alternative boxes need to be plastic!
  • 1 × CML 190B1350 LED Panel Mount Indicator, Red An IP67 LED with integrated resistor for 24VDC operation

View all 7 components

  • 1
    Step 1

    First assemble your Arduino and shields. For the shields listed, only the NFC shield has stacking connectors so it has to go in the middle with the relay shield on top. This isn't ideal because it means the NFC antenna is surrounded by the Uno and the Relays and the card is further from the antenna than it could be. However, there is enough range for this arrangement to work well enough.

  • 2
    Step 2

    Now load and run the Sketch with the serial monitor in the Arduino IDE active. Hold the card you want to use as a key close to the NFC antenna for a few seconds. The NFC reader will read the ID number from the card and display it on the serial monitor, marked as "invalid". Note the ID number.

  • 3
    Step 3

    Now edit the Sketch to add the ID number of your card to the list of valid cards.

    Edit the valid_id array declaration to replace one of the 10 digit numbers below or add more numbers as required. For example, the code below establishes two valid ID numbers. 123456790 and 0987654321.

    // Set up valid card IDs
    uint32_t valid_id[] = {
    1234567890,
    0987654321
    };

    Re-compile and install your revised Sketch. Present the card again, it should now be identified as "valid".

    Note that relays will click for valid and invalid cards. The relays control the LEDs as well as the door.

View all 4 instructions

Enjoy this project?

Share

Discussions

Similar Projects

Does this project spark your interest?

Become a member to follow this project and never miss any updates