Close
0%
0%

analog2pi

Two channel analog input for the Pi Zero for under a dollar.

Similar projects worth following
Using two resistors, four diodes, and some fancy software you can sample two analog channels on the Pi Zero with 6 bits of resolution, a 52KHz sample rate, and 1V p-p signal range.

THE STORY

You've heard it a million times: "The Arduino has analog inputs, why doesn't the Pi?". So, awesome hacker that you are, you decide to do something about it. But it wouldn't be any fun if there weren't some serious constraints. How about it has to be low cost, have low parts count, consist entirely of easy to acquire parts, and be simple to build even for novices? Something like PiFM, where the entire hardware interface is a piece of wire? (OK, a piece of wire is an over-simplification. It works, but you're supposed to add a filter consisting of something like 3 inductors and 2 capacitors or the FCC gets a bit grumpy.)

So you begin thinking: there is a well-known trick used with microcontrollers to measure analog values using a digital input. Here's how it works: you connect a capacitor from a GPIO to ground, and a resistor across the capacitor. You set the GPIO to output a one: this charges the capacitor. Then set the GPIO to an input, and the resistor will discharge the capacitor. All you need to do is measure the time for the input to go from a one to a zero. This works because a digital input can be used as a fairly consistent analog comparator, with a fixed threshold of approximately half the power supply voltage (for most CMOS devices). Typically this technique is used to measure the resistor or the capacitor. But you realize you can measure voltage if the the resistor is disconnected from the ground end of the capacitor and is connected to a voltage source instead. The voltage will, of course, have to be less than the input threshold voltage. But it CAN be below ground!

In microcontrollers it's easy to measure small units of time, but not so with the Pi. So you wonder: how can you sample a GPIO pin at regular intervals? Anything like a shift register will suffice, regularly sampling the input and combining the samples into a byte or word. And guess what, the Pi has two peripherals like this: PCM and SPI, which are both little more than shift registers.

However, there's a small problem: these peripherals can't change a GPIO from input to output automatically while sampling. But maybe there's a way to use another output to do this job? It could charge the capacitor through a diode while an output is high, and would have no affect when it's low. Then the sampling input could remain an input. How about if this reset signal was generated by the SPI output? It would just need to be fed the right data. And the SPI has to output data for the input to work anyway!

Next you review the design to see if things could be further improved. How about eliminating the capacitor? Since digital inputs have some parasitic capacitance associated with them, and the diode adds even more capacitance, maybe that will be enough. So you run some numbers to see if it will work: you pick a 1 megohm resistor (doesn't most test equipment have 1 megohm input resistance?) and take an educated guess that the input capacitance will be about 10 picofarads.

Using your old friend the RC time constant, and assuming a grounded input, you figure out that the capacitance will discharge to the Pi's threshold voltage in around 10 microseconds. This means the sample rate is around 100 kilohertz, which implies you will be able to measure anything lower than half that frequency. It looks like you'll be able to measure audio-range signals: not too shabby! But you realize you can do a little better: since the capacitance doesn't have to be charged up much past the threshold voltage, you can use two diodes in series. This has the effect of cutting the capacitance they contribute in half, decreasing the sample time.

And since the PCM peripheral is similar to SPI, you can add a second channel! Just use a second set of diodes from DOUT to DIN. You have to synchronize the PCM and SPI clocks, but you've done this before. And what's more, both peripherals can be serviced by DMA controllers! No processor intervention is needed during sampling. The only effect there might be...

Read more »
analog2pi.c

C Source File - 14.38 kB - 02/29/2016 at 23:35

Download

analog2pi.ko

ko - 12.27 kB - 02/29/2016 at 23:35

Download

  • photo uploaded

    mincepi03/22/2016 at 02:27 1 comment

    I uploaded a screen cap of a scope display program I wrote last year. It's located at the end of the Project Details section. It's running on a Model B+ with an older version of raspbian. It's actually displaying data captured with the analog2pi interface - before the DMI api was changed. And I spent far too much time on it making it look just like my trusty Philips scope.

    Just a little tease to hold you over while I work on the module rewrite...

  • progess update

    mincepi03/13/2016 at 16:48 0 comments

    Sorry about the lack of progress. The new DMA API is quite different, but I think I have it almost figured out. I'm going to use the spi-bcm2835 code as an example, and I'll use device tree to reserve channels.

    If you can't wait, you can use the code at my old site to get it working (with only one channel) now. You'll have to use an older version of Raspbian though.

  • changed a gallery photo

    mincepi03/06/2016 at 14:31 0 comments

    Made it square.

  • files posted

    mincepi02/29/2016 at 23:38 0 comments

    Posted files for old version that was a character device. Second channel (i2s) won't work with this version of the interface.

  • initial posting

    mincepi02/25/2016 at 17:28 0 comments

    Initial posting, copied from my website https://sites.google.com/site/mincepi/analog2pi

    It doesn't include code since I'm in the process of writing a proper sound device module. My previous code was a simple character device, but it worked just fine, and served to prove the concept.

View all 5 project logs

  • 1
    Step 1

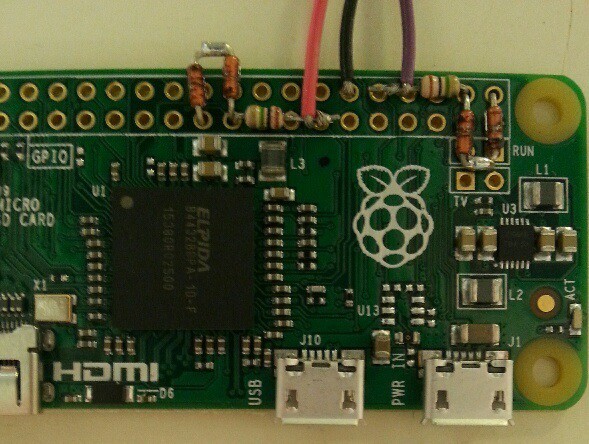
    Build it like this. Orange and purple are inputs, black is ground.

    CALIBRATION

    NOTE: These instructions are for a character device kernel module. I will re-write them when I finish a proper sound device kernel module. They're also horribly confusing - I'll do something about that too.

    If you use my code as-is, you'll probably have some distortion and incorrect amplitudes. If you want an accurate display, you'll need to calibrate it.

    To do this, you'll need a source of several calibration voltages. The easiest and cheapest way is a series string of five 1K resisors, with a 10K resistor at the end of the string. (In the above picture the clip leads are the inputs, and the black alligator clip is ground, The battery is connected by the red and black alligator clips at the top.) You can solder it together or use a proto board. The ends of this string are connected to a 1.5V battery: the battery positive to the 10K resistor, negative to the 1K resistor. Measure and record the voltages between each pair of resistors, with the meter ground lead connected to the battery negative terminal. A cheap DVM is quite adequate. The voltages should be at roughly .1, .2, .3, .4, and .5 volts. For each measured value, subtract the value from .5 and multiply the result by 300. These are the positive values. For the negative values, add .5 to the measured value and multiply the result by 300. Write these values on labels at each corresponding resistor junction.

    Now connect a Pi ground pin to the battery negative lead, and both input leads to one of the resistor junctions. Make sure the kernel module is loaded, and compile and run the analog2screen program. It will display the capture values for SPI and PCM. Write down the value for each: use the average value displayed. Also write down the positive junction label value. Move the inputs to each resistor junction and repeat the measurement.

    Now reverse connections: the inputs go to the battery negative, and the pi ground pin is connected to a resistor junction. Do the measurements like above, moving the Pi ground to each resistor junction in turn. You are, however, measuring negative voltages: use the negative label values. The final measurement is with the inputs connected to a Pi ground pin: this gives measurements for a value of 150. You should now have 11 measurements recorded for SPI and 11 for PCM. I know this isn't a very good description, so I've listed my values here to help you figure it out. These are for SPI on a PI 2:

    OUT SPI

    -13 64.8

    20 54.2

    52 45.4

    85 38.1

    117 31.8

    150 26.6

    183 22.4

    215 18.5

    248 15.1

    281 12.0

    313 9.3

    Next you'll have to use these values to generate coefficients for a linearizing equation. Since the Pi has Mathematica already installed, we'll use that. Enter your SPI values into a text file named spi.wm. The file contents should look like this:

    data={{64.8,-13},{54.2,20},{45.4,52},{38.1,85},{31.8,117},{26.6,150},{22.4,183},{18.5,215},{15.1,248},{12.0,281},{9.3,313}}

    Fit[data,{1,x,x^2,x^3},x]

    Then run the following command:

    wolfram < spi.wm

    The output of the command lists the coefficient values.

    Repeat the process for PCM, but instead use pcm.wm and edit pcmlin. After piScope.c is compiled the new values will take effect. Test it to make sure.

View all instructions

Enjoy this project?

Share

Discussions

Yann Guidon / YGDES wrote 03/22/2016 at 10:49 point

In case you didn't know, the SPI port of the PI (I tested on the old B) has a "feature" (I'm being generous). It does not send 8 but 9 bits ! IIRC, the last bit is repeated for a 2nd clock cycle (while the input value is transferred from the shift register to the data register). This makes your linearization step even more important but I'm not sure it accounts for the double weight of the 8th bit.

Finding this "feature" with the 'scope made me even more angry at Broadcom and the Pi Foundation. But in the end we get what we pay for...

  Are you sure? yes | no

mincepi wrote 03/22/2016 at 19:24 point

Are you accessing the registers directly, or using the kernel module?

  Are you sure? yes | no

Yann Guidon / YGDES wrote 03/22/2016 at 19:30 point

directly. I examined the datasheets but to the best of my knowledge, it's really an implementation issue. How else could the 9th bit remain stuck ?

Check if your code adjusts for odd and even data output.

  Are you sure? yes | no

K.C. Lee wrote 03/22/2016 at 20:04 point

I am seeing MOSI on my STM32F0 part doing funny things at first byte or last byte during DMA block transfer depending on my settings.  Might not be an issue if you use SPI like a normal person, but I use that to blast video out (without SCK).

  Are you sure? yes | no

mincepi wrote 03/22/2016 at 20:18 point

SPI0 or one of the others? If you don't know, let me know the base address of the registers.

  Are you sure? yes | no

mincepi wrote 03/22/2016 at 23:27 point

This concerns me, looks like I'll need to test it. I'm looking for an extra clock pulse, correct? So if I send 8 bytes of data (2 32-bit words) via DMA, I should see more than 64 clock pulses if this is a problem?

  Are you sure? yes | no

Yann Guidon / YGDES wrote 03/23/2016 at 09:28 point

I use the SPI0 port on the RPi. There is no additional clock pulse, but the external clock and data pulses are longer by one cycle. I suppose that internally it works with 8 cycles to shift data out/in, then one cycle to move data around.

  Are you sure? yes | no

Eric Hertz wrote 03/19/2016 at 23:09 point

Dag-nab, I swear I commented on this one, as well...

This is some awesome hackery, all-'round. 

We've got: 

Removal of the capacitor usually used in such things... "such things" (using a digital-I/O to measure R/C constants) already being a bit of a hack, now it's simplified by removal of an otherwise conceptually-essential component by making use of parasitics most people try to pretend don't exist. Awesome.

Nevermind replacement of the "such-things'" usual use of the oft-not-available comparator in favor of the much-more-ubiquitous digital I/O. (Something I was once quite proud to have figured out, but reached nowhere near this ultimate level of hackery).

Removal of the timing-specific code usually used in such things... Generally requiring a tight (oft CPU-intensive) timing-loop (not necessarily possible on systems running OS's, etc.) and/or some sort of timer-peripheral with input-capture (also not available on many systems)... In favor of a friggin' serial port peripheral (SPI or PCM) already available in most microcontrollers, computers, FPGAs, and even those FT2232-style boards... A peripheral that's darned-near everywhere and was in no-way designed with such purposes in mind. Nevermind, still, that this same concept could be implemented with little more than a shift-register, for CPU-less projects, or maybe even connected to something like some SPI slave-*peripherals.* The options are endless.

Oh man, I'm sure I'm forgetting a whole slew of awesomeness in here. There's the diodes removing the necessity for a GP*I/O* in place of a dedicated In and Out, which are surely more ubiquitous...

And, besides that, I dig the way it's written like a story that seems to just make sense, each step a logical conclusion the whole way through. And each piece/step something that could be just as useful when applied to entirely different systems.

Massive props.

  Are you sure? yes | no

mincepi wrote 03/21/2016 at 05:16 point

Thanks for the kind words. I was trying out a new writing style, glad you liked it.

I bent the truth a little bit in the story - the project actually started as a 2-channel logic analyzer (something you could appreciate I'm sure) using the SPI and I2S ports. Somewhere along the line I realized I could use it for A to D. Someday I might finish the logic analyzer, but first I'll look at your project to see if it might be usable in combination with a Pi.

And I think you got all of the awesomeness. Except two diodes in series having half the capacitance. I'm rather proud of that one. Of course a proper diode (like the ones designed for ESD protection) has even less capacitance, but they're not something most people have laying around.

Speaking of lying around, I actually built several of the circuits from parts scrounged from CRT monitor circuit boards. I must have nearly a hundred of those boards squirreled away as parts sources. I call them my "parts store".

I wonder what the local electronics recycler thought when they opened up the monitors and there was nothing inside but the CRT!

  Are you sure? yes | no

Eric Hertz wrote 03/22/2016 at 01:20 point

Ah-hah! I hadn't quite grasped the dual-diode-capacitance-reduction. Nice!

I think you're on the right track for a dual-channel-logic-analyzer via DMA and SPI, etc... That, too, is a new one for me. My project is... a bit overboard. But it's made with junk-parts, so you know that's something I appreciate. Even more than that I appreciate parts-reduction like you've done here. 

Great story re: CRT-recyc :) 

I usually label my "part stores" "crap-boxes", maybe I should be more kind to them, as they've been to me!

  Are you sure? yes | no

Similar Projects

Does this project spark your interest?

Become a member to follow this project and never miss any updates