 Don R-Crenshaw
It's been a busy winter (darn pesky day job) so I'm only now finishing up my hive temperature and humidity monitor. Here are a few build details and results.
The key is the simplicity of the DHT22 temperature and humidity sensor coupled with an Arduino Uno R3 and the great DHT libraries from Adafruit.
The Build
DHT22 sensors have four pins:
- Vcc
- Signal
- Unused
- Gnd
Vcc is connected to the Arduino 5V pin and Gnd to the Arduino Gnd. Signal is connected a digital pin. I used 3, 4, 5 for the three sensors. (I know pin 2 is traditional in this context but I let the smoke out of that pin on my scratch arduino)
I did a lot of this work in October 2015 while watching Back To The Future so the seven segment LEDs were the only way to display output. I took the easy way out with I2C and used an Adafruit backpack connected to Clock and Data on the Arduino A4 and A5 pins. I soldered the A0 jumper on the humidity backpack so I had two addresses to write to: 0x70 (temperature) and 0x71 (humidity). From there the LED backpack library from Adafruit made the I2C almost trivial.
But being too cheap to buy six backpacks, one for each of the three sensors, I decided to toggle through them with momentary switch. One side of the switch is connected to Arduino pin 9, the other to ground. A press pulls the pin low. That triggers the code to toggle display among the three sensors and light up the appropriate LED to indicate the sensor. Once again, a really good library saved me the pain of actually writing any hard code. The positive side of each LED was tied to an Arduino pin (6, 7, 8). The negative side through 1 K ohm current limiting resistor.

One DHT22 connected. Green LED indicates it's in slot 2. Seven segment LEDs
read Temperature (top) and Relative Humidity (bottom)
A 9 volt battery and a power switch pretty much complete the package. Once I had it working on a breadboard I moved it to a project box sandwich box. I wanted to keep it reasonably modular and swappable so I cobbled together some connectors from headers and wire salvaged from an old Cat 5 Ethernet cable. A little work with an Xacto knife, some hot melt glue and it all came together rather nicely. There is a Fritzing file on the project github showing how it is wired up. Make sure you open it in breadboard view. A different Fritzing file gives a schematic showing the pinouts. Make sure you open that one in schematic view.

Inside the project box. Left side, perfboard for indicator LEDs, I2C
Backpacks, connector perfboard, power switch. RIght side. 9V battery,
Aduino Uno R3. Don't you love the cable management?
Does it work?
Yup. Here are a couple of action shots:
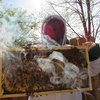
 There is a sensor in the top super, one on the bottom board, and a third outside the hive.
This is displaying the ambient temperature. and humidity. Note the 1.00%
relative humidity. The DHT22 left outside the hive failed and has been
replaced.
I have the arduino code up on github and I'm open sourcing it so feel free to examine it, use it, change it, redistribute it.
Libraries
DHT from Adafruit:
https://github.com/adafruit/DHT-sensor-library.git
LED Backpack from Adafruit:
https://github.com/adafruit/Adafruit_LED_Backpack.git
Graphics libraries (required for backback) from Adafruit:
https://github.com/adafruit/Adafruit-GFX-Library.git
Momentary switch button from Alexander Brevig:
https://github.com/tigoe/Button.gitOpens in a new window
Project github: https://github.com/dgr-crenshaw/cyberhive.git

 kamalkedin123

 Hulk
Hulk
BEADS?!?