 Yann Guidon / YGDES
Power LEDs were not as tightly binned as today. Their Vf would vary and any mass deployment requires a loooong string of LED fed by a constant-current power driver. But if one LED breaks, all the others turn off.
There is also the issue of temperature regulation. The hotter the LEDs get, the shorter their lifespan and I aimed at 10y+ average lifespan. I don't want to be called back on site to replace one LED every year.
The solution I found employed several methods to keep the whole design safe at all levels.
- Turn the LED off most of the time, of course
- Bring cool air from the main AC tubes
- Screw the LED's "star" on aluminium bars
- regulate each group of 4 LEDs individually
The last part could have cost an arm and a leg, since a simple power resistor would not be enough (too much variation of Vf from LED to LED, and power trimmers are expensive)
This project describes the technique I used. It was so efficient that it would actually not regulate the current, but the temperature.
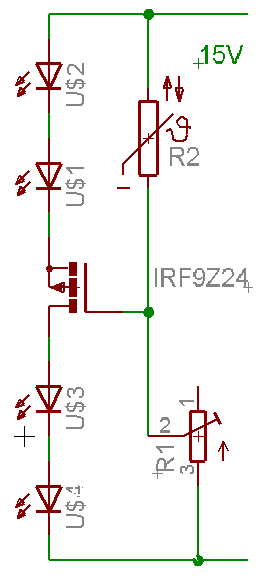
This circuit is (mostly) stable but has a very high temperature sensitivity. It uses cheap parts, and each string can be individually set to a desired current at a certain temperature. When the ambient temperature rises :
- The LED have negative tempco and will let more current pass
- The MOSFET tempco is positive so it will reduce the current increase
- The NTC is thermally coupled with one LED so it will change the balance of the circuit, thus reducing slightly the control voltage so the LED stay in the safe operating parameters
As can be seen on this prototype, all the parts are thermally coupled by screws in the aluminium bar:
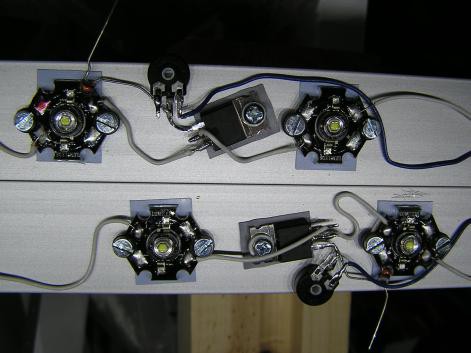
The thermistors were not yet totally cemented in silver oxyde thermal paste.
The circuit worked very well, considering that more than a hundred had to be wired, tested and calibrated individually. The whole project was a nightmare but I have done a great job.
Some of the issues were:
- Luxeons have (had?) a fucking Zener diode electrically connected to the "Star" aluminium base. Extreme care was necessary to prevent any short, while ensuring excellent thermal transfer.
- Some didn't have the Zener. They had to be sorted from the lot of 500 I ordered...
- The first prototype used anodised aluminium bars. To reduce costs, the series used standard finish. This led to more shorts...
- Current could only be set when the group of LED was disconnected or not yet connected. Now I put a 0.1Ω in series with every group and measure the current with a voltmeter.
- A friend wanted to "increase the thermal characteristics" but he mistook thermal grease and mechanical grease. A whole lot of bar had to be dismantled to be cleaned. More costs.
- Powering on all the bars was too much for my electric panel, the inrush current from 10× 150W PSU would trip the mains.
- Oh and while I was assembling the "power bars", I didn't advance on the control electronics and the programming...
Anyway the simple regulator circuit was a great design and I reused it for my own lighting purposes, in 24V version. You can use it to power lighting and keep the LED from suffering if exposed to heat. If you have only one string, you can even dim it !


 MagicWolfi
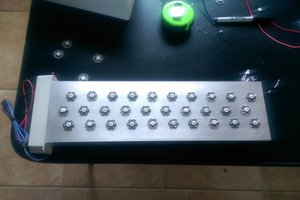

 Christoph Tack
Very clever !