Close
0%
0%

The Print3r

All Metal Triple Extruder Water Cooled Delta 3D Printer

Similar projects worth following
Some highlights:

-US made machined aluminum corner brackets
-Bulldog XL open hardware Extruders
-Timing Belt with embedded steel cables
-Screw-adjustable belt tension
-On-board self contained water cooling loop
-Carbon-Fiber magnetic push rods
-Stainless linear rails (Recirculating ball bearing)
-Matte-Etched silicon wafer build surface
-Aluminum-PCB heated bed
-Silicone rubber bed insulation
-Rumba open hardware control board
-Trinamic TMC2100 stepper motor drivers for the extruders
-DRV8825 Stepper drivers with 1/32th microstepping for XYZ
-Customized Wim3rl water cooled print head (made in Austria)
-RepRapDiscount Full Graphic Smart Display with stainless enclosure

This was a build first design later kind of project.

All design details will be made available - My goal is 100% open source and open hardware.

The Firmware for the moment is Marlin although I have also tried Repetier (both GPL licensed)

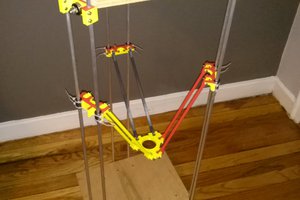
The design is similar to the Kossel http://reprap.org/wiki/Kossel
and the
RepRap Rostock http://reprap.org/wiki/Rostock
Both are GPL licensed designs

Zip Archive - 485.66 kB - 10/10/2016 at 02:04

Download

Zip Archive - 6.71 MB - 10/10/2016 at 02:04

Download

View all 40 components

  • Extruder Heat Sinks

    oneohm10/23/2016 at 20:52 0 comments

    Heat sinks will help keep the extruder stepper motors cool.

    I had to buy longer screws to properly mount these.

    Especially since they are geared down, the steppers will run fast continuously -potentially leading to overheating.

    I skipped the thermal paste for now - if they still run hot I have the option of adding some later.

  • Video is up!

    oneohm10/10/2016 at 01:59 0 comments

  • Print Head Details

    oneohm10/10/2016 at 01:57 0 comments

    The print head assembly is a customized version of the Wim3rl.

    The designer (Mathias Dragobert) describes the Wim3rl:

    "This head is an all-in-one solution, where the cooler and hotends are one stiff, durable and heat-resistant package. The head weights only 80 g (not including heaters and connectors to tubes and hoses) when filled with water, being as heavy as a common plastic part with the hotend and cooling components.”

    https://www.kickstarter.com/projects/1057128232/wim3rl-water-cooled-print-head-with-3-nozzles-for

    Despite an unsuccessful kickstarter campaign Mathias was extremely helpful and produced this customized version for me adapted to the magnetic push rod ball ends.

    Looking up:

    Looking down:


  • Silicone Heated Bed Insulation

    oneohm10/10/2016 at 01:12 0 comments

    After an exhaustive search of practically every silicone pad/pan/trivet/sheet... available on amazon I settled on the "Heavy Duty Silicone Hot Pad Trivet, Circle, Large (9 1/8"), Dark Red":

    https://www.amazon.com/gp/product/B00T92X2Z0/ (They seem to be out of the large now)

    It is 6mm thick with raised ridges on both sides (included in the 6mm) and rated to over 200 degrees celsius.

    Here is the trivet as it arrived:

    I used a 220mm glass plate as a template:

    Trimming the excess:

    Finished with a hole in the center for wire routing and holes cut for the mounting screws:


  • Heated Bed Mounting Holes

    oneohm10/10/2016 at 01:02 0 comments

    I went through several drill bits trying to make these holes to mount the heated bed. Here is the finished plate:

  • Bed Support Plate

    oneohm10/10/2016 at 00:56 0 comments

    In order to route the power and thermistor wires to the control board I used an high speed cut-off saw to chop out a hole in the center of the stainless bed support plate.

    This turned out to be pretty difficult as this stainless plate is 3mm thick. The heat caused it to warp slightly, but I was able to (with the careful application of force) flatten it out again.

    Closeup (the bottom is not this nice looking):

  • Heated Bed Thermistor Mounting

    oneohm10/05/2016 at 00:02 0 comments

    This was a 12v aluminum heated bed - I later swapped it for a 24v version. The process was the same however. To start I milled out a small pocket to hold the thermistor:

    Finished pocket:

    A tiny copper sheet cut to fit the pads intended for the LED indicator:

    Securely held in place by the soldered copper sheet:

    Lots of kapton just to be safe:

  • Water Cooling Loop Detail

    oneohm10/02/2016 at 21:48 0 comments

    You can see all of the important connections in the cooling loop here:

    On the left is a 500L/h pump with a built tank.
    https://www.amazon.com/gp/product/B00VHPADRW

    The silicone tubing is undersized for the pump connections, but I was able to force the tube into the connectors (rather than over). To stabilize and further seal the connections larger latex tubing was stretched over the whole thing and zip tied to lock everything down.
    https://www.amazon.com/gp/product/B013SYAVIU

    No doubt this restricts the flow - although it still works quite well thanks to the over-specked pump.

    The upper pump connector feeds the print head assembly, then the hot returning water goes into the radiator. The radiator is sandwiched between two 120mm fans to ensure sufficient airflow.
    https://www.amazon.com/gp/product/B00CFDS3JA
    https://www.amazon.com/gp/product/B000O8I474

    The cooled water exits the radiator and re-enters the pump through the lower connection.

    I repurposed one of the fan outputs to control the cooling system. Both the pump and the fans run on 12v, but the rest of the system is powered by a single 24V supply. The Rumba board includes a fairly powerful 12v switching regulator - but this seems to have been intended to only power one or two fans. Rather than risk it - I configured the Rumba fan output for 24v (this is a jumper setting) and connected that to a small 12v regulator. The pump and fans are then connected to the regulator.
    https://www.amazon.com/GERI-1-25V-30V-converter-Constant-Adjustable/dp/B013WKRDKE

    Here is the jumper in question:


  • First Print - Early Single Extruder Configuration

    oneohm10/02/2016 at 07:41 0 comments

    Mid-Print on the first successful object! (with a traditional single extruder...)

    Finished Object:

  • Control Board Details

    oneohm10/02/2016 at 07:35 0 comments

    Two types of stepper motor drivers are utilized on the Rumba control board - the DRV8825 is configured for 1/32 microstepping for the XYZ steppers. The Trinamic TMC2100 which features 1/256 microstep interpolation is used for the extruders which provides extrusion consistency and speed.

    Here it is with better heat sinks and a few other tweaks (more or less the current configuration):

    And buttoned up to contain the madness:


View all 11 project logs

Enjoy this project?

Share

Discussions

Similar Projects

Does this project spark your interest?

Become a member to follow this project and never miss any updates