Craig Hissett
-
Process Report
06/07/2017 at 21:01 • 0 commentsCurrently I have the following:
Pi Zero W in DIN enclosure
Wemos D1 in DIN enclosure w/oled display and relay shield
DIN on/off switch
Currently on order awaiting delivery:
DIN power supply
DIN rail
DIN brackets
In order to make this iteration of the Aquariumatic look the absolute balls I'm going to mount a rail in a small flight case on some angled brackets. This will look great for presentation and also will allow it to be really transportable.
-
Oled screen arrived!
05/30/2017 at 20:41 • 0 commentsToday is another good day.
My oled add-on screen for my Arduino enclosure from Hartmut Wendt has arrived.
Great service from Hartmut - the first one didn't arrive so was quick to repost.
The screen has 3 buttons with the screen, meaning ingredients I can add a small onboard menu for toggling displayed data etc, which is great.
Today I've also found some good example code of a python websocket client. This is fantastic, as I can now put a websocket server on my esp8266 units and use the python client to request data from the all.
Boom!
-
What a day!
05/04/2017 at 14:23 • 9 commentsYou know when you order so many little parts and components from various places you forget what you've ordered, and a few months down the line they all start arriving and every day is like Christmas, and the parts that arrive actually solve some project problems that you didn't have when you ordered them?
Welcome to my Thursday!Today's delivery of note: a Wemos D1.
ESP8266-based, and compatible with the Uno footprint, I'll be able to plug this into my enclosure instead of my Uno and have Wifi included without needing to add another module.
Wunderbar!!
-
To Grove, or not to Grove...
04/05/2017 at 14:39 • 0 commentsI am so, so close to finally putting all the components together I need for my modular Aquariumatic prototype.
Once this is done I'm laughing; I'll be able to turn my hand to working on the code for the project (Raspberry Pi Images, sketches for the Arduino and ESP8266 devices etc), and also finalise my schematic to then start putting together a design for the PCB I most covet (I know exactly what I want in my head but can't design it until I get it down properly!)
I've ordered a handful of components to and I'm now playing the waiting game until they arrive from China of course. While looking at ways and means to mount and connect all these bits and bobs in a nice clean way I came across the Grove modules. After looking through their list of modules they've got everything I'd need to rustle up my prototype; Relay modules, Temperature sensors, lcd screens, pH sensor modules and a ESP8266-based Wifi module. The Grove shield for the arduino would fit perfectly into my enclosure and it would make the completion of my prototype trivial.
It would also make the swapping around of modules a doddle too, something I am looking for in prototyping platform.
So, is it worth it? I will mull it over...
-
ESP Spree!
04/03/2017 at 15:04 • 0 commentsThat monthly sacred day known as Pay Day has arrived.
I've ordered a few different types of ESP8266 based boards for my various projects:
- A few NodeMCU boards with a view to potentially running my #GBAA: Game Boy Advance Arduino project.
- An ESP-07 based serial port board for my #Arduino Mega Expansion board
- And, for my #Aquariumatic, a few ESP-01 modules to use as plug-in modules.
The ESP-01 has a nice small header, so will take up little real estate on any pcb designs as they materialise. This will give me a great platform to work on my new target of websocket communication with my prototypes once the chips arrive.
Good times!
-
Protocol
03/29/2017 at 00:48 • 0 commentsThis is just a small update regarding a change of tact regarding communication for the Aquariumatic.
My Arduibox arrived:
![]()
Here it is pictured alongside my Pi Zero case. I love it! I am currently testing the configurations of lcd shield, relay shield etc. I think it's looking like both Shields will be dropped and just a standard 4 channel relay module added (screws and spacers added to the Arduibox prototyping area). With regards to the screen I feel like I may end up purchasing the oled add-on module available from Hartmut to keep the device looking so clean.
So, protocol - up until this very point the plan has always been to use i2c to chain my units together; nice and easy, and addresses for 112 devices to be linked together. As a secondary form of communication the pcb was going to carry an esp8266, connected to the Nano via serial, for an additional way of getting data out of the slave, whether that be to a iot site like Thingspeak or even just to another Web browser.
Today I had a brief chat over on the Aquariumatic Facebook page with a chap who was questioning my use of i2c. After talking him through my plans for i2c and a secondary esp8266 connection he said 'why not just use the wireless connection for the main protocol?'
I couldn't give him a good reason why not, other than I have used i2c successfully in other projects so knew I could develop something for this project using it.
After some thinking I have decided to stop letting my inexperience in wireless comms get in the way and have started looking at ways to implement this as the main comms in the project.
The Tornado library (used to create the Python webserver on the Pi) has a handler for websockets, so I am going to look into using that to handle connections from my ESP8266. The ESP8266 will be getting coded to take data from the serial connection with the Arduino, package it into json format and sending it via websockets to the Pi.
Wish me luck! Ha ha!
-
Prototyping Continues
03/09/2017 at 07:06 • 0 commentsJust a quick update, as I haven't posted anything in a while.
The project is still very much on, but it is hinging on a pcb design. Luckily I am getting some help with that, and in the future we should have a great board to connect the Pi Zero, arduino nano and the ESP8266 together, with plenty of io ports on the board for connecting relay boards, sensors modules etc in a very modular way. There will also be extra i2c ports for daisychaining units together.
Until the board is ready I am keen to make a new prototype to allow me to keep refining code. For ease I would love to be able to use as many off the shelf component as possible to make prototyping easier; that's where @Hartmut Wendt and his awesome Arduibox comes in!
Hartmut has a range of amazing DIN rail enclosures for Raspberry Pi and Arduino available on his webshop. I was lucky enough to get sent a prototype for his Pi zero-based one, and have running a demo webserver on it ever since.
I have just ordered Hartmut's Arduino box enclosure; it takes an Arduino Zero and a shield, while still leaving space for prototyping and extra components.
I have also ordered a relay shield for arduino, and an extra lcd shield too.
I'm going to experiment with using the lcd shield in the case and trying to fit a 4 channel relay module in the case too.
If that doesn't work I will switch to using the relay shield and an alternative screen. Hartmut has just released a fantastic i2c OLED module board that can be added to any of his enclosures, so I will look to order one of those and explore how to use it using a software i2c on the arduino (keeping the main i2c bus free for just master and slave unit addresses).
Cheers!
-
Arduino Software i2c library
11/19/2016 at 11:15 • 0 commentsThis is just a note to myself really :-)
In order to simplify the chaining of slaves to master I wanted to keep the i2c bus free of any devices other than the slave units (the arduino nanos).
Using i2c displays on the same bus would complicate the process; each slave having two i2c addresses, the screens all carrying the same address etc.
The ideal solution would be to use a library such as this one to create a second bus, just for the screen. this second bus cpild also be used for any further i2c devices added to the slave unit if necessary.
-
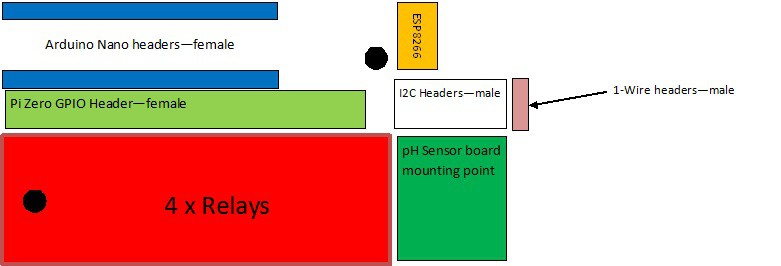
PCB Thinkings
11/15/2016 at 18:10 • 0 commentsI've been having a think about what kind of layout I'd like for my components to have on a PCB if I ever learn how to create them.
The plan is to have the Nano and Pi's USB ports available via the top/side for serial access/programming etc, with the relay and sensor outputs (and power) ins and outs via the bottom:
![]()
Arduino Nano (Blue Headers)
Either female headers or soldered directly to the PCB, connected to i2c bus (A4/A5), software serial (pins 2,3?) to ESP8266 header, relays (4,5,6,7?) and pH/one-wire sensors (use A1/A2?). 5v Power & Ground
Pi Zero (Light Green Header)
40pin Female header to allow Pi to mount over the top of the the Nano; if the Nano is mounted directly to the PCB there should be clearance to do so.
The only connections for the Pi are to 5v, GND, and i2c Bus. Full header only really required for a sturdy mount, so to speak.
Relays (Red zone)
Potentially a four channel Relay board mounted, or 4 individual relays or fets. TBC
ESP8266 (Orange Headers)
Female headers for mounting an ESP8266.
Connected via serial pins to the Arduino's Software serial pins, and also power and ground. 5v tolerant ESP module would be ideal, or tie it to the Arduino's 3.3v pin.
i2c Headers (White block)
breakout pins for 5v, Ground, SDA and SDL. For connecting LCD Screen and other modules.
1 Wire headers (Awful pinky colour)
Header for Power, GND and 1-wire data pin (A1?). To be used with temp sensors.
pH Sensor Board (Green block)
a mounting point for the standard pH sensor breakout boards with the BNC connectors.
Power, Ground and data (A0) pins to be made available for this module.
LCD Mounting holes (Black spots)
These are to insert spacers for the LCD screen.
Next step - to actually take some measurements and see if this will work!
Also need to draw up a proper pin connection list too.
-
Software Serial Options
11/08/2016 at 19:49 • 0 commentsIn addition to the rest of the ideas I have for communication I want to add one more thing; a flexible software serial header.
This is to serve as an extra port for communication and control of a slave unit's Nano. This port will mirror everything sent monitored in Nano's code. this can be used in severbal ways, such as:
USB serial cable - for streaming data to a serial window on a PC/Laptop serial monitor, and for manually updating thresholds.
With a Bluetooth module - to allow the same as above but perhaps with a phone/tablet app
With an ESP8266 module - an ESP module could be used in many ways; to host a basic standalone webserver in the bounce of a master unit, to allow wireless comms as the methods above, or even to stream data to IoT sites such as thingspeak :-)
Aquariumatic
Automated aquarium monitor with Web GUI. daisychain units can control multiple tank all from the one master unit. PI/Arduino/ESP Powered