 Ahmed Azouz
Step 1: Getting Ready With Your WAV Audio Files

For playing sounds from SD Card using Arduino, we need audio files in.wav format because Arduino Board can play an audio file in a specific format that is wav format. To make an Arduino mp3 player, there are a lot of mp3 shields are available which you can use with Arduino. Or else to play mp3 files in Arduino, there are websites which you can be used to convert any audio file on your computer into that specific WAV file.
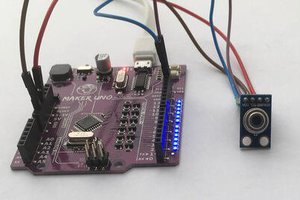
Arduino SD card module
+5V Vcc
Gnd Gnd
Pin 12 MISO (Master In Slave out)
Pin 11 MOSI (Master Out Slave In)
Pin 13 SCK (Synchronous Clock)
Pin 4 CS (Chip Select)
1. Click on “ Online Wav Converter” to enter into the website.
2. Arduino can play a WAV file in the following format. You can toy around with the settings later, but these settings were the experiment to be the best in quality.
Bit Resolution 8 Bit
Sampling Rate 16000 Hz
Audio Channel Mono
Step 2: Get Ready With Multi Sensors

Moisture sensor:
You’ll use an HL-69 moisture sensor, readily available online for a few dollars. The prongs of the sensor detect the moisture level in the surrounding soil by passing current through the soil and measuring the resistance. Damp soil conducts electricity easily, so it provides lower resistance, while dry soil conducts poorly and has a higher resistance.
The sensor consists of two parts
1. Two pins on the sensor need to connect to the two separate pins on the controller (connecting wires are usually supplied).
2. The other side of the controller has four pins, three of which connect to the Arduino.
·VCC: For power
·A0: Analog output
·D0: Digital output
·GND: Ground
DHT11 Temperature & Humidity:
DHT11 Temperature & Humidity Sensor features a temperature & humidity sensor complex with a calibrated digital signal output. By using the exclusive digital-signal-acquisition technique and temperature & humidity-sensing technology, it ensures high reliability and excellent long-term stability. This sensor includes a resistive-type humidity measurement component and an NTC temperature measurement component, and connects to a high-performance 8-bit microcontroller, offering excellent quality, fast response, anti-interference ability, and cost-effectiveness.
LDR light dependent resistor:

The LDR is a special type of resistor that allows higher voltages to pass through it (low resistance) whenever there is a high intensity of light, and passes a low voltage (high resistance) whenever it is dark. We can take advantage of this LDR property and use it in our DIY Arduino LDR sensor project.
KY-038 Sound Sensor:
Sound sensors can be used for a variety of things, one of them could be turning lights off and on by clapping. Today however we are going to use hook up the sound sensor to an array of LED lights which will beat with music, clapping or knocking.
PIR Sensor:
Passive infrared sensor is an electronic sensor that measures infrared (IR) light radiating from objects in its field of view. They are most often used in PIR-based motion detectors.
All objects with a temperature above absolute zero emit heat energy in the form of radiation. Usually, this radiation isn't visible to the human eye because it radiates at infrared wavelengths, but it can be detected by electronic devices designed for such a purpose.
Step 3: Hacked Webcam

The entire project is controlled by windows application that helps receive messages and notifications, as well as the ability to receive photos through the webcam and store it.

 Hulk
Hulk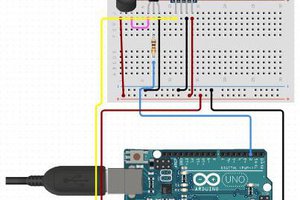
 hIOTron
Cute concept!