Fox.Build PNP
This is an attempt to bring pick and place capability to our makerspace based on the work done by Erich Styger
This is an attempt to bring pick and place capability to our makerspace based on the work done by Erich Styger
To make the experience fit your profile, pick a username and tell us what interests you.
We found and based on your interests.
Idler Assembly.pdf2 Assembly of three Idlers which are at the end of the axesAdobe Portable Document Format - 565.02 kB - 09/04/2019 at 03:48 |
|
|
X and Y Motor Assembly.pdf3 Assembly of Motors for x and y axesAdobe Portable Document Format - 427.75 kB - 09/04/2019 at 03:47 |
|
|
Brass Bracket.stepBrass Bracket to hold the shaft that turns the slave pulley.step - 29.71 kB - 09/04/2019 at 03:14 |
|
|
Shaft - Shaft 5 x 469 mm.step5 mm diameter by 469mm shaft. Stainless or steel.step - 6.27 kB - 09/04/2019 at 02:44 |
|
|
Shaft Coupler - Shaft Coupler.stepCoupler to attach the Y axis motor to the slave y axis. Made of aluminum with setscrews.step - 32.68 kB - 09/04/2019 at 02:42 |
|
|
We have been putting the electronics together and overall the build has gone well. Here is a general layout. The additions to the design that we incorporated were as follows:
1) Added a fan mounted directly to the 24 V power strip to cool the motor drivers.
2) Mounted the pump on some foam to try to reduce noise and vibration.
3) We replaced the power supply with something we had in the shop. The one on the BOM had power spikes when we looked at it with a scope and somehow was not doing the job. The motor drivers seem to shut down when we used it and despite numerous attempts to put the cheap one back in we gave up and ran with this one.
I had never looked it up before as it was a donated supply. (Thank you Butch!) This power supply is worth $250. Wow! I expect any power supply that provides a clean 24V will do.
4) We mounted everything directly to the particle board base. This worked well as it is flat and easy to screw to. Until we screw down the top, it is quite easy to access as well.
Overall we are very pleased with the layout. The smooth board USB connector and MicroUSB card can easily be accessed. We will put the two power cords on a separate power supply because we seem to need to dump the power often in debugging and calibration.
Once we got everything sorted, we tried to get the camera's working. Following the instructions in the PNP guide. https://github.com/openpnp/openpnp/wiki/Setup-and-Calibration%3A-General-Camera-Setup
Everything worked for the camera in the head but the up facing camera did not work. We did the obligatory swap and found the camera to be non- functional. I was pulling up Amazon to try to get another and Doug took it over to the solder bench with the big magnifier. Two minutes later after a few touch ups on the high pin count IC legs with a solder iron, we try it again and it works! I suppose the moral of the story is that if something does not work, take a really good look at it.
The last hurdle we came across was that when we hooked everything up, only have half the items worked. The pump and the Head LED ring were fine. The up looking camera LED ring and valves did not seem to be working. Even more strangely, when we turned on the Valve, the voltage on the pump dropped to 17 V. Back to Google and we found a requirement to add some jumpers to use the P2.x ports. Here are the locations in pink for the jumpers on the Smoothie board.
Thank you open builds. Here is the link and the information that saved us is under the Electronics heading. https://github.com/openpnp/openpnp-openbuilds/wiki/Build-Instructions
The last piece of the puzzle that we had to search for was the list of M-Codes. The example had the little comment that said we should use what ever M-code works for your machine. https://github.com/openpnp/openpnp/wiki/Setup-and-Calibration%3A-Camera-Lighting
After more searching, it turns out it was all in the setup file provided by Dr. Styger. Here is the relevant portion of the code.
https://github.com/ErichStyger/McuOpenPnP_Machine/blob/master/Smoothieboard/config
# Switch module for head light control
switch.headlight.enable                            true             # Enable this module
switch.headlight.startup_state                     false            # turned off at start
switch.headlight.input_off_command                 M800             # Command that will turn this switch off
switch.headlight.input_on_command                  M801             # Command that will turn this switch on
switch.headlight.output_pin                        1.22             # Pin this module controls: small MOSFET Q4
switch.headlight.output_type                       digital          # Digital means this is just an on or off pin

# Switch module for bottom light control
switch.bottomlight.enable                          true             # Enable this module
switch.bottomlight.startup_state                   false            # turned off at start
switch.bottomlight.input_off_command M802...
Read more »
It's been a few months but by no means is this project abandoned. As the project is coming together, I wanted to share some of the key hurdles we had to clear to get things moving.
Firstly, after we got the digital potentiometer issue solve we were happily running it back and forth. Then we noticed the y axis would catch some times. It seemed to be getting worse. Looking into the forums, we saw people pointing and the cheap rails we were using and we thought we may have to bite the bullet and upgrade. We tried copious amounts of oil and the stickiness remained. It seemed to be coming from the left side so we ordered 1 Hiwin rail and the project seemed stuck. Then Doug got out his fine tooth comb and went through the mechanics. Turns out we found some friction in the following location between the slave pulley and the spacer bracket.
We had designed in one brass bracket but we got some bearings (not shown) and we put one on either side of the pulley. The outer bearing interfered with the pulley so we added another spacer bracket. In any case, it working very well now and we do not have to deal with the slave motor.
We finally got the 50 cables routed and it was time to start plugging stuff in. The anticipation of driving the gantry around was palatable. We had a monthly makerspace meeting up coming up on Friday so we got together on Wednesday to make it work for the grand unveil.
We plugged in the smoothie board and it came up in pronterface. It was like magic. We did not even flash the board yet. Smoothie boards have an advanced method of getting firmware on the board. The microSD drive contains two files. One is a config file which we got from McuEclipse. https://github.com/ErichStyger/McuOpenPnP_Machine/tree/master/Smoothieboard The other is a file pulled from https://github.com/Smoothieware/Smoothieware/tree/edge/FirmwareBin called you guessed it , firmware.bin. I am writing about this because I wondered about it for 3 months before we got to the point where we needed to know and we figured it out. It is not like any other microcontroller project I have worked on. The really slick part is you can edit the file on the microSD card because it appears as a external drive to the computer.
Next, we hooked up the drive board with the connectors in the right orientation and got nothing. Looked up the forums and apparently this driver adapter board had the connectors on backwards so you had to force them on in the opposite direction. The tabs are backwards but it kind of works. Then we got the 3D printer controls to come up. Now this is where it dawned on me that we basically using 3D printer software with a few special configurations. It really is quite slick and once we understood that, the locations of connections made a lot more sense.
We hooked up a motor and we got the error for the lack of endstops. Well that is easy enough to fix so we wired up all the endstops. We tried the X motor and got a one movement before it would crash. We tried the other axes and the Y axis motor and driver got hot. Then the screen stopped working and we were back to just having nice blinking lights.
So we missed our grand unveil and hit the trouble shooting site. http://smoothieware.org/troubleshooting We reloaded the firmware and config files after reformating the SD card. Bingo we were back to the run once and crash mode. We put a meter on the power supply and we were seeing some weird spikes so we pulled and industrial strength power supply out and all of a sudden, we could move the X axis multiple times without crash. Yes! Thinking our teething was over we started plugging everything else in and soon we heard the clicking from the Y axis we saw before. Touching the Y axis motor driver resulted in a burnt finger and a return to the forums to look for the problem.
Turns out, on the batch of boards that we bought, the wrong version of the digital pot was used. The choices are replacing the component in question or applying a marginal fix in the config file. Since the down side is frying a $70 board, we will start with the config file. There is a replacement on Amazon but since the lead time is 3-4 weeks, it may be the same board coming from China. We are going to get the heat sinks on and put a fan on those. Maybe it will hang in there.
Here is the link to the explanation of the issue. https://forum.makerforums.info/t/aliexpress-fysetc-smoothieboard-v1-1-mcp4441-issue/77926
We made the changes to the config file and now it seems to be OK. Hopefully with the fan and heat sinks it will not get too hot. Next is the plumbing.
Cameras Mounting
One of the big unknowns was how to hold the cameras. Erich was kind enough to answer my question about how high to mount the down facing camera. The answer was to align it with the bottom of the pick head. I had a goal of keeping the two camera holders as similar as possible and just changing the aluminum brackets that held the camera. In the end, I made new acrylic brackets with thin white acrylic top piece as a diffuser.
Here is a screen shot of the top facing camera. I wanted to put the camera above the aluminum straps but it would stick up above the board and could get hit.
Here it is from the bottom. The big circle is to hold the ring LED and there is a square hole in the back to get the wires and switch out.
Here it is on the back of the pick and place head. I am thinking about shaving off the lower sensor holder bracket so I can bring it down a bit and make it even with the bottom of the head.
Sorry I have put in all the screws yet.
Got to love the laser cutter. We call it cut and try!
Here is how it looks lit up.
Looks like the next step is routing the wires from the pnp head to under the boards with the cable chains.
This has been an exciting week with more people from Fox.Build joining the project. We had 4 out of 5 of us at the space on Friday working through the design. On top of that, our muse Dr. Erich Styger has joined our team and gave us some insights on the improvements he has been making and the things he would do differently.
Of those items, the second y-axis is getting the most attention. Since it rolled so well, we thought the second y-axis motor was not necessary. Erich mentioned that he added one but it was hard to sync the movement. So he recommended using stepper motor with a shaft out that back that is connected to the second y axis. We decided to follow this advice but we are trying to turn the first y axis motor around and make a coupling shaft between the two axes. We will start with just supporting it on the far side with a brass plate. Having the 3D model is great because I can reference the model and design this part the right way the first time. At the makerspace we got a huge donation of metal and now shopping is as easy as going to the basement and picking out what we need. Here is the metal rack.
Here is what it looks like when we flip the motor. I am a little concerned that it might interfere with the cable chain when we get that set up but for now, we will flip it. I have to give some props to our CAD system of choice Onshape. We noticed the timing belt was rubbing on the sensor and was on bit of an angle. To avoid wear on the belt and inaccuracies from the angle, it was decided the bracket had to change. I changed it in context, using dimensions from the assembly. I just changed the sketch while seeing how it was looking and final model adjusted including the mates. An all this on a free CAD system that I can run on my Linux box. Here is what it looks like after the motor is raised and the motor turned around. I can see the top of the pulley is about the same height as the sled top bracket that holds the belt.
We decided to tackle the most undefined portion of the project. The files for the laser cut wooden pick and place head were in the repo but all the final pictures had the aluminum head. Of course that meant we had to find a way to start in aluminum. We had a clean slate so we tried to keep the design as clean and simple as possible. The machining is limited to cuts and holes being drilled. Here is what we have so far.
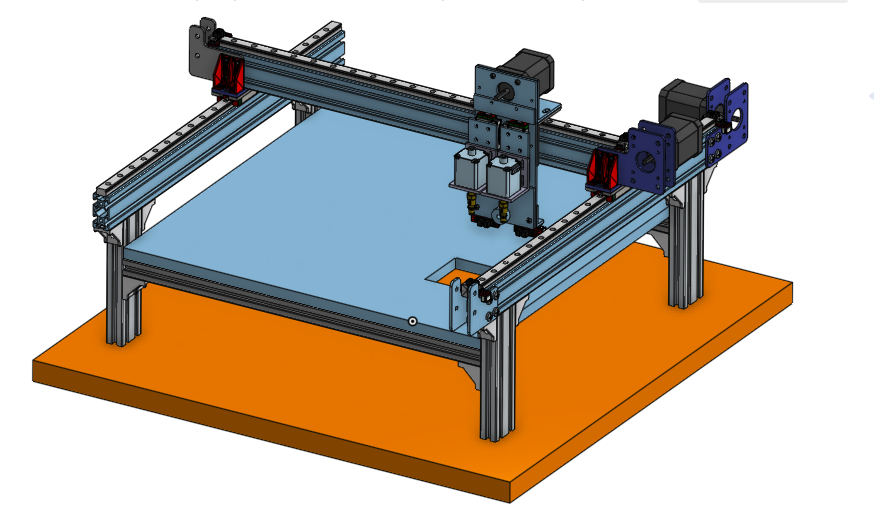
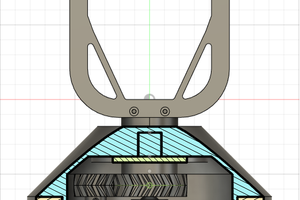
The two 9mm slides are attached and allow the heads to move up and down. They will be connected with a timing belt that goes through the middle. This means that if one head goes down the other comes up. We have determined the motor moving these was massively over specified but in the name of commonality we let it be. There is an acrylic piece above and below the rails. This is just to keep the sliders from coming off the rails. On top of the sliders there is a 3D printed part that grabs the belt. Then there is an adapter piece to connect the slider to the adapter bracket to the motor brackets. These two plates also allow the motors to be moved down a bit to get below the front plate. The motor brackets then carry the motors. These motors have hollow shafts to allow the vacuum though. The purpose of the motors is to be able to rotate the smd part after it is imaged to be able to line it up with the needed orientation on the board. Other than that, there is an idler pulley on the bottom to return the belt. We still need to design the 3D printed parts to interface with the photo interrupters on the bottom.
It think we have done well to minimize machining complexity, while maximizing rigidity and achieving the required movement.
Again the purpose of this project is to bring PnP capability to our makerspace and hopefully make it a little easier for the next group to do it. Our intention is to show where we got the inputs, what changes we made and why, and leave a good trail so the build should not be any harder than making a Prusa printer. It is going to cost you a few days but the it will be well layed out.
First, if you would like to do this yourself, review the page from Professor Styger.
https://mcuoneclipse.com/2018/06/26/building-a-diy-smt-pickplace-machine-with-openpnp/
When we took on this project the first order of business was to get parts in house. Proffessor Styger has a Github repo with everything needed here.
https://github.com/ErichStyger/McuOpenPnP_Machine
Since a year has gone by, a lot of the links are broken so we searched for alternates to the parts and made an update list. ODS and xls copies are in the documents section. Through the miracle of continual cost reduction, the purchased part on this are not only $746 with is amazing for a pick and place machine.
One of our members at Fox.Build, our makerspace, is a founder of Farmbot and he introduced me to Onshape. Onshape seems very good for this project because it is easily viewable by anyone and can archive many types of files. The downside is the process of making a model is messy and keeping an archive in a presentable format all the time is more than I am willing to signup for. So, in effort to provide visibility during the build, I will publish links to Onshape documents that are complete up to a certain stage. There will also be step by step assembly instructions in this blog to correspond to what has been completed so far.
Of course, we welcome other groups to build along with us and we would love to get feedback on the instructions and our material choices.
Create an account to leave a comment. Already have an account? Log In.
Become a member to follow this project and never miss any updates
By using our website and services, you expressly agree to the placement of our performance, functionality, and advertising cookies. Learn More
 charliex
 Bash Sarbora
 Alastair Young
 caver.adam