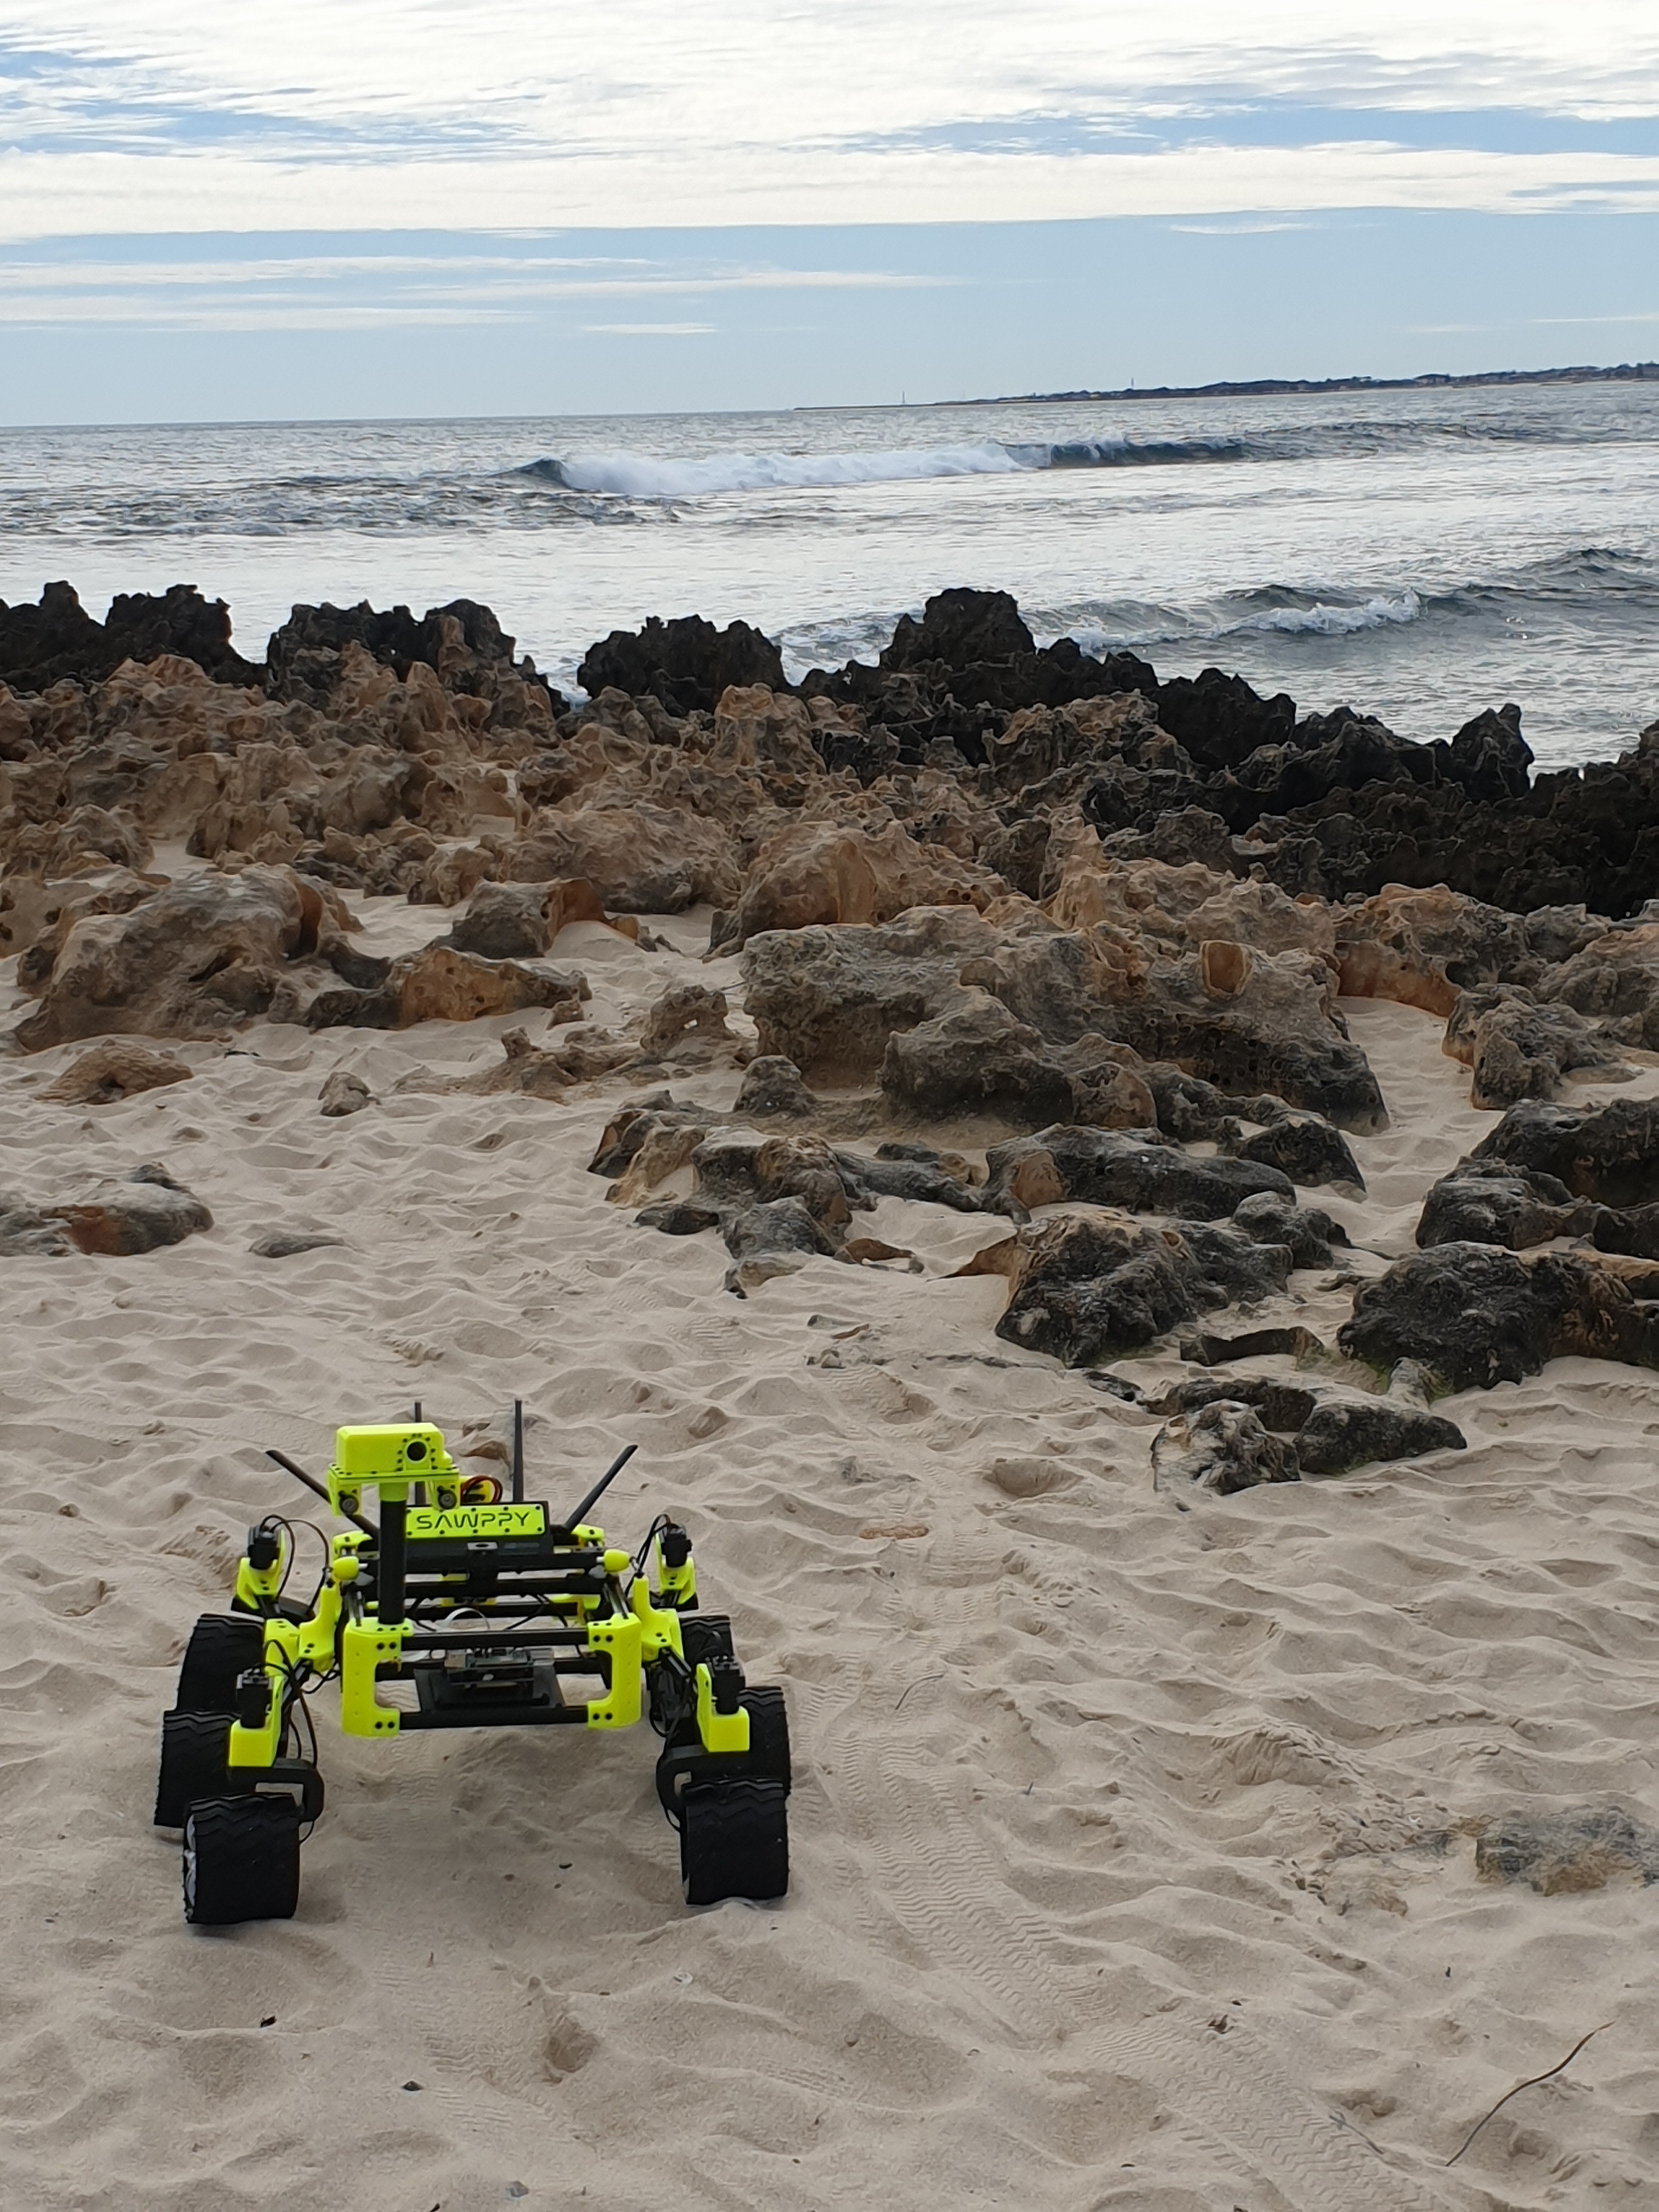
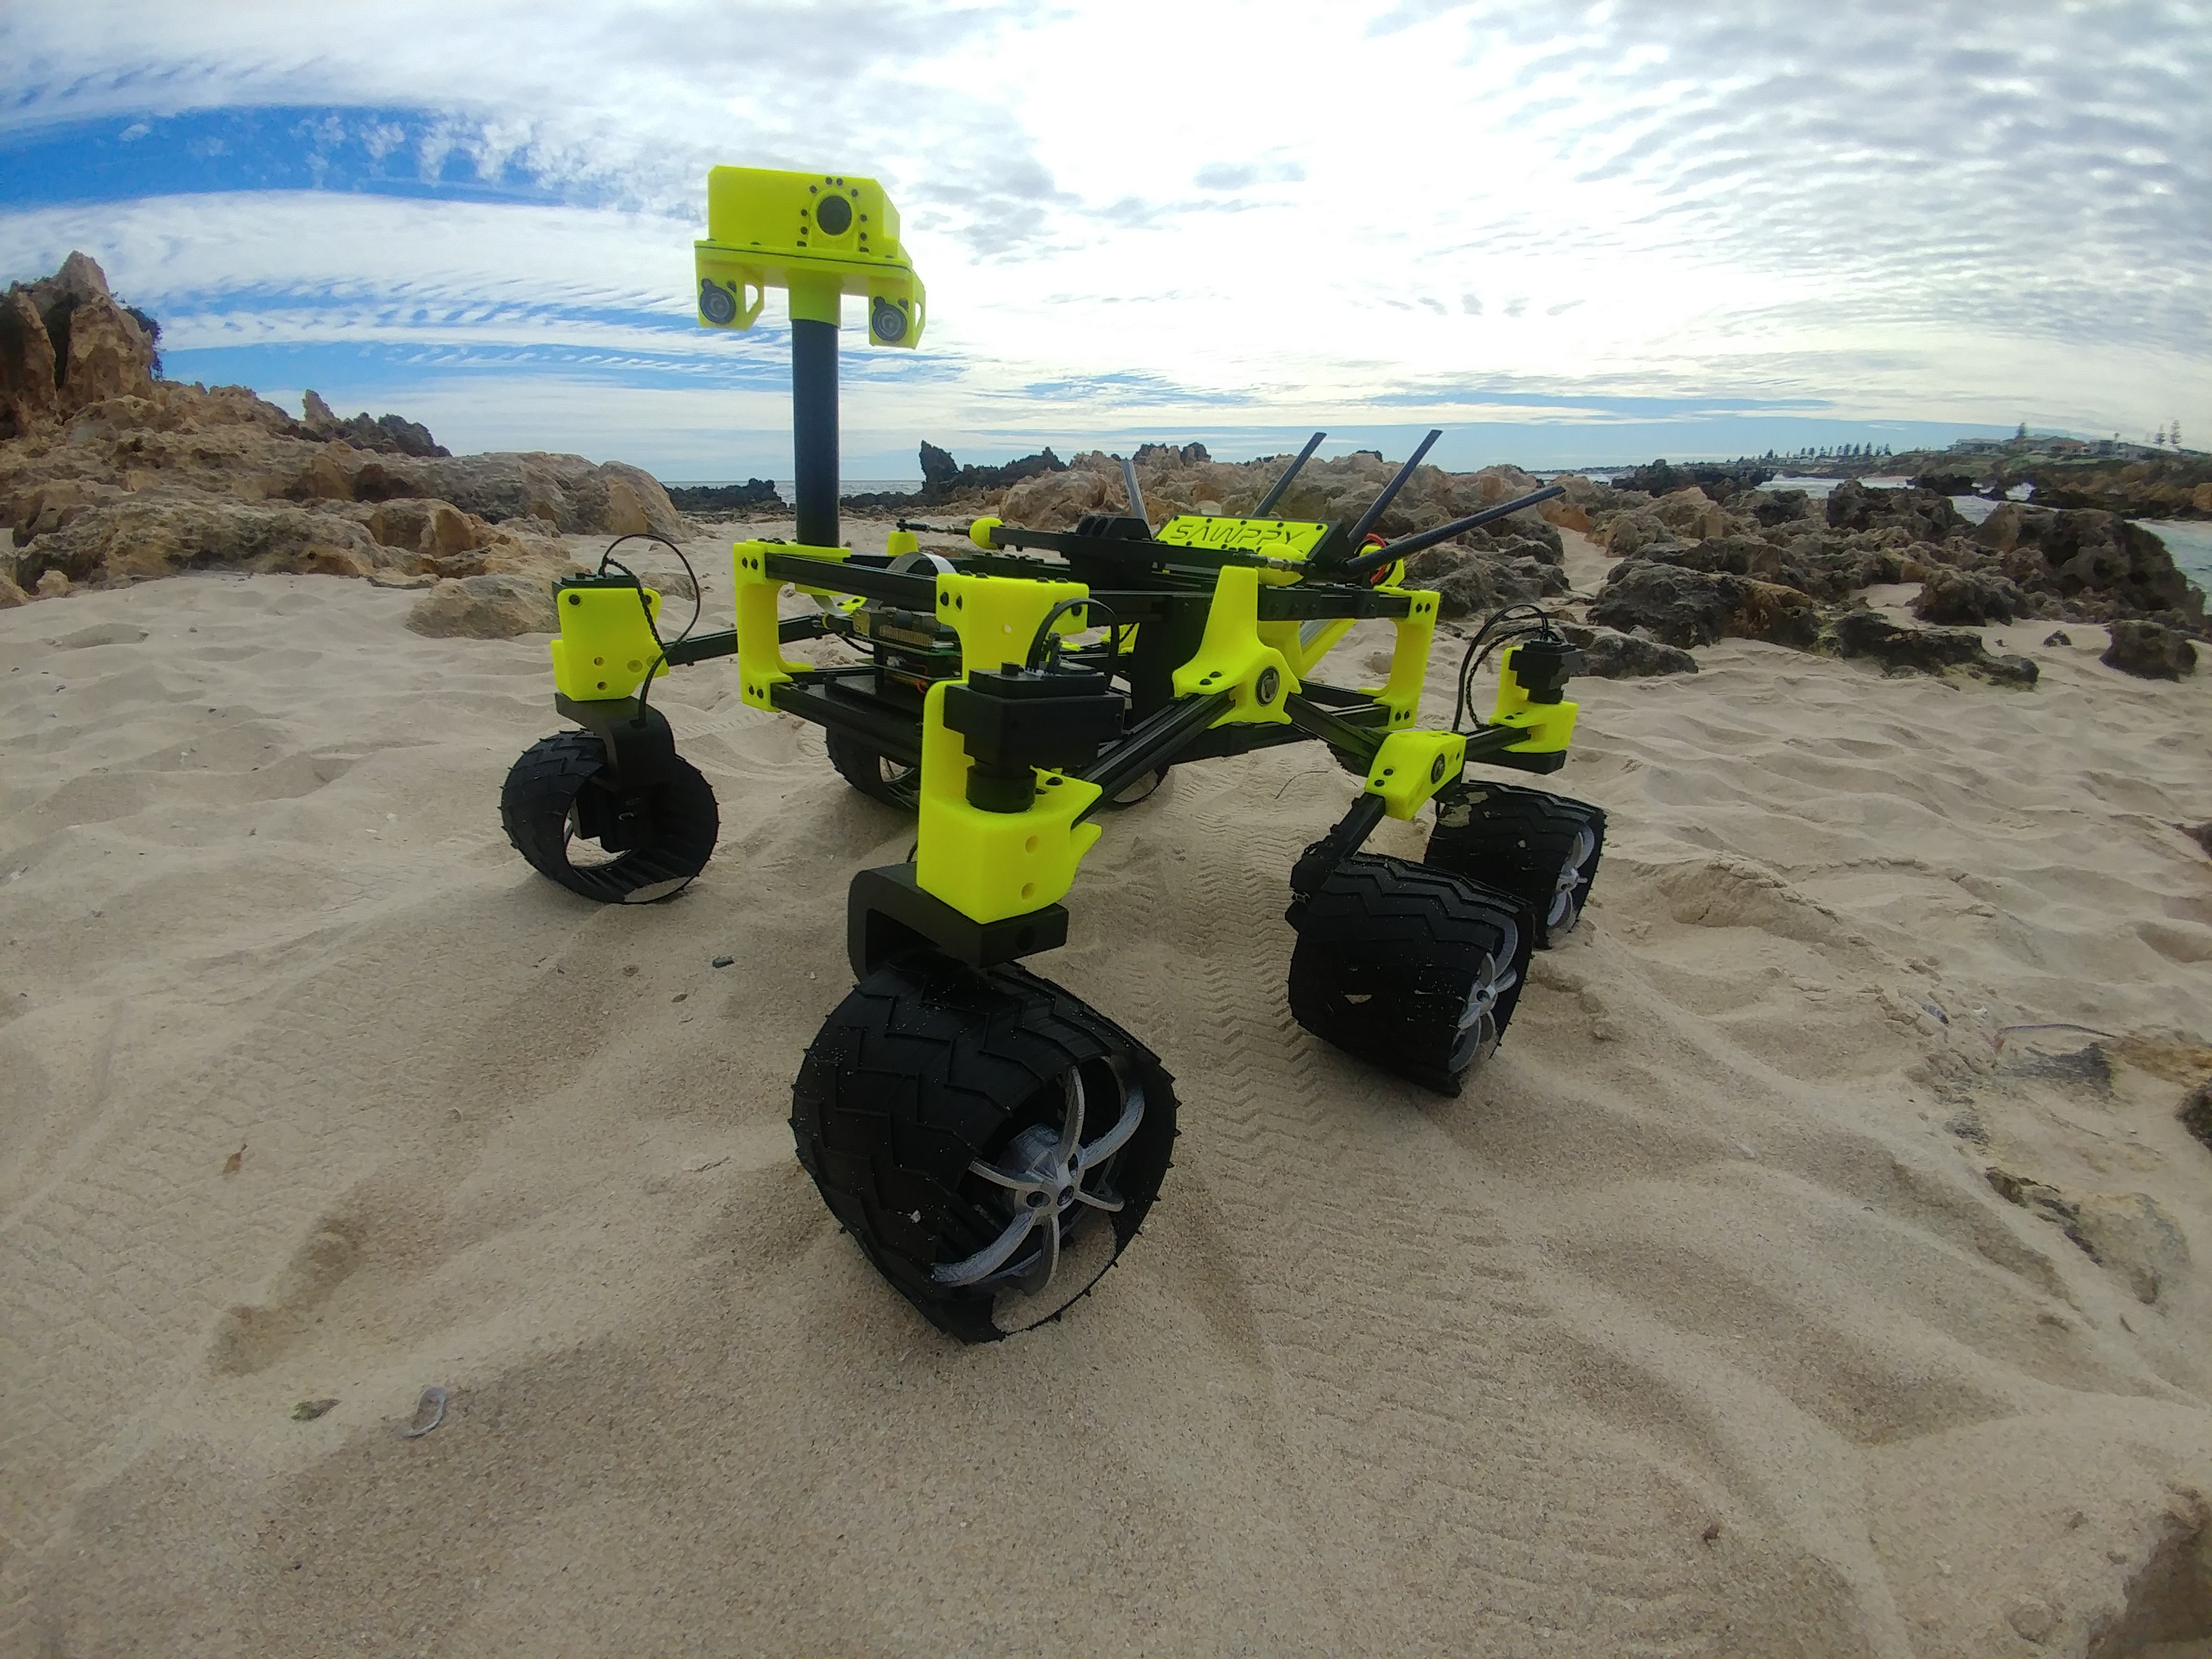
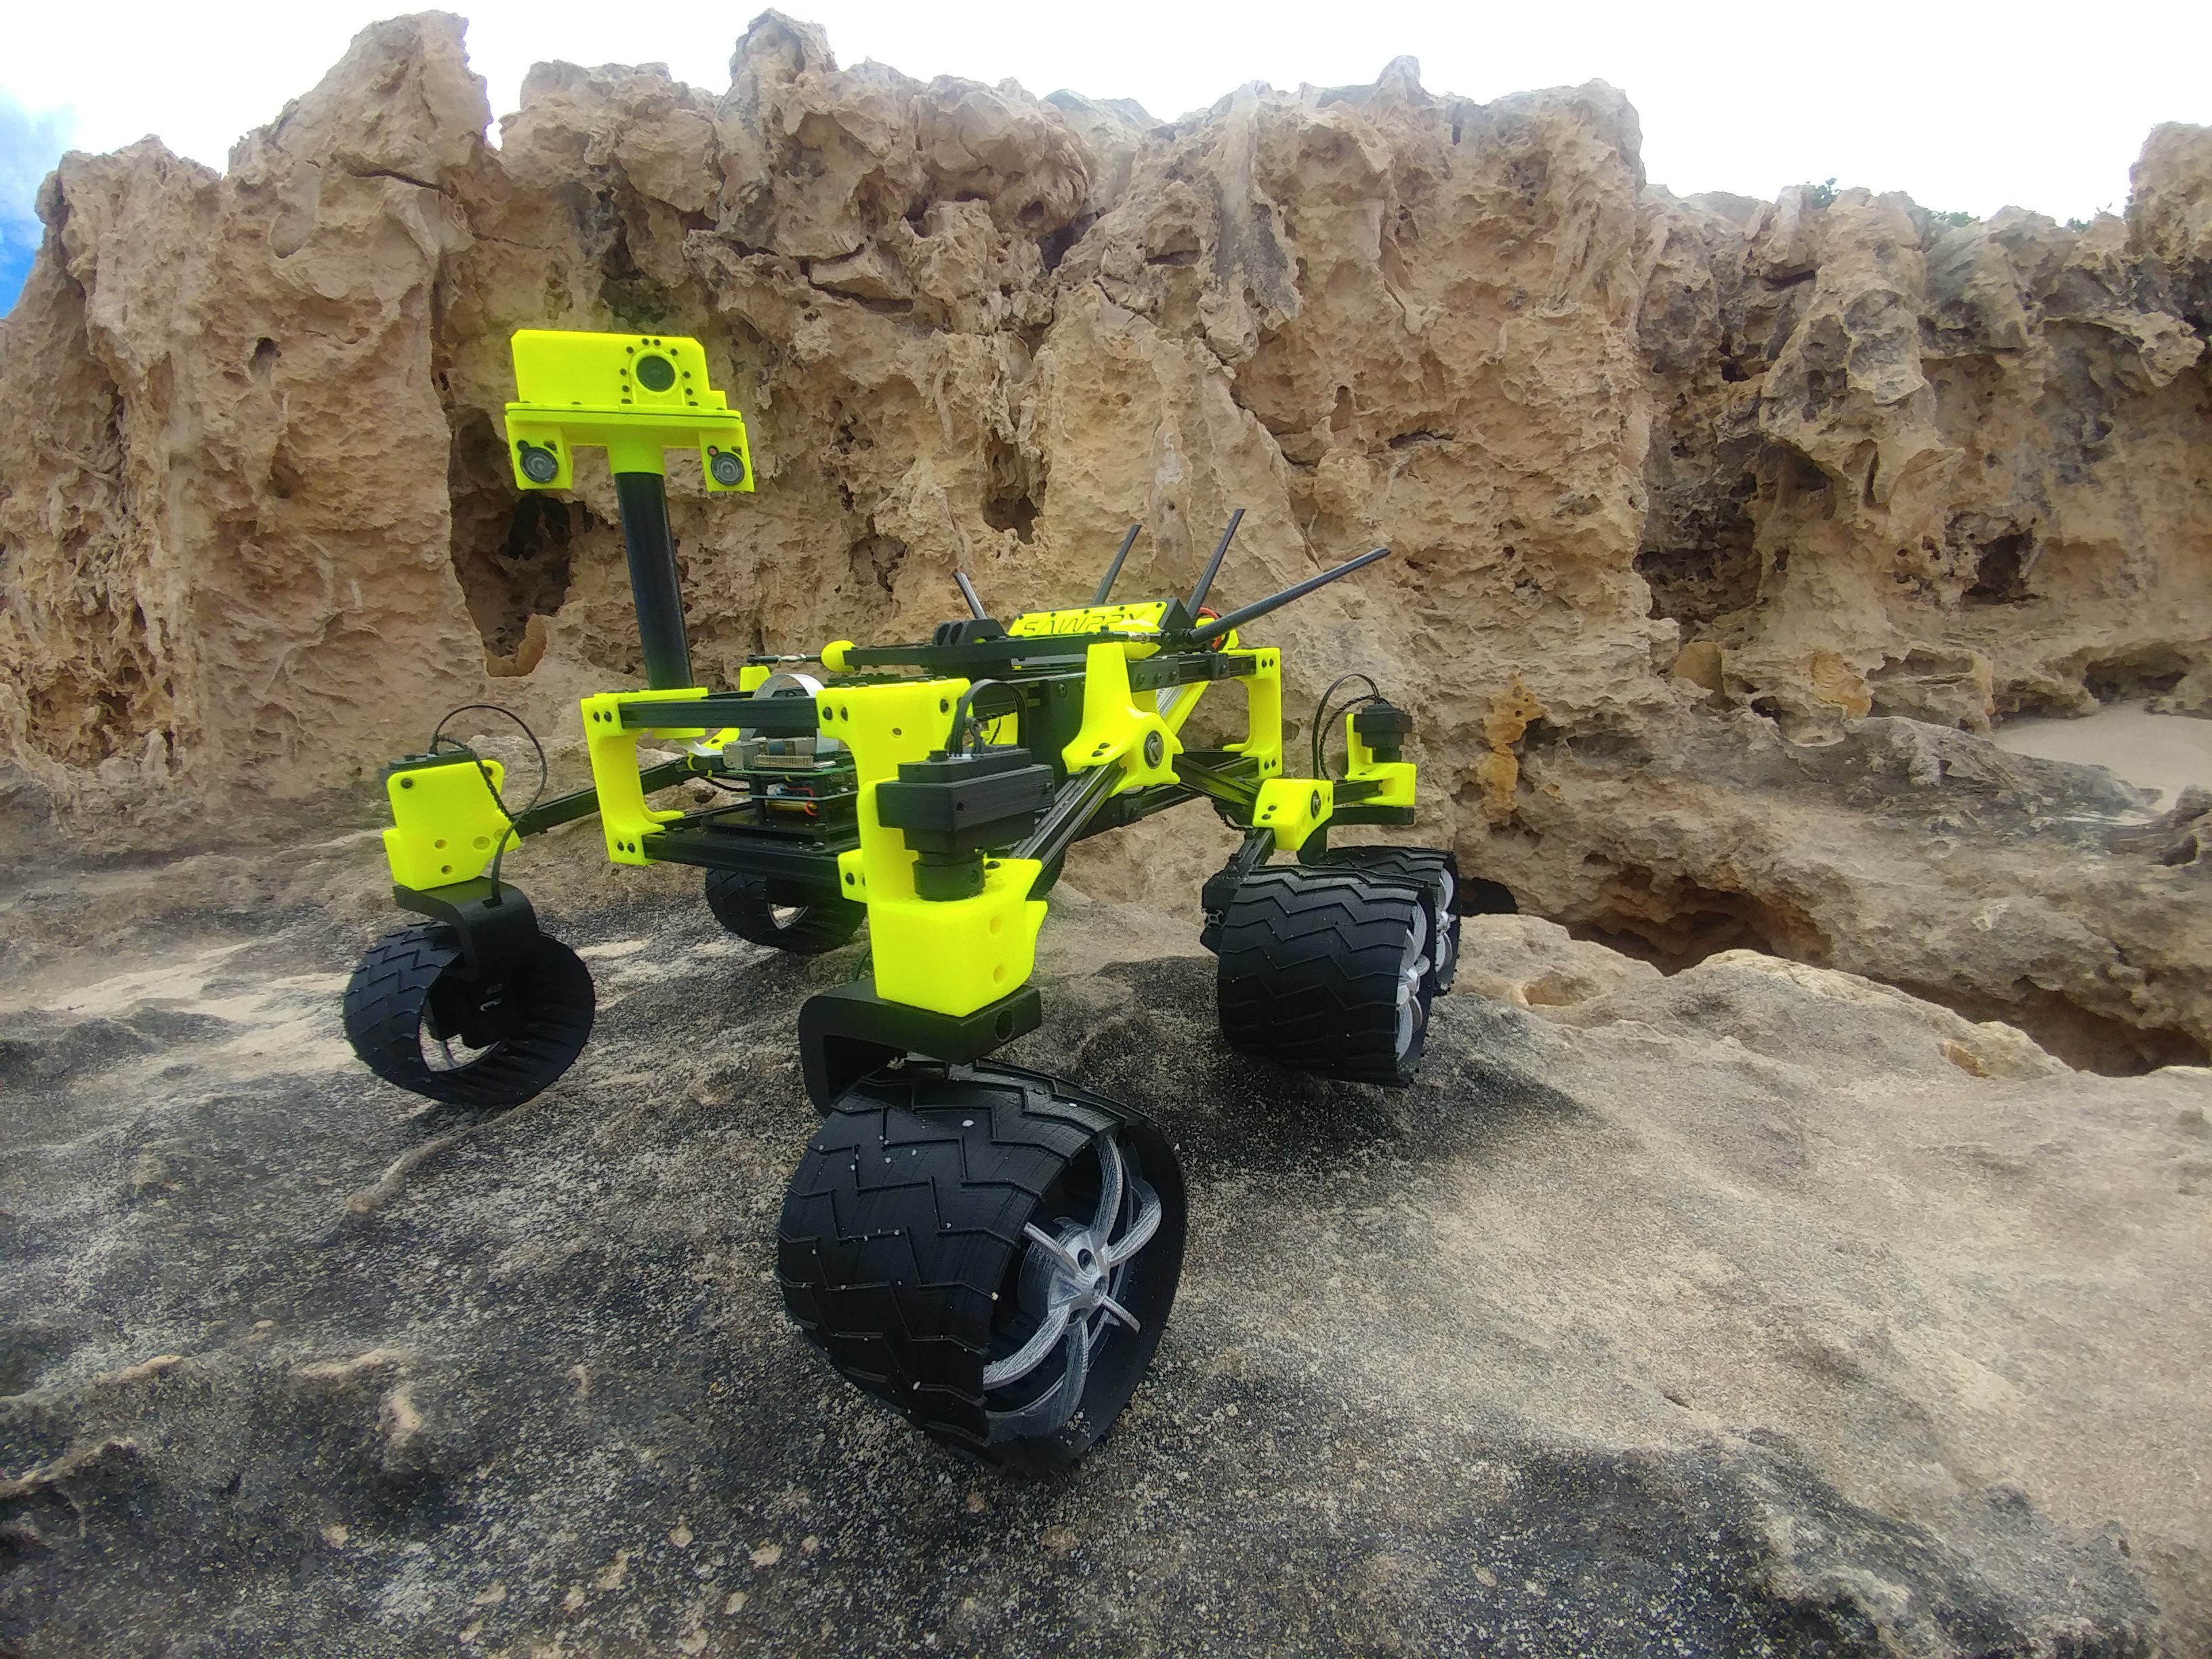
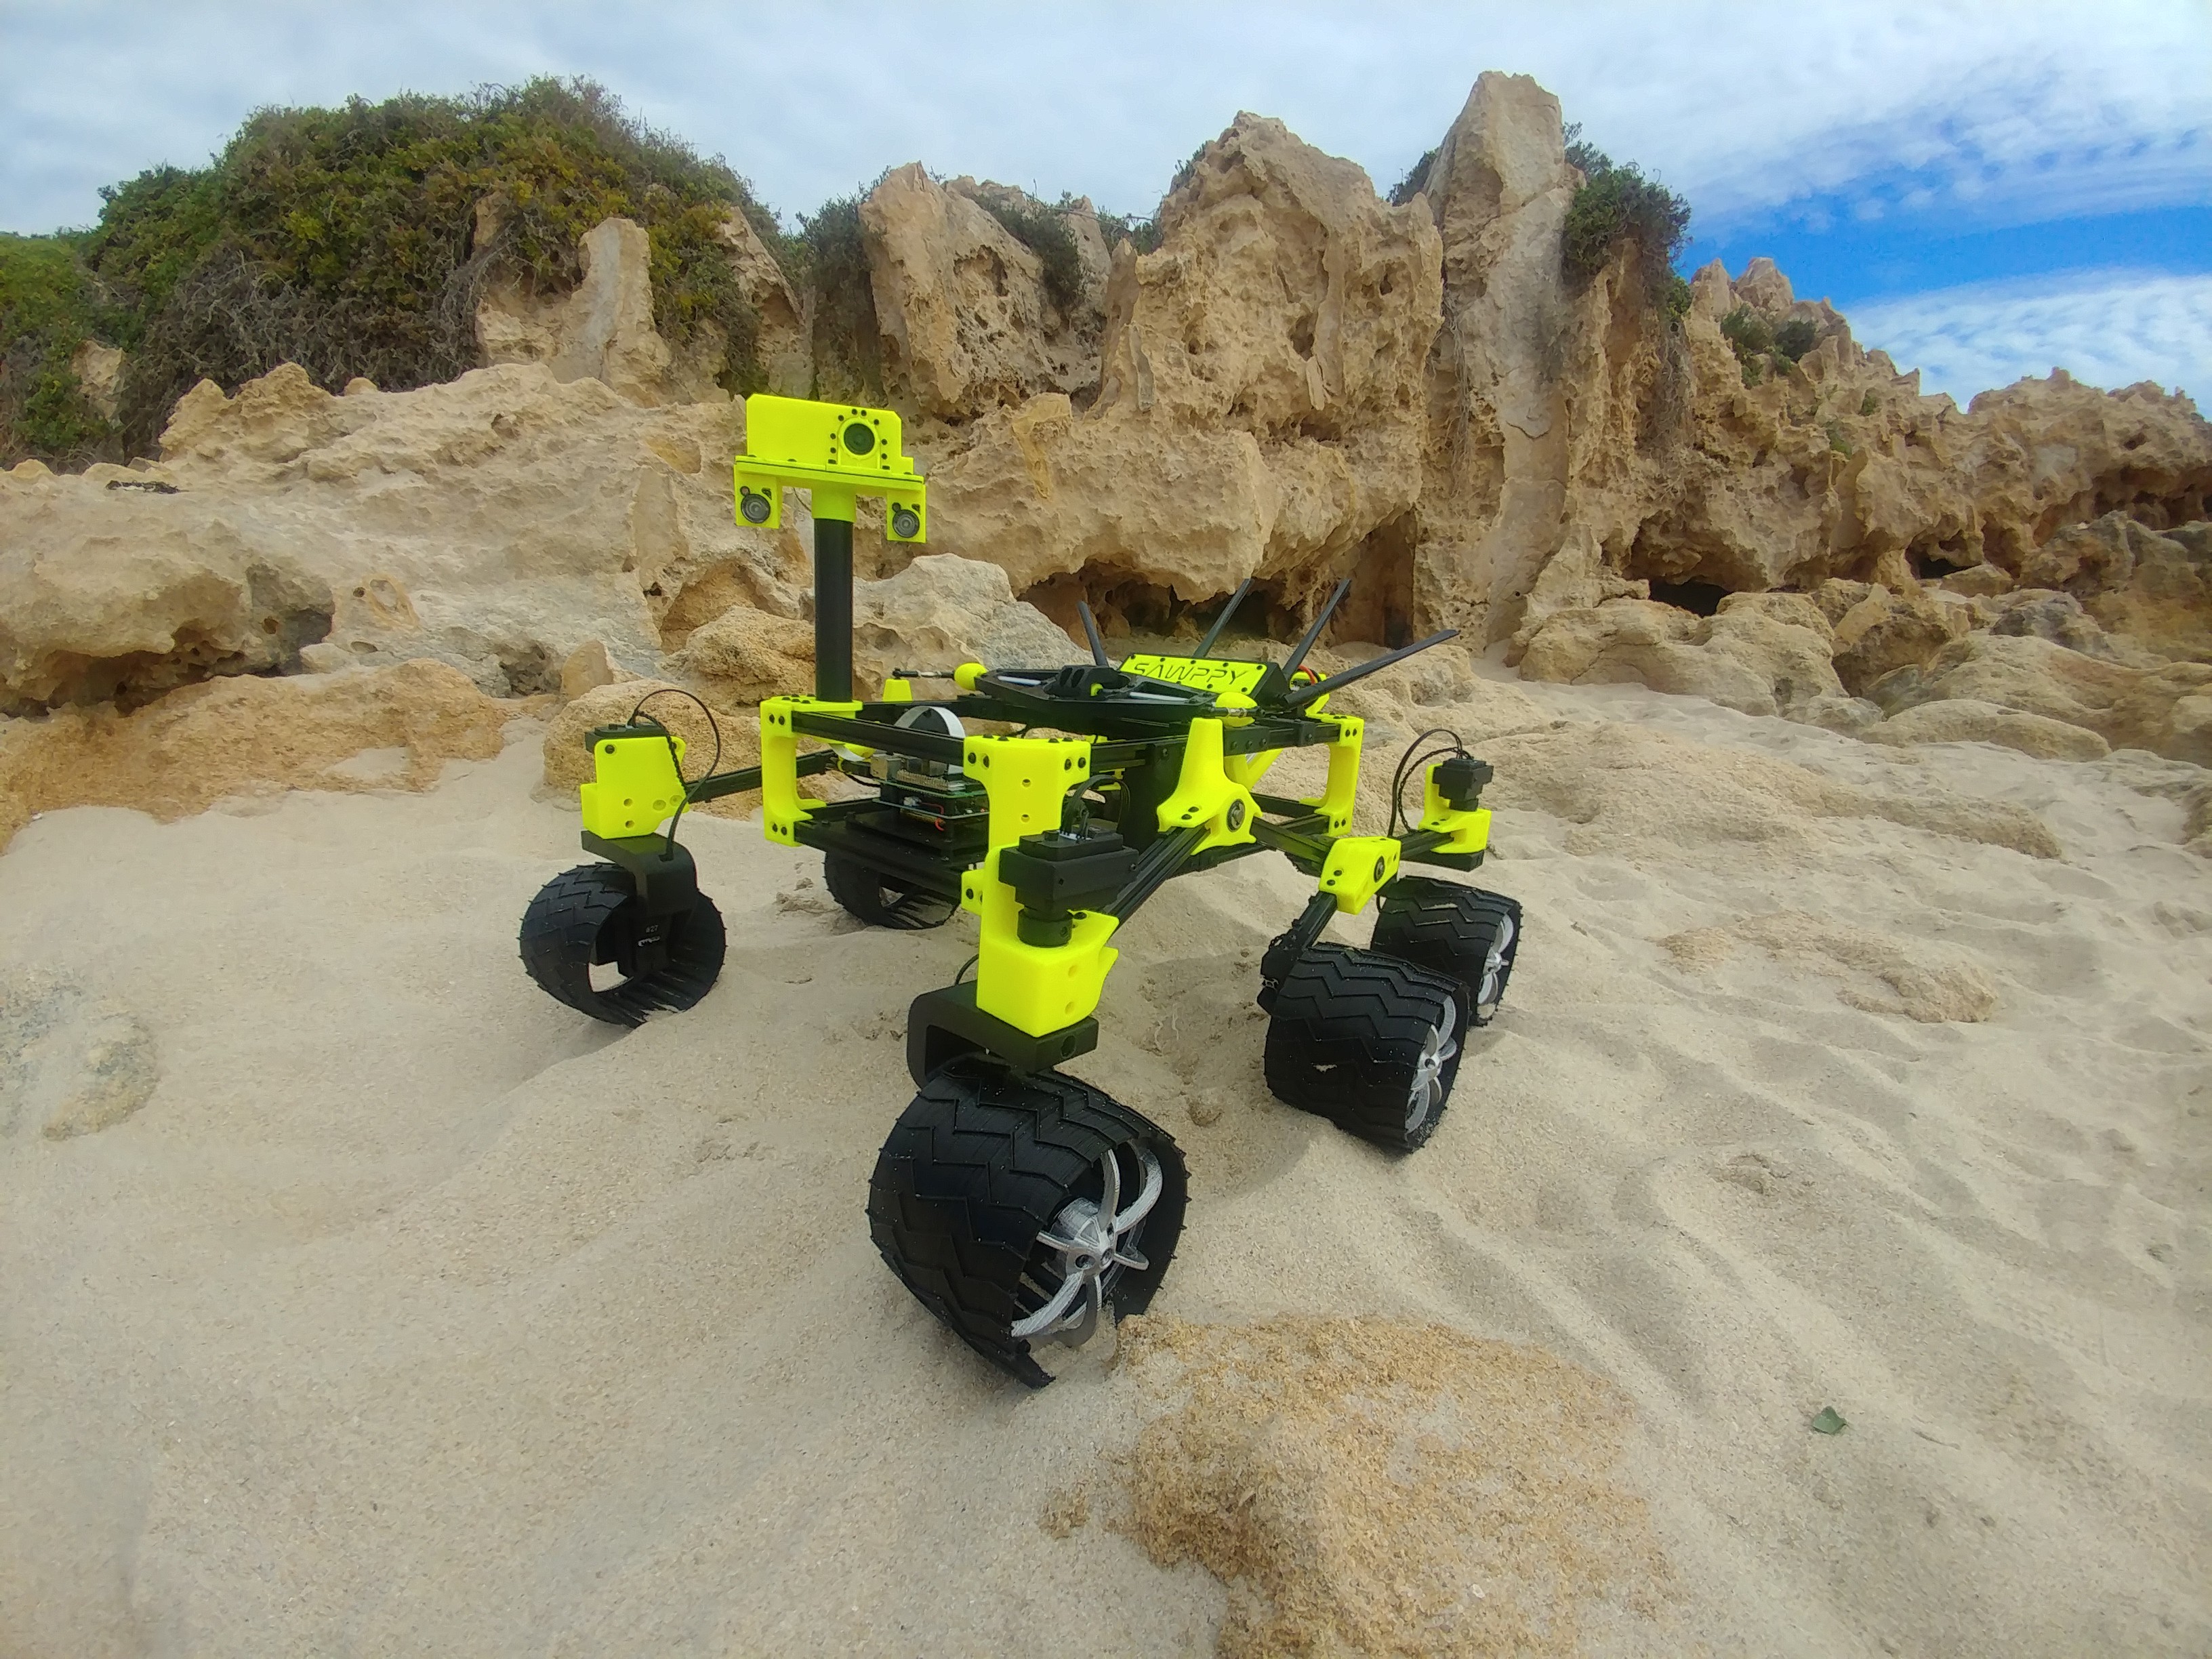
Close
0%
0%

Aussie Sawppy

An antipodean sibling

Similar projects worth following
My teenage son and I are going to follow Roger Chen's path to a replica Curiosity, maybe with variations along the way. We'll see how we go.

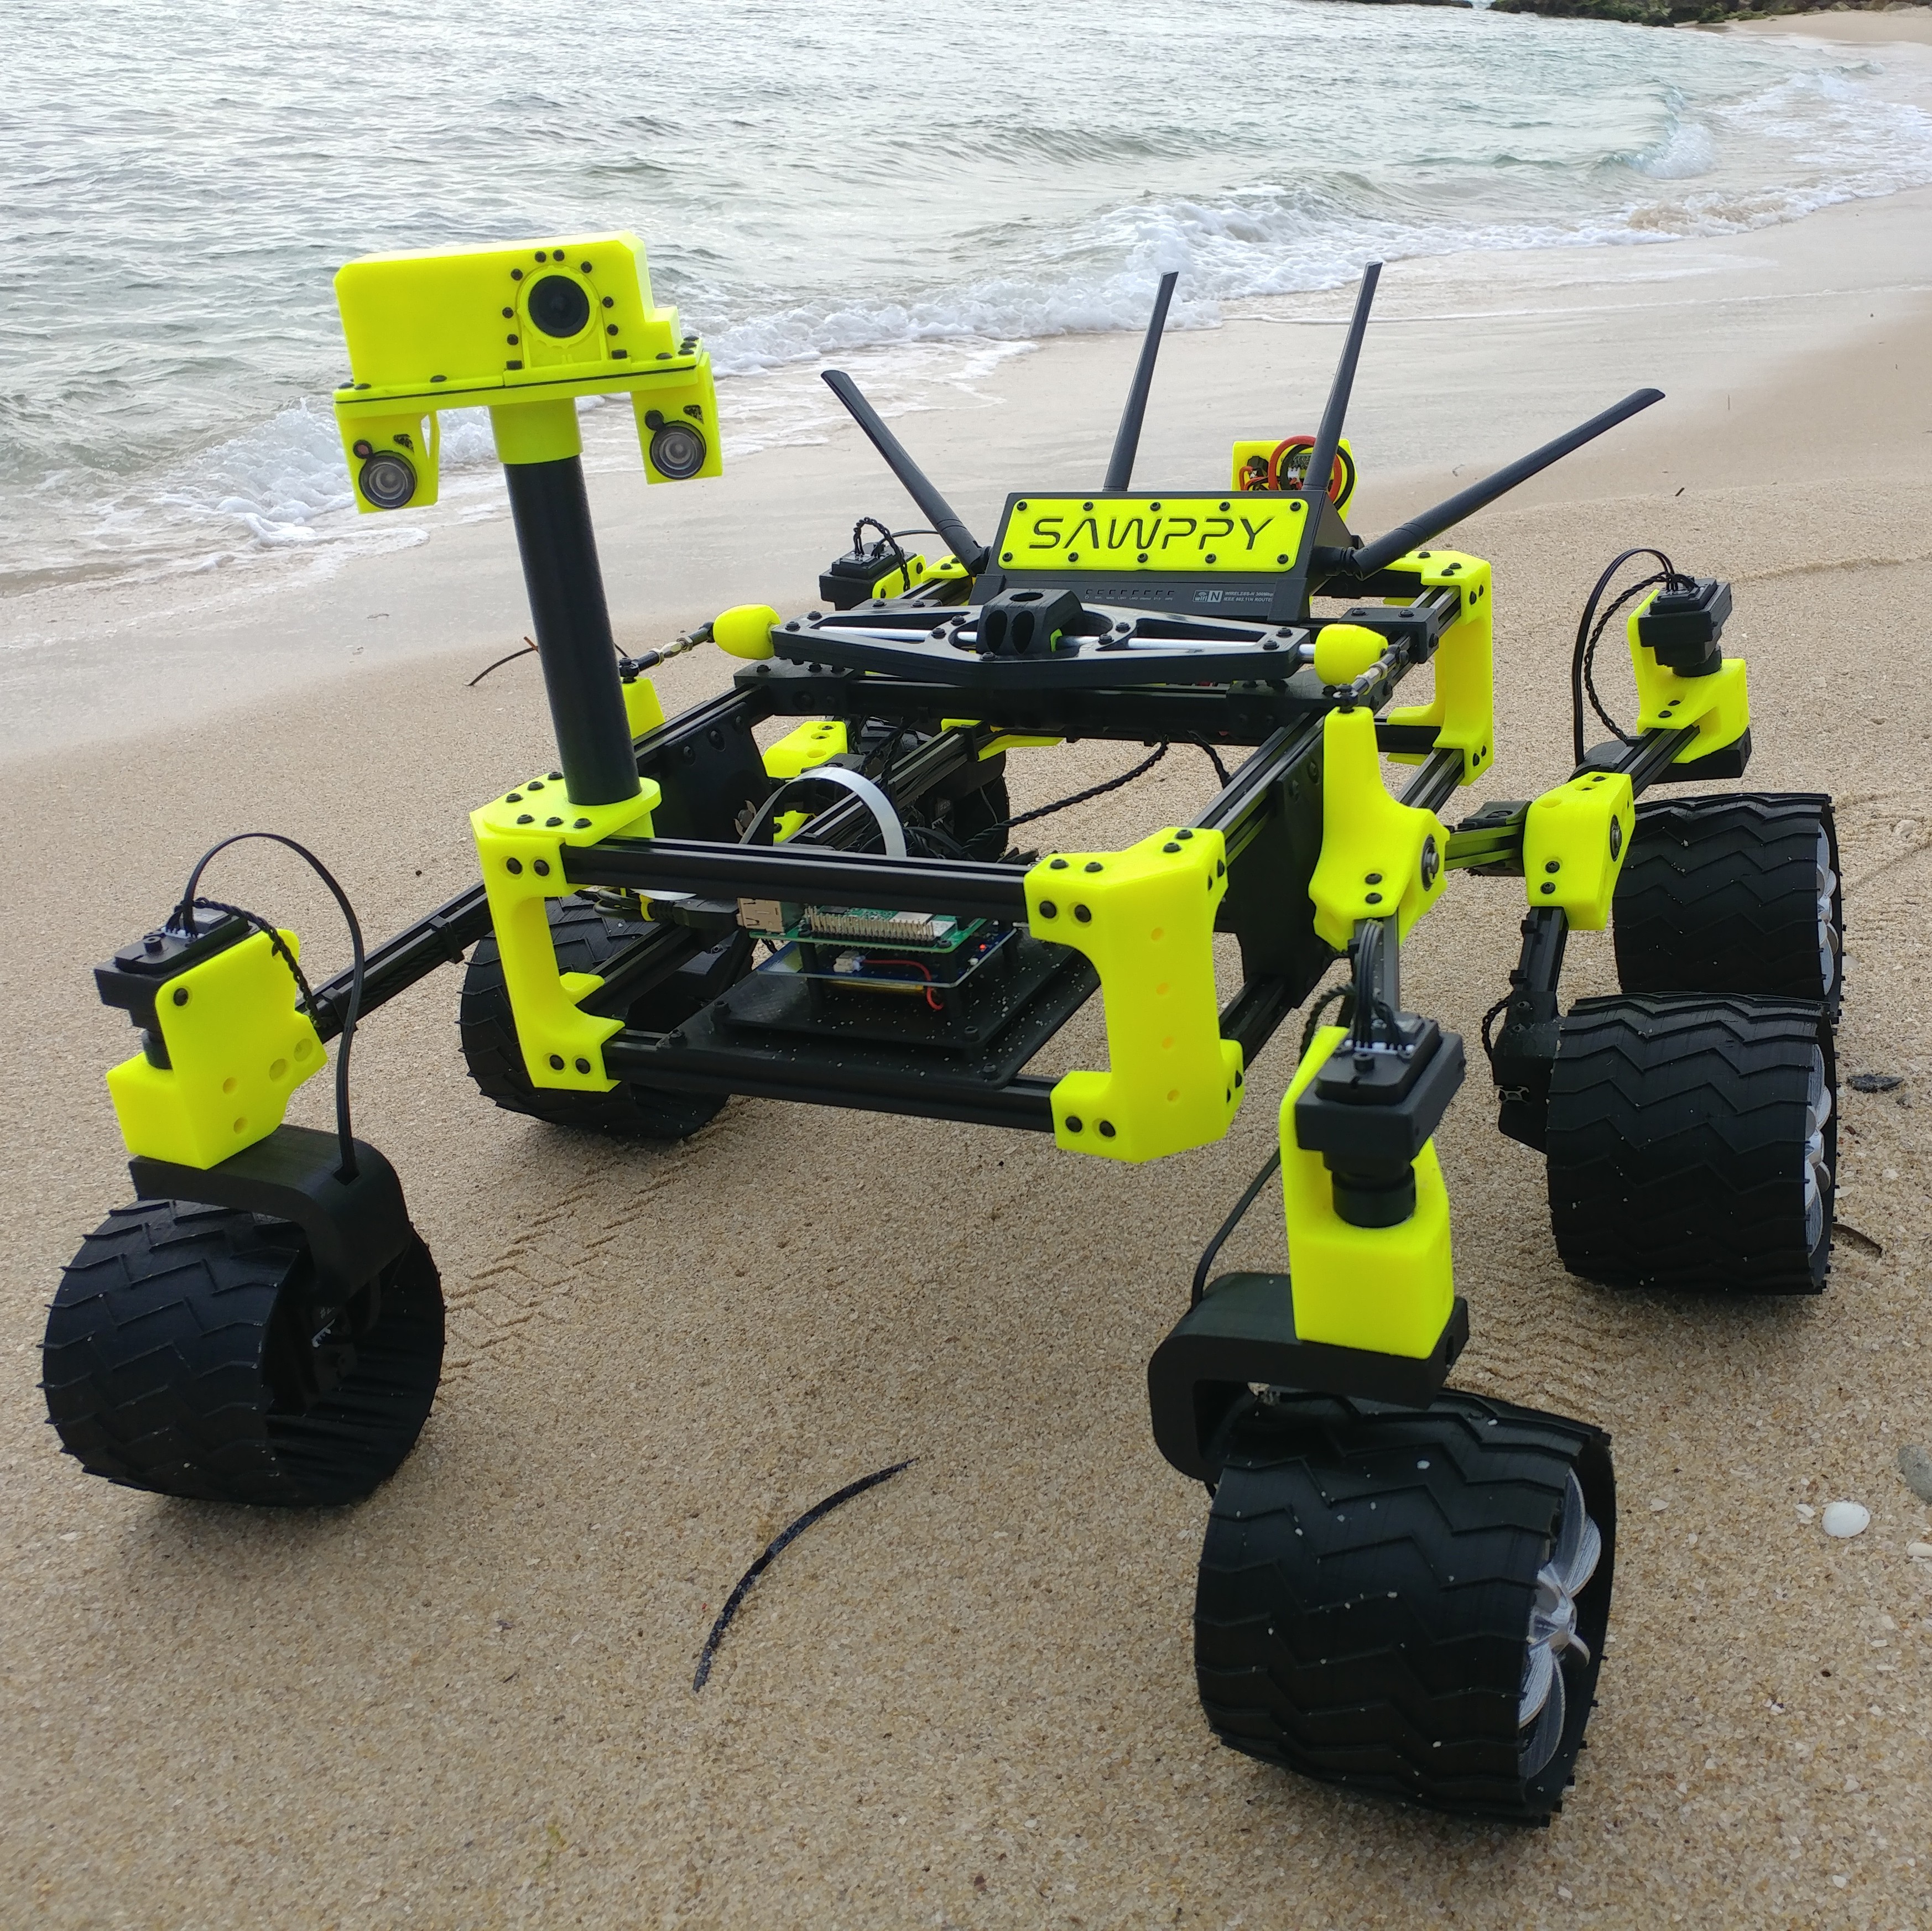
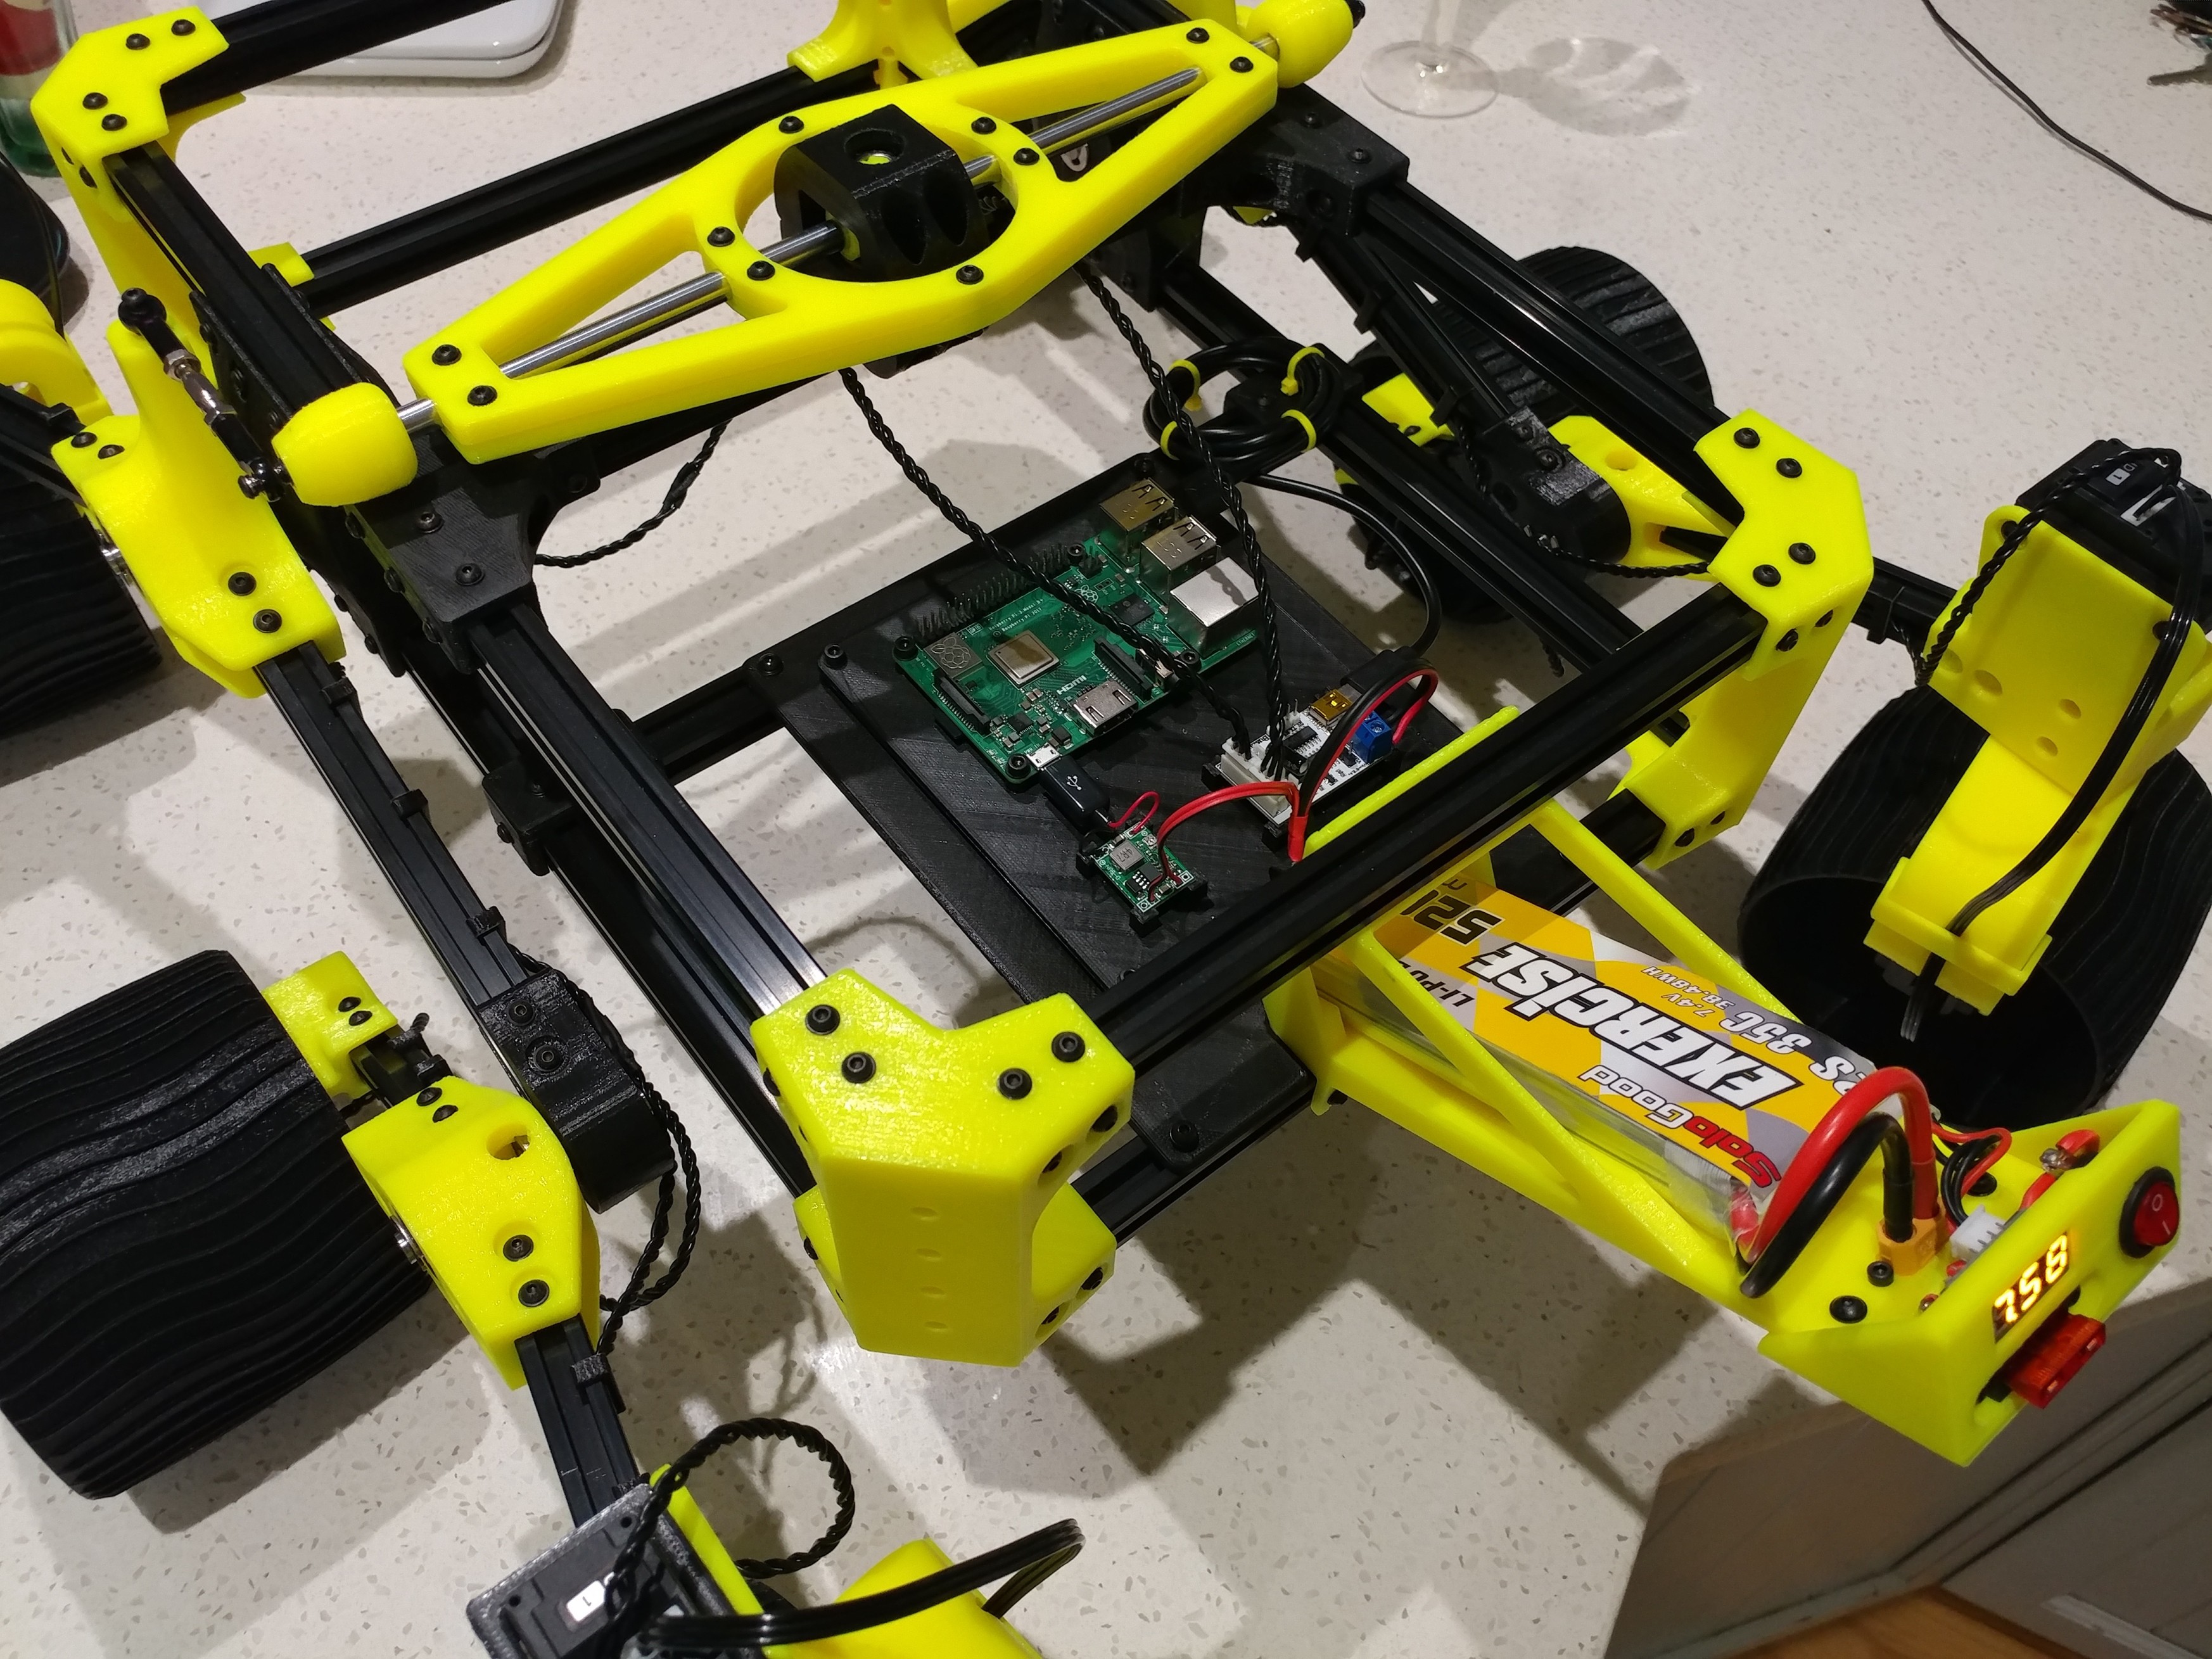
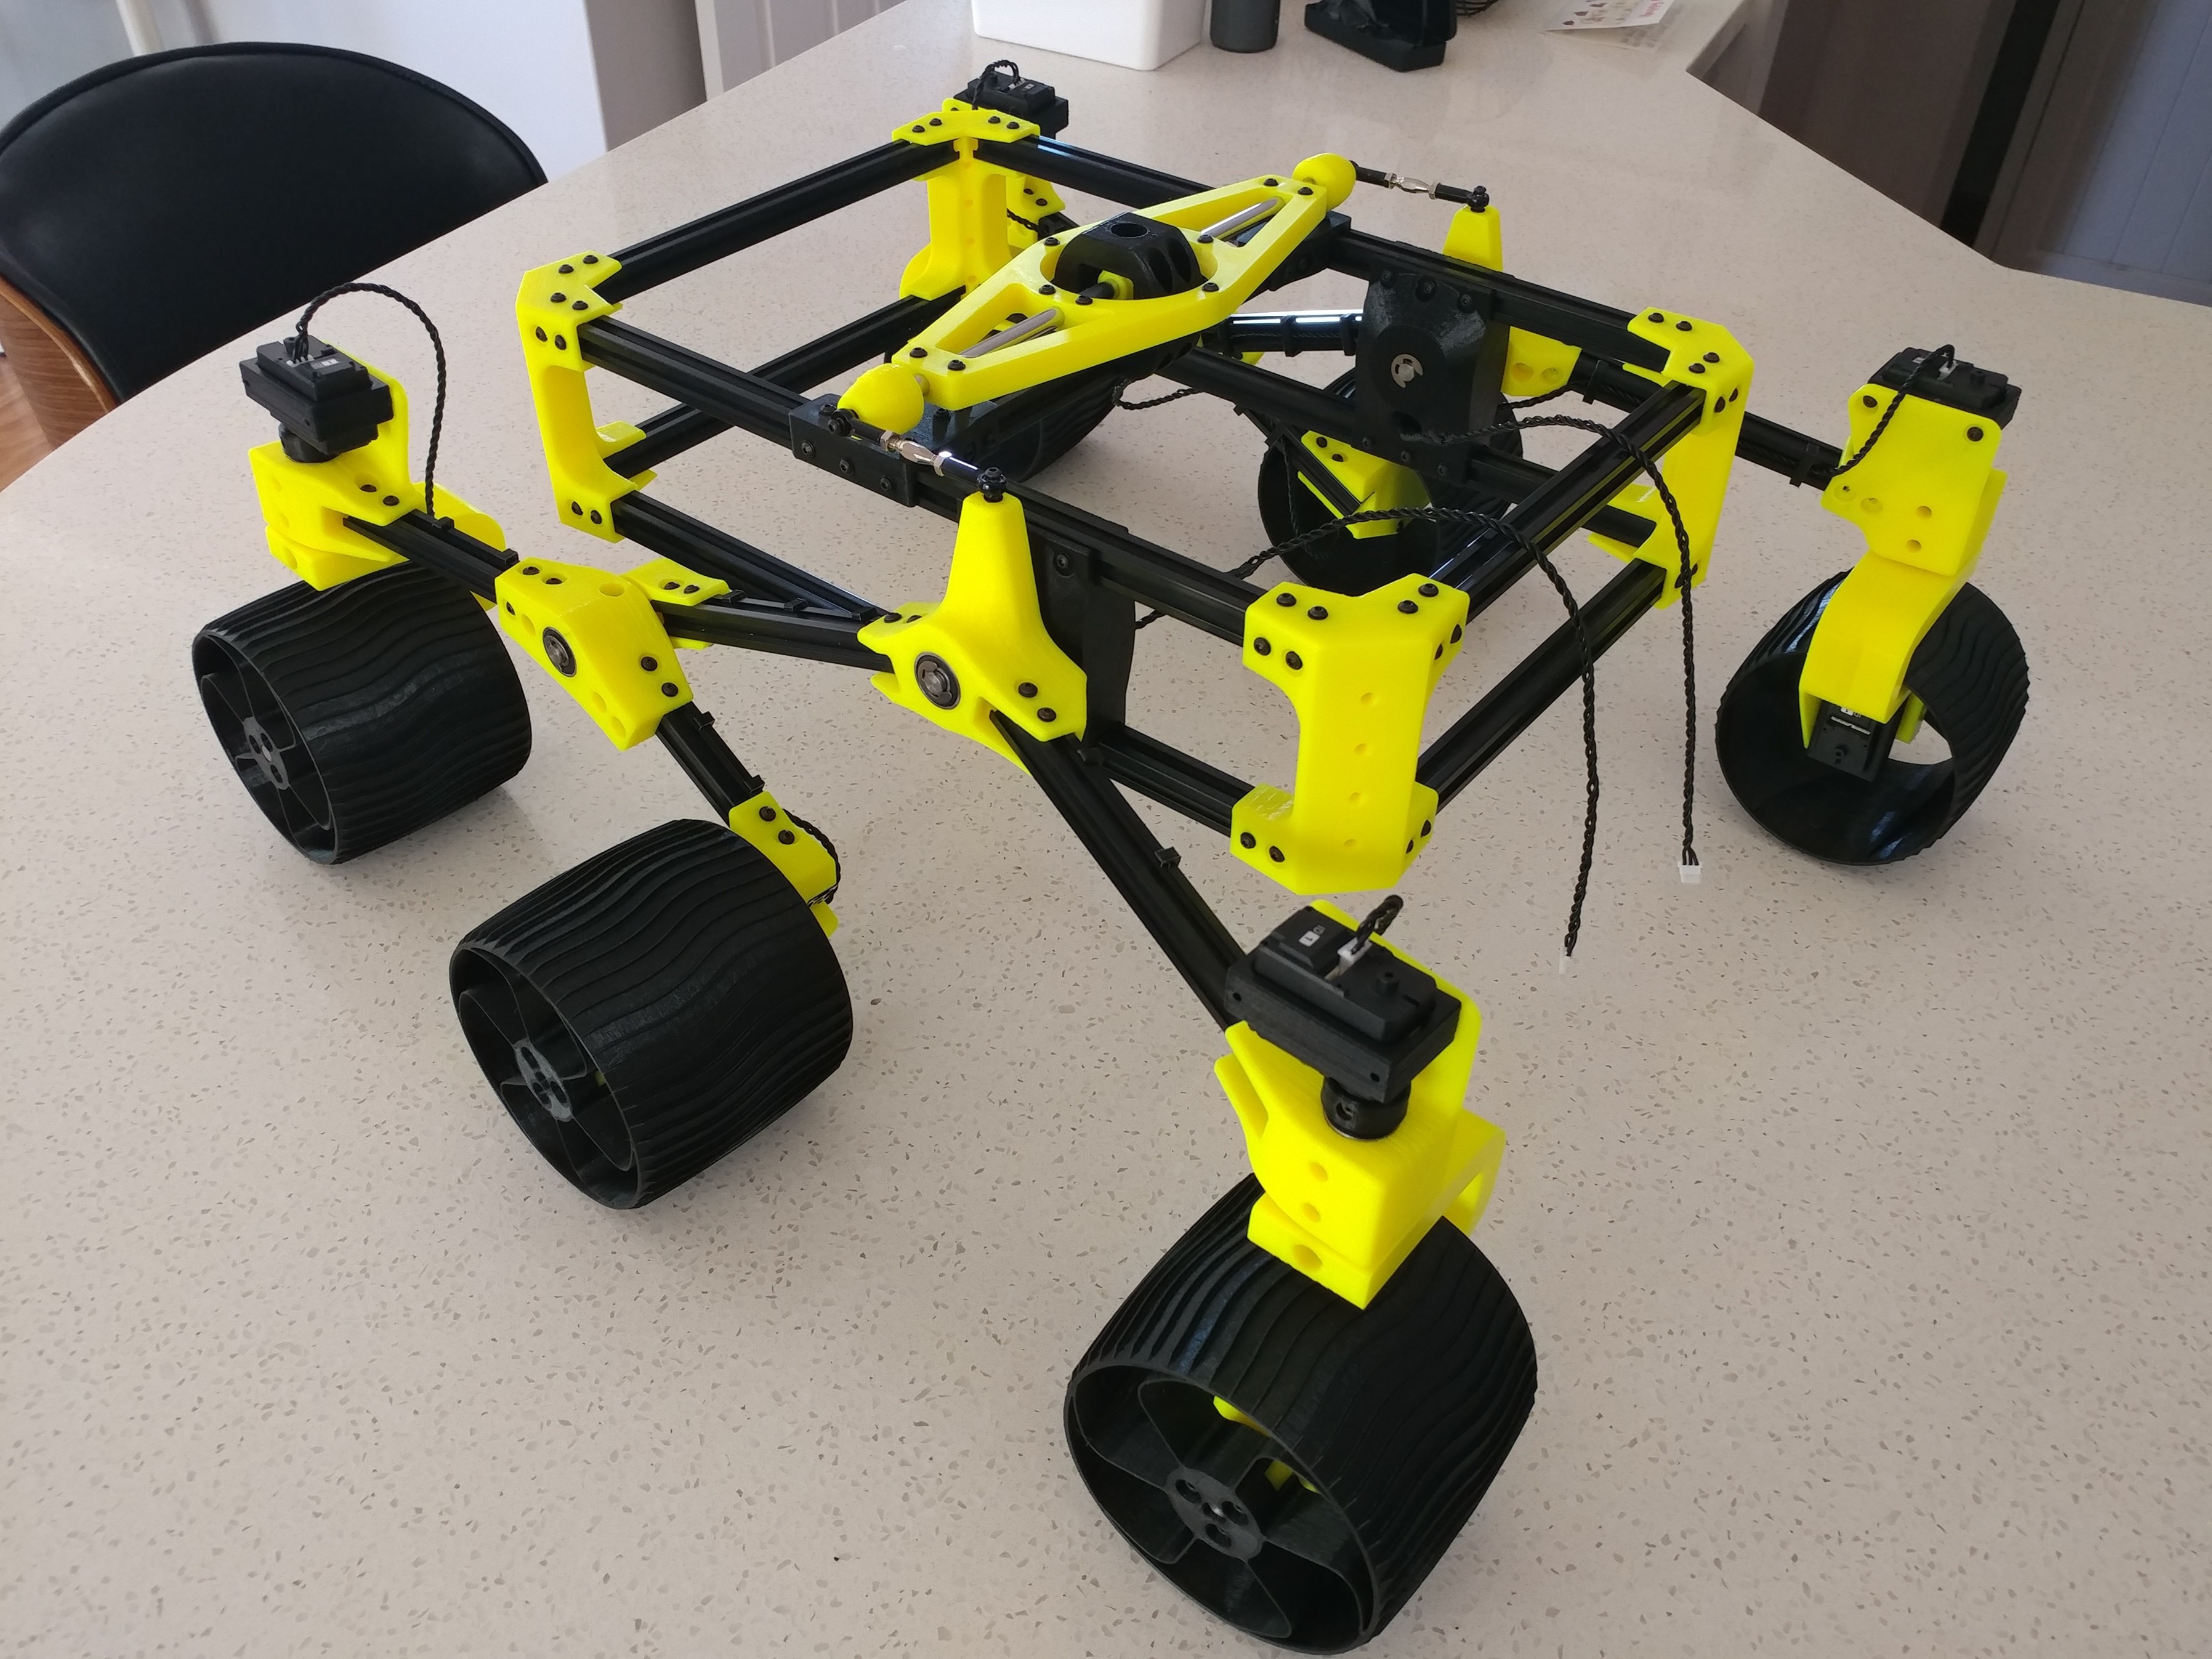
Firstly, a big hat-tip to @Roger for developing his original Sawppy in the glare of the public domain (and taking the time to blog). Much goodness there.

https://hackaday.io/project/158208-sawppy-the-rover

Roger's work is a walk-up start on a project that would be far too complex for me to seriously contemplate on a blank sheet basis.

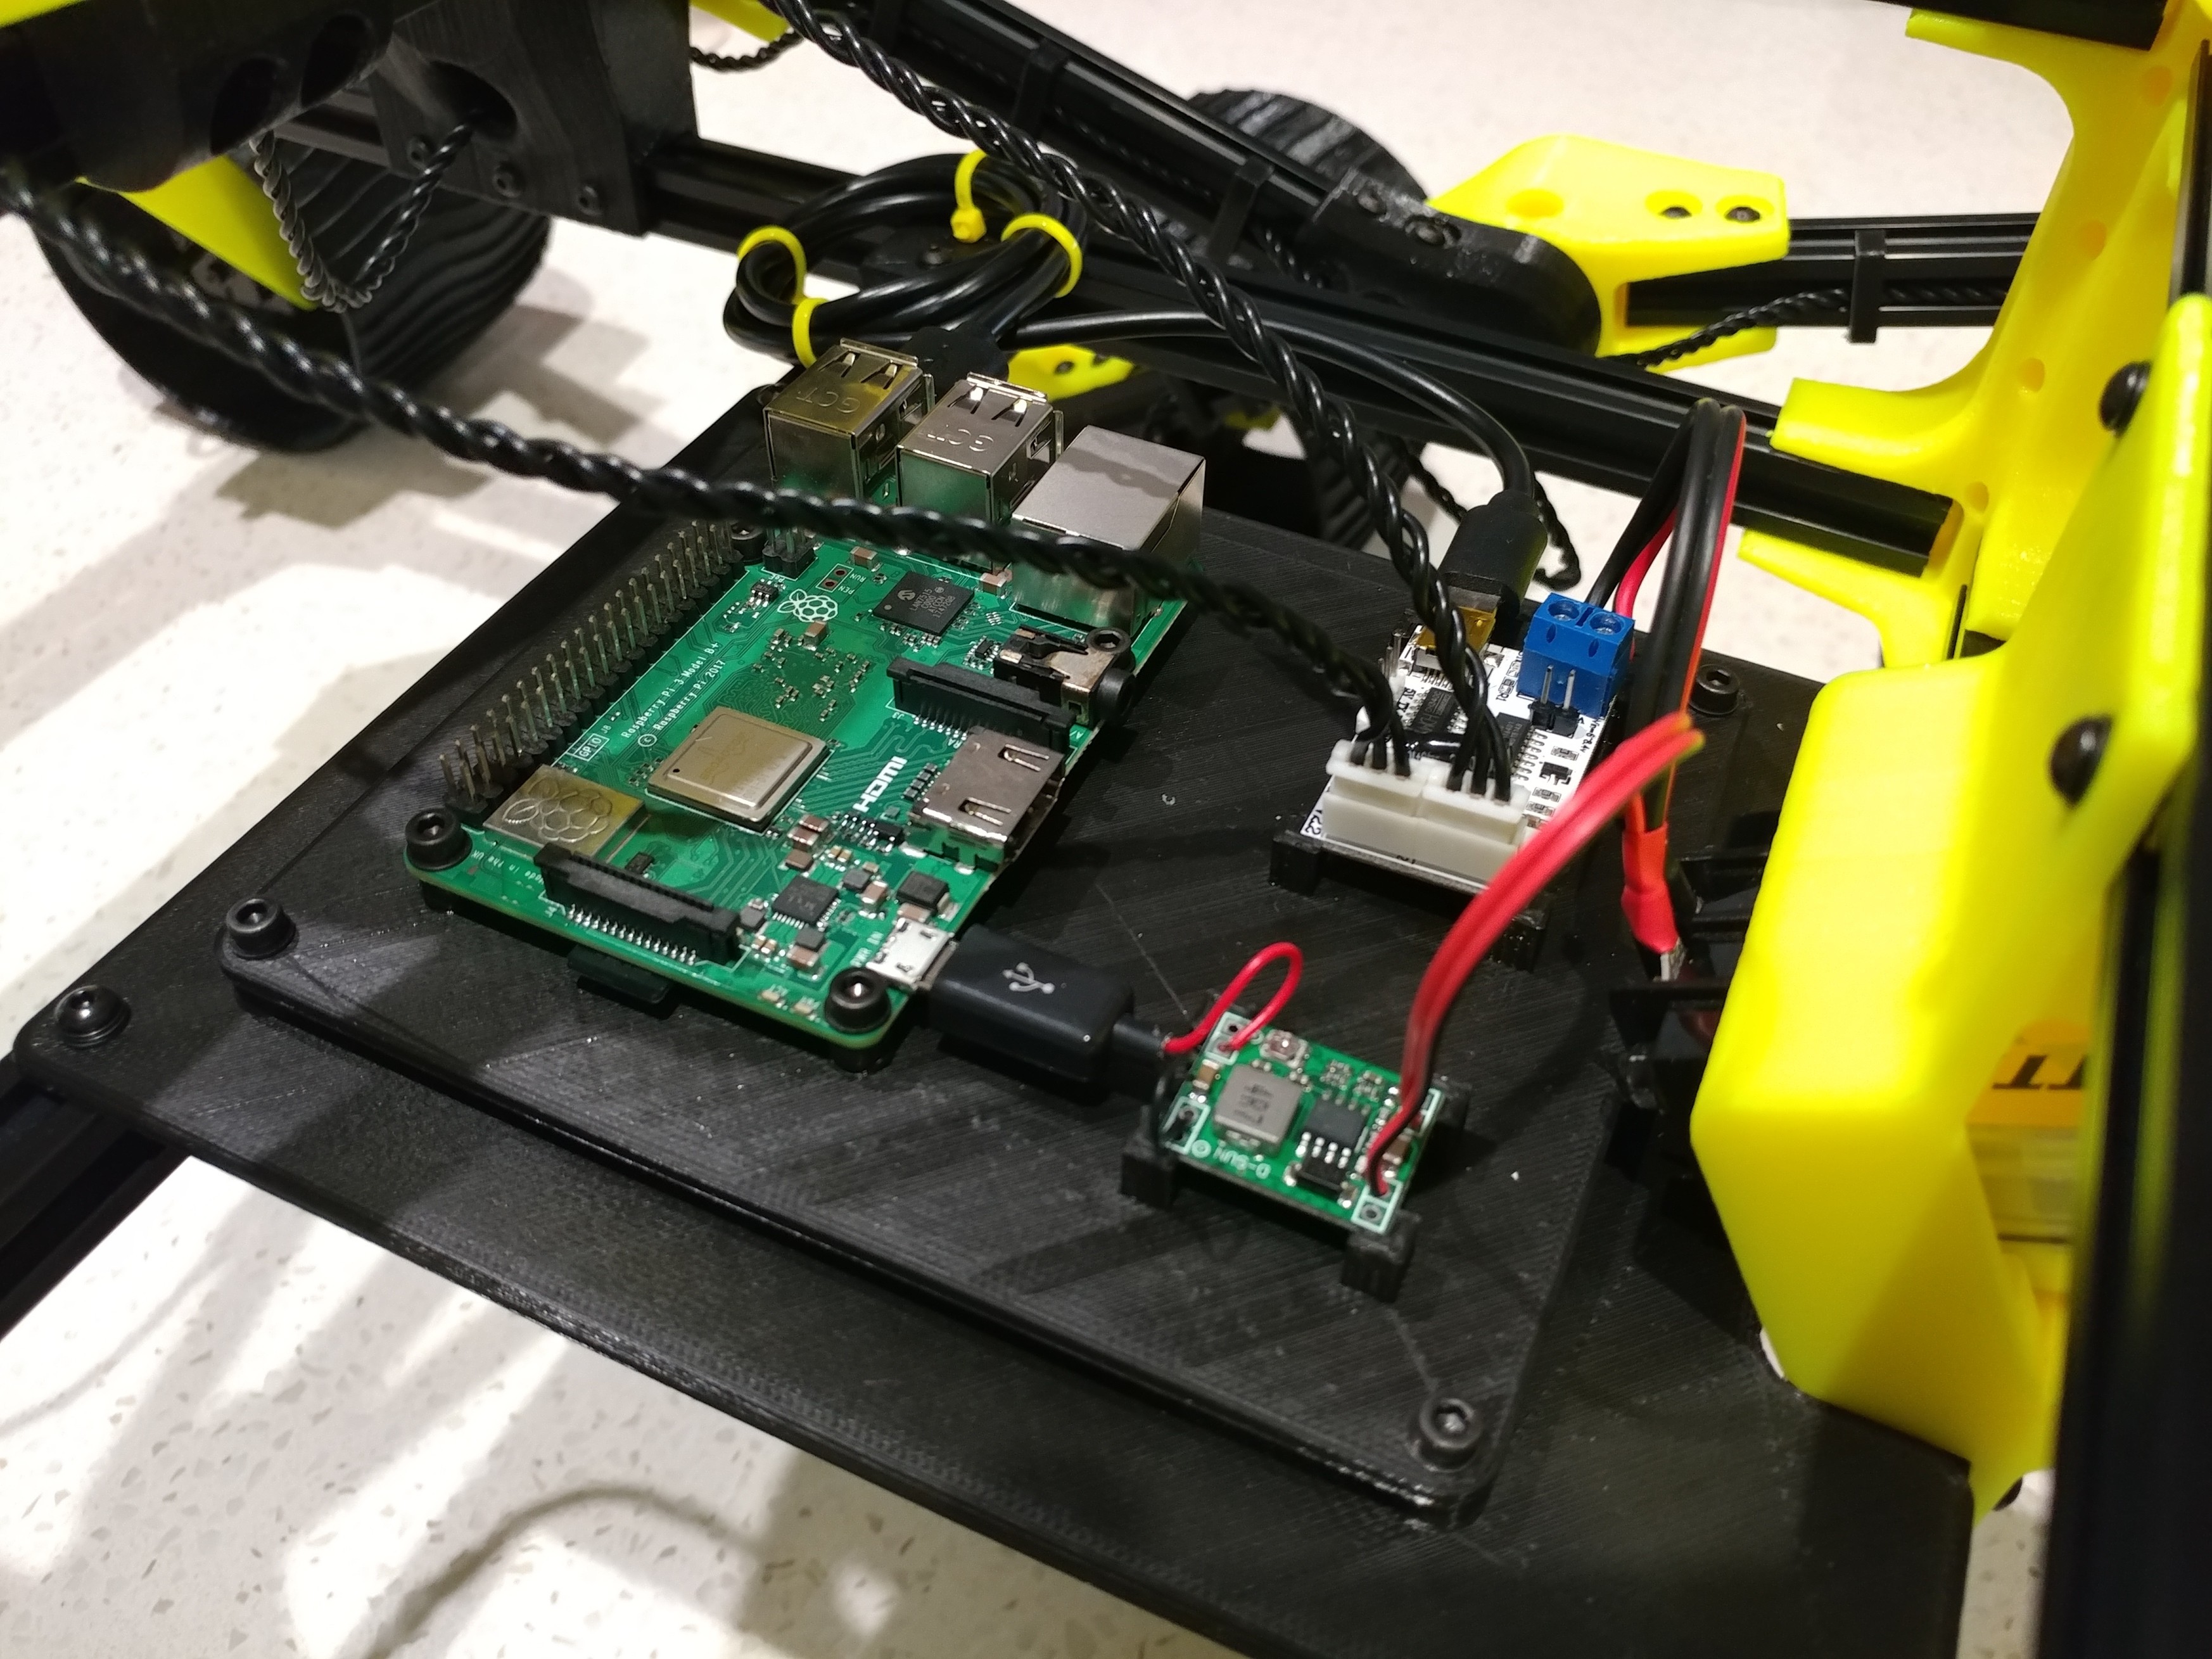
The project is mostly about a challenge for my son & I.

Aussie Sawppy Cost Report.xlsx

Pretty much all that I've spent so far (13 May 2020)

sheet - 57.38 kB - 05/13/2020 at 12:57

Download

  • Aussie Sawppy - At the Beach

    TeamSG08/10/2020 at 14:30 3 comments

    We went for a cruise on Trigg Beach, which I wasn't allowed to do apparently. They have a blanket ban on remote controlled devices at the beach - which I understand, but didn't know about. Oops. Soz.

    Took some video that wasn't all that interesting, tbh. I'll upload that later.

    Took some photos that were more interesting. I guess they show the machine in something like it's final configuration (for now).

    Some upgrades since it was moving in basic form.

    • Some reprints to drop a bit of yellow and improve the colour balance
    • On-board wifi router for extra range
    • Nameplate on the router casing to advertise the franchise
    • Dedicated RasPi stacked battery pack
    • Curiosity-esque wheels & tyres (front right destroyed later in the day)
    • Hex drive shafts (can't see them but they performed perfectly)
    • Pi Camera with night vision / IR LEDs

    It's all come together pretty well, although I'm not sure I like the LED mount design in "portrait" mode now that they are fixed to the machine. I think I'll redesign & rotate them 90° to fit them in landscape mode. Filling in some of the gap between the camera mast and the LED mounts will give it a bit more visual weight.

    Still some bugs to be worked through. The router is a bit finicky to get up & rolling without mucking about a bit. I had the camera streaming to a smart phone but a ribbon cable mishap seems to have fried the camera electronics and now it's cactus. Didn't even get to test the night vision :(

    Regarding the photos, I was trying for something like a real Mars rover's "selfie" style photo using a wide angle lens at the same level as the on-board camera. Kinda worked. Second order effect is that some of the outer edges of the photos look a bit distorted because of the lens.

    I have plans to get the rover cruising on some bigger & whiter undisturbed sand dunes in the not too distant future. Pics / video when it happens.

    Edit: 

    The not-all-that-interesting video...

  • Aussie Sawppy - Catastrophic Wheel Failure

    TeamSG08/08/2020 at 10:18 1 comment

    We were out taking video / photos of the rover tackling some interesting terrain and the front right wheel picked a fight with a feral stick or something. Snap, crackle, pop - Doh!

    Prolly a number of compounding factors but I think the big one was the dodgy filament I used for the print. I knew I was going to paint them so I used some old red PLA I had l laying around.

    My wheel design could do with looking at too. It was a bit of a rush at the time. I think Roger's design is much more robust.

    I'll put up the photos we took later. Video needs some editing input from my daughter before I post that.

  • Aussie Sawppy - What's the damage?

    TeamSG05/13/2020 at 13:19 2 comments

    I finally got it together to organise the dollars / details / notes that I've been setting aside since we started the rover build.

    So what's the damage?

    ***   $737.16 AUD  ***

    Today is the first time I've added it all up and I'm pleasantly surprised. I'd figured we'd gone a bit over the nominal $750 AUD budget I set in June 2019.

    AUD vs USD is currently 0.6485, so my total cost is $478.05 USD.  @Roger set himself a target of sub-$500 USD for the Rev0, public-domain #Sawppy the Rover build, so...

    .

    Mission Accomplished.

    .

    The full, tidied-up-for-public-consumption cost spreadsheet is in the Files section of this project log.

    Or get it here.

    Most of our parts came through Ali-Express, which has a bewildering array of supply options for the more common items. The prices in the spreadsheet are what we paid but there are myriad vendors and endless variations of free / paid shipping, bonus offers and discounts plus the daily fluctuations in exchange rates. You can waste tremendous amounts of time chasing & comparing prices in order to save just a couple of dollars. How much is your time worth?

    The only thing not on the final list, so far as I can tell, is the 3D printer we bought to kick this whole thing off, which was $399 AUD from here.

  • Aussie Sawppy - Hex Drive

    TeamSG04/21/2020 at 22:44 4 comments

    OK. So COVID-19 has obviously crashed any significant outdoor fun for a while now. We had plans for Sawppy excursions to interesting terrain that were victims of Western Australia's sudden inter-regional travel restrictions. Such is life...


    So, the rover upgrades have now gone a bit deeper than they might have done in happier times.

    Let's talk shaft couplings.


    We've had a fair bit of trouble keeping the adapter / shaft joints tight on the drive and the steer servo motors as well as the steer knuckles. I think Roger's original design is sound and not an uncommon solution, but the materials crash the party.


    Metal shaft with detent, metal grub screw, metal threaded insert all surrounded by printed plastic. That plastic's job is to resist concentrated stresses along multiple axes. Plastics tend to deform over time under steady stress and I think that's where the frequently loose shaft joints come from.


    ***

    I'll throw a rider in here and say that we're using bog-standard PLA across the board on the rover. More exotic plastics may be tougher / more robust and so less problematic.

    ***


    Anyways, constant mucking with loose shaft connectors arising from Sawppy driving around the house got me pondering. Then @Quinn Morley and his monster rover build showed me the answer.

    Hex profile drive shafts! The hex profile means that the motor torque for driving and steering is transmitted over a *significantly* larger surface area of plastic. We're yet to do any serious torture testing, but early indications are all good for a sustainable solution.

    Some details...

    If you do the calculations it turns out that a 7mm hex shape across the flats is a touch over 8mm across the points - almost a perfect replacement profile for the round 8mm drive and steer shafts. No need for new bearings!


    Finding 7mm hex shaped rod was a firstly a challenge and secondly expensive, so we just bought four extra-long 7mm Allen keys to cut up instead.


    We had to change to proper circlips (8mm ID) because the original E-clips don't work on a hex profile.
    I hacked up the OnShape designs for the servo and wheel adaptors to put a hex instead of round hole in the centre. A bit of dimensional experimentation yielded a snug interference fit on the shaft.


    Same mod for the rover's corner steering knuckles - hex hole substitution. There is also now an extruded a cable path through the new knuckles, in lieu of the surface recess in the standard design.


    End result is that now the grub screw mostly provides a locating force along the shaft's axis. The interference fits means there's actually not much of that locating force required.


    Nothing's coming loose so far :)


    Sweet as, bruh'!

  • Aussie Sawppy - Rims

    TeamSG03/21/2020 at 10:38 4 comments

    So I applied my dodgy CAD skills to the wheels situation.

    • Tyre tread more like Curiosity's, as appears on Mars.
    • Wheel centre a classic six-spoker - kinda like Curiosity's if you squint (a lot). 
    • It's a two-part design so I can maybe have another crack at the centre later and swap them out.
    • BTW, the silver is paint, not a raw filament colour.

    I figure these flasherer wheels are Jordan 1's - the nice alloys you fit for a show-n-shine. The original Sawppy wheels will be the work boots - the steelies you bolt on for circle work / skids.

  • Aussie Sawppy - Signage

    TeamSG03/14/2020 at 09:29 0 comments

    Been working on a few upgrades. Pretty happy with how this turned out.

    Still got stuff  to do before the rest of the work makes a debut...

  • Aussie Sawppy - She rides....

    TeamSG02/09/2020 at 14:07 0 comments

    With the first power up, I get my favourite fault: “Internal Error 500” when you tried to connect your smartphone to the on-board wireless network. The error that caused some furrowed brows during the bench test period a few months ago was back! So no smartphone access to the control interface. Doh!

    After a brief, fruitless look for a solution, I bypassed the Pi's on-board network and just hooked up a monitor/mouse/keyboard directly to the Pi so that I could test the servos with the mouse on the Pi-hosted SGVHAK web page.

    Setting aside that big, initial error, there were a few commissioning issues around the servo set-up. In a nutshell, at the right rear I managed to botch the drive and steer servo assignments. As a result, the first powered test saw that right rear steer servo think it was a drive and attempt to twist the link cable off. Whoopsie!

    A bit of mucking around sorted that situation out with just a bit of fuss – connecting the laptop to the rover servo looms to run the servo configuration software..

    AND... a couple of the servo couplers blew out where the threaded insert is fitted. I’m pretty sure that was a result of my dodgy, fumbly, initial attempts at the insert insertion process. I got better at it as I worked my way through the required 38 and don’t expect similar failures in the near future based on what I can see of the other ones. We’ll see.

    And so ... back to the “Internal Error 500” problem… it seems that the error arises if you start the Pi with the BusLinker already connected.

    The solution is to either...

    ...start the Pi with the BusLinker USB cable unplugged and then connect it once the Pi has settled...

    OR...

    ...with the Pi already running you unplug / replug the BusLinker's USB cable.

    I’m not exactly sure what the go is there. My guess is that the Pi needs to complete its start-up sequence and be idling in a steady state before the code on the BusLinker chip can initialise properly.

    Happy to have that issue sorted.

    And so, Aussie Sawppy makes its public debut (below) with the traditional ascent and descent of a strategically-placed backpack. 

    Getting the rover going has been a cool achievement. Thanks go to the team here at home and to @Roger for having the guts and the gameplan to make his homage to Curiosity a public project.

    Thanks, too, to @Roger for offering sage advice when I was flummoxed by the software side of the build.

    Now for upgrades 😊 

  • Aussie Sawppy – Rover Control Unit

    TeamSG02/08/2020 at 10:55 0 comments

    G'day

    I finally got the extra link cables from AliExpress / China. But they were the wrong cables! After waiting a month it’s frustrating to get the incorrect part – that’s online shopping for you! I ordered link cables to suit a Lewansoul / Lobot LX-16A servo but what I received were cables that match the other of the two sets of plugs on the BusLinker board.

    The cables themselves are smaller cross-section and a ribbon style, too. Dunno what servo they fit but it ain’t an LX-16A. There’s no way to make the plugs fit - physically the wrong size / shape and pin centres not quite there. DOH!!!

    Anyways, I lodged a dispute and got my money back. That bit was a super quick and fuss free process. Kudos to AliExpress and the vendor there.

    I grumbled to myself about the situation for a couple of days but then had a brainwave – I had kept all the excess plugs from when I chopped up and reconfigured all the original cables! Bonus!!

    So pulled the wrong plugs off the wrong cables and managed to make the salvaged ones fit. The smaller pin connectors will have to do. When the Frankenstein cable is hooked up, the plug connection isn’t as “full” as it should be but it’s good enough. Situation salvaged, we’re back in the game.

    Meanwhile the RCU has been mounted in the machine.

    • There’s a new 1515 structural element installed across the rover body to support everything.
    • There’s a base board mounted to the chassis that’s kind of intended to be a permanent feature.
    • There’s a separate RCU panel with the Pi, BusLinker & transformer mounted on pedestals in an orderly, geometric fashion with the various cables set-up to be to be nice and neat.

    The overarching idea is to be able to remove / refit the whole RCU with minimal fuss.

    Admission: I made a classic rookie mistake in failing to account for clearances by barely leaving enough room to get a screwdriver (a New Screwdriver???) on the power terminal screws with the RCU in place (Pi gets in the way). It’s doable but not what I’d like it to be - fine but annoying. Doh!

    Drum roll... and thus, the Aussie Sawppy Rev0 build is complete. Oi!

  • Aussie Sawppy - Power Unit

    TeamSG01/21/2020 at 13:17 2 comments

    G'day

    OK, so three weeks ago I said I had a chopped / hacked / optimised Sawppy power unit under development in OnShape. Well, I'm finally done.

    For those not following closely (most?), I figured I could afford to optimise the power unit a bit, safe in the knowledge it was unlikely to require significant future modification, regardless of whatever else I end up doing with the rover. Thus I've spent a bit of time pondering the power supply set-up in order to satisfy my overly-finicky sensibilities.

    Quick list of mods to the OS (Original Sawppy) power panel & battery tray.

    • spacers either side of the tray to keep the battery centred and aligned
    • integrated battery connector socket in the floor of the tray
    • recessed, panel-mount fuse holder on the power panel face
    • next size down voltmeter unit
    • voltmeter wires exchanged for pins so as to accept the battery balance plug 
    • mostly hidden cable conduit in battery tray base
    • terminal block mounted on back side of battery tray

    End result is a power unit that can be easily disconnected and quickly dismounted from the rover body. Pretty stoked with it. A nice example of what I'd suggest was fruitful pondering. Maybe it took too long, but that's fine.

    Next sub-project is mounting the RCU components (pi, buslinker, tx) within the body of the rover. I already have some ideas there, but I'm sure more will come as I periodically stare at it intently whilst mumbling to myself at appropriate intervals.

    Still waiting for my extra link cables from China...

    Pics or it didn't happen:

  • Aussie Sawppy - #failure to meet deadline

    TeamSG01/02/2020 at 06:56 0 comments

    Yeah, so the Xmas deadline came and went and the machine ain't near done yet. Doh!

    Mostly, I ran out of time with the festive season crashing my spare moments. Although the root cause was actually a lack of progress MONTHS AGO. And so the project's critical path to completion (if it had a Gantt chart) became simply unachievable in the planned time-frame. No amount of additional resource allocation would have overcome the situation.

    And, tbh, I'm quite enjoying the pondering aspect of this late-stage build phase so "time taken" is less of a concern than it was. Up to recently, I've pretty much just followed the solid, public-domain Sawppy recipe as laid down by @Roger. So the foundations of the machine are good. Now I'm wandering through the final electrical / mechanical build.

    Generally, I'm not one to go with my first thought on anything - my first thought is rarely my best thought and quite often it's just someone else's thought anyways. Thus I'm happy to drop in and out of things, thinking hard and then dropping it, waiting for inspiration to strike. Dangerously close to procrastination, admittedly, but it works for me. My professional life abounds in hard deliverables, deadlines & budgets, so the stretchable slack in personal projects is a precious commodity.

    OK, so quit rambling...

    Progress has been on the wiring harness and tweaking the design of the official power unit.

    Harness: In a nutshell, I deconstructed, chopped, spliced, soldered, heat-shrunk & rebuilt the three metres of triple-stranded wiring that came with the LX-16 servos to create the compact, neat, tidy shape I wanted. I've already used up all of the supplied wire, so I've had to order some more to finish, but that's OK. Our good friends at AliExpress will deliver the four additional link wires shortly.

    The harness I've cobbled together mostly hides neatly in the offside channel of the 1515 extrusion with the help of some printed clips that I knocked up in OnShape.

    So I'm stoked with the loom / harness.

    On the power unit, I've decided that regardless of anything else that I might decide to do with the rover, the power unit will likely remain as it is so I'm doing my own optimised version. Thus, I have hacked, almost-complete versions of the standard battery tray and power panel sitting in OnShape. Design tweaks are around neatness / tidiness of wiring again. Some more pondering still to do ;)

    So, yeah progress is slower than originally planned, but that's because I've decided (belatedly) to row my boat gently down the stream rather than be in too much of a hurry :)

View all 23 project logs

Enjoy this project?

Share

Discussions

Mike Szczys wrote 07/02/2019 at 22:20 point

Love seeing another Sawppy build coming together!

  Are you sure? yes | no

Ken Yap wrote 06/23/2019 at 05:18 point

I think it should be christened Mad Max. 😜 But great work mate. 👍

  Are you sure? yes | no

TeamSG wrote 06/23/2019 at 05:53 point

Haha... we're going yellow and black (for dramatic effect) so it'll be more like the mostly yellow Interceptor than the all black, 2-dr coupe Max made most famous.

We call it just 'the rover' or 'sawppy' at the moment.

  Are you sure? yes | no

Roger wrote 06/20/2019 at 18:39 point

I love that my rover is getting a sibling down under. Sorry to hear parts are hard to come by. I had hoped Sawppy could be built worldwide, but there's more to building a world-friendly project than using millimeters. I welcome feedback from your Perth perspective on what is and isn't easy to procure. Especially if there are any "make this small change and my life becomes easier" insights.

Thank you for sharing your progress and best wishes on putting together your Sawppy variant!

  Are you sure? yes | no

TeamSG wrote 06/22/2019 at 05:15 point

Hi, Roger. I don't think you should be particularly concerned about how hard your recommended parts are to find. AliExpress is a great option regardless of where you are in the world. The wait for shipping is a tad annoying, but it does make you plan ahead, if nothing else :)

Broadly, it'd be nicer to be able to wander into a bricks & mortar shop and get what you need, but that experience is fast disappearing across the globe.

I'm often chasing reasonably obscure (though modern) auto parts. I gave up on local suppliers on that front years ago. Online shopping is always the the first stop for car parts now. The rover is in that boat, too.

So the Sawppy parts were only 'hard to come by' locally. In my experience, that's not saying much.

  Are you sure? yes | no

Similar Projects

Does this project spark your interest?

Become a member to follow this project and never miss any updates