 Patrick
As I was pondering porting the C-based FluidSynth code to the bare metal Circle-TeensyAudioLibrary environment for the vGuitar project, I decided that it would be wise to first at least build a Zynthian to provide a baseline and a test platform for my own project.
The result is a simple instance of a Zynthian that can be made with a minimum of hassle and basically works, more or less, direclty out of the box with the current Zynthian released binaries.
I need to do more testing to see if this actually fits into the project ... perhaps the actual stage rig will be a conjunction of a linux rPi running Zynthian and and a separate bare metal rPi running the looper, we'll see. In any case I am eager to hook this build up to the PA and my Fishman FTP pickup and see how well it works, but first I thought I would write a hackaday project page for it. So here it is!

One nice thing about this particular build is that it works without the somewhat complicated Zynthian cables. It could be built in an hour, though it actually took me a full day to work the kinks out, particularly for the resistive touch screen. The shield stack, from the bottom up, consists of
- the rpi 3b+
- my rpi breakout board
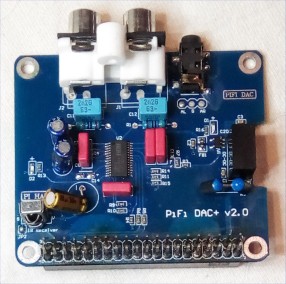
- a pi-fi clone? sound card
- a cheap ili9486/xpt2046 touch screen I had sitting there
At some point I realized I had all the parts on hand to try the build. It needs an mpc23017 and four rotary controllers, the rpi, a sound card, and a display device (you could do without the display device and use HDMI, but that is beyond the scope of this simple project).
The only thing that my breakout board provides is (a) the input 5V and ground to the rPi and controller board, and (b) access to the rpi SDA and SDC i2c pins, and access to two gpio pins used for interrupts from the controller board. The controller board is connected to the stack by six wires. There are many other ways to achieve the same connections, so your build would likely be a little different.
This is not intended to be a box-able, final hardware solution, though I might make it into one, just for fun, when I get my (woo-hoo) first 3D printer next week. This project is intended more for just building a Zynthian and getting it working as quickly as possible, so for example, the controller board does not include any debouncing capacitors that would be present on a "real" persistent Zynthian build, nor have I implemented any serial MIDI ports. The rotary controllers and pushbuttons seem to work well enough for me without the caps, and I am just going to test it with USB midi devices so I don't need to build those in at this point ....
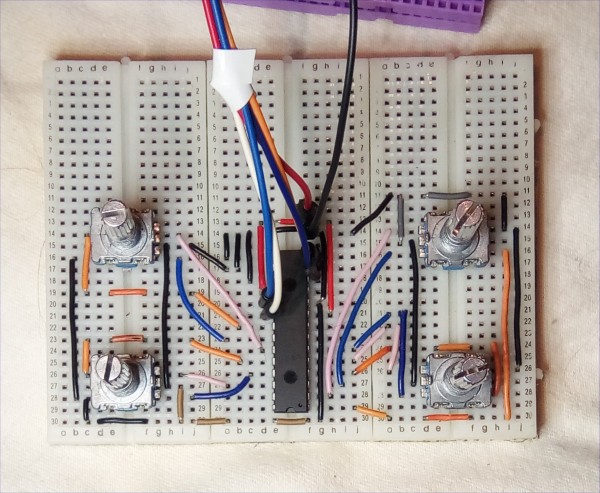
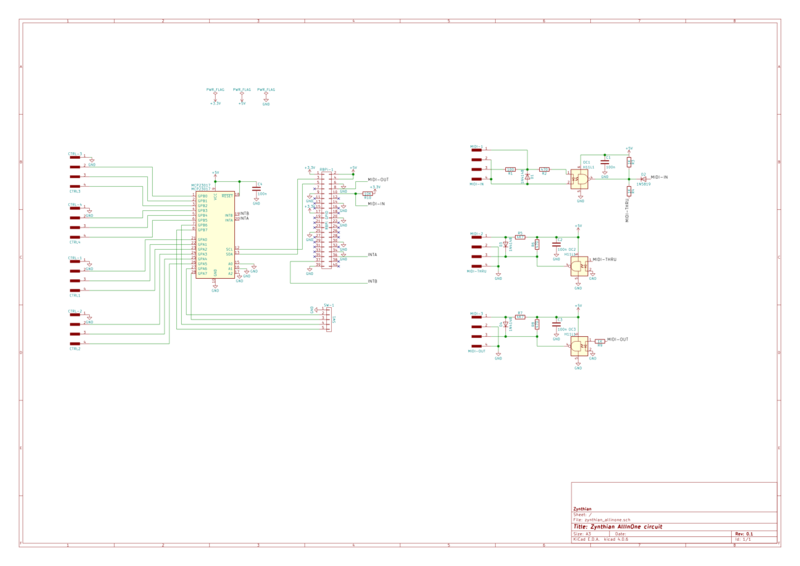
The controller board is, more or less, an exact realization of the Zynthian schematic for the all-in-one board. It is based on the mpc23017 io multiplexer IC and four standard rotary controllers with push buttons. I was surprised how well the rotary controllers attach to the breadboard. If I press them firmly the metal tabs on the sides fit right into the gap on the breadboard and provide a fairly good mechanical connection. I can pick the circuit board up by any of the control knobs!
I'm still learning, and, on the other hand, plugging the mpc23017 IC directly into the breadboard is, uhm, not as secure. With a little bit of tweaking of the pins it works reasonably well, but probably I should invest in some breadboard-able IC sockets.
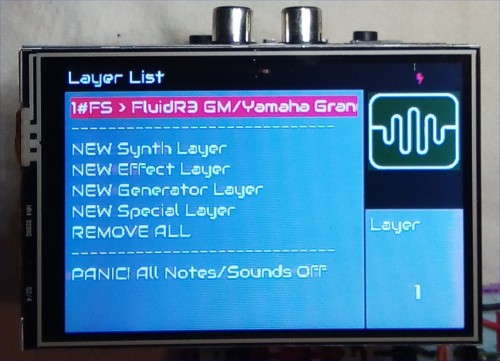
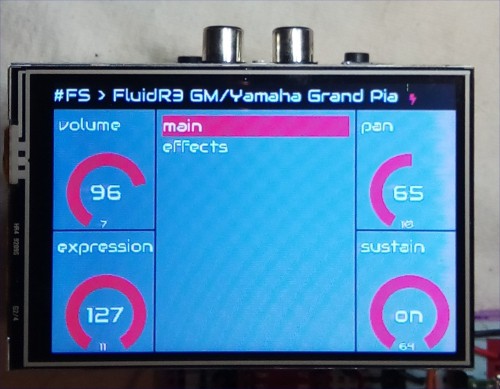
Here's a couple of pics of the device running:
In order to get it to stack I had to remove the 40 pin header from the Pi-Fi sound card that came with it, which for some reason was just a male connector, and hence you could not put anything on the stack above it, with a 40 pin female header with long pins:
(btw, the following photos *should* be NEXT to each other, and not ABOVE one another ... can't do this well in hackaday.io editor)

I guess I just lucked out in using the cheap touch screen. It works with the out-of-the box Zynthian Raspian Stretch New Aruk SD-Image except that the touch x coordinates were reversed (see below). It's an 11GB download and requires the Balena Etcher to burn an rpi Card.
CORRECTING THE XY TOUCH COORDS
Though I was pleasantly surprised that the screen displayed ANYTHING lol, as always it was the xpt2046 resistive touchscreen that caused the headache. In my case the touch was reversed in the X (long) dimension. It took some monkeying around, and permutational analysis to come up with the following steps to correct the problem. It reminds me why I don't want to use Linux in the first place. Too many arcane commands and side effects and who knows, try this and see what happens (nothing) over and over again until you're almost not sure what caused it to work, so you keep everything like some voodoo black magic spell.
Anyways, here's the verbatim steps I used to correct the problem.
user: root
password: raspberry

1.  Using "Balena Etcher" burn new card with
    2019-06-26-zynthianos-stretch-lite-1.0.0.img

2.  Plug in an ethernet cable and access the WebUI
    at 169.254.30.134.  You may need to use Chrome.

3.  Optional but likely:
    open the WebUI at the ip address in a browser
    with "raspberry" password.

    Goto WIFI and add SSID of network.  The MAC address
    is hardwired to 192.168.0.109 in my router

4.  For Serial Port (com25, console -rpi)
    config.txt:
        # prh - comment out midi as it changes serial port behavior
        # dtoverlay=midi-uart0
    cmdline.txt
        change "console=tty1" to "console=serial0,115200"

    * NOTE: THESE CHANGES GET WIPED OUT WHEN YOU USE
    the zynthian WebUI to change anything!


------------------------------------------------------
For Cheap 3.5 LCD Screen
------------------------------------------------------

The default PiScreen 3.5 (v2) works, mostly, except
the touch is wrong on the long axis.  You have to
SSH into the device or have serial working.


1.  Install the xinput mapping stuff

    apt-get install xserver-xorg-input-evdev
    cp -rf /usr/share/X11/xorg.conf.d/10-evdev.conf /usr/share/X11/xorg.conf.d/45-evdev.conf


2.  Install Calibration stuff and get Calibration values

    as user "root" in directory "/root"

    Create a file in /root called "calibrate.sh" (using nano editor)

        #!/bin/sh
        xinput_calibrator -v

    Make it executable

        chmod +x calibrate.sh

    Install the calibration tool

        apt-get install -y xinput-calibrator

    Stop zynthian and run the calibration tool

        systemctl stop zynthian
        startx ./calibrate.sh

    Press the highlighted points on touch screen.
    The program will display something like:

        Section "InputClass"
            Identifier      "calibration"
            MatchProduct    "ADS7846 Touchscreen"
            Option  "MinX"  "3652"
            Option  "MaxX"  "63453"
            Option  "MinY"  "61883"
            Option  "MaxY"  "2628"
            Option  "SwapXY"        "0" # unless it was already set to 1
            Option  "InvertX"       "0"  # unless it was already set
            Option  "InvertY"       "0"  # unless it was already set
        EndSection

    Save this to a text file in windows notepad

3.  using the nano editor
    nano /etc/X11/xorg.conf.d/99-calibration.conf
    paste the above "section" into the file, but change InvertX to 1

        Section "InputClass"
            Identifier      "calibration"
            MatchProduct    "ADS7846 Touchscreen"
            Option  "MinX"  "3652"
            Option  "MaxX"  "63453"
            Option  "MinY"  "61883"
            Option  "MaxY"  "2628"
            Option  "SwapXY"        "0" # unless it was already set to 1
            Option  "InvertX"       "1"  # unless it was already set
            Option  "InvertY"       "0"  # unless it was already set
        EndSection

    nano commands are ^O  to write the file
    ^x to Exit

4.  You test the XY in zynthian by pressing "select" until
    you get to a contrroller screen, pressing two buttons
    simultaneously and then touching the screen to get
    some crosshairs.
I hope you find this mini-project interesting and/or useful.
- Patrick