Close
0%
0%

MIPI-HDMI Bridge RE

Reverse-Engineering a random MIPI-HDMI bridge from China

Similar projects worth following
You can get these interesting MIPI-HDMI bridge modules from China, usually with a display of some sort. They are based around the Toshiba TC358870XBG chip, which is quite a powerful beast - it can power a 4K OLED over HDMI 1.4b, or even dual 2K displays!

This project details my efforts in reverse-engineering the board, in hopes it can be used for generic MIPI display experimentation. It's obvious that the board is intended to fit a large variety of displays.

The Toshiba TC358870XBG MIPI-HDM bridge chip is very powerful, and supports dual MIPI channels! This makes it perfect for VR headsets, which is why you can find it in the Oculus CV1, Razer OSVR HDK2, HTC Vive, and the Open Source Relativ project.
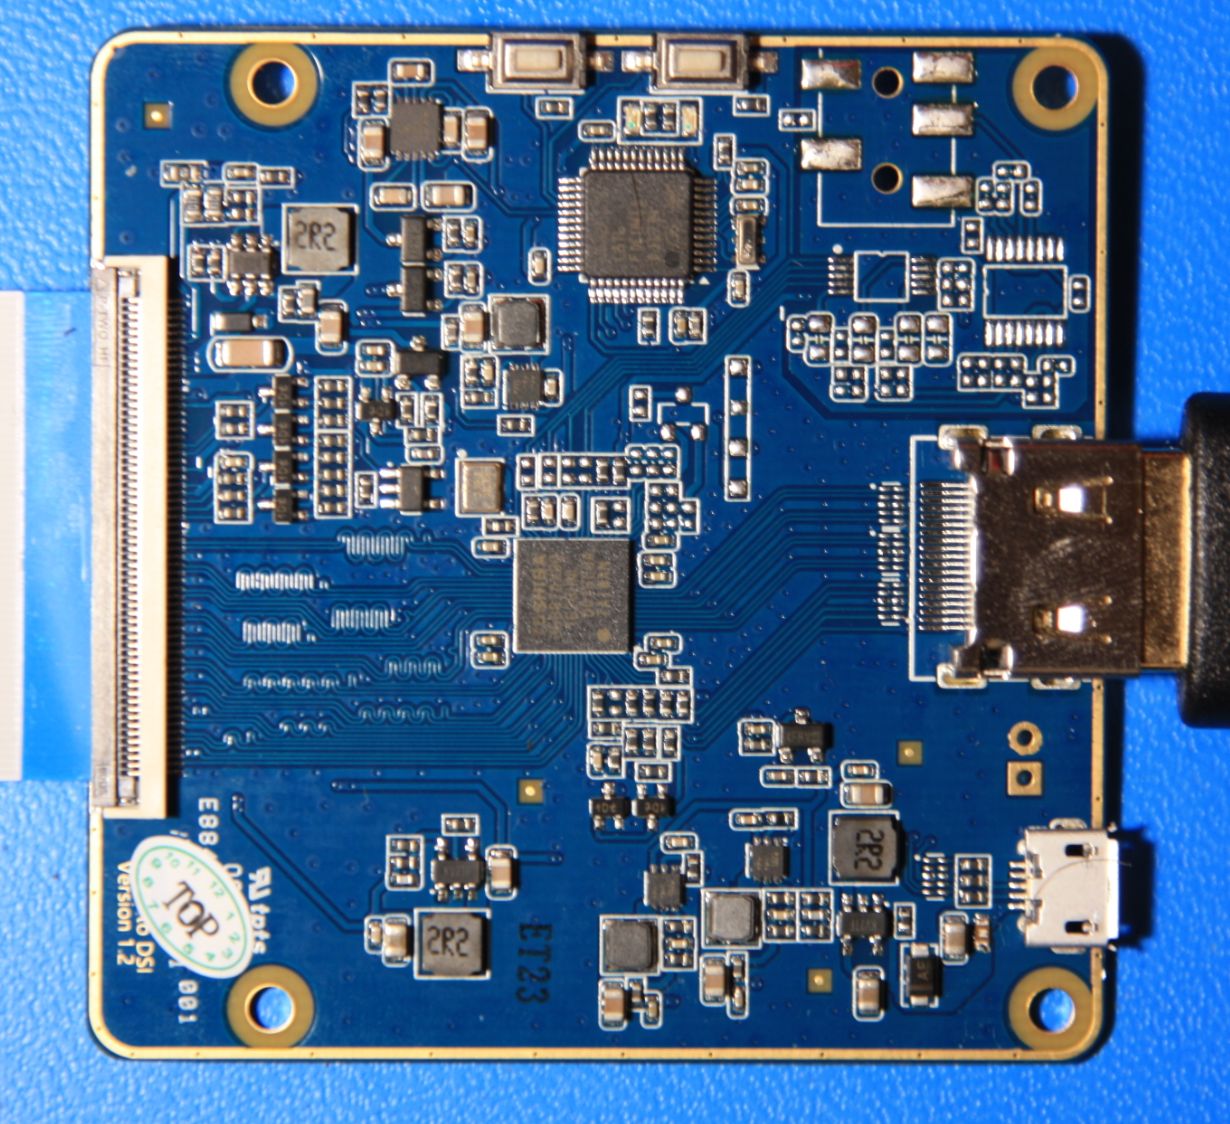
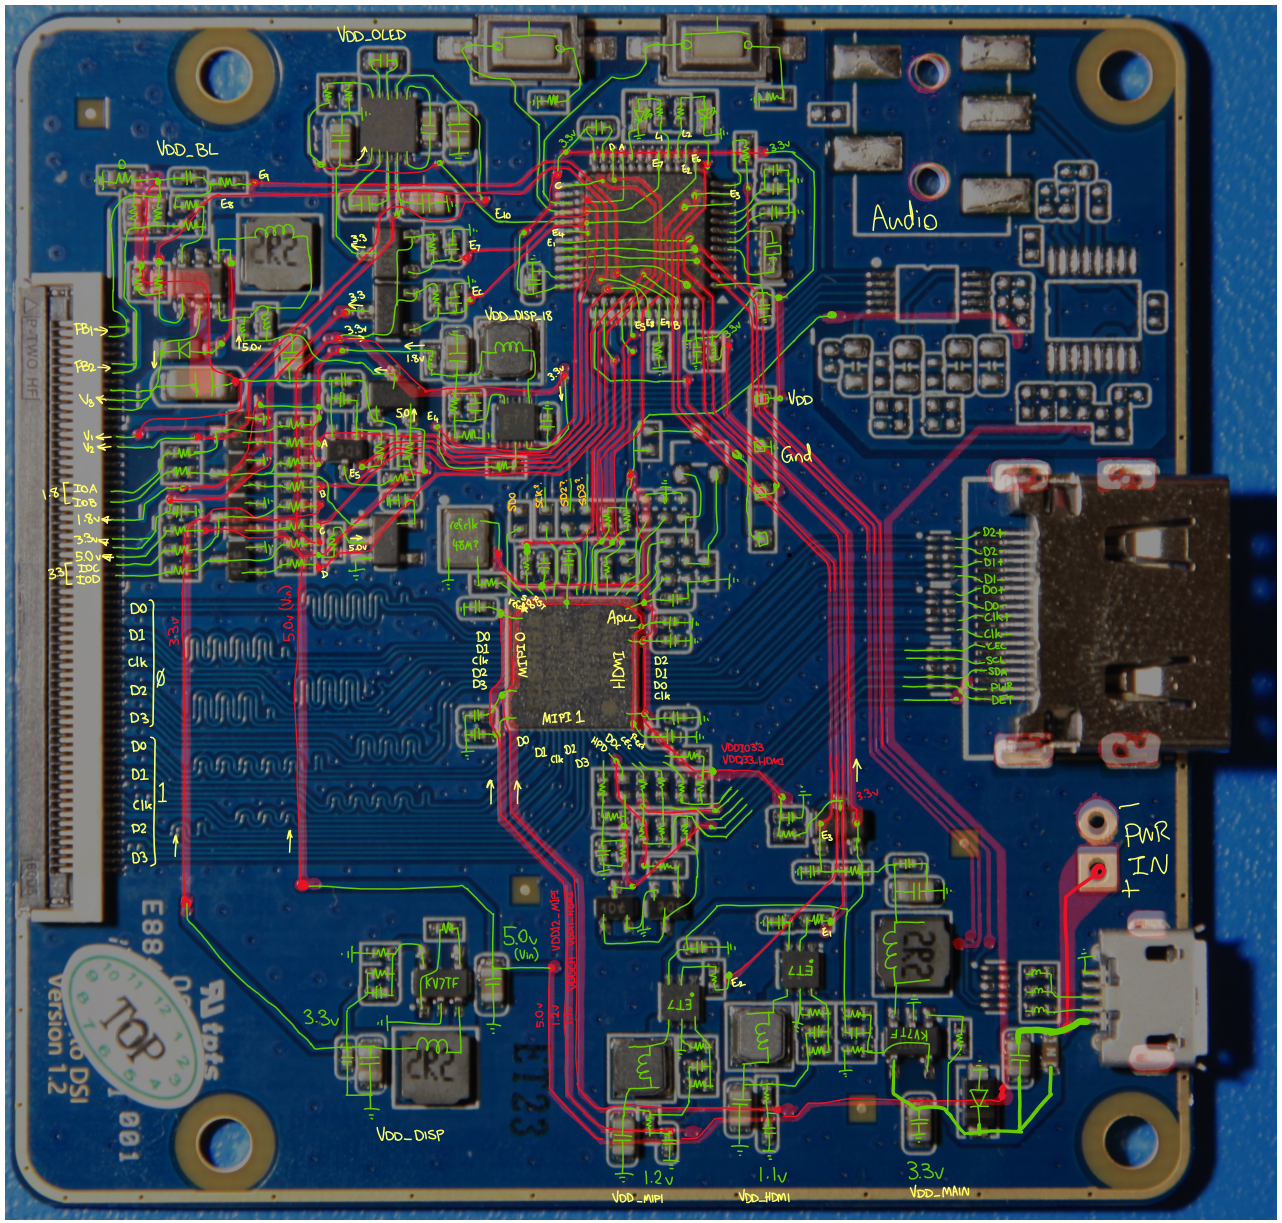
  • On the left you can see a large ribbon connector. This allows you to connect a range of different types of display using one or both MIPI channels. It has multiple voltage rails, and bi-directional GPIOs at 1.8 & 3.3V. These are usually used for power-sequencing the display.
  • On the right is the HDMI 1.4b connector.
  • And at the top is the controlling MCU, which is an STM32 clone. This initializes the bridge chip via I2C.
  • There are also some unpopulated pads, which seem to be for an optional I2S audio output.

Each board comes pre-configured for the displays that it comes with, but I have not yet figured out how to reconfigure a board to support an abitrary display. Mine came with support for these interesting round OLEDs, presumably intended for some kind of smartwatch...

See the project log for reverse-engineering details...

octet-stream - 32.00 kB - 10/29/2019 at 06:18

Download

hex - 154.15 kB - 10/29/2019 at 06:18

Download

  • 1 × Toshiba TC358870XBG MIPI-HDMI Bridge Chip
  • 1 × GigaDevices GD32F103C8T6 (STM32 clone)

  • OLED Breakout

    Jared Sanson10/29/2019 at 06:03 0 comments

    Here is the breakout board that came with my unit:

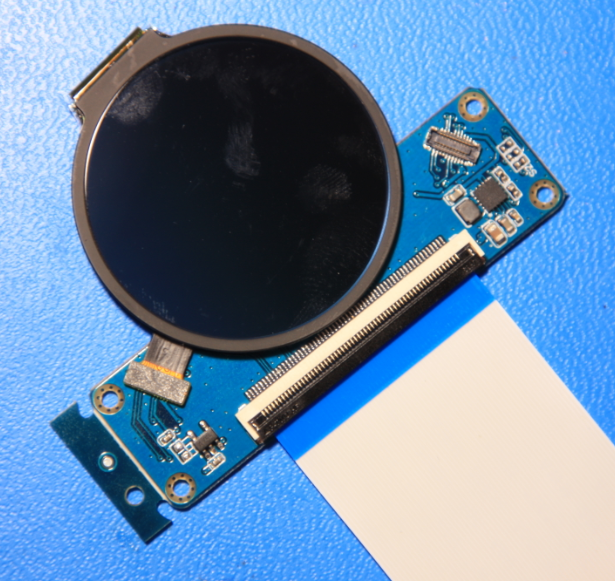
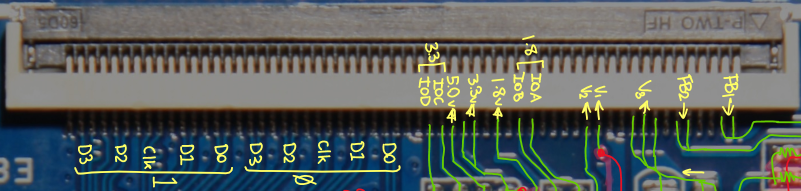
    This consists of a specialized OLED driver chip, a 2.8v LDO, and two OLED connectors that utilize only 1 MIPI data pair on each channel:
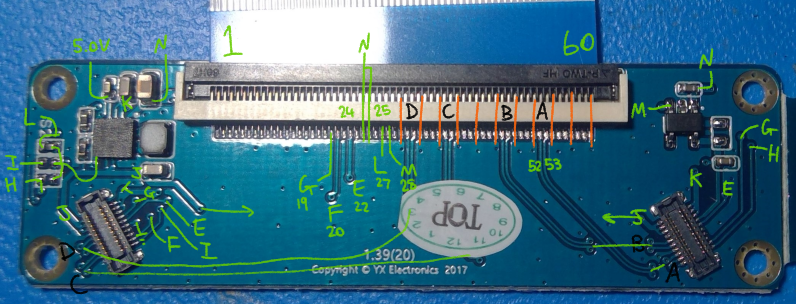
    I was unable to find a datasheet for my specific displays, but I determined the pinout for each display is roughly:

  • MCU

    Jared Sanson10/29/2019 at 05:25 8 comments

    As explained in previous logs, the MCU is the brain of the board. It configures the HDMI bridge chip, and handles power-sequencing of the display.

    Out of curiousity, I connected an STLink to the SWD pads on the PCB, and behold, the chip is unlocked!


    This allowed me to extract the firmware. I plan to reverse-engineer the firmware to determine how it configures the system, and how it could be configured via USB.

    GPIO map:

    Read more »

  • Display Connector

    Jared Sanson10/29/2019 at 05:19 0 comments

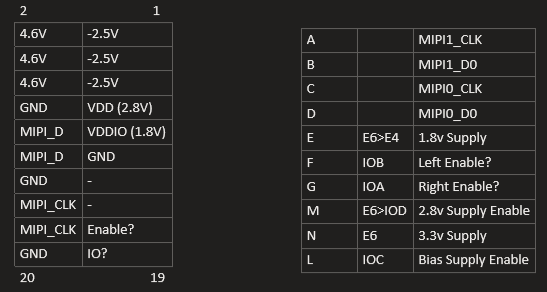
    The connector provides two independent MIPI channels, each with 4 data pairs & 1 clock pair. The 5V rail is always powered, but the other rails can be individually sequenced and controlled by the MCU. The GPIOs can be used to control additional regulators or enable control signals on the display board. They are output only.
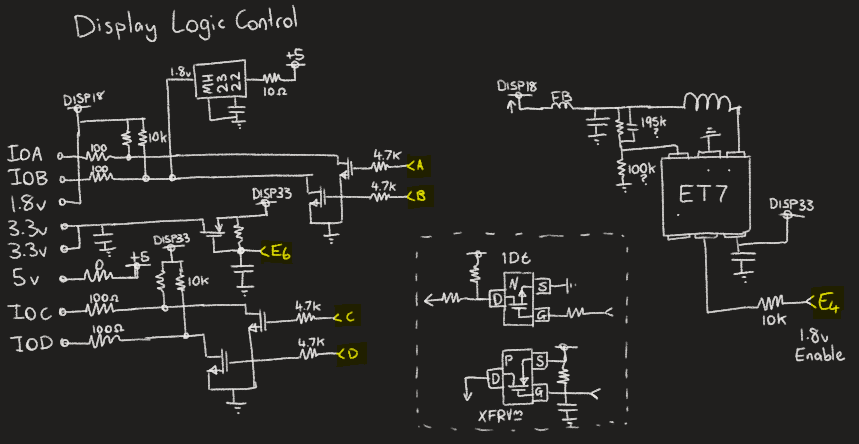
    Read more »

  • Board Overview

    Jared Sanson10/29/2019 at 05:17 0 comments

    To start reverse-engineering the circuit behind this board, I started by taking photos of the bottom and top layers, and inking over with my Surface:

    Read more »

View all 4 project logs

Enjoy this project?

Share

Discussions

John Molton wrote 09/11/2023 at 05:19 point

Nice work!

Assuming I get this board/or your pcb built, what steps would I need in terms of flashing firmware/software to drive a display? Specifically, the "Innolux p068hfb-dk1" touchscreen..

I have access to the display's datasheet and timings, and just wanted to know a way of flashing that to the board, so I can use it with my intended display.

Is this doable yet?

  Are you sure? yes | no

AndrejChoo wrote 06/14/2023 at 16:12 point

Hi. I suggest to start sharing firmware dumps for the board. For example, I have a board for a screen resolution of 2k 2560*540. Oddly enough, the firmware in the microcontroller is not blocked for reading.

  Are you sure? yes | no

fa1ke5 wrote 05/07/2022 at 01:11 point

Hello all, i open project on github https://github.com/fa1ke5/confu_vr

and releasing my own version of FW for this board

  Are you sure? yes | no

michael mcgroary wrote 08/30/2021 at 22:23 point

Hi, I just got this board and I came across this project, you have some pinouts listed as audio but do you happen to know what each of the 5 pins are specifically? I am trying to solder on a headphone jack and just wanted to know if you knew the specific ones I'm supposed to use

  Are you sure? yes | no

Andrealdo wrote 01/31/2021 at 14:59 point

Hi, have you the clone code for the Toshiba chip?

Because I want to recreate the board on KiCad with smaller form factor and produce some board for my project. Thank you

  Are you sure? yes | no

Miroslav Zuzelka wrote 12/23/2020 at 01:01 point

Hi, awesome work! Will you make PCB from this? What about FW for MCU? Do you have any code for that? Thx 

  Are you sure? yes | no

l33tn00b wrote 01/02/2021 at 15:36 point

The firmware can be re-written without too much of an effort (there's an Arduino Core for the STM32 (and the clone on the board). It will need to do the basic setup of the Toshiba chip (the datasheet is availiable with some Google-Fu). Then comes the harder part: Programming the Toshiba chip's output format (number of DSI lanes, clock setup...) and to send the required init sequence(s) to the specific display.

  Are you sure? yes | no

Rob0xFF wrote 10/04/2020 at 09:02 point

at the two resistors near the Toshiba chip you can listen to the internal i2c conversation. So far I could see that the MC constantly polls status register 0x8520, and additionally, if a device is connected it polls 0x8520 and 0x0290. Was not able to listen to the start sequence because my analyzer stops working, when powering up the HDMI-MIPI converter. Maybe someone has more luck.

  Are you sure? yes | no

l33tn00b wrote 01/02/2021 at 14:13 point

0x8520 is the status register of the Toshiba chip.

  Are you sure? yes | no

cacoaccount wrote 08/03/2020 at 02:09 point

thank you for the write up jared, very nice. i have the same board here and was wondering if you had thoughts on an issue. if i hook my computer HDMI to the board, all is well. it cycles through slow blink, fast blink, green. all works as suspected. if i hook smaller devices to the input, including a windows 10 tablet via micro HDMI it connects to the computer, see's the second screen but wont connect in any way. still slow blink. i tried a different tablet, it would connect but only in the "duplicate" screen mode and not full power (screen really dim). im at a loss here. does the board look for a certain signal from HDMI in? i pulled a cable apart and measure voltage across all the HDMI wires while hooked to a laptop and they all match signal from the tablet hookup that doesnt work (no green light). any help would be hugely helpful

  Are you sure? yes | no

fa1ke5 wrote 07/26/2020 at 11:18 point

https://blog.naver.com/chandong83/221283973095

korean guy did part of the job for GPIOs reverse

  Are you sure? yes | no

Rahul wrote 06/16/2020 at 17:29 point

Hi Jared,

I have a 4k MIPI board and tried connecting to it through ST-Link but wasn't able to access / read .  SWD Pads were connected in following order: 

Pad-1: 3.3v, Pad-2: GND, Pad-3: SWDIO, Pad-4: SWCLK. 

Error: Target Detection Failed.

Any idea what I may be missing here?

  Are you sure? yes | no

ellimtl wrote 05/14/2020 at 20:14 point

Hi Jared,

I already saw and tried the extracted .hex and .bin files for the STM32 of this board. Have you tried a C/C++ program that can implement the functionality of these files to be able to upload on any other STM mictocontroller? I think the STM32 for this board might not have a complex programming because seems that it only initializes the TOSHIBA 358870XBG bridge. I am looking for such C/C++ program.

Thanks for your help.

Regards,
Daryon

  Are you sure? yes | no

Jared Sanson wrote 05/15/2020 at 07:53 point

No, I haven't yet attempted this. But I believe it shouldn't be too complex as all of the initialization is done via I2C. I imagine you could do it all with a standard Arduino...

  Are you sure? yes | no

Similar Projects

Does this project spark your interest?

Become a member to follow this project and never miss any updates