 Christoph Tack
Technical spec of the Wandboard
- NXP i.MX6 Quad
- 4x ARM Cortex-A9 @ 1GHz
- 2 GB DDR3
Setting up the WBQUAD
Already have an account? Log in.
To make the experience fit your profile, pick a username and tell us what interests you.
sudo apt install alsa-utils
We want to route audio to the line-out. In order to do that, let's find out what the possible output devices are.
ubuntu@wandboard:~$ aplay -L
null
    Discard all samples (playback) or generate zero samples (capture)
samplerate
    Rate Converter Plugin Using Samplerate Library
speexrate
    Rate Converter Plugin Using Speex Resampler
jack
    JACK Audio Connection Kit
oss
    Open Sound System
pulse
    PulseAudio Sound Server
upmix
    Plugin for channel upmix (4,6,8)
vdownmix
    Plugin for channel downmix (stereo) with a simple spacialization
default:CARD=DWHDMI
    DW-HDMI, dw-hdmi-ahb-audio
    Default Audio Device
sysdefault:CARD=DWHDMI
    DW-HDMI, dw-hdmi-ahb-audio
    Default Audio Device
dmix:CARD=DWHDMI,DEV=0
    DW-HDMI, dw-hdmi-ahb-audio
    Direct sample mixing device
dsnoop:CARD=DWHDMI,DEV=0
    DW-HDMI, dw-hdmi-ahb-audio
    Direct sample snooping device
hw:CARD=DWHDMI,DEV=0
    DW-HDMI, dw-hdmi-ahb-audio
    Direct hardware device without any conversions
plughw:CARD=DWHDMI,DEV=0
    DW-HDMI, dw-hdmi-ahb-audio
    Hardware device with all software conversions
usbstream:CARD=DWHDMI
    DW-HDMI
    USB Stream Output
default:CARD=imxspdif
    imx-spdif, S/PDIF PCM snd-soc-dummy-dai-0
    Default Audio Device
sysdefault:CARD=imxspdif
    imx-spdif, S/PDIF PCM snd-soc-dummy-dai-0
    Default Audio Device
dmix:CARD=imxspdif,DEV=0
    imx-spdif, S/PDIF PCM snd-soc-dummy-dai-0
    Direct sample mixing device
dsnoop:CARD=imxspdif,DEV=0
    imx-spdif, S/PDIF PCM snd-soc-dummy-dai-0
    Direct sample snooping device
hw:CARD=imxspdif,DEV=0
    imx-spdif, S/PDIF PCM snd-soc-dummy-dai-0
    Direct hardware device without any conversions
plughw:CARD=imxspdif,DEV=0
    imx-spdif, S/PDIF PCM snd-soc-dummy-dai-0
    Hardware device with all software conversions
usbstream:CARD=imxspdif
    imx-spdif
    USB Stream Output
default:CARD=imx6wandboardsg
    imx6-wandboard-sgtl5000, HiFi sgtl5000-0
    Default Audio Device
sysdefault:CARD=imx6wandboardsg
    imx6-wandboard-sgtl5000, HiFi sgtl5000-0
    Default Audio Device
dmix:CARD=imx6wandboardsg,DEV=0
    imx6-wandboard-sgtl5000, HiFi sgtl5000-0
    Direct sample mixing device
dsnoop:CARD=imx6wandboardsg,DEV=0
    imx6-wandboard-sgtl5000, HiFi sgtl5000-0
    Direct sample snooping device
hw:CARD=imx6wandboardsg,DEV=0
    imx6-wandboard-sgtl5000, HiFi sgtl5000-0
    Direct hardware device without any conversions
plughw:CARD=imx6wandboardsg,DEV=0
    imx6-wandboard-sgtl5000, HiFi sgtl5000-0
    Hardware device with all software conversions
usbstream:CARD=imx6wandboardsg
    imx6-wandboard-sgtl5000
    USB Stream Output
Storing sound settings with "alsactl store" gives an error message.
Let's play a wav-file now using hw:CARD=imx6wandboardsg,DEV=0 if we would use plughw:CARD=imx6wandboardsg,DEV=0 ve9qrp.wav, then the mono audio from the file will be sent only to the left or right channel of line-out.
ubuntu@wandboard:~$ aplay -D hw:CARD=imx6wandboardsg,DEV=0 ve9qrp.wav
Playing WAVE 've9qrp.wav' : Signed 16 bit Little Endian, Rate 8000 Hz, Mono
The mono-wav file will be output to the left and right channel of line-out.
By default audio will be recorded from MIC_IN. To record from LINE_IN, the capture multiplexer (mux) must first be adjusted:
ubuntu@wandboard:~$ amixer -c 2 cset name='Capture Mux' 1
numid=24,iface=MIXER,name='Capture Mux'
  ; type=ENUMERATED,access=rw------,values=1,items=2
  ; Item #0 'MIC_IN'
  ; Item #1 'LINE_IN'
  : values=1
After that, recording 5s of audio from line-in is as simple as:
ubuntu@wandboard:~$ arecord -D default:CARD=imx6wandboardsg -d 5 -f S16_LE -c 2 -r 48000 output.wav
Recording WAVE 'output.wav' : Signed 16 bit Little Endian, Rate 48000 Hz, Stereo
https://blog.backslasher.net/ssh-openvpn-tunneling.html
Setting up a VPN-server is notoriously hard, so there are some scripts like openvpn-install and pivpn to help you out.
To be able to connect to the VPN remotely, you need:
ubuntu@wandboard:~$ sudo dpkg-reconfigure tzdata
[sudo] password for ubuntu:

Current default time zone: 'Europe/Brussels'
Local time is now:      Sun Jun  7 20:11:48 CEST 2020.
Universal Time is now:  Sun Jun  7 18:11:48 UTC 2020.
Reboot your device afterwards. Some services (like tor) don't like time zone switches.
All the info and programs can be found on Github.
It's as simple as running that single command. The shared secret is here "hellohello" (could use something more sophisticated).
ubuntu@wandboard:~$ TUNTOX_SHARED_SECRET=hellohello ./tuntox-armv7l
2020-06-06 15:11:42: [INFO]     Tuntox built from git commit 0.0.9
2020-06-06 15:11:42: [INFO]     Using 11624 for TCP relay port and 50928-50938 for UDP
2020-06-06 15:11:42: [WARNING]  File not found (/etc/tuntox/tox_save)
2020-06-06 15:11:42: [WARNING]  Could not open save file
2020-06-06 15:11:42: [WARNING]  Could not open save file
2020-06-06 15:11:42: [INFO]     Using Tox ID: 6611AA8F892AC73A88C43379C0CA31F1FDA58EED917D970846A43A45BF664966E48678E3ABB1
2020-06-06 15:11:51: [INFO]     Connection status changed: An UDP connection has been established
2020-06-06 15:14:51: [INFO]     Accepted friend request from 9E85FB6D952DDE04580E87E5EEBFD46E75DBD322B374D973EA214DF16C8EE3313E4E7AF0A901 as 0
2020-06-06 15:16:06: [INFO]     Got a request to forward data from 127.0.0.1:22
2020-06-06 15:16:06: [INFO]     Created a new tunnel object connid=35487 sockfd=8
This command connects to the server and sets up local port forwarding.
christoph@christoph-ThinkPad-L580:~/Documents/InterestingStuff/remoteConnection$ TUNTOX_SHARED_SECRET=hellohello ./tuntox-x64 -i 6611AA8F892AC73A88C43379C0CA31F1FDA58EED917D970846A43A45BF664966E48678E3ABB1 -L 2222:127.0.0.1:22
2020-06-06 17:14:32: [DEBUG]	Server whitelist mode enabled
2020-06-06 17:14:32: [INFO]	Tuntox built from git commit 896775c6089baa24edee06e04f5b83c3bb3bef5d
2020-06-06 17:14:32: [INFO]	Using 17636 for TCP relay port and 56728-56738 for UDP
2020-06-06 17:14:32: [INFO]	Connecting to Tox...
2020-06-06 17:14:40: [INFO]	Connection status changed: An UDP connection has been established
2020-06-06 17:14:40: [INFO]	Connected. Sending friend request.
2020-06-06 17:14:40: [INFO]	Waiting for friend to accept us...
2020-06-06 17:14:53: [INFO]	Friend request accepted (A TCP connection has been established (via TCP relay))!
2020-06-06 17:16:06: [INFO]	Accepting a new connection - requesting tunnel...
2020-06-06 17:16:06: [INFO]	Sending packet to friend #0 to forward 127.0.0.1:22
2020-06-06 17:16:06: [INFO]	Created a new tunnel object connid=35487 sockfd=7
2020-06-06 17:16:06: [INFO]	Accepted a new connection on port 2222
In another window, the client can now make a SSH connection on port 2222 which will be forwarded to the Tox-server's port 22.
christoph@christoph-ThinkPad-L580:~/Documents/InterestingStuff/remoteConnection$ ssh -p 2222 ubuntu@localhost
The authenticity of host '[localhost]:2222 ([127.0.0.1]:2222)' can't be established.
ECDSA key fingerprint is SHA256:DsYVUlf605cdhz55Anl14mqYHqnV7ZKEcm4O0xyTaOk.
Are you sure you want to continue connecting (yes/no)? yes
Warning: Permanently added '[localhost]:2222' (ECDSA) to the list of known hosts.
Last login: Sat Jun  6 15:10:44 2020
ubuntu@wandboard:~$
Well, that wasn't hard, was it? The connection seems to be lagging a bit.
I planned to follow this guide.
ubuntu@wandboard:~$ sudo apt install tightvncserver
Reading package lists... Done
Building dependency tree
Reading state information... Done
The following additional packages will be installed:
  libdrm-amdgpu1 libdrm-common libdrm-nouveau2 libdrm-radeon1 libdrm2 libfontenc1 libgl1 libgl1-mesa-dri libglapi-mesa libglvnd0 libglx-mesa0 libglx0 libice6 libllvm9 libsensors-config libsensors5
  libsm6 libx11-xcb1 libxaw7 libxcb-dri2-0 libxcb-dri3-0 libxcb-glx0 libxcb-present0 libxcb-shape0 libxcb-sync1 libxcomposite1 libxcursor1 libxdamage1 libxext6 libxfixes3 libxft2 libxi6 libxinerama1
  libxkbfile1 libxmu6 libxmuu1 libxrandr2 libxrender1 libxshmfence1 libxt6 libxtst6 libxv1 libxxf86dga1 libxxf86vm1 x11-common x11-utils x11-xserver-utils xauth xfonts-base xfonts-encodings xfonts-utils
Suggested packages:
  lm-sensors tightvnc-java mesa-utils nickle cairo-5c xorg-docs-core
The following NEW packages will be installed:
  libdrm-amdgpu1 libdrm-common libdrm-nouveau2 libdrm-radeon1 libdrm2 libfontenc1 libgl1 libgl1-mesa-dri libglapi-mesa libglvnd0 libglx-mesa0 libglx0 libice6 libllvm9 libsensors-config libsensors5
  libsm6 libx11-xcb1 libxaw7 libxcb-dri2-0 libxcb-dri3-0 libxcb-glx0 libxcb-present0 libxcb-shape0 libxcb-sync1 libxcomposite1 libxcursor1 libxdamage1 libxext6 libxfixes3 libxft2 libxi6 libxinerama1
  libxkbfile1 libxmu6 libxmuu1 libxrandr2 libxrender1 libxshmfence1 libxt6 libxtst6 libxv1 libxxf86dga1 libxxf86vm1 tightvncserver x11-common x11-utils x11-xserver-utils xauth xfonts-base
  xfonts-encodings xfonts-utils
0 upgraded, 52 newly installed, 0 to remove and 0 not upgraded.
Need to get 27.5 MB of archives.
After this operation, 482 MB of additional disk space will be used.
Do you want to continue? [Y/n] n
482MB for a VNC-server? Really? No, thank you.
Vino VNC-server is even worse: 903MB. x11vnc is also 482MB. TigerVNC is 483MB. directVNC is 474MB.
The actual VNC-server is smaller than 0.5GB of course but it needs the graphical environment, which makes up most of the download.
Installing from Ubuntu repository is the easiest, but if you want to make hidden services work with authentication, you'll need a more recent version.
ubuntu@wandboard:~$ sudo apt install tor
Add the correct version to /etc/apt/sources.list (see Beginner’s Guide to Tor on Ubuntu).
Tor key fingerprints : https://2019.www.torproject.org/docs/signing-keys.html.en
christoph@christoph-ThinkPad-L580:~$ curl https://deb.torproject.org/torproject.org/A3C4F0F979CAA22CDBA8F512EE8CBC9E886DDD89.asc | gpg --import
  % Total    % Received % Xferd  Average Speed   Time    Time     Time  Current
                                 Dload  Upload   Total   Spent    Left  Speed
100 19665  100 19665    0     0  61839      0 --:--:-- --:--:-- --:--:-- 61839
gpg: key EE8CBC9E886DDD89: 36 signatures not checked due to missing keys
gpg: key EE8CBC9E886DDD89: public key "deb.torproject.org archive signing key" imported
gpg: Total number processed: 1
gpg:               imported: 1
gpg: public key of ultimately trusted key 04C9A9E2D54E852C not found
gpg: marginals needed: 3  completes needed: 1  trust model: pgp
gpg: depth: 0  valid:   1  signed:   0  trust: 0-, 0q, 0n, 0m, 0f, 1u
christoph@christoph-ThinkPad-L580:~$ gpg --export A3C4F0F979CAA22CDBA8F512EE8CBC9E886DDD89 | sudo apt-key add -
OK
christoph@christoph-ThinkPad-L580:~$ sudo apt-get update
...
christoph@christoph-ThinkPad-L580:~$ sudo apt-get install tor deb.torproject.org-keyring
...
christoph@christoph-ThinkPad-L580:~$ tor --version
Tor version 0.4.3.5.
On Beginner’s Guide to Tor on Ubuntu it's explained how to put a password on the control port. We'll leave the control port disabled.
This is explained well in Building a Tor Hidden Service From Scratch.
If you use this command, you should change the username, the path, the ssh-key and the name of your onion-domain.
christoph@christoph-ThinkPad-L580:~$ ssh -o VerifyHostKeyDNS=no -o User=ubuntu -o CheckHostIP=no\
>     -o IdentitiesOnly=yes \
>     -o ProxyCommand="nc -X 5 -x localhost:9050 %h %p" \
>     -i ~/.ssh/sshhs1.rsa af66kcmtrfqp6de7wfmfhou5pfrtxqbxtbwpryxl4tuixa5qfe55kkid.onion
Last login: Wed Jun  3 18:45:01 2020
ubuntu@wandboard:~$
It's easier to put it all in ~/.ssh/config of christoph@christoph-ThinkPad-L580:
Host myOnion
      Hostname af66kcmtrfqp6de7wfmfhou5pfrtxqbxtbwpryxl4tuixa5qfe55kkid.onion
      User ubuntu
      IdentityFile ~/.ssh/sshhs1.rsa
      ProxyCommand nc -X 5 -x localhost:9050 %h %p
      VerifyHostKeyDNS no
      CheckHostIP no
      IdentitiesOnly yes
Then connection is as simple as:
christoph@christoph-ThinkPad-L580:~$ ssh myOnion
Last login: Wed Jun  3 19:01:32 2020 from 127.0.0.1
ubuntu@wandboard:~$
Configuring Onion service version 3 explains how to do it. On client side, make sure to set the access rights for the ClientAuthDir correctly.
root@christoph-ThinkPad-L580:/var/lib/tor# ls -l
total 7936
-rw------- 1 debian-tor debian-tor   20442 jun  2 21:33 cached-certs
-rw------- 1 debian-tor debian-tor 2128913 jun  5 20:15 cached-microdesc-consensus
-rw------- 1 debian-tor debian-tor 5381686 jun  2 22:03 cached-microdescs
-rw------- 1 debian-tor debian-tor  573384 jun  5 20:25 cached-microdescs.new
drwxr-sr-x 2 debian-tor debian-tor    4096 jun  5 21:52 client-auth
drwx--S--- 2 debian-tor debian-tor    4096 jun  5 20:15 keys
-rw------- 1 debian-tor debian-tor       0 jun  5 20:15 lock
-rw------- 1 debian-tor debian-tor    7449 jun  5 21:33 state
/var/lib/tor/client-auth was owned by "root". That didn't work.
SSH-connections to the wandboard are great, but you need to know the IP-address in advance. This becomes difficult in networks with a DHCP-server. It would be easy if you could just call your device by its name. No matter what IP-address it has. Luckily in Linux, you can do that.
The default hostname for the wandboard is arm. Let's change that to wandboard.
ubuntu@arm:~$ hostname
arm
ubuntu@arm:~$ sudo hostnamectl set-hostname wandboard
ubuntu@arm:~$ hostname
wandboard
ubuntu@arm:~$
Reboot the wandboard.
There's no need to know the IP-address.
christoph@christoph-ThinkPad-L580:~$ ssh ubuntu@wandboard.local
The authenticity of host 'wandboard.local (192.168.1.8)' can't be established.
ECDSA key fingerprint is SHA256:DsYVUlf605cdhz55Anl14mqYHqnV7ZKEcm4O0xyTaOk.
Are you sure you want to continue connecting (yes/no)? yes
Warning: Permanently added 'wandboard.local' (ECDSA) to the list of known hosts.
Last login: Sat May 30 12:58:22 2020
ubuntu@wandboard:~$
The Wandboard's /etc/hosts file will still contain the entries for arm. One of the problems with that is that sudo will not be able to resolve the name. Every sudo command will take about 30s to authenticate. The solution is simple. Open the Wandboard's /etc/hosts file and replace arm by wandboard.
root@wandboard:~# cat /etc/hosts
127.0.0.1       localhost
127.0.1.1       wandboard.localdomain   wandboard

# The following lines are desirable for IPv6 capable hosts
::1     localhost ip6-localhost ip6-loopback
ff02::1 ip6-allnodes
ff02::2 ip6-allrouters
ubuntu@arm:~$ sha256sum /lib/firmware/brcm/brcmfmac4330-sdio.bin
004eb91ba7f1cd6eaf57b51f90d8004c5663c38175a8a9314a4e2f574cbfbd14  /lib/firmware/brcm/brcmfmac4330-sdio.bin
ubuntu@arm:~$ sha256sum /lib/firmware/brcm/brcmfmac4330-sdio.txt
240cb4cbfb37cf516cb6df6373e6fb573ee45e14a22a565bf7d60f42fc40bdd8  /lib/firmware/brcm/brcmfmac4330-sdio.txt
There should be some logging messages:
ubuntu@arm:~$ dmesg | grep brcmf
[   17.644303] brcmfmac: brcmf_fw_alloc_request: using brcm/brcmfmac4330-sdio for chip BCM4330/4
[   17.644638] usbcore: registered new interface driver brcmfmac
[   17.693124] brcmfmac mmc1:0001:1: Direct firmware load for brcm/brcmfmac4330-sdio.wand,imx6q-wandboard.txt failed with error -2
[   17.981990] brcmfmac: brcmf_fw_alloc_request: using brcm/brcmfmac4330-sdio for chip BCM4330/4
[   17.982083] brcmfmac: brcmf_c_process_clm_blob: no clm_blob available (err=-2), device may have limited channels available
[   17.982727] brcmfmac: brcmf_c_preinit_dcmds: Firmware: BCM4330/4 wl0: Oct 25 2011 19:34:12 version 5.90.125.104
[   19.875155] ieee80211 phy0: brcmf_p2p_create_p2pdev: timeout occurred
[   19.881689] ieee80211 phy0: brcmf_cfg80211_add_iface: add iface p2p-dev-wlan0 type 10 failed: err=-5
Don't panic. The wandboard connects to the AP, even though there seem to be some errors.
Check that wlan0 exists now:
ubuntu@arm:~$ ip link
1: lo: <LOOPBACK,UP,LOWER_UP> mtu 65536 qdisc noqueue state UNKNOWN mode DEFAULT group default qlen 1000
    link/loopback 00:00:00:00:00:00 brd 00:00:00:00:00:00
2: eth0: <NO-CARRIER,BROADCAST,MULTICAST,DYNAMIC,UP> mtu 1500 qdisc fq_codel state DOWN mode DEFAULT group default qlen 1000
    link/ether 00:1f:7b:b4:11:ef brd ff:ff:ff:ff:ff:ff
3: wlan0: <BROADCAST,MULTICAST,DYNAMIC,UP,LOWER_UP> mtu 1500 qdisc fq_codel state UP mode DEFAULT group default qlen 1000
link/ether fc:4d:d4:c5:17:ac brd ff:ff:ff:ff:ff:ffThis is the active command-line network manager. Tips for practical use can be found on the ArchWiki.
Just follow the steps to connect to an access point. Once done, the DHCP-server should have assigned you an IP-address:
ubuntu@wandboard:~$ ifconfig wlan0
wlan0: flags=-28605<UP,BROADCAST,RUNNING,MULTICAST,DYNAMIC>  mtu 1500
        inet 192.168.1.6  netmask 255.255.255.0  broadcast 192.168.1.255
        inet6 fe80::fe4d:d4ff:fec5:17ac  prefixlen 64  scopeid 0x20<link>
        ether fc:4d:d4:c5:17:ac  txqueuelen 1000  (Ethernet)
        RX packets 255  bytes 31958 (31.9 KB)
        RX errors 0  dropped 0  overruns 0  frame 0
        TX packets 224  bytes 27296 (27.2 KB)
        TX errors 0  dropped 0 overruns 0  carrier 0  collisions 0
Pinging and DNS should work as well:
ubuntu@wandboard:~$ ping -c3 google.com
PING google.com (172.217.168.238) 56(84) bytes of data.
64 bytes from ams15s40-in-f14.1e100.net (172.217.168.238): icmp_seq=1 ttl=54 time=30.9 ms
64 bytes from ams15s40-in-f14.1e100.net (172.217.168.238): icmp_seq=2 ttl=54 time=34.3 ms
64 bytes from ams15s40-in-f14.1e100.net (172.217.168.238): icmp_seq=3 ttl=54 time=33.1 ms

--- google.com ping statistics ---
3 packets transmitted, 3 received, 0% packet loss, time 2003ms
rtt min/avg/max/mdev = 30.943/32.773/34.295/1.385 msHow to make a connection from the internet to your wandboard when it's behind a router/NAT? I see four options:
I'll only handle reverse SSH tunneling here, because it avoids fiddling with your router settings.
Using Serveo.net almost any port can be forwarded. In the following example port 22 (SSH) will be forwarded with serveo.net used as a jump server. It's also explained here.
Serveo.net might not be up all the time. Check here.
This command instructs Serveo.net to forward incoming SSH-connections (on port 22) destined for the alias "wandboard" (the first wandboard in the command) to the localhost (which is the wandboard) (also on port 22).
The alias "wandboard" in the command is free for you to choose. The following command must be run from your wandboard:
ubuntu@arm:~$ ssh -R wandboard:22:localhost:22 serveo.net
Forwarding SSH traffic from alias "wandboard"
Press g to start a GUI session and ctrl-c to quit.
Remark that this command will lock up your terminal if you don't add an &.
If you want to make this connection persistent, you might want to use autossh.
On your local machine, which could be located anywhere on the internet, you execute the following command:
christoph@christoph-ThinkPad-L580:~$ ssh -J serveo.net ubuntu@wandboard
Last login: Fri May 22 17:03:39 2020
ubuntu@arm:~$
This command makes an SSH-connection to serveo.net, which in turn connects us through to ubuntu@wandboard.
Weaved, Dataplicity, ngrok, pitunnel offer similar services. But they require registration and the execution of some sort of script.
Teleconsole can be used to share terminal sessions between users and port forwarding. Basically, it's just an SSH-proxy.
The disadvantage is that the client side must also use Tor to make a connection. For more info see Tor project log. Tor is also quite slow.
For connection through cellular networks, this is not possible because you have no access to the router.
This fully exposes your wandboard to the internet. I don't see a reason in taking this risk.
You might also want to try MOSH.
christoph@christoph-ThinkPad-L580:~$ ssh -o "ProxyCommand nc -X 5 -x 127.0.0.1:9050 %h %p" af66kcmtrfqp6de7wfmfhou5pfrtxqbxtbwpryxl4tuixa5qfe55kkid.onion
The authenticity of host 'af66kcmtrfqp6de7wfmfhou5pfrtxqbxtbwpryxl4tuixa5qfe55kkid.onion (<no hostip for proxy command>)' can't be established.
ECDSA key fingerprint is SHA256:DsYVUlf605cdhz55Anl14mqYHqnV7ZKEcm4O0xyTaOk.
Are you sure you want to continue connecting (yes/no)? yes
You should only type "yes" after verifying the key fingerprint of the host. This can be done by typing the following command on the host side. First check the correct key algorithm and then show its fingerprint.
ubuntu@wandboard:~$ sudo ssh-keygen -l -f /etc/ssh/
moduli                    ssh_config.d/             ssh_host_ecdsa_key.pub    ssh_host_ed25519_key.pub  ssh_host_rsa_key.pub      sshd_config.d/
ssh_config                ssh_host_ecdsa_key        ssh_host_ed25519_key      ssh_host_rsa_key          sshd_config
ubuntu@wandboard:~$ sudo ssh-keygen -l -f /etc/ssh/ssh_host_ecdsa_key
256 SHA256:DsYVUlf605cdhz55Anl14mqYHqnV7ZKEcm4O0xyTaOk root@arm (ECDSA)
christoph@christoph-ThinkPad-L580:~$ ssh-keygen -b 4096 -t rsa -C "myKey" -f ~/.ssh/sshhs1.rsa
Generating public/private rsa key pair.
Enter passphrase (empty for no passphrase):
Enter same passphrase again:
Your identification has been saved in /home/christoph/.ssh/sshhs1.rsa.
Your public key has been saved in /home/christoph/.ssh/sshhs1.rsa.pub.
The key fingerprint is:
SHA256:dBZqUfK7f4L+U36rc7ZPws+uKCJtUihO7fKrS9V4yKg myKey
The key's randomart image is:
+---[RSA 4096]----+
|        o.o      |
|         = .     |
|        + +      |
|     o * o .     |
|    ..=.S .      |
|   .o.o..  . ..  |
|  Eo.o o  .. oo .|
|   .o + + o.oooB.|
|    o=o= o.o+=**O|
+----[SHA256]-----+
You should already have a working SSH-connection for that user on that server to do this.
christoph@christoph-ThinkPad-L580:~$ ssh-copy-id -o VerifyHostKeyDNS=no -o User=ubuntu -o CheckHostIP=no    -o ProxyCommand="nc -X 5 -x localhost:9050 %h %p"     -i ~/.ssh/sshhs1.rsa af66kcmtrfqp6de7wfmfhou5pfrtxqbxtbwpryxl4tuixa5qfe55kkid.onion
/usr/bin/ssh-copy-id: INFO: Source of key(s) to be installed: "/home/christoph/.ssh/sshhs1.rsa.pub"
/usr/bin/ssh-copy-id: INFO: attempting to log in with the new key(s), to filter out any that are already installed
/usr/bin/ssh-copy-id: INFO: 1 key(s) remain to be installed -- if you are prompted now it is to install the new keys

Number of key(s) added: 1

Now try logging into the machine, with:   "ssh -o 'VerifyHostKeyDNS=no' -o 'User=ubuntu' -o 'CheckHostIP=no' -o 'ProxyCommand=nc -X 5 -x localhost:9050 %h %p' 'af66kcmtrfqp6de7wfmfhou5pfrtxqbxtbwpryxl4tuixa5qfe55kkid.onion'"
and check to make sure that only the key(s) you wanted were added.
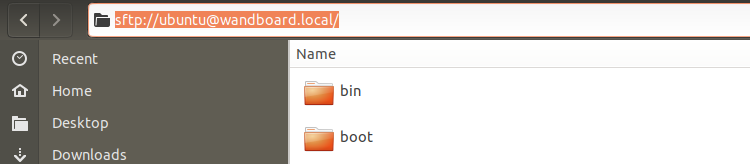
There's no need to use scp over the command line.
lsblk
NAME        MAJ:MIN RM   SIZE RO TYPE MOUNTPOINT
mmcblk0     179:0    0   3,7G  0 disk
├─mmcblk0p1 179:1    0    11M  0 part /media/christoph/74C5-8858
└─mmcblk0p2 179:2    0   3,7G  0 part
So our SD-card is /dev/mmcblk0.
sudo umount /dev/mmcblk0p1
sudo umount /dev/mmcblk0p2
sudo fdisk /dev/mmcblk0
--> o
--> w
sudo dd if=./wandboard-all-ubuntu-16.04-sdcard-20160525.img of=/dev/mmcblk0 bs=512 status=progress && sync
sudo fsck /dev/mmcblk0p2

 The Sycorax

 Enki
Enki
 tobychui